background image

2-686-372-

21

(2)

© 2006 Sony Corporation

RDR-HXD760

DVD Recorder

Operating Instructions

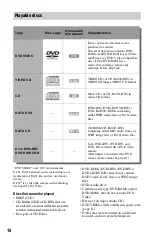
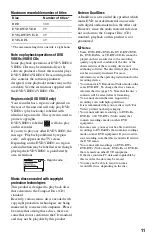
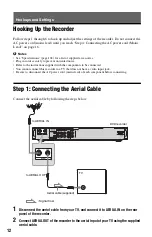
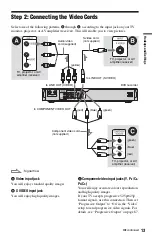
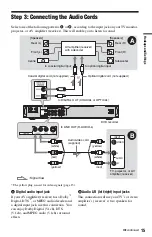
Summary of Contents for RDR-HXD760

Page 1: ...2 686 372 21 2 2006 Sony Corporation RDR HXD760 DVD Recorder Operating Instructions ...

Page 2: ...and other European countries with separate collection systems Precautions This equipment has been tested and found to comply with the limits set out in the EMC Directive using a connection cable shorter than 3 metres On safety Should any solid object or liquid fall into the cabinet unplug the recorder and have it checked by qualified personnel before operating it any further About the hard disk dr...

Page 3: ...l shock Do not place the recorder in an inclined position It is designed to be operated in a horizontal position only Keep the recorder and discs away from equipment with strong magnets such as microwave ovens or large loudspeakers Do not place heavy objects on the recorder On recording Make trial recordings before making the actual recording On compensation for lost recordings Sony is not liable ...

Page 4: ...e the same or similar names as those on the remote The on screen display illustrations used in this manual may not match the graphics displayed on your TV screen The explanations regarding DVDs in this manual refer to DVDs createdonthis recorder The explanations do not apply to DVDs that are created on other recorders and played back on this recorder IMPORTANT NOTICE Caution This recorder is capab...

Page 5: ... to the LINE 1 IN jacks 21 Connecting to the LINE 2 IN jacks on the front panel 22 Connecting to a Satellite or Digital Tuner 23 1 Inserting a Disc 24 2 Recording a Programme 24 Checking the disc status while recording 25 3 Playing the Recorded Programme Title List 25 4 Displaying the Playing Remaining Time and Play Information 28 Checking the playing remaining time 29 Checking the remaining disc ...

Page 6: ...g the picture quality 54 Adjusting the delay between the picture and sound AV SYNC 55 Pausing a TV Broadcast TV Pause 55 Playing from the beginning of the programme you are recording Chasing Playback 56 Playing a previous recording while making another Simultaneous Rec and Play 56 Searching for a Title Chapter Track etc 57 Playing MP3 Audio Tracks JPEG Image Files or DivX Video Files 58 About MP3 ...

Page 7: ... Region 81 Language 81 Digital TV settings DTV Settings 82 Favourites 82 Parental Lock 82 Tuning 83 Technical Information 85 Video Settings Video 86 Audio Settings Audio 88 Recording Settings Recording 90 Disc Settings DVD 92 Remote Control Settings Factory Settings Others 94 Easy Setup Resetting the Recorder 95 Additional Information 96 Troubleshooting 96 Self diagnosis Function When letters numb...

Page 8: ...ge 24 Playable only on VR mode compatible players finalisation unnecessary Video mode Format in Video mode page 24 Playable on most DVD players finalisation necessary page 33 DVD R Automatically formatted in VR mode DVD R VIDEO Playable on most DVD players finalisation necessary page 33 DVD R DL DVD R VR mode Format in VR mode page 24 1 Formatting is performed using the Disc Information display Pl...

Page 9: ...er discs DVD RW DVD RW DVD R DVD R DL and DVD R are trademarks 1 When an unformatted DVD R is inserted into this recorder it is automatically formatted in Video mode To format a new DVD R in VR mode format using the Disc Information display page 24 2 CPRM Content Protection for Recordable Media is a coding technology that protects copyrights for images Discs that cannot be recorded on 8 cm discs D...

Page 10: ...fferent recorder and not correctly finalised Playable discs Type Disc Logo Icon used in this manual Characteristics DVD VIDEO Discs such as movies that can be purchased or rented This recorder also recognizes DVD RAMs and DVD R Dual Layer Video mode discs as DVD Video compatible discs If the DVD RAM has a removable cartridge remove the cartridge before playback VIDEO CD VIDEO CDs or CD Rs CD RWs i...

Page 11: ... product which mates DVD recorded material on one side with digital audio material on the other side However since the audio material side does not conform to the Compact Disc CD standard playback on this product is not guaranteed b Notes Some DVD RWs DVD Rs DVD RWs DVD Rs DVD RAMs or CD RWs CD Rs cannot be played on this recorder due to the recording quality or physical condition of the disc or t...

Page 12: ...ons supplied with the components to be connected You cannot connect this recorder to a TV that does not have a video input jack Be sure to disconnect the AC power cord mains lead of each component before connecting Step 1 Connecting the Aerial Cable Connect the aerial cable by following the steps below 1 Disconnect the aerial cable from your TV and connect it to AERIAL IN on the rear panel of the ...

Page 13: ...joy accurate colour reproduction and high quality images If your TV accepts progressive 525p 625p format signals use this connection Then set Progressive Output to On in the Video setup to send progressive video signals For details see Progressive Output on page 87 Audio video cord supplied Component video cord not supplied yellow TV projector or AV amplifier receiver TV projector or AV amplifier ...

Page 14: ...y not fit your TV screen To change the picture size see page 86 If you are connecting to a VCR Connect your VCR to the LINE IN jack on the recorder page 21 b Note Do not connect more than one type of video cord between the recorder and your TV at the same time ...

Page 15: ...njoy Dolby Digital 5 1ch DTS 5 1ch and MPEG audio 5 1ch surround effects B Audio L R left right input jacks This connection will use your TV s or stereo amplifier s receiver s two speakers for sound VIDEO AUDIO INPUT L R A B AV amplifier receiver with a decoder white TV projector or AV amplifier receiver Audio video cord supplied Signal flow Optical digital cord not supplied to LINE OUT R AUDIO L ...

Page 16: ... a loud noise will come from your speakers 1 Manufactured under license from Dolby Laboratories Dolby and the double D symbol are trademarks of Dolby Laboratories 2 DTS and DTS Digital Out are trademarks of Digital Theater Systems Inc Step 4 Connecting the AC power cord Mains Lead Connect the supplied AC power cord mains lead to the AC IN terminal of the recorder Then plug the recorder and TV main...

Page 17: ...he remote for an extended period of time remove the batteries If battery leakage occurs wipe out any liquid inside the battery compartment and insert new batteries Do not expose the remote sensor marked on the front panel to strong light such as direct sunlight or a lighting apparatus The recorder may not respond to the remote When you replace the batteries of the remote the code number and Comman...

Page 18: ...completed Step 6 Easy Setup The default command mode setting for this recorder and the supplied remote is DVD3 1 Check that Easy Setup page 20 has been finished If Easy Setup has not been finished first perform Easy Setup 2 Press SYSTEM MENU The System Menu appears 3 Select SETUP and press ENTER Manufacturer Code number Sony 01 default Grundig 11 Hitachi 24 ITT Nokia 15 16 JVC 33 Loewe 45 Nokia 69...

Page 19: ...seconds To check the Command Mode for the recorder Press x on the recorder when the recorder is turned off The Command Mode for the recorder appears in the front panel display You can change programme positions of the recorder using the number buttons Example for channel 50 Press 5 0 then press ENTER Command Mode Code number DVD1 number button 1 DVD2 number button 2 DVD3 number button 3 If the Com...

Page 20: ...cally capture and store the available TV and Radio channels Easy Setup Clock The recorder will automatically search for a clock signal If a clock signal cannot be found set the clock manually using M m and press ENTER Easy Setup TV Type page 86 If you have a wide screen TV select 16 9 If you have a standard TV select either 4 3 Letter Box shrink to fit or 4 3 Pan Scan stretch to fit This will dete...

Page 21: ...tails refer to the instruction manual supplied with the connected equipment To record on this recorder see Recording from connected equipment without a timer on page 50 Connect a VCR or similar recording device to the LINE 1 IN of this recorder If the equipment has an S video jack you can use an S video cord instead of an audio video cord Connecting to the LINE 1 IN jacks OUTPUT S VIDEO AUDIO R L ...

Page 22: ...d instead of an audio video cord z Hint When the connected equipment outputs only monaural sound connect to just the L MONO and VIDEO input jacks on the front of the recorder Do not connect the R input jack b Notes Do not connect the yellow LINE IN VIDEO jack when using an S video cord Do not connect the output jack of this recorder to another equipment s input jack with the other equipment s outp...

Page 23: ...ction is necessary to use the Synchro Recording function See Recording from connected equipment with a timer Synchro Rec on page 48 b Notes Synchro Recording does not work with some tuners For details see the tuner s operating instructions If you disconnect the recorder s AC power cord mains lead you will not be able to view the signals from the connected tuner AUDIO OUTPUT L R VIDEO AUDIO INPUT L...

Page 24: ...e on this recorder you can manually re format the disc to make a blank disc page 35 2 Recording a Programme This section introduces the basic operation to record a current TV programme to the hard disk HDD or to a disc DVD For an explanation of how to make timer recordings see page 41 1 Press HDD or DVD If you want to record to a DVD insert a recordable DVD 2 Press PROG to select the programme pos...

Page 25: ...hile to start recording You cannot change the recording mode while recording If there is a power failure the programme you are recording may be erased You can check the recording information such as recording time or disc type Press DISPLAY during recording The recording information appears A Disc type format B Recording status C Recording mode D Recording time Press DISPLAY to turn off the displa...

Page 26: ... titles containing Copy Once copy protection signals HDD only page 72 D Scroll bar Appears when all of the titles do not fit on the list To view the hidden titles press M m E Title s thumbnail picture The still images for each title are displayed 3 Select a title and press ENTER The sub menu appears The sub menu displays options applicable only to the selected item The displayed options differ dep...

Page 27: ... picture and press ENTER The display asks for confirmation To change the thumbnail press M 6 Select OK and press ENTER The scene is set for the title s thumbnail picture To turn off the Title List Press TITLE LIST z Hints After recording the first scene of the recording the title is automatically set as the thumbnail picture You can select TITLE LIST from the System Menu b Notes The title names ma...

Page 28: ...y temporarily Example Dolby Digital 5 1 ch D The current selected angle E Disc type 1 format page 8 F Title type only appears for Playlists G Play mode H Recording mode page 41 I Playing status bar 2 J Title number chapter number 3 page 57 Shows either track number scene number album number 3 or file number for CDs VIDEO CDs DATA DVDs or DATA CDs K Album name appears for DATA DVDs or DATA CDs For ...

Page 29: ...ent track index number m Remaining time of the current track m Playing time of the disc m Remaining time of the disc m CD text when available Example When playing an MP3 audio track Playing time and number of the current track m Current album number Example When viewing a JPEG image Current file number and total number of files in the current album m Current album number and total number of albums...

Page 30: ... Recorded Programme You can label a DVD title or programme by entering characters You can enter up to 64 characters for a title or disc name but the actual number of characters displayed in the menus such as the Title List will vary The steps below explain how to change the name of the recorded programme 1 Press TITLE LIST 2 Select a title and press ENTER The sub menu appears 3 Select Title Name a...

Page 31: ...er at the input row Select Back and press ENTER To insert a character move the cursor to the right of the point where you want to insert the character Select the character and press ENTER To erase all of the characters select Clear All and press ENTER 7 Select Finish and press ENTER To cancel the setting select Cancel To use the number buttons You can also use the number buttons to enter character...

Page 32: ...a DVD s disc name The disc name may not appear when the disc is played on other DVD equipment 1 Insert a disc See 1 Inserting a Disc on page 24 2 Press OPTIONS to select Disc Information and press ENTER The Disc Information display appears Available settings differ depending on the disc type Example When the inserted disc is a DVD RW VR mode A On Off Indicates whether protection is set DVD RW DVD ...

Page 33: ...owever you may need to finalise the disc for certain DVD equipment or if the recording time is short You can edit or record on the disc even after finalising Finalising is unnecessary when playing a disc on VR format compatible equipment Even if your other DVD equipment is VR format compatible you may need to finalise the disc especially if the recording time is short You can edit or record on the...

Page 34: ...not be able to finalise the disc if it was recorded on another recorder For DVD RWs Video mode DVD RWs Video mode that have been finalised to prohibit additional recording or editing can be unfinalised to allow further recording or editing For DVD RWs VR mode If you cannot record or edit on a DVD RW VR mode that has been finalised with other DVD equipment unfinalise the disc b Note The recorder is...

Page 35: ...c on page 24 2 Press OPTIONS to select Disc Information and press ENTER Example When a DVD RW is inserted 3 Select Format and press ENTER 4 Select OK and press ENTER For DVD RWs and unrecorded DVD Rs Video mode select VR or Video and press ENTER All contents on the disc are erased z Hint By reformatting you can change the recording format on DVD RWs or record again on DVD RWs that have been finali...

Page 36: ...ay A Indicates the TV or Radio mode The Radio mode is indicated by a Radio icon B Indicates the Local Channel Number and the Channel name of the programme that is currently selected in the list C Indicates the currently selected programme and allows you to move around the list D Channel name E Indicates the currently viewed programme F Colour buttons G Time slot H Icon tray Depending on the channe...

Page 37: ...ay appears showing a description of the current programme on view Programmes with Parental Rating limitaions will have a or similar icon For more information about Parental Rating limitaions see page 83 Buttons Operations PAGE Display the previous next ten channels The green button Toggle the display as follows 2 hour schedule half hour time shots y 30 minute schedule 15 minutes time shots The yel...

Page 38: ...n the Favourites List 1 Press SYSTEM MENU The System Menu Display appears 2 Select SETUP and press ENTER The Setup Display appears 3 Select DTV Settings and press ENTER Buttons Operations PAGE Scroll the information display by page Toggle the display between discription of the current next programme M m or the number buttons Display programme information for other channels Toggle the Favourites Li...

Page 39: ...ous or next available channels z Hints Press the blue button to view the list showing only your favourite channels Press the blue button once again when you wish to return to the previous favourite channel setting display 1 While in normal operation mode press repeatedly to select a list Then press ENTER The selected Favourites List display appears 2 Press TV RADIO to display either your favourite...

Page 40: ...ed was the Favourites List then the Favourites List appears 2 Press to switch between the Programme List 3 Press TV RADIO to display either the TV or the Radio channels at any time The Radio mode is indicated by the presence of a Radio icon in the Index panel 4 Press M m to select the desired channel then press ENTER to exit the index menu and view the selected channel To scroll the Index display ...

Page 41: ...me but the lower data volume results in a coarser picture quality Press REC MODE repeatedly to switch the recording modes To select the HQ mode set HQ Setting of the HDD Rec Settings to HQ in the Recording setup page 91 HQ records pictures in higher quality than HQ on the HDD Note that HQ appears as HQ in the front panel display and the on screen displays The recording time for DVD R DL Double Lay...

Page 42: ...ecording You can set the timer for a total of 40 programmes up to 30 days in advance Set the date time and programme position of the programme manually 1 Press TIMER 2 Press M m to select the Day and Time or Mode row Then press ENTER Unrecordable pictures Copy control signals Recordable discs Copy Free Copy Once CPRM CPRM Copy Never None a blank screen is recorded RW RWVR RWVideo RVideo R HDD RVR ...

Page 43: ...age 46 appears The TIMER REC indicator lights up on the front panel and the recorder is ready to start recording Unlike a VCR there is no need to turn off the recorder before the timer recording starts To stop recording during timer recording Press x REC STOP Note that it may take a few seconds for the recorder to stop recording Rec Mode Adjust If there is not enough available disc space for the r...

Page 44: ...nction page 48 Even if the timer is set for the same daily or weekly programme the timer recording cannot be made if it overlaps with a programme that has priority will appear next to the overlapped setting in the Timer List Check the priority order of the settings Even if the timer is set timer recordings cannot be made while recording a programme that has priority The Rec Mode Adjust function on...

Page 45: ... other recording modes the screen size is fixed at 4 3 For DVD Rs DVD RWs VR mode the actual picture size is recorded regardless of the setting For example if a 16 9 size picture is received the disc records the picture as 16 9 even if DVD Rec Picture Size is set to 4 3 For DVD RWs DVD Rs the screen size is fixed at 4 3 Rec NR noise reduction Reduces noise contained in the video signal Rec Video E...

Page 46: ...g To disable this function set Auto Chapter in the Recording setup to Off page 91 When recording to the HDD a DVD R VR mode or a DVD RW VR mode you can insert and erase chapter marks manually page 66 b Note When dubbing page 70 the chapter marks in the dubbing source are not retained in the dubbed title Checking Changing Cancelling Timer Settings Timer List You can check change or cancel timer set...

Page 47: ...timer setting Select an item using and adjust using M m Select OK and press ENTER Erase Erases the timer setting Select OK and press ENTER Check Overlap Checks for overlapped settings The timer setting without the mark has priority over the other settings Select Close to return to the Timer List Info Displays the timer setting information box along with the disc space required to record the whole ...

Page 48: ...ly or weekly programme the timer recording cannot be made if it overlaps with a programme that has priority will appear next to the overlapped setting in the Timer List Check the priority order of the settings Recording From Connected Equipment You can set the recorder to automatically record programmes from connected equipment that has a timer function such as a satellite tuner Connect the equipm...

Page 49: ...REC The SYNCHRO REC indicator on the recorder turns off b Notes The recorder starts recording only after detecting a video signal from the connected equipment The beginning of the programme may not be recorded regardless of whether or not the recorder s power is on or off During Synchro Recording other operations such as normal recording cannot be performed To use the connected equipment while the...

Page 50: ...ode see page 41 5 Insert the source tape into the connected equipment and set to playback pause 6 Press z REC This recorder starts recording 7 Press the pause or play button on the connected equipment to cancel the playback pause status The connected equipment starts playback and the playback image is recorded by this recorder To stop recording press x REC STOP on this recorder If you connect a di...

Page 51: ... screen When you start playing a VIDEO CD with PBC functions the menu appears Select an item using the number buttons and press ENTER Then follow the instructions in the menu press H when Press SELECT appears The PBC function of Super VIDEO CDs does not work with this recorder Super VIDEO CDs are played in continuous play mode only To change the angles If various angles multi angles for a scene ar...

Page 52: ...sume playback during TV Pause To play restricted DVDs Parental Control If you play a restricted DVD the message Do you want to temporarily change the Parental Control level to appears on your TV screen 1 Select OK and press ENTER The display for entering your password appears 2 Enter your four digit password using the number buttons 3 Press ENTER to select OK The recorder starts playback To regist...

Page 53: ...he HDD you cannot go to the beginning of the previous next title fast reverse fast forward Fast reverses fast forwards the disc when pressed during playback Search speed changes as follows fast reverse fast forward m1 T t 1M 1 m2 T T t t 2M m3 2 T T T t t t 3M 2 When you press and hold the button fast forward fast reverse continues at the selected speed until you release the button 1 When you pres...

Page 54: ...justment display appears FNR frame noise reduction Reduces noise contained in the luminance element of the video signal BNR block noise reduction Reduces block noise or mosaic like patterns in the picture MNR mosquito noise reduction Reduces the faint noise appearing around the outlines of the images The noise reduction effects are automatically adjusted within each setting range according to the ...

Page 55: ...s to adjust the setting and press ENTER You can pause a current TV broadcast and then continue watching the programme at a later time This is useful when you receive an unexpected phone call or visitor while watching TV 1 While viewing a TV broadcast with this recorder press X The picture pauses You can pause the picture for up to three hours 2 Press X or H again to resume watching the programme b...

Page 56: ...is function as follows While recording to the HDD Play another title on the HDD Play a previously recorded programme on a DVD by pressing DVD While recording to a DVD Play a previously recorded programme on the HDD by pressing HDD While recording to a DVD RW VR mode 1 Play another title on the same DVD RW VR mode disc 2 1 Simultaneous Rec and Play function does not work when you record on a 1x spe...

Page 57: ...page 88 Searching for a Title Chapter Track etc You can search a disc by title chapter scene or track As titles and tracks are assigned individual numbers select the title or track by entering its number You can also search for a scene using the time code 1 Press OPTIONS during playback to select a search method and press ENTER Title Search for DVDs Chapter Search for HDD DVDs Track Search for CDs...

Page 58: ...u make a mistake select another number 3 Press ENTER The recorder starts playback from the selected number b Note Title Search is not applicable to the HDD Playing MP3 Audio Tracks JPEG Image Files or DivX Video Files You can play MP3 audio tracks JPEG image files and DivX video files on DATA CDs CD ROMs CD Rs CD RWs or JPEG image files and DivX video files on DATA DVDs DVD ROMs DVD RWs DVD Rs DVD...

Page 59: ...lideshow To display the registration code for this recorder Select Registration Code in the Others setup page 94 To rotate a picture Press OPTIONS while the JPEG image is displayed to select Rotate Right or Rotate Left and press ENTER z Hints Press AUDIO to switch between stereo or monaural audio tracks when playing MP3 audio tracks You can change the audio track when playing MP3 or MPEG audio of ...

Page 60: ...ome DATA CDs DATA DVDs created in the Packet Write format The recorder can play the following tracks and files MP3 audio tracks with the extension mp3 JPEG image files with the extension jpeg or jpg JPEG image files that conform to the DCF image file format DivX video file with the extension avi or divx Design rule for Camera File system Image standards for digital cameras regulated by JEITA Japan...

Page 61: ... recommended that you create albums with no more than two trees b Notes Depending on the software you use to create the DATA DVD DATA CD the playback order may differ from the above illustration No more than a total of 999 individual folders can be played Folders that do not contain JPEG MP3 DivX files are counted as well No more than a total of 999 folders and 9999 files can be played Files other...

Page 62: ...inish all editing before finalising the disc You cannot edit a finalised disc DVD RW only Edit features Original title Playlist title Original title Playlist title Erase page 63 Yes Yes Yes Yes Yes Protect page 63 Yes Yes Yes No Yes Title Name page 63 Yes Yes Yes Yes Yes A B Erase page 64 Yes Yes Yes Yes Yes Erase Titles page 64 Yes Yes Yes Yes Yes Divide page 65 Yes Yes No Yes No Set Thumbnail pa...

Page 63: ...see page 66 Erasing and Editing a Title This section explains the basic edit functions Note that editing is irreversible To edit the HDD or DVD RWs DVD Rs VR mode without changing the original recordings create a Playlist title page 66 1 Press TITLE LIST For HDD titles or DVD RWs DVD Rs in VR mode press to switch the Title Lists if necessary 2 Select a title and press ENTER The sub menu appears 3 ...

Page 64: ...ENTER again To clear all of check marks select Reset 4 Repeat step 3 to select all of the titles you want to erase 5 When you finish selecting titles select OK and press ENTER The list of the titles to be erased appears for confirmation To change the selection select Change and repeat from step 3 6 Select OK and press ENTER The titles are erased To erase all titles on the disc You can reformat the...

Page 65: ...han five seconds may not be erased For DVD RWs the erased section may be slightly different from the points you selected If you want to dub a long title to a disc but do not want to reduce the picture quality divide the title into two shorter titles Note that dividing a title cannot be undone Only playlist titles can be divided for DVD RWs DVD Rs VR mode 1 Press TITLE LIST Press to switch the Titl...

Page 66: ...e edit without changing the actual recordings You can create up to 97 Playlist titles Example You have recorded the final few matches of a football tournament on a DVD RW DVD R VR mode You want to create a digest with the goal scenes and other highlights but you also want to keep the original recording In this case you can compile highlight scenes as a Playlist title You can even rearrange the sce...

Page 67: ...scene list To add more scenes go to step 5 9 When you finish adding scenes press m A Total duration of the selected scene B Total number of scenes C Selected scene 10Select the scene you want to re edit and press ENTER The sub menu appears Move Changes the scene order using and press ENTER Erase Erases the scene When asked for confirmation select OK To add more scenes press M and go to step 5 To a...

Page 68: ...ect a new location for the title using M m and press ENTER The title moves to the new location To move more titles go to step 3 To finish select Quit and press ENTER 1 Press TITLE LIST If the Title List Original menu appears press 2 Press OPTIONS to select Combine and press ENTER The display for selecting titles appears 3 Select a title and press ENTER A number indicating the order in which you se...

Page 69: ...n the number of chapters in the title to be combined exceeds the limit the chapters at the end are combined into a single chapter You can divide a Playlist title For operations see page 65 Dividing a Playlist title Divide RWVR HDD RVR ...

Page 70: ...icture size and the sound types originally recorded are retained b Notes You cannot make a recording while dubbing To play a dubbed disc on other DVD equipment finalise the disc page 33 You cannot dub from DVD VIDEOs to the HDD Thumbnails that you have set for the originally recorded title page 27 will not be retained in the dubbed title When dubbing to a DVD R DL disc the video may be momentarily...

Page 71: ...od This will smooth out the seams Original Dubbing n Original Dubbing allows you to make smooth dubbings by de emphasizing the seams that are left over from editing In this case the recording mode is set to the same recording mode that the source title was recorded in To set the Dub Mode to Original you must make your selection from the Dub Selected Titles display page 74 Note that you cannot sele...

Page 72: ... better picture quality Dubbing restriction You cannot dub movies and other DVD VIDEOs to the HDD Also when dubbing from a DVD to the HDD a grey blank screen will be recorded for scenes that contain a copy protection signal CPRM compatible DVD RWs DVD Rs VR mode only CPRM Content Protection for Recordable Media is a coding technology that protects copyrights for images Move Titles containing Copy ...

Page 73: ...speed Dubbing is available for the title page 70 8 Select Start and press ENTER The remaining time of dubbing appears in the front panel display To automatically adjust the dubbing mode If there is not enough available space on the target disc the recorder automatically selects a dubbing mode with lower picture quality according to the available space If there is insufficient disc space in the sel...

Page 74: ... dubbing mode appears 8 Select a dubbing mode using M m From the HDD to a DVD only Appears when available for the title page 70 9 Select Start and press ENTER The remaining time of dubbing appears in the front panel display To automatically adjust the dubbing mode If there is not enough available space on the target disc the recorder automatically selects a dubbing mode with lower picture quality ...

Page 75: ...jack and record on a DVD RW DVD R VR mode or HDD b Notes You cannot make a recording while DV dubbing The DV IN jack is for input only It will not output signals You cannot use the DV IN jack when signal input to the DV IN jack on the front panel or recorder operation cannot be performed correctly when using a digital video camera see About i LINK on page 105 Connect the camera to the LINE IN jack...

Page 76: ...en after being turned off b Notes You cannot connect more than one piece of digital video equipment to the recorder You cannot control the recorder using another device or another recorder of the same model You cannot record date time or the contents of the cassette memory onto the disc If you record from a DV Digital8 format tape that is recorded in multiple sound tracks such as a tape with multi...

Page 77: ...eparing for DV dubbing on page 75 and press ONE TOUCH DUB on the recorder The recorder rewinds the tape and then starts recording the tape contents When the recording is finished the recorder rewinds the tape in the digital video camera To stop during recording Press x REC STOP Note that it may take a few seconds for the recorder to stop recording z Hints If you set Finalise Disc of One Touch Dubb...

Page 78: ...proximately 6 minute intervals 1 Follow steps 1 to 6 of Preparing for DV dubbing on page 75 and press SYSTEM MENU 2 Select DV EDIT and press ENTER The display asks if you want to start selecting scenes If you have previously saved a program the display asks if you want to edit an existing program or to create a new program To resume editing the existing program select Saved Data and go to step 9 3...

Page 79: ...t Start and press ENTER The recorder starts recording the tape contents as programmed To stop during recording Press x REC STOP Note that it may take a few seconds for the recorder to stop recording To automatically adjust the dubbing mode If there is not enough available space on the target disc the recorder automatically selects a dubbing mode with lower picture quality according to the availabl...

Page 80: ...n and press ENTER If the recorder does not receive a time signal from any station Auto Adjust returns to Off automatically and the menu for setting the clock manually appears on the screen b Note When you cannot receive the time correctly set the clock manually To set the clock manually 1 Select Clock in Basic and press ENTER 2 Select Auto Adjust and press ENTER 3 Select Off and press ENTER 4 Sele...

Page 81: ...hen you select Audio Follow the subtitle language changes according to the language you selected for the sound track z Hint If you select Others in DVD Menu Subtitle or Audio select and enter a language code from Language Code List on page 110 using the number buttons b Note If you select a language in DVD Menu Subtitle or Audio that is not recorded on the DVD VIDEO one of the recorded languages w...

Page 82: ...ables you to lock certain channels you consider unsuitable and to set an age limit so that any programme classed above that age by the broadcaster is restricted 1 Select Parental Lock in DTV Settings and press ENTER When you have already registered a password the display for entering the password appears If you have not yet registered a password the display for registering a new password appears 2...

Page 83: ...ious next page b Note If you select a channel which Parental Lock is activated appears on the gray screen and it is recorded To set the Parental Rating 1 Once the Parental Lock menu is displayed select Set Parental Rating and press ENTER 2 Press M m to set the desired limitation level and press ENTER No block t All block t General t Parental Guidance Recommended t Mature Audience 15 t Mature Adult...

Page 84: ... by the presence of a Radio icon in the display 3 Select a channel you want to hide using M m or the number buttons then press ENTER Press the green or red button to view the previous or next page 4 Once you have hidden the unwanted channels as desired press O RETURN repeatedly to return to the main menu Restoration of hidden programmes Hidden channels are identified by an icon next to the program...

Page 85: ...gs and press ENTER Manufacturer Information This information screen shows you the current version of software installed in your recorder 1 Once the Technical Information menu is displayed select Manufacturer Information and press ENTER 2 After viewing the information displayed press O RETURN to come back to the Technical Information menu Signal Strength This information screen shows the signal str...

Page 86: ...ch as size and colour Choose the settings according to the type of TV or tuner connected to the DVD recorder 1 Press SYSTEM MENU while the recorder is in stop mode 2 Select SETUP and press ENTER 3 Select Video and press ENTER The Video setup appears with the following options The default settings are underlined Video Output TV Type Sets the picture size when playing back a title recorded from 16 9...

Page 87: ...ntains both Video and Film In order for these images to appear natural on your screen when output in progressive mode 50 or 60 frames per second the progressive video signal needs to be converted to match the type of DVD software that you are watching You can fine tune the progressive 525p 625p video signal that is output when you set Progressive Output to On Note that you must connect to a progre...

Page 88: ...s ENTER The Audio setup appears with the following options The default settings are underlined Audio ATT attenuation If the playback sound is distorted set this item to On The recorder reduces the audio output level This function affects the output of the following jacks LINE OUT R AUDIO L jacks Auto The picture including subjects that move dynamically is output with no jitter Normally select this...

Page 89: ...ency is 96kHz signals are simply converted to analog signals and output On Normally select this position Off The influence of the digital circuit upon the analogue circuit is minimal D PCM Select this when the recorder is connected to an audio component lacking a built in Dolby Digital decoder The surround effects of output signals are determined by the Downmix setting item in the Audio setup Dolb...

Page 90: ...le the recorder is in stop mode 2 Select SETUP and press ENTER 3 Select Recording and press ENTER The Recording setup appears with the following options The default settings are underlined HDD Rec Settings Bilingual Recording Selects the sound to be recorded on the HDD when recording from externally input audio signals such as audio signals from connected equipment b Note If you change the recordi...

Page 91: ... during recording or dubbing b Notes The actual chapter mark interval may vary depending on the amount of information contained in the video to be recorded Chapter marks are automatically inserted where the recordings start on the tape when Auto Chapter is set to On during DV dubbing to the HDD or a DVD RW DVD R VR mode HQ Records in higher quality approximate 15 Mbps HQ Records in the standard HQ...

Page 92: ...ked or replaced with different scenes 1 Select Parental Control in DVD and press ENTER If you have not entered a password the display for registering a new password appears When you have already registered a password the display for entering the password appears 2 Enter your four digit password using the number buttons then select OK and press ENTER 3 Select Standard and press ENTER The selection ...

Page 93: ...l function playback cannot be limited on this recorder Depending on the disc you may be asked to change the Parental Control level while playing the disc In this case enter your password then change the level Format DVD RW DVD RW only The recorder automatically starts formatting in VR mode or Video mode whichever is selected below when a new unformatted DVD RW is inserted One Touch Dubbing Display...

Page 94: ...al Lock settings 1 Select Password in Others and press ENTER If you have not yet set a password the display for registering a new password appears When you have already registered a password the display for entering the password appears If you wish to change your password first enter your current password using the number buttons then select OK and press ENTER The display for registering a new pas...

Page 95: ...efault from Basic DTV Settings Video Audio Recording DVD Others Password and All and press or ENTER 3 Select Start and press ENTER The selected settings return to their default settings 4 Press ENTER when Finish appears Format You can erase all titles recorded on the HDD Easy Setup Resetting the Recorder Select this to run the Easy Setup programme 1 Press SYSTEM MENU while the recorder is in stop ...

Page 96: ... VIDEO player the copy protection signal applied to some DVD programmes could affect picture quality If you still experience this problem even when you connect your recorder directly to your TV try connecting your recorder to your TV s S VIDEO input You have set the recorder to progressive format even though your TV cannot accept the progressive signal In this case hold down x and press PROGRAM mi...

Page 97: ...f the playback picture output from a DVD player VCR or tuner goes through your recorder before reaching your TV the copy protection signal applied to some programmes could affect picture quality Disconnect the playback equipment in question and connect it directly to your TV The picture does not fill the screen Set TV Type of the Video Output in the Video setup in accordance with the screen size o...

Page 98: ...er In this case if the recorder is on leave it on if it is off leave it off for about an hour until the moisture evaporates If the disc was recorded on another recorder and was not finalised page 33 the recorder cannot play the disc The recorder does not start playback from the beginning Resume play was activated page 52 You have inserted a DVD whose Title menu or DVD menu automatically appears on...

Page 99: ...ording to the HDD or the HDD is full The programme position cannot be changed from the programme position you are recording Set the TV s input source to TV Recording does not start immediately after you press z REC Operate the recorder only after LOAD FORMAT or INFOWRITE disappears from the front panel display Nothing was recorded even though you set the timer setting correctly There was a power f...

Page 100: ...ed the recorder s timer setting page 49 There was a power failure during the recording The recorder automatically starts recording when the satellite receiver is turned on The Synchro Rec function was activated Turn off the satellite receiver and cancel the Synchro Rec function page 48 You dubbed a title but the title did not appear in the HDD Title List The title contained a copy protection signa...

Page 101: ...to the disc The disc tray does not open and LOCKED appears in the front panel display The disc tray is locked Cancel the Child Lock page 52 The disc tray does not open and TRAY LOCKED appears in the front panel display Contact your Sony dealer or local authorized Sony service facility The disc tray does not open and you cannot remove the disc after you press Z open close Turn off the recorder Once...

Page 102: ...ters numbers appear in the display When the self diagnosis function is activated to prevent the recorder from malfunctioning a five character service number e g C 13 00 with a combination of a letter and four numbers appears in the front panel display In this case check the following table First three characters of the service number Cause and or corrective action C 13 There is a problem in the HD...

Page 103: ...ive pad scouring powder or solvent such as alcohol or benzine On cleaning discs disc lens cleaners Do not use cleaning discs or disc lens cleaners including wet or spray types These may cause the recorder to malfunction Notes about the discs To keep the disc clean handle the disc by its edge Do not touch the surface Dust fingerprints or scratches on the disc may cause it to malfunction Do not expo...

Page 104: ...O Phono jack 2 Vrms more than 22 kilohms VIDEO Phono jack 1 0 Vp p S VIDEO 4 pin mini DIN Y 1 0 Vp p C 0 3 Vp p PAL DV IN 4 pin i LINK S100 DIGITAL OUT OPTICAL Optical output jack 18 dBm wave length 660 nm DIGITAL OUT COAXIAL Phono jack 0 5 Vp p 75 ohms COMPONENT VIDEO OUT Y PB CB PR CR Phono jack Y 1 0 Vp p PB CB 0 7 Vp p PR CR 0 7 Vp p General Power requirements 220 240 V AC 50 60 Hz Power consu...

Page 105: ...t bus proposed by SONY and is a trademark approved by many corporations IEEE 1394 is an international standard standardized by the Institute of Electrical and Electronics Engineers i LINK s maximum baud rate varies according to the equipment Three maximum baud rates are defined S100 approx 100 Mbps S200 approx 200 Mbps S400 approx 400 Mbps The baud rate is listed under Specifications in the instru...

Page 106: ...lable in your area K TOP MENU button 51 L DISPLAY button 28 TIME TEXT button 28 M Coloured multimedia applications interactive services control buttons 36 CHAPTER MARK button 66 CHAPTER MARK ERASE button 66 N SYSTEM MENU button 78 80 TITLE LIST button 25 51 63 GUIDE Electronic Programme Guide button 36 O INFO button 37 P Favourite button 39 Q O RETURN button 46 R M m ENTER button 20 S PAGE ALBUM b...

Page 107: ...ODE button 24 wj TV 2 volume buttons 17 wk TV 1 on standby button 17 wl TV DVD button This button has the same function as the 6 INPUT SELECT button e TV t button 17 ea TV PROG programme buttons 17 The button has a tactile dot Use the tactile dot as a reference when operating the recorder continued ...

Page 108: ...n 51 H remote sensor 17 I z REC button 24 J x REC STOP button 24 K HDD button indicator 24 DVD button indicator 24 L DV IN jack 75 M ONE TOUCH DUB button 77 N PROGRAM buttons 24 The button has a tactile dot O INPUT SELECT button 48 75 P REC MODE button 24 Q LINE 2 IN S VIDEO VIDEO L MONO AUDIO R jacks 22 Use the tactile dot as a reference when operating the recorder Front panel ...

Page 109: ...type E angle indicator 51 Displays DATA CDs as CD z Hint You can turn off the front panel display when the recorder is turned off by setting Dimmer to Save Power in the Others setup page 94 A AERIAL IN OUT jacks 12 B DIGITAL OUT COAXIAL OPTICAL jacks 15 C LINE 1 IN R AUDIO L VIDEO jacks 13 D LINE 1 IN S VIDEO jack 21 E COMPONENT VIDEO OUT Y PB CB PR CR jacks 13 F AC IN terminal 16 G LINE OUT S VID...

Page 110: ...usa 1217 Hindi 1226 Croatian 1229 Hungarian 1233 Armenian 1235 Interlingua 1239 Interlingue 1245 Inupiak 1248 Indonesian 1253 Icelandic 1254 Italian 1257 Hebrew 1261 Japanese 1269 Yiddish 1283 Javanese 1287 Georgian 1297 Kazakh 1298 Greenlandic 1299 Cambodian 1300 Kannada 1301 Korean 1305 Kashmiri 1307 Kurdish 1311 Kirghiz 1313 Latin 1326 Lingala 1327 Laothian 1332 Lithuanian 1334 Latvian Lettish ...

Page 111: ...imer settings Timer List 46 Child Lock 52 Clock 20 80 Colour 45 54 Colour System 88 Colour systems 104 Combine 68 Command Mode 19 94 COMPONENT VIDEO OUT 13 Connecting the aerial cable 12 the audio cords 15 the video cords 13 Contrast 45 54 Controlling TVs with the remote 17 Copy control signals 42 Copy Free 42 Copy Never 42 Copy Once 42 CPRM 9 Create a Playlist 66 Creating chapters 66 D DATA CD 10...

Page 112: ...n sound 53 91 Make a Playlist 68 Manual Clock Set 80 Manufacturer Information 85 MENU 51 Menu DVD s Menu 51 Top menu 51 Mix 76 MNR 54 Modify 47 Move 67 79 MP3 audio tracks 58 MPEG 89 N Number buttons 31 O One Touch Dubbing 77 93 Original 26 62 Others 94 P Page mode 26 48 Parental Control 52 92 Parental Lock 82 Parts and controls 106 Password 94 Pause Mode 88 PB Video Equalizer 54 PBC 51 Picture qu...

Page 113: ...ng of the title chapter track 53 scan audio 51 search mode 57 Set Thumbnail 64 Sharpness 54 Signal Strength 85 SimultaneousRecandPlay 56 Slow motion play 53 Sort 27 Stereo1 76 Stereo2 76 Sub sound 53 91 SUBTITLE 53 Subtitle 81 Super VIDEO CD 10 Synchro Rec 48 T Technical Information 85 Thumbnail picture 27 Time Search 57 TIME TEXT 29 TIMER 42 Timer List 46 Timer recording Auto Title Erase 43 check...

Page 114: ...114 ...

Page 115: ...115 ...

Page 116: ...Sony Corporation Printed in Malaysia Printed on 100 recycled paper using VOC Volatile Organic Compound free vegetable oil based ink ...

Reviews: