background image

Advanced Remote Operations

15

GB

Performing several
commands in sequence
automatically
(Macro Play)

The Macro Play function lets you link several
IR codes in a sequential order as a single
command. The remote provides 2 macro lists
(M1 and M2). You can specify up to 10 IR
codes for each macro list.

Setting the sequence of IR codes

1

Press M1 (or M2) while pressing down
USE MODE.

The indicator lights.

2

Press the numeric buttons to select the
macro step number.

For example, to program step 1, press 1.
The indicator blinks slowly.

3

Point the remote control code receiver
section of the remote towards the
receiver/transmitter on the remote
control to be learned.

4

Press the appropriate button on the
remote control to be learned to send
the remote button code.

Lightly pressing the button once should be
sufficient.

If learning is completed successfully, the
indicator slowly flashes twice and the
remote automatically exits the learning
mode.

When learning is not completed
successfully, the indicator flashes 4 times in
quick succession and the procedure returns
to step 4.

5

Repeat steps 1 through 4 to program up
to 10 IR codes.

Tip

If programming is unsuccessful, check the follwing:

– If the indicator does not light up in step 1, the

batteries are weak. Replace both batteries.

– If the indicator lights 4 times in quick

succession in step 3, an error has occured. Start
again from step 1.

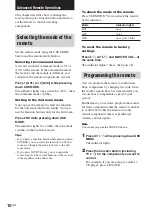
To cancel programming

Press USE MODE during any step. The remote
automatically exits the macro setting mode.

To delay the output of an IR code

Start over from step 1. In step 3, press each
button as shown below momentarily.

• Press M1 (TV/SAT) when the macro setting

is M1.

• Press M2 (TAPE) when the macro setting is

M2.

1 second delay is programmed at this program
step. The indicator lights twice slowly, then the
remote automatically exits the macro setting
mode.

To clear the programmed IR codes

Clear each macro step individually. In step 3,
press each button as shown below for more
than 2 seconds.

• Press M1 (TV/SAT) when the macro setting

is M1.

• Press M2 (TAPE) when the macro setting is

M2.

The IR code is cleared. The indicator lights
twice slowly, then the remote automatically
exits the macro setting mode.

To start macro play

Press M1 (TV/SAT) or M2 (TAPE) while the
ALT indicator turns ON.

Note

If the Macro Play function does not work properly,
program a delay between each operation. See “To
delay the output of an IR code”.

Summary of Contents for RM-PG411

Page 1: ...M PG411 Owner s Record The model and serial numbers are located on the rear of the unit Record the serial number in the space provided below Refer to them whenever you call upon your Sony dealer regarding this product Model No Serial No 2002 Sony Corporation ...

Page 2: ...ceiver On cleaning Clean the cabinet panel and controls with a soft cloth slightly moistened with a mild detergent solution Do not use any type of abrasive pad scouring powder or solvent such as alcohol or benzine If you have any question or problem concerning your remote please consult your nearest Sony dealer About this manual The instructions in this manual are for model RM PG411 Check your mod...

Page 3: ...of the receiver to direct sunlight or lighting apparatuses Doing so may cause a malfunction If you don t use the remote for an extended period of time remove the batteries to avoid possible damage from battery leakage and corrosion Table of Contents Location of Parts and Basic Remote Operations Parts description 4 Table of buttons that you can use to control each component 9 Advanced Remote Operat...

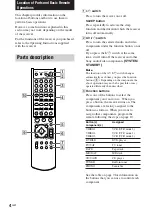
Page 4: ...be possible or may operate differently than described 3 Function buttons Press one of the buttons to select the component you want to use When you press a button the receiver turns on The components are factory assigned to the buttons as follows When you want to assign other components program the remote following the steps on page 10 Button s Assigned component s VIDEO1 VCR VTR mode 3 VIDEO2 VCR ...

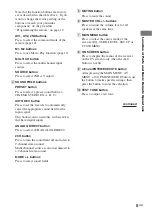
Page 5: ...he input signal This button can be used only with receivers that have digital inputs ANALOG DIRECT button Press to select 2CH ANALOG DIRECT 2CH button Press to turn the sound field off and listen to 2 channel stereo sound Multi channnel source is also downmixed to a 2 channel stereo sound MODE buttons Press to select sound fields 5 MUTING button Press to mute the sound 6 MASTER VOL buttons Press t...

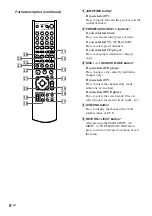
Page 6: ...mode Press to select the unit for search track index etc qf AV MENU button Press to display the menus of the VCR satellite tuner or DVD qg RETURN O EXIT button After pressing the MAIN MENU AV MENU or TOP MENU GUIDE button press to return to the previous menu or exit the menu N X m M VIDEO1 VIDEO2 USE MODE SYSTEM STANDBY SLEEP AV1 AV2 M1 M2 2ND TV 1 AV 1 VIDEO3 DVD LD TV SAT TAPE MD DAT CD SACD TUN...

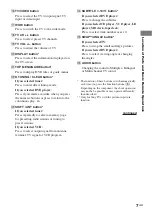
Page 7: ...ess repeatedly to select a memory page for presetting radio stations or tuning to preset stations If you selected VCR Press to select output signal from antenna terminal TV signal or VCR program wf SUBTITLE 10 11 button If you selected DVD player Press to change the subtitles If you selected CD player VCD plyer LD player MD deck tape deck Press to select track number over 10 wg SWAP ANGLE button I...

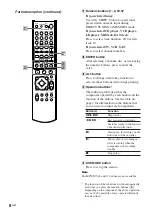
Page 8: ...rds or rewinds Searches tracks in the forward or backward direction N Starts play Starts play on the front sides of the cassette X Pauses play or recording or starts recording when the component is in recording standby x Stops play ea USE MODE button Press to set up the remote Note The MPX DUAL and 12 buttons are not available The function of these buttons switch automatically each time you press ...

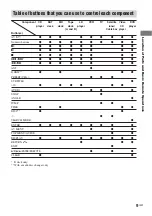
Page 9: ...z z z z z Numeric buttons z z z z z z z z z z N z z z z z z z z X z z z z z z z z x z z z z z z z z z z z z z z z z m M z z z z z z z z ANT z D SKIP z z z z PRESET CH z z z SUBTITLE z 10 z z z z z z AUDIO z z z SWAP z ANGLE z JUMP z z TIME z z z z DISC z z z z SEARCH MODE z ENTER z z z z z z z z z AV MENU z z z TOP MENU GUIDE z z DISPLAY z z z z z z z z RETURN O z z z EXIT z V v B b ENTER EXECUTE ...

Page 10: ...nd room even though the mode is not set to the 2nd room mode If you press SOURCE only you can output the source signal of the current function of the receiver to the amplifier in the 2nd room Advanced Remote Operations To check the mode of the remote Press USE MODE You can check the remote by the indicator Mode Indicator lights AV1 once AV2 twice 2ND once for a while To reset the remote to factory...

Page 11: ...c codes are based on the latest information available for each brand There is a chance however that your component will not respond to some or all of the codes All of the functions on this remote may not be available when used with your particular component continued 3 Press the numeric buttons to enter the numeric code or one of the codes if more than one code exists corresponding to the componen...

Page 12: ...16 YAMAHA 217 218 To control an LD player Maker Code s SONY 601 602 603 PIONEER 606 To control a video CD player Maker Code s SONY 605 To control a VCR Maker Code s SONY 701 702 703 704 705 706 AIWA 710 750 757 758 AKAI 707 708 709 759 BLAUPUNKT 740 EMERSON 711 712 713 714 715 716 750 FISHER 717 718 719 720 GENERAL ELECTRIC 721 722 730 GOLDSTAR 723 753 GRUNDIG 724 HITACHI 722 725 729 741 ITT NOKIA...

Page 13: ...13 814 PANASONIC 818 RCA 805 819 S ATLANTA 815 816 817 Learning the commands of your components By using the Learning function it is possible for this remote to perform learned commands Setting remote control codes that are not stored in the remote When a remote control code is not one of the presets stored in the remote it is possible for the remote to learn the code using the Learning function 1...

Page 14: ...everal buttons that can be used for learning are pressed only the last pressed button is valid The indiactor blinks slowly it turns ON while a valid button is pressed In step 5 if a button that can be used for learning is pressed the new button is selected and the learning procedure returns to the beginning of step 5 To activate the function after programming Press the programmed button to activat...

Page 15: ... 4 to program up to 10 IR codes Tip If programming is unsuccessful check the follwing If the indicator does not light up in step 1 the batteries are weak Replace both batteries If the indicator lights 4 times in quick succession in step 3 an error has occured Start again from step 1 To cancel programming Press USE MODE during any step The remote automatically exits the macro setting mode To delay ...

Page 16: ...r on the receiver Remove any obstacles in the path between the remote and the receiver Replace both batteries in the remote with new ones if they are weak Make sure you select the correct function on the remote Press MAIN MENU before you use the V v B b ENTER EXECUTE button for receiver operation page 5 Additional Information Specifications General Remote control system Infrared control Power requ...

Reviews: