8
GB
This chapter provides information on the
location of buttons and how to use them to
perform basic operations.
However, some functions explained in this
section may not operate depending on the
component you are controlling.
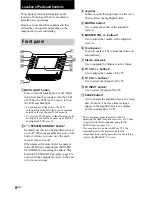
Front panel
1
BACK LIGHT button
Press to turn the backlight on or off. Hold
down for about 2 seconds to turn the LCD
off. When the LCD is off, press to turn on
the LCD and backlight.
• To prolong use of the battery, the LCD
automatically turns off if there is no command
entered in the touch panel for 60 seconds.
• To view the LCD display without turning on the
backlight, touch the touch panel when both the
backlight and LCD are off.
2
?/1/
SYSTEM STANDBY button*
Normally used to turn the amplifier/receiver
on or off. When the amplifier/receiver in the
2nd or 3rd zone is on use, only the main
receiver turns on or off.
When pressed for more than 2 seconds, it
turns off all Sony components (SYSTEM
STANDBY) by executing the Macro Play
function SYSTEM OFF program (page 23),
even when the amplifier/receiver in the 2nd
or 3rd zone is on use.
Location of Parts and Controls
3
Jog dial
Rotate to scroll through items in a list (etc.).
Push to select the highlighted item.
4
MUTING button*
Use to mute the sound of the amplifier/
receiver.
5
MASTER VOL +/– buttons*
Use to adjust the volume of the amplifier/
receiver.
6
Touch panel
Touch to operate. The commander turns on
automatically.
7
Stereo mini jack
Use to upgrade the firmware in the future.
8
TV VOL +/– buttons*
Use to adjust the volume of the TV.
9
TV CH +/– buttons*
Use to select the channel of the TV.
0
TV INPUT button*
Use to select the input of the TV.
qa
SLEEP button*
Use to operate the amplifier/receiver’s sleep
timer function. The sleep timer settings
appear in the amplifier/receiver’s display,
not the commander’s LCD.
* The commander emits the remote code for
operating the AMP (amplifier/receiver) or TV that
is registered to this commander using the IR
SETUP function (page 10).
If you register two or more AMPs or TVs, the
commander emits the remote code for the
component (icon) that appears first (on the left top
side) in the RM SELECT screen.
1
2
4
6
7
8
9
0
qa
3
5
Summary of Contents for RM-TP2
Page 41: ...Additional Information 41GB ...


