background image

32

*

In order to avoid recording by mistake, the 

z

 REC

button does not work by itself.

KEY DISPLAY

qd

1

3qh

1 – 9, 0, ENT

4

-/-- (+10)

2

DIGITAL
(AUDIO)

0

GUIDE

qa

RETURN

qh

ENT

qf

a

(SUBTITLE)

w;

(DISPLAY)

wa

MENU
(DVD MENU)

wd

TOOLS

ws

V

ws

v

ws

b

ws

B

ws

OK

qj

PROG + (

>

)

qj

PROG – (

.

)

qk

qg

/

qs


H

qs


m

qs


M

qs


z

 REC

qs


x

qs


X

qs


.

qs


>

qs


qs


qs

 REC STOP

7

 RED, GREEN ,

YELLOW , BLUE

8

 SERVICE

9

 FAV (FAVORITE)

1


t

ql

(PAP)

DVD

FUNCTION

To turn on and off.
Number buttons: To set items selected
from the screen.
To select numbers 10 and above.
To switch the audio mode.

To bring up the Master Guide.
To return to the previous screen.
To enter the setting. To set items
selected from the screen.
To switch the subtitle.

To show the current play status on the
screen.
To display the DVD menu.

To call up the setup menu
To move the cursor upward.
To move the cursor downward.
To move the cursor to the right.
To move the cursor to the left.
To enter the selection.
P:
Programme up
PROGRAM –:
Programme down
To select the deck.

To switch to Teletext.
To play.
To rewind.
To fast-forward.
To record, press 

H

 while pressing

z

 REC.

To stop.
To pause.
To proceed to the previous song.
To proceed to the next song.
To replay.
To advance forward.
To stop recording, press 

x

 while

pressing 

z

 REC.

Fastext buttons.

Timer on/off.
To display the title menu.
To change the input mode.
To display the program explanation.

KEY DISPLAY

qd

1

7

RED,  GREEN ,
YELLOW  , BLUE

3


4

1 – 9, 0,  -/--

1


t

(INPUT SELECT)

0

GUIDE

qa

RETURN (EXIT)

qg


/

(TELETEXT)

wa

MENU

ws

V

ws

v

ws

b

ws

B

ws

OK

qj

PROG +/–

qk

ql

(PAP)

9

FAV

8

 SERVICE

w;

(DISPLAY)

qs

m

qs

H

qs

M

qs

REC 

z

qs

x

qs

X

SAT

FUNCTION

To turn on and off.
Fastext buttons

To change programmes.
For example, to change to programme
5, press 0 and 5 .
To switch the output of the SAT
receiver to the TV. (When you connect
a TV cable or aerial to the receiver, the
output switches between a TV and
SAT programme.)
To bring up Master Guide.
To exit the mode.
To switch to teletext.

To call up the MENU display.
To move the cursor upward.
To move the cursor downward.
To move the cursor to the right.
To move the cursor to the left.
To bring up the Station Index when a
programme guide is not displayed.
To select the programme that is
highlighted.
Programme up : +
Programme down : –
To return to the last tuned station.

 To show the Help screen.

To show the Box Office screen.
To show the Services screen.

To show the interactive screen.
To rewind.
To play.
To fast-forward.
To record, press 

H

 while pressing

REC 

z

*

. First release 

H

, then release

REC 

z

.

To stop.
To pause.

*

In order to avoid recording by mistake, the REC 

z

button does not work by itself.

Using Fastext

With Fastext you can access pages with one key stroke.
When a Fastext page is broadcast, a colour-coded menu
will appear at the bottom of the screen.
The colours of this menu correspond to the red, green,
yellow and blue keys on the Remote Commander.
Press the key which corresponds to the colour-coded
menu.
The page will be displayed after some seconds.

Summary of Contents for RM-VL610T

Page 1: ...4 117 855 11 1 Integrated Remote Commander 2008 Sony Corporation RM VL610T Operating Instructions ...

Page 2: ...ackaging indicates that this product shall not be treated as household waste Instead it shall be handed over to the applicable collection point for the recycling of electrical and electronic equipment By ensuring this product is disposed of correctly you will help prevent potential negative consequences for the environment and human health which could otherwise be caused by inappropriate waste han...

Page 3: ...onent Select button 3 Enter the code number 4 Finish setting Press SET and MENU Press ENT You can search for the component code available for your component 1 Set the Remote Commander for code input mode 2 Press the desired Component Select button 3 Transmit code number signals in turn 4 Finish setting Press SET and MENU Press ENT For more details see page 10 Press PROG or PROG and then 1 Repeat u...

Page 4: ...e RM VL610T learn the functions of your component s remote control Learning function Example To teach the H play signal of your video cassette recorder to the VCR H button of the RM VL610T 4 Press the button you want to teach 5 Press and hold the H play button of your VCR s remote control until the VCR button of the RM VL610T lights up 6 Repeat Steps 4 and 5 to teach other functions 7 Finish setti...

Page 5: ... for an air conditioner 18 Advanced Features Controlling the Volume of Visual Components Connected to an Audio System 19 Adding an Extra Function to the Component Select Buttons 20 Programming the Power On command of the selected component just by pressing that Component Select button for Sony components only 20 Executing a Series of Commands System Control Functions 21 To clear programmed command...

Page 6: ...ot operate properly the batteries might be drained When this happens replace the batteries with new ones Note Do not take more than one hour to replace the batteries Otherwise your code number settings page 8 and learned remote control signals page 12 will be erased Notes on batteries Do not use an old battery with a new one or mix different types of batteries together If the electrolyte inside th...

Page 7: ... Table of Preset Functions page 30 shows how the Commander generally operates for each component in the factory preset mode 1 SET indicator 2 SET button 3 Component Select buttons Light or flash during operation 4 t input select button 5 DIGITAL button 6 Number buttons 7 button 8 2 volume buttons 9 muting button 0 Fastext button qa SERVICE button qs FAVORITE button qd GUIDE button qf Cursor Contro...

Page 8: ...ponent Select buttons to freely set signals of your desired components For further information see Assigning Other Components to the Component Select Buttons page 24 For the functions of buttons as for each component see Table of Preset Functions page 30 Basic Operations Setting the Code for non Sony Preset Audio and Visual Components Setting component codes The Commander is preset at the factory ...

Page 9: ... press a function button and turns off when you release it The component should power off 4 If you have succeeded check that the Commander is operating the other functions of your component such as programme and volume control See page 11 for details If the Commander does not seem to be working Try repeating the setup procedure using the other codes listed for your component or try setting the cod...

Page 10: ...The SET indicator lights up 2 Press the Component Select button for the desired component The SET indicator and the selected Component Select button light up 3 Press PROG or PROG and then 1 in turn until the component reacts as described in the following TV AMP Powers off VCR CBL SAT DVD Powers on CD player MD player cassette deck Plays back Press PROG to go to the next code number Press PROG to g...

Page 11: ...ponents or functions In this case programme the remote control signals with the Learning function page 12 Note however that components and functions that do not support the remote control of infrared signals will not work with this Commander 5 Check if the code number works by following the instructions on page 9 Notes If you do not input anything into the Commander within 20 seconds between each ...

Page 12: ...rol the volume Press to mute the sound When you select a visual component the TV s volume will be controlled TV Component Select button lights up and when you select an audio component the amplifier s volume will be controlled AMP Component Select button lights up You can change this setting page 19 Notes If you used the Learning function page 12 to programme the 2 or button to send a signal to an...

Page 13: ... another signal has already been learned by that button The SET indicator flashes twice and the Commander takes no action returning to its state after the Component Select button was pressed in Step 3 Either teach to another free button or clear the already learned function page 16 and start over from the beginning 5 Press and hold the button on the other remote control until both the SET indicato...

Page 14: ...nction to programme the 2 or buttons to send any signal to components other than the TV or AMP that signal will be transmitted only by pressing 2 or when you select that component If you used the Learning function to programme the 2 or buttons to send any signal to the TV or AMP that signal will be transmitted only after you select TV or AMP When you select other components the learned signal will...

Page 15: ... up you can release the Component Select button The SET indicator flashes and the selected Component Select button lights up Learning function standby When you teach signals to the SYSTEM CONTROL buttons you can release the SYSTEM CONTROL button when the SET indicator lights up The SET indicator lights up but the SYSTEM CONTROL button does not light up If another signal has already been learned by...

Page 16: ...you release the Component Select button the Commander changes to Learning mode 3 Press SET to finish setting To cancel erasing press SET Changing or erasing the function of a learned button To change the learned function clear it first and perform Learning again To clear the learned function of a single button 2 1 3 Example To erase the learned function from the Number button 1 in VCR mode 1 Press...

Page 17: ... To clear all function signals learned for a specific Component Select button Example To erase all functions learned by the VCR button 1 Press and hold SET for over 3 seconds The SET indicator flashes 2 While holding x pressed press the Component Select button you want to erase When erasing of a learned function has completed all the other Component Select button lights turn off Notes With this op...

Page 18: ...le button programme the signal on two buttons of the Commander as follows 1 Clear the learned power on off signal on the programmed button of the Commander 2 Reprogramme only the power on signal of the air conditioner on the button of the Commander by following the steps of Programming Signals of Another Remote Control Learning Function page 12 3 Programme the power off signal of the air condition...

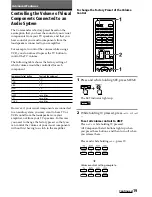
Page 19: ...o system you may want to hear TV or VCR sound from the loudspeakers via your amplifier not from your TV speakers In this case you need to change the factory preset so that you can control the volume of your visual components without first having to switch to the amplifier Component Select button TV VCR CBL DVD SAT AMP CD TAPE Controls the volume of TV TV TV TV TV amplifier amplifier amplifier To c...

Page 20: ...tra Function to the Component Select Buttons Programming the Power On command of the selected component just by pressing that Component Select button for Sony components only When a code number of a Sony component is set to a Component Select button the Power On signal is automatically programmed to the button You can select the desired component and power it on by just pressing that Component Sel...

Page 21: ...ower on the amplifier r Set the input selector of the amplifier to VIDEO 1 r Set the input mode of the TV to VIDEO 1 r Start video playback To cancel the setting press SET To programme the Power On command Repeat the same procedure pressing the desired Component Select button Notes If the component code of a non Sony brand has been set on a Component Select button you cannot programme the Power On...

Page 22: ...r the Learning function To clear the Learning function see Changing or erasing the function of a learned button on page 16 If you change the component code number page 8 or programme a new signal by using the Learning function page 12 on a key or a button that has been programmed with a series of commands using the System Control function the new signal will be transmitted when you press the corre...

Page 23: ...ons on page 22 Example To programme the procedure on page 21 for the VCR Component Select button 1 Press and while holding SET press the VCR Component Select button The SET indicator and the VCR Component Select button lights turn on If a Control Programme function Component Macro has already been set on the button the button flashes twice The setting procedure is automatically cancelled 2 Set the...

Page 24: ...function will not work until you clear the Leaning function To clear the Leaning function see Changing or erasing the function of a learned button on page 16 While you are setting a programme you can insert a 0 4 second interval before the next step is executed by pressing the same Component Select button again For the example above in the Step 2 you can insert a 0 4 second interval between the TV...

Page 25: ...he Component Select button currently selected flash once and the Hold function is released 1 Press and while holding 1 press t and PROG The SET indicator and the Component Select button currently selected flash once and the Hold function is set Using Other Functions Locking the Controls Hold Function To prevent accidental operation you can lock all the buttons with the Hold function once x All the...

Page 26: ...1 Press and while holding 1 press t and 2 When pressing the 1 button and the t button all the Component Select buttons go off When pressing the 2 button while holding down the 1 button and the t button the SET indicator lights up and the Component Select buttons light up one by one When the SET indicator turns off at last all settings are cleared and the Commander returns to its original state ...

Page 27: ...solution Do not use any type of solvent such as alcohol benzene or thinner as they may damage the finish of the surface Specifications Operating distance Approx 10 m 32 8 ft varies depending on components of different manufacturers Power requirements Two R6 size AA batteries Battery life Approx 1 year varies depending on frequency of button use up to approx 300 times per day Dimensions Approx 54 2...

Page 28: ...or the component page 12 The component may be operated with a code number that is not listed in the Component code numbers See Setting a Component Code by the Search Function page 10 and try setting a code number again with the Search function When you teach signals of an interactive signal exchange system remote control unit supplied with some of Sony s amplifiers to the Commander the response si...

Page 29: ...re to do this can result in incorrect operation when you use these functions again Some components may not always be powered on by the System Control function or Control Programme function This is because the power of the component turns on and off alternately when receiving the power on off signal In this case check the operating component s power on off state before using the System Control func...

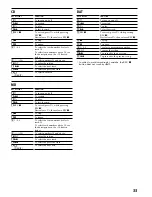
Page 30: ... be some components or functions that cannot be operated with this Commander KEY DISPLAY qk 52 6 9FAV 16 9 7RED GREEN YELLOW BLUE qaRETURN qfa TV ON qg TELETEXT ql PAP 0GUIDE EPG wdTOOLS w DISPLAY wfSERVICE freeze qs H qs m qs M qs z REC qs x qs X qs qs qs qs qs REC STOP qs REC PAUSE FUNCTION To operate JUMP FLASHBACK or CHANNEL RETURN function on the TV depending on the setting of the TV s manufa...

Page 31: ...ECT 0GUIDE qaRETURN EXIT qg TELETEXT waMENU ws V ws v ws b ws B ws OK qjPROG qk ql PAP 9FAV 8 SERVICE w DISPLAY qsm qsH qsM qsREC z qsx qsX CBL Cable box Continued FUNCTION To turn on and off Fastext buttons To change programmes For example to change to programme 5 press 0 and 5 To switch the output of the SAT receiver to the TV When you connect a TV cable or aerial to the receiver the output swit...

Page 32: ... 7RED GREEN YELLOW BLUE 3 4 1 9 0 1 t INPUT SELECT 0GUIDE qaRETURN EXIT qg TELETEXT waMENU ws V ws v ws b ws B ws OK qjPROG qk ql PAP 9FAV 8 SERVICE w DISPLAY qsm qsH qsM qsREC z qsx qsX SAT FUNCTION To turn on and off Fastext buttons To change programmes For example to change to programme 5 press 0 and 5 To switch the output of the SAT receiver to the TV When you connect a TV cable or aerial to t...

Page 33: ...ber 0 selects track 10 To select track numbers above 10 see the descriptions on the 10 button below To select numbers 10 and above To enter the setting To select the next track To select the previous track To select next disk KEY DISPLAY qd1 qsm qsH qsM qsREC z qsx qsX 31 9 0 4 10 qhENT qs qs qk D SKIP MD FUNCTION To turn on and off To rewind To play To fast forward To record press H while pressin...

Page 34: ...verse To reverse To record press V while pressing RETURN 1 First release V then release RETURN To play 2 To call up the setup menu To fast forward 2 To rewind 2 To pause 2 To select the tape deck Deck A or B dual cassette deck only To stop 2 1 In order to avoid recording by mistake the REC z button and RETURN button do not work by themselves 2 Activated when using a double cassette deck for deck A...

Page 35: ......

Page 36: ...Printed in China ...

Reviews: