background image

17 

GB

Basi

c ope

rati

ons

Slideshow display

Display

Style

Description

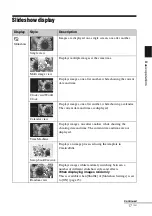
Slideshow

Single view

Images are displayed on a single screen, one after another.

Multi image view

Displays multiple images at the same time.

Clock view/World 
Clock

Displays images, one after another, while showing the current 
date and time.

Calendar view

Displays images, one after another, while showing a calendar. 
The current date and time are displayed.

Time Machine 

Displays images, one after another, while showing the 
shooting date and time. The current date and time are not 
displayed.

Scrap-book/Creative 

Displays an image processed using the template in 
CreativeEdit.

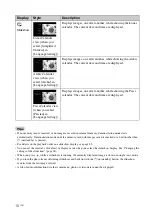
Random view

Displays images while randomly switching between a 
number of different slideshow styles and effects.

When displaying images randomly

This is available when [Shuffle] of [Slideshow Settings] is set 
to [ON] (page 25).

Continued

Summary of Contents for S-Frame 4-259-436-12 (1)

Page 1: ...Digital Photo Frame DPF XR100 VR100 2010 Sony Corporation Before operation Basic operations Advanced operations Using with a computer Error messages Troubleshooting Additional information Digital Photo Frame Handbook ...

Page 2: ...7 Importing a music file 27 Selecting a music file to play 27 Playing background music with a slideshow 27 Refresh mode 28 Maintenance mode 29 Activating maintenance mode 29 Initializing the system 29 Importing images from a memory card to internal memory 30 Specifying the playback device 32 Exporting an image from the internal memory to a memory card 33 Deleting an image 34 Registering a mark 35 ...

Page 3: ...s 55 Additional information About memory cards 61 Memory Stick 61 SD memory card 62 xD Picture Card 62 CompactFlash card DPF XR100 only 62 Notes on using a memory card 62 Index 64 On the illustrations and screen shots used in this manual The illustrations and screen shots used in this manual are of the DPF XR100 unless noted otherwise The illustrations and screen shots used in this manual may not ...

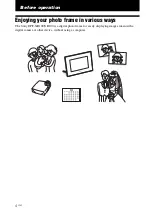
Page 4: ...Before operation Enjoying your photo frame in various ways The Sony DPF XR100 VR100 is a digital photo frame for easily displaying images taken with a digital camera or other device without using a computer ...

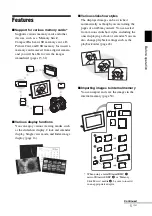
Page 5: ...ock and calendar display Single view mode and Index image display page 16 xVarious slideshow styles The displayed image can be switched automatically as though you are turning the pages of an album yourself You can select from various slideshow styles including the ones displaying a clock or calendar You can also change playback settings such as the playback order page 24 xImporting images to inte...

Page 6: ... image orientation mark and videos photos page 37 x Alarm function You are notified at the specified time on the specified day of the week with an audio alarm and alarm display page 41 xAutomatic rotation of images The photo frame automatically rotates images to their proper orientation Images are also automatically rotated when the photo frame is set in either the portrait or landscape position p...

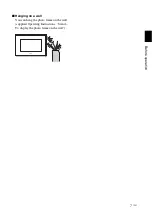
Page 7: ...7 GB Before operation xHanging on a wall You can hang the photo frame on the wall supplied Operating Instructions Stand To display the photo frame on the wall ...

Page 8: ...ital photo frame Front Rear LCD screen Remote sensor Sony logo page 13 VIEW MODE button page 16 1 on standby button Standby indicator Access lamp Memory card slot page 15 MENU button Direction B b v V buttons ENTER button BACK button ...

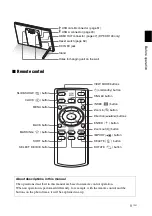
Page 9: ... button SORT button SELECT DEVICE button VIEW MODE buttons 1 on standby button SINGLE button INDEX button Zoom in button Direction B b v V buttons ENTER button Zoom out button IMPORT button DELETE button ROTATE button About descriptions in this manual The operations described in this manual are based on remote control operation When an operation is performed differently for example with the remote...

Page 10: ...l Replacing the battery of the remote control If the remote control stops working replace the battery CR2025 lithium battery with a new one 1 Press the tab in 2 Pull the battery holder out 3 Insert a new battery and slide the battery holder back into the remote control Insert the battery so that is facing upwards Notes Using a battery other than the specified one may result in the battery rupturin...

Page 11: ...charge the battery When the remote control will not be used for a long period of time remove the battery from the remote control to prevent leaking and corrosion Incorrectly inserting shorting dismantling or heating the battery or throwing it into a fire may cause the battery to rupture or leak ...

Page 12: ...ns indicated on the direction button on the rear panel depend on the orientation of the photo frame Notes Check whether the stand is stable If the stand is not set properly the photo frame may fall over The Sony logo does not light up when the photo frame is placed vertically or turned off You can also rotate the image manually page 38 The photo frame does not detect and rotate the orientation of ...

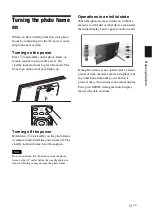
Page 13: ...the power turns off The standby indicator turns to red from green Note Do not disconnect the AC adaptor from the photo frame or the AC outlet before the standby indicator turns red Doing so may damage the photo frame Operations in an initial state When the photo frame is turned on without a memory card loaded or other device connected the initial display below appears on the screen If the photo fr...

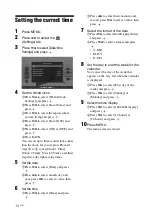
Page 14: ... date 1Press v V to select Date and press 2Press B b to select month day and year press v V to select a value then press 6 Set the time 1Press v V to select Time and press 2Press B b to select hour minute and second press v V to select a value then press 7 Select the format of the date 1Press v V to select Date Display Order and press 2Press v V to select a format and press Y M D M D Y D M Y 8 Set...

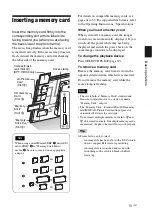
Page 15: ...move the memory card from its slot in the opposite direction from which it was inserted Do not remove the memory card while the access lamp is flashing Notes The slot is both a Memory Stick standard and Duo size compatible slot so you do not need a Memory Stick adaptor The Memory Stick Standard Duo SD memory card MMC xD Picture Card multi purpose slot automatically detects the card type Do not ins...

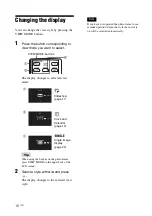
Page 16: ...n using the buttons on the photo frame press VIEW MODE on the upper back of the LCD screen 2 Select a style with B b and press The display changes to the selected view style Note If you have not operated the photo frame for an extended period of time the style the cursor is on will be selected automatically 1 Slideshow page 17 2 Clock and Calendar page 19 3 Single image display page 20 VIEW MODE b...

Page 17: ...ages one after another while showing a calendar The current date and time are displayed Time Machine Displays images one after another while showing the shooting date and time The current date and time are not displayed Scrap book Creative Displays an image processed using the template in CreativeEdit Random view Displays images while randomly switching between a number of different slideshow styl...

Page 18: ...photo frame off during slideshow and back on with the 1 on standby button the slideshow restarts from the last image viewed A file of audio information data that contains no photo or video data cannot be displayed Slideshow Lunar Calendar view when you select Simplified Chinese in Language Setting Displays images one after another while showing the Lunar calendar The current date and time are disp...

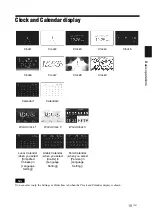
Page 19: ...ar display is shown Clock1 Clock2 Clock3 Clock4 Clock5 Clock6 Clock7 Clock8 Clock9 Calendar1 Calendar2 World Clock 1 World Clock 2 World Clock 3 Lunar Calendar when you select Simplified Chinese in Language Setting Arabic Calendar when you select Arabic in Language Setting Farsi Calendar when you select Persian in Language Setting ...

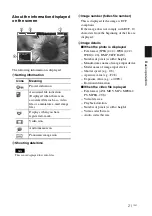
Page 20: ...e in the screen You can switch the images to be displayed by pressing B b Fit to screen Displays an image over the whole screen Depending on the aspect ratio of the recorded image the border of the image may only be partially displayed You can switch the images to be displayed by pressing B b Entire image with Exif Displays image information such as the image number file name and shooting date whi...

Page 21: ...2 JPEG 4 2 0 BMP TIFF RAW Number of pixels width height Manufacturer name of image input device Model name of image input device Shutter speed e g 1 8 Aperture value e g F2 8 Exposure value e g 0 0EV Rotation information xWhen the video file is played File format AVI MOV MP4 MPEG 2 PS MPEG 2 TS Video file size Playback duration Number of pixels width height Video codec bit rate Audio codec bit rat...

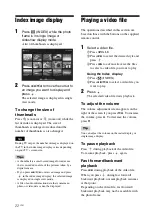
Page 22: ...ontains no photo or video data cannot be displayed Playing a video file The operations described in this section are based on those with the buttons on the supplied remote control 1 Select a video file 1Press SINGLE 2Press B b to select the desired style and press 3Press B b to advance reverse the files to select a video file you want to play Using the Index display 1Press INDEX 2Press B b v V to ...

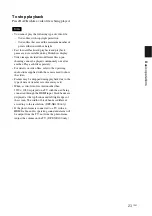
Page 23: ...ely For details on video files refer to the operating instructions supplied with the camera used to shoot the video Frames may be dropped during playback due to the type of data or transfer rate of memory card When a video file of resolution other than 1920 1080 is played on a TV with the unit being connected through the HDMI input black bands are displayed at the top bottom and left right edges o...

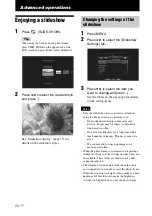
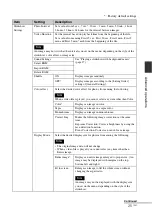
Page 24: ...w using the image stored on a memory card Due to the characteristics of memory card devices images may be subject to data error when read too often Do not run a slideshow for a long time with a small number of images This may cause data error We recommend you back up images on a memory card often When the photo frame is for instance displaying a slideshow changes to the settings of some items are ...

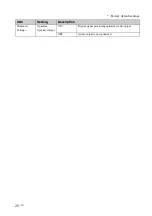
Page 25: ...ect the desired color effect for photos from among the following Note When a video file is played you cannot select any item other than Color Color Displays an image in color Sepia Displays an image in a sepia color Monochrome Displays an image in monochrome Correct Img Makes the following image corrections at the same time Exposure Correction Corrects brightness by using the face detection functi...

Page 26: ...26 GB Slideshow Settings Optimize Speaker Output ON Digital signal processing optimizes audio output OFF Audio output is not optimized Factory default settings Item Setting Description ...

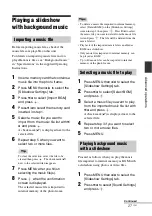
Page 27: ...ed to internal memory of the photo frame Tips To delete a music file imported to internal memory select Delete BGM on the Slideshow Settings screen in step 2 then press Press v V to select the music file you want to delete from the music file list and press The file will be deleted from the music file list Playback of the imported music file is enabled as BGM on a slideshow Only music files import...

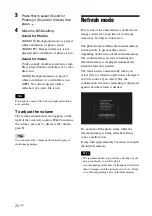
Page 28: ...mage display Refresh mode Due to one of the characteristics of the device images stored for a long time or read many times may be subject to data error The photo frame refreshes the internal memory automatically to prevent these errors depending on the status of the internal memory The confirmation screen for refreshing the internal memory is displayed automatically when the refresh is needed The ...

Page 29: ... VIEW MODE until the following screen appears Maintenance mode is activated 3 Press v V to select Update firmware or Initialize system and press Update firmware For detailed information on how to obtain an update file or how to update the firmware access and view http www sony net Initialize system The operation screen is displayed Go to Initializing the system below 1 Press B b to select Yes in t...

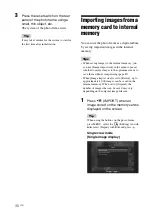
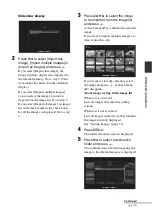
Page 30: ...nal memory you can use Image import size in the menu to preset whether to resize images to the optimum size or to save them without compressing page 45 When Image import size is set to Resize up to approximately 4 000 images can be saved in the internal memory When set to Original the number of images that can be saved may vary depending on the original image file size 1 Press IMPORT when an image...

Page 31: ...ed Go to step 4 3 Press B b v V to select the image to be imported from the image list and press A check mark is added to the selected image If you want to import multiple images at a time repeat this step If you want to clear the selection select the image and press A check mark disappears About image sorting in the image list When sort is activated Lists all images that meet the sorting criteria...

Page 32: ...he photo frame For details see Connecting to a computer page 51 Tip You can change the thumbnail size in the image list using Due to one of the characteristics of the internal memory device images stored for long time or read many times may be subject to data error We recommend that you perform a backup of your data periodically to avoid losing it Specifying the playback device You can specify whe...

Page 33: ... the image you want to export from the image list Go to step 5 If you select Export all images an image list with check marks in the check boxes for all the images is displayed Go to step 6 5 Press B b v V to select the image to be exported from the image list and press A check mark is added to the selected image If you want to export multiple images at a time repeat this step If you want to clear...

Page 34: ... using the buttons on the photo frame press MENU select the Editing tab with B b select Delete with v V and press 2 Press v V to select Delete this image Delete multiple images or Delete all images and press If you select Delete this image the image currently displayed is deleted Go to step 5 This item cannot be selected on the slideshow display If you select Delete multiple images you can select ...

Page 35: ...y with images which have been selected beforehand and have been marked You can easily check the images with marks using the index image display or single view mode 1 Press MARKING when an image is displayed on the screen Tip When using the buttons on the photo frame press MENU select the Editing tab with B b select Marking with v V and press 2 Press v V to select the desired mark and press 3 Press...

Page 36: ...e selected image To delete the registration of a mark Select Unmark this image or Unmark all images and press in step 3 You can also cancel the selection when you remove the check mark from the check box Unmark this image Removes a mark from the image currently displayed This item cannot be selected on the slideshow display Unmark all images When sort is activated Unmarks all images that meet the ...

Page 37: ...videos or photos 3 Press v V to select the item and press 4 Repeat step 3 then press MENU when sorting is finished To cancel the sort Press MENU while the sorted images are displayed select Exit sort show all photos and press To change the sort style Press BACK while the sorted images are displayed then select Reselect Notes Do not turn the photo frame off or remove the memory card during sorting ...

Page 38: ...ess Tip If you move the enlarged image with B b v V and press MENU in step 1 the image is trimmed into the displayed image size and saved Notes You cannot overwrite files except for a JPEG file extension jpg or jpeg Enlarging an image may reduce the quality depending on the image size It is not possible to enlarge an image using the buttons on the photo frame A video file cannot be enlarged or red...

Page 39: ...select the Settings tab 3 Press v V to select Auto Power ON OFF and press 4 Press v V to select Setup method and press Press v V to select Advanced Simple or Auto off and press Advanced Sets the auto power on off function in one hour increments for each day of the week Simple Sets the auto power on off function finely in one minute increments Auto off Sets the auto power off time for when the spec...

Page 40: ...the photo frame The power is turned on automatically at the time you set for Power ON timer during standby mode 2Press B b v V to select OK and press Simple 1Select an item for which you want to set the time Press v V to select Power ON timer or Power OFF timer and press Press v V to select Enable and press 2Set the time at which you want to activate the Power ON timer or Power OFF timer Press v V...

Page 41: ...ess v V to select the time and press 3 Set the day of the week 1Press v V to select Day and press 2Press v V to select the day of the week and press OK Tip Every day of the week is marked with a check mark at the factory Remove the check marks for any days of the week for which you do not wish the alarm set 4 Set the alarm sound 1Press v V to select Alarm sound and press A list of the music files ...

Page 42: ...photo frame is connected to a computer an internal alarm will sound even if imported music files are set as the alarm sound Changing the settings You can change the following settings Picture mode Alarm Settings Auto Power ON OFF Date time Settings General Settings Listing Order Sony logo ON OFF etc Language Setting Initialize 1 Press MENU 2 Press B b to select the Settings tab 3 Press v V to sele...

Page 43: ...Each time you press v V the setting value changes In the case of a numerical value press V to increase the value and press v to decrease it If you press the setting is confirmed 6 Press MENU The menu closes To reset to factory default settings 1 Press MENU then select the Settings tab by pressing B b 2 Press v V to select Initialize and press 3 Press v V to select Initialize settings and press All...

Page 44: ...time or day of the week the setting is confirmed and the previous screen is restored Cancel If you press this button after setting the auto power on off time or day of the week the operation is canceled and the previous screen is restored Reset all If you press this button after setting the auto power on off time or day of the week all the setting times are deleted Simple You can set the auto powe...

Page 45: ...rioration but you can save fewer images Control for HDMI DPF XR100 only ON OFF Sets whether to enable or disable the HDMI control function When set to ON the TV connected via the HDMI connector on the photo frame automatically switches to video input mode displaying the images stored in the photo frame The photo frame can be operated with the remote control of the TV Sony logo ON OFF ON OFF You ca...

Page 46: ...ed to the internal memory will be deleted Do not format the internal memory by using other devices such as a computer Initialize settings Returns all settings to their factory defaults except for the current date and time setting of Date time Settings Factory default settings Item Setting Description ...

Page 47: ... frame and connect the AC power adaptor to an AC outlet supplied Operating instructions Turning the photo frame on 2 Prepare a commercially available HDMI cable Notes Use an HDMI cable that is less than 3 meters long Use an HDMI cable with the HDMI logo Connection to a TV input except for an HDMI input using a conversion adaptor cable or connector is not guaranteed 3 Connect the HDMI OUT connector...

Page 48: ...you can use the remote control of your TV to operate the photo frame Notes We cannot guarantee operation with all types of TVs When the remote control of your Sony TV is equipped with a link menu button you can use the remote control to operate the photo frame To operate the photo frame the 5 4 Enter Return buttons support the control for HDMI If the control for HDMI setting of your TV is off TV s...

Page 49: ...ync compatible TV with an HDMI cable you can use a BRAVIA control unit to perform linked operations Operating an external device connected to the photo frame You can connect a mass storage compatible digital camera USB memory device photo storage device or other external device to the photo frame and display an image directly from the external device Notes We cannot guarantee connection with all t...

Page 50: ...nnect the USB cable or turn the photo frame and external device off while the access lamp on the external device is flashing Doing so may damage the data stored in the external device Sony assumes no responsibility for any damage or loss of data A USB hub or USB device with a built in USB hub may not work properly The photo frame cannot use data that has been encrypted or compressed using for inst...

Page 51: ... has been demonstrated as operable when connected to a computer or Sony digital photo printer When other devices are connected to the photo frame these devices may not recognize the internal memory of the photo frame Do not connect a computer to the USB mini B connector on the photo frame simultaneously when a USB memory or external device is connected via the USB A connector Notes This section sh...

Page 52: ...emory of the photo frame the files are saved without being compressed As a result fewer images may be able to be saved to the internal memory of the photo frame Images can be saved from a computer in the internal memory directly without making a folder In this case you can only save up to 512 images In addition the number of images that can be saved may be reduced depending on the file name length...

Page 53: ...onnected to the USB A connector Use a memory card or external device that is supported by the photo frame No images on file There is no image file that can be displayed on the screen of the photo frame on the memory card or the external device Use a memory card or external device containing image files that can be displayed with the photo frame Note This error message may be displayed when you ins...

Page 54: ...ternal memory Write error on the External Device The Memory Stick is read only A Memory Stick ROM is inserted To save the images use the Memory Stick recommended The Memory Stick is protected A protected Memory Stick is inserted To edit and save the images use an external device to remove protection Memory card format not supported For a memory card use your digital camera or other device to forma...

Page 55: ...rted or an external device connected properly c Insert a memory card or connect an external device properly pages 15 49 Does the memory card contain images saved with a digital camera or other device Are images stored on the external device c Insert a memory card containing images or connect an external device containing images c Check the file formats that can be displayed supplied Operating inst...

Page 56: ... displayed again the image cannot be displayed because the image file is not supported by the photo frame Does the mark displayed below appear in the index view c If the mark shown on the left is displayed the image file is supported by the photo frame but the thumbnail data or image itself cannot be opened Select the mark and press If the mark shown on the left is displayed again the image cannot...

Page 57: ...ry saving again Is the write protect switch of the memory card in the LOCK position c Slide the write protect switch to the enabled position Is the memory card full c Delete unwanted images page 34 or replace the memory card with one with sufficient free space Is the internal memory full c Delete unwanted images page 34 Did you save images from a computer to the internal memory without making a fo...

Page 58: ...Symptom Check item Cause Solutions A music file cannot be imported Is a memory card that stores only music files inserted Does the message No images on file appear on the screen c When a memory card that stores only music files is inserted the message No images on file appears on the screen In this case do not replace the card and press See Importing a music file page 27 for the proper subsequent ...

Page 59: ...00 only Symptom Check item Cause Solutions Nothing happens even if you operate the photo frame c Push the reset switch on the back of the photo frame using a long thin object such as a pin etc page 9 The photo frame does not start c Use maintenance mode to initialize the system of the photo frame page 29 A memory card cannot be ejected c If a miniSD card microSD card or Memory Stick Micro is inser...

Page 60: ...operly c Replace the battery page 10 c Insert a battery page 10 c Insert a battery in the proper orientation page 10 c Point the top end of the remote control towards the remote sensor on the photo frame page 10 c Remove any obstruction between the remote control and the remote sensor Is there a protective sheet inserted c Remove the protective sheet page 10 ...

Page 61: ... supplied Operating instructions back cover Do not insert more than one Memory Stick at the same time or this may cause trouble with the photo frame If you use a Memory Stick Micro with the photo frame the Memory Stick Micro needs to be inserted into an M2 adaptor If you insert a Memory Stick Micro into the photo frame without an M2 adaptor you may be unable to remove the Memory Stick Micro If you...

Page 62: ... you to use the following CompactFlash Memory Card Type I Type II and CF Card Type I Type II compatible CompactFlash Card 7 You can also use the Smart Media card by using a commercially available CompactFlash card adaptor 8 However we do not guarantee proper operations for all types of CompactFlash cards 7 Use a CompactFlash card with a power specification of 3 3V or 3 3V 5V You cannot use a type ...

Page 63: ...its copyright We are obligated to announce the contents of the agreement to customers under requirement by the owner of copyright for the software The contents of the license are given on the supplied CD ROM Please read NOTICE html in the License folder on the CD ROM Notice on GNU GPL LGPL applied software This product contains software that is subject to the following GNU General Public License h...

Page 64: ...e 43 46 Initialize settings 46 Inserting a memory card 15 L Language setting 45 Listing Order 45 M Marking 35 Mass storage compatible devices 49 Memory card slot 15 Memory cards 15 61 Memory Stick 15 61 CompactFlash card 15 62 Notes on use 61 62 SD memory card 15 62 xD Picture Card 15 62 P Placing to portrait or landscape orientation 12 Playback device 32 Playing a video file 22 Power on off 13 R ...

Page 65: ...Sony Corporation ...

Reviews: