background image

12 

GB

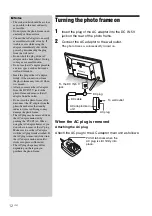
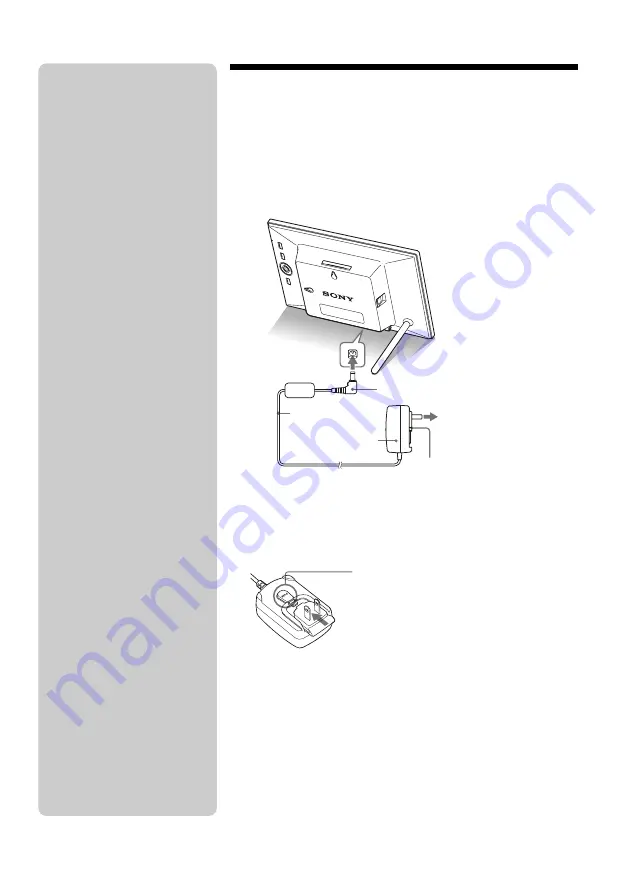
Turning the photo frame on

1

Insert the plug of the AC adaptor into the DC IN 5 V 
jack on the rear of the photo frame.

2

Connect the AC adaptor to the wall outlet.

The photo frame is automatically turned on.

When the AC plug is removed

Attaching the AC plug

Attach the AC plug to the AC adaptor main unit as follows:

To wall outlet

To the DC IN 5 V 
jack

AC adaptor main 
unit

DC cable

DC plug

AC plug

PUSH tab clicks when the 
AC plug is slid  firmly into 
place. 

P

Notes

• The socket outlet should be as close 

as possible to the unit, and easily 
accessible.

• Do not place the photo frame on an 

unsteady or tilted surface.

• Connect the AC adaptor to an easily 

accessible wall outlet close by. If 
trouble occurs while using the 
adaptor, immediately shut off the 
power by disconnecting the plug 
from the wall outlet.

• Do not short the plug of the AC 

adaptor with a metal object. Doing 
so may cause a malfunction.

• Do not use the AC adaptor placed in 

a narrow space, such as between a 
wall and furniture.

• Insert the plug of the AC adaptor 

firmly, if the connection is loose, 
the photo frame may turn off when 
it is moved.

• After use, remove the AC adaptor 

from the DC IN 5 V jack of the 
photo frame, and remove the AC 
adaptor from the outlet.

• Do not turn the photo frame off or 

disconnect the AC adaptor from the 
photo frame before the standby 
indicator turns red. Doing so may 
damage the photo frame.

• The AC plug may be removed from 

the AC adaptor main unit by 
pushing the “PUSH” tab. When 
using the AC adaptor, however, you 
do not have to remove the AC plug. 
Make sure to use the AC adaptor 
with the AC plug firmly attached. If 
the AC plug is removed, slide it into 
the AC adaptor main unit until it 
clicks into place as illustrated. 

• The AC plug shape may differ 

depending on the region you 
purchase the photo frame.

Summary of Contents for S-FRAME DPF-895

Page 1: ...DPD75 UC CED_IM 010COV fm Master Right DPF D75 D85 D95 E75 4 174 745 12 1 Operating Instructions Before operating this unit please read this manual thoroughly and retain it for future reference Product lineup differs by country and region Owner s Record The model and serial numbers are located at the rear Record the serial number in the space provided below Refer to these numbers whenever you call...

Page 2: ...s subject to the following two conditions 1 This device may not cause harmful interference and 2 this device must accept any interference received including interference that may cause undesired operation Declaration of Conformity Trade Name SONY Model No DPF D85 Responsible Party Sony Electronics Inc Address 16530 Via Esprillo San Diego CA 92127 U S A Telephone No 858 942 2230 This device complie...

Page 3: ...ve natural resources For more detailed information about recycling of this product please contact your local Civic Office your household waste disposal service or the shop where you purchased the product Applicable Accessories Remote control Disposal of waste batteries applicable in the European Union and other European countries with separate collection systems This symbol on the battery or on th...

Page 4: ...ht holders for the materials to be duplicated use of those materials beyond this limit may infringe the provisions of the copyright law and be subject to the copyright holders claim for damages When using photo images with this digital photo frame pay special attention not to infringe the provisions of the copyright law Any unauthorized use or modification of other s portrait may also infringe the...

Page 5: ...2 Operations in an initial state 13 Setting the current time 14 Let s view an image Inserting a memory card 15 Changing the display 16 About the information displayed on the LCD screen 17 Try using various functions Various functions 18 Sorting images Filtering 19 Specifying the playback device 20 Adjusting image size and orientation Zoom in Zoom out Rotate 20 Changing the settings of the auto pow...

Page 6: ...n error message appears 24 If trouble occurs 24 Additional information Precautions 26 Installation 26 Cleaning 26 Restrictions on duplication 26 Disposing of the photo frame 26 Specifications 27 On trademarks and copyrights 29 ...

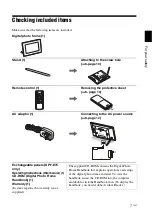
Page 7: ...e 12 Exchangeable panels DPF E75 only Operating Instructions this manual 1 CD ROM Digital Photo Frame Handbook 1 Warranty 1 In some regions the warranty is not supplied The supplied CD ROM contains the Digital Photo Frame Handbook that explains operations and setups of the digital photo frame in detail To view the handbook insert the CD ROM into the computer and double click the Handbook icon To d...

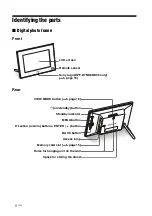
Page 8: ...ote sensor Sony logo DPF D75 D85 D95 only page 10 VIEW MODE button page 16 1 on standby button Standby indicator MENU button Direction B b v V buttons ENTER button BACK button Access lamp Memory card slot page 15 Holes for hanging unit on the wall Space for storing the stand ...

Page 9: ...tton BACK button MARKING button SORT button SELECT DEVICE button VIEW MODE buttons 1 on standby button SINGLE button INDEX button Zoom in button Direction B b v V buttons ENTER button Zoom out button IMPORT button DELETE button ROTATE button About descriptions in this manual The operations described in this manual are based on remote control operation When an operation is performed differently for...

Page 10: ...ery becomes weak the operating distance of the remote control may shorten or the remote control may not function properly In this case replace the battery with a Sony CR2025 lithium battery Use of another battery may present a risk of fire or explosion Replacing procedures CD ROM Handbook page 9 z Tips x When the photo frame is placed in the portrait orientation If you set the photo frame with its...

Page 11: ...e wall The screws may be damaged depending on the type of material used in the wall Set the screws in a pillar or stud in the wall When you want to re insert the memory card remove the photo frame from the wall then eject and re insert the memory card while the photo frame is placed on a stable surface Remove the stand and store it in the space for storing the stand provided on the rear when you h...

Page 12: ...e wall outlet Do not short the plug of the AC adaptor with a metal object Doing so may cause a malfunction Do not use the AC adaptor placed in a narrow space such as between a wall and furniture Insert the plug of the AC adaptor firmly if the connection is loose the photo frame may turn off when it is moved After use remove the AC adaptor from the DC IN 5 V jack of the photo frame and remove the A...

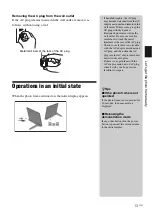
Page 13: ... as illustrated and remove it from the wall outlet Do not use a tool Be careful not to touch the metal terminals at the rear of the AC plug Check to see if there is no trouble with the AC adaptor main unit and AC plug and then slide the AC plug into the AC adaptor main unit until it clicks into place If there is any problem with the AC adaptor main unit or AC plug consult with your Sony service fa...

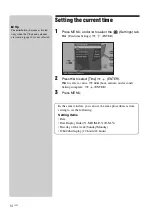
Page 14: ...inute and second Setting complete ENTER 3 Press MENU In the same window you can use the same procedures as time setting to set the following Setting items Date Date Display Order Y M D M D Y D M Y First day of the week Sunday Monday 12hr 24hr display 12 hours 24 hours P Tip The B b buttons become activated only when the Clock and calendar view mode page 16 is not selected ...

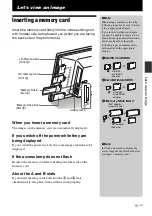
Page 15: ...u insert memory cards both into the A and B slots simultaneously the photo frame will not work properly Access lamp xD Picture Card Slot A SD memory Card Slot A Memory Stick Slot A Memory Stick Duo Slot B PNote When using a memory card of the following types make sure to insert it in an appropriate adaptor If you insert it without an adaptor you may be unable to remove it As shown in the right mos...

Page 16: ... image view Clock view Calendar view Time Machine Random view Clock and calendarr Clock1 to Clock11 Calendar1 to Calendar3 Lunar Calendar Arabic Calendar Farsi Calendar Entire image Fit to screen Entire image with Exif Fit to screen with Exif Index Index 1 to Index 3 VIEW MODE buttons PNote If you do not operate the photo frame for a certain period of time the style indicated by the cursor is auto...

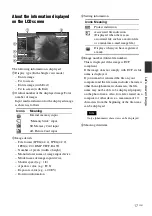
Page 17: ... 5Image number folder file number This is displayed if the image is DCF compliant If the image does not comply with DCF its file name is displayed If you named or renamed the file on your computer and the file name includes characters other than alphanumeric characters the file name may not be able to be displayed properly on the photo frame Also for a file created on a computer or other device a ...

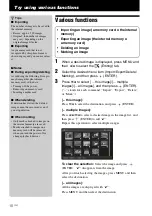
Page 18: ...appears from the image After you finish selecting the images press MENU and then select the destination all images All the images are displayed with Press MENU and then select the destination z Tips x Importing The number of images to be saved in the internal memory Resize approx 500 images Original the number of images may vary depending on the original image file size x Exporting Any memory card...

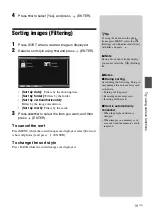
Page 19: ...hile the sorted images are displayed select Exit sort show all photos and press ENTER To change the sort style Press BACK while the sorted images are displayed zTip If using the buttons on the photo frame press MENU select the Editing tab with B b select Sort with v V and press P Note During Clock and calendar display you cannot select the Editing tab PNotes x During sorting Avoid doing the follow...

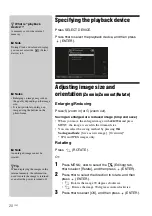
Page 20: ...ect the Editing tab v V to select Rotate and then press ENTER 2 Press v V to select the direction to rotate and then press ENTER Rotates the image 90 degrees clockwise Rotates the image 90 degrees counterclockwise 3 Press v V to select OK and then press ENTER z What is playback device A memory card or the internal memory P Note During Clock and calendar display you cannot select the Select device ...

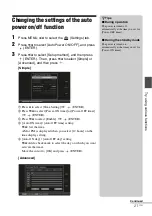
Page 21: ...wer ON timer or Power OFF timer ENTER 3Press v V to select Enable ENTER 4 Auto ON time Auto OFF time setting v V Set the time AM or PM is displayed when you select 12 hours on the time display setting 5 Auto ON day Auto OFF day setting v V Add a check mark to select the day on which you want activate the timer Move the cursor to OK and press ENTER Advanced z Tips x During operation The power is tu...

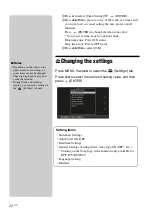
Page 22: ...Press MENU then B b to select the Settings tab Press v V to select the item and setting value and then press ENTER Setting items Slideshow Settings Auto Power ON OFF Date time Settings General Settings Listing Order Sony logo ON OFF etc Turning on the Sony logo is the function only available for DPF D75 D85 D95 Language Setting Initialize PNotes Depending on the status on the photo frame some sett...

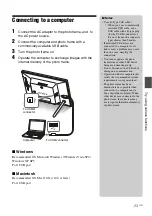
Page 23: ...ou use a commercially available USB cable use a USB cable with a B type plug for the USB B connector of this unit frame side connector type shorter than 3 meters If multiple USB devices are connected to a computer or if a hub is used a problem may occur In such a case simplify the connection You cannot operate the photo frame from another USB device being used simultaneously Do not disconnect the ...

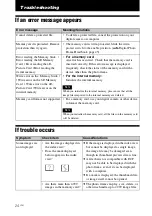
Page 24: ...ge files imported to the internal memory are deleted Write error on the Memory Stick Write error on the SD Memory Card Write error on the xD Picture Card Write error on the internal memory Memory card format not supported For a memory card use your digital camera or other device to format the memory card Note When you initialize the memory card all the files on the memory card will be deleted Symp...

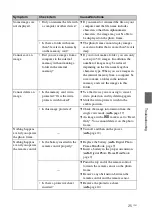
Page 25: ...emory and save the images in this folder Cannot delete an image Is the memory card write protected Or is the write protect switch locked c Use the device you are using to cancel write protection and try deleting again c Slide the write protect switch to the enable position Is this image protected c Check the image information from the single view mode page 17 c An image with a mark is set to Read ...

Page 26: ...t In such cases the photo frame will probably not work properly and may even develop a fault if you persist in using it If moisture condensation occurs unplug the AC adaptor of the photo frame and do not use the photo frame for at least one hour On transport When you transport the photo frame remove the memory card AC adaptor and connected cables from the photo frame and put the photo frame and it...

Page 27: ...Speed USB Slots Memory Stick PRO Standard Duo SD memory card MMC xD Picture Card slot Compatible image file formats JPEG DCF 2 0 compatible Exif 2 21 compatible JFIF 1 TIFF Exif 2 21 compatible BMP 1 4 8 16 24 32 bit Windows format RAW preview only 2 SRF SR2 ARW 2 0 or lower version Some image file formats are not compatible Maximum number of pixels that can be displayed 8 000 H 6 000 V dots 3 Fil...

Page 28: ...Hz 0 3 A Rated output voltage 5 V 2 A Dimensions Approx 45 72 50 mm 1 13 16 2 7 8 2 inches width height depth excluding the protruding parts Mass Approx 110 g 4 oz See the label of AC adaptor for more details Design and specifications are subject to change without notice 1 Baseline JPEG with 4 4 4 4 2 2 or 4 2 0 format 2 RAW files are displayed as thumbnail preview 3 17 bits or more are required b...

Page 29: ...S are registered trademarks of Apple Inc in the United States and or other countries or xD Picture Card is a trademark of FUJIFILM Corporation The SD logo is a trademark The SDHC logo is a trademark Contains iTypeTM and fonts from Monotype Imaging Inc iTypeTM is a trademark of Monotype Imaging Inc This software is based in part on the work of the Independent JPEG Group Libtiff Copyright 1988 1997 ...

Page 30: ...75 series IM 4174745121DPFD75 D85 D95 E75_GB_IM 4174745121 4174745112 4174745112DPFD75 D85 D95 E75_GB 01GB DPD75 UC CED_IM 080ADD fm Master Left DPF D75 D85 D95 E75 4 174 745 12 1 30 GB memo 010COV book Page 30 Friday February 12 2010 12 37 PM ...

Page 31: ...5 series IM 4174745121DPFD75 D85 D95 E75_GB_IM 4174745121 4174745112 4174745112DPFD75 D85 D95 E75_GB 01GB DPD75 UC CED_IM 080ADD fm Master Right DPF D75 D85 D95 E75 4 174 745 12 1 31 GB memo 010COV book Page 31 Friday February 12 2010 12 37 PM ...

Page 32: ...Sony Corporation Printed in China Printed using VOC Volatile Organic Compound free vegetable oil based ink ...

Reviews: