background image

2

To reduce the risk of fire or shock hazard, do not expose the unit
to rain or moisture.

This symbol is intended to alert the user to the
presence of uninsulated “dangerous voltage”
within the product’s enclosure that may be of
significant magnitude to constitute a risk of
electric shock to persons.

This symbol is intended to alert the user to the
presence of important operating and
maintenance (servicing) instructions in the
literature accompanying the appliance.

Note to the CATV Installer

This reminder is provided to call the CATV system installer’s
attention to Article 820-40 of the NEC that provides guidelines for
proper grounding and, in particular, specifies that the cable
ground shall be connected to the grounding system of the building
as close to the point of cable entry as practical.

Note to the Satellite Dish Antenna Installer

This reminder is provided to call the Satellite Dish Antenna
installer’s attention to Article 810 and in particular Article 810-15
of the NEC, which covers proper installation and grounding of
television receiving equipment, as well as to Article 820-40 of the
NEC, which specifies that the Satellite Dish Antenna cable ground
shall be connected to the grounding system of the building as close
to the point of cable entry as practical.

Telephone Line Interruption

Periodically, information on your DIRECT TICKET

®

and Pay Per

View selections is sent, free of charge, via your telephone line to an
800 number. If you use your telephone during the time the
information is being forwarded, you will hear static noise for
approximately 30 seconds. If you would like to use your telephone
while the information is being sent, you can interrupt the sending
of this information at any time by temporarily unplugging the
phone line to the receiver.

Local Programming

With this Digital Satellite Receiver and a DIRECTV Plus satellite
dish antenna, you may be able to receive local channels from
DIRECTV in certain areas. Additional equipment may be required
in some areas. Check with your retailer or visit www.directv.com for
information on availability of local channels from DIRECTV in
your area.

The Digital Satellite Receiver is intended for use only within the
United States.

The model and serial numbers are located on the bottom of the
Digital Satellite Receiver. The number for the Access Card is on the
back of the card and on the carton label. Record these numbers in
the space provided below. Refer to these numbers whenever you
need to call your sales or service representative regarding this
product.

For Programming

For subscription information, or to resolve problems related to
programming, call:
DIRECTV at 1-800-DIRECTV (347-3288)

For Hardware and Installation

To arrange for the installation of your Digital Satellite Receiver,
call the dealer from whom you purchased your system.
For general information, or to resolve problems related to the
operation of your Digital Satellite Receiver or Satellite Dish
Antenna, please contact your Sony dealer. If your dealer or
installer is unable to answer your questions, call the Sony Satellite
System Information Center at 1-800-838-7669.

Trademark and Copyrights

Sony, Media Window, Signal Seeker, Remote Commander and
SmartFile are trademarks of Sony. DIRECTV is a trademark of
DIRECTV, Inc., a unit of Hughes Electronics, and is used with
permission.
Manufactured under license from Dolby Laboratories. “Dolby”
and the double-D symbol are trademarks of Dolby Laboratories.
Confidential Unpublished Works. © 1992–1997 Dolby
Laboratories Inc. All rights reserved.

Macrovision Information

This product incorporates copyright protection technology that is
protected by U.S. patents and other intellectual property rights.
Use of this copyright protection technology is granted by
Macrovision for home and other limited pay per view uses only.
Reverse engineering or disassembly is prohibited.

Note on Recording Programming

Programming may be taped for home viewing only. All other
taping is expressly prohibited. Some programming may not be
taped. An additional taping fee may be applied. Call your
program providers for details.

StarSight Licensed

The manufacture and sale of the television schedule feature of this
product was licensed under one or more of the following patents
of StarSight Telecast, Inc.: U.S. Patent Nos. 4,706,121; 4,977,455;
5,151,789; and 5,353,121; with use rights reserved.

These Operating Instructions describe how to use the SAT-A55
and its remote control. Any differences in operation for the
SAT-B55 are noted in the text.
The

z

icon indicates hints and tips for making the task easier.

A

Note

provides information that may be necessary to complete

the task.

You are cautioned that any changes or modifications not
expressly approved in this manual could void your authority to
operate this equipment.

WARNING

Attention

Model Number:

Serial Number:

Access Card Number:

Owner’s Record

Customer Support

About These Operating Instructions 

Summary of Contents for SAT-A55 RM-Y802

Page 1: ...eceiver on pages 6 13 and Setting Up Your Digital Satellite Receiver SYSTEM on pages 22 34 Also make sure your Satellite Dish Antenna has been properly installed and call your service provider to begin service DIRECTV 1 800 DIRECTV 347 3288 SAT A55 MODEL ONLY RF ANTENNA This Digital Satellite Receiver is shipped with IR reception enabled and RF reception disabled To use the RF feature and the RF A...

Page 2: ...rd and on the carton label Record these numbers in the space provided below Refer to these numbers whenever you need to call your sales or service representative regarding this product For Programming For subscription information or to resolve problems related to programming call DIRECTV at 1 800 DIRECTV 347 3288 For Hardware and Installation To arrange for the installation of your Digital Satelli...

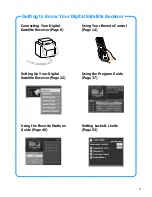
Page 3: ...tal Satellite Receiver Page 6 Using Your Remote Control Page 14 Setting Up Your Digital Satellite Receiver Page 22 Using the Program Guide Page 37 Using the Favorite Stations Guide Page 40 Setting Locks Limits Page 53 Getting to Know Your Digital Satellite Receiver ...

Page 4: ...n your remote control See pages 32 34 Excellent Performance The Auto Title Insert feature for VCR recording can display program information at the beginning of any Timer Rec event You ll have a convenient title recorded at the beginning of your tapes See page 26 Choose to listen to different audio tracks available with many programs See page 64 SAT A55 model Select Dolby Digital audio to truly mak...

Page 5: ...26 Performing a System Test 29 Setting the Aspect Ratio 30 Replacing Your Access Card 31 Selecting RF or IR Remote Control Reception SAT A55 only 32 Using the Guides Menu 35 Viewing Station and Program Information GUIDES 35 Using the Alpha List 36 Using the Program Guide 37 Using the Category Guide 38 Using the Station Index 39 Using the Favorite Stations Guide 40 Using Other Guides 43 Viewing Pay...

Page 6: ...ith the SAT B55 model Note Keep the original carton and packing materials to safely transport the Digital Satellite Receiver in the future Digital Satellite Receiver Access Card S S A T E L L IT E R E C E IV E R 2 8 3 4 5 6 9 1 7 0 AC Power Cord Telephone Cord RF Antenna Remote Control Size AA Batteries VCR Controller Audio Video Cable RF Coaxial Cable S Video Cable Connecting Your Digital Satelli...

Page 7: ...properly the batteries may be weak When replacing batteries replace both batteries with new ones Do not mix different types of batteries together When you remove the batteries any manufacturer codes you ve set up may be erased To set up the remote control again see Setting Up the Remote Control on page 65 v v v v v v v Step 1 Inserting the Batteries Page 7 Step 2 Connecting the Satellite Dish Ante...

Page 8: ...axial cable RG 6 Coaxial Cable from Satellite Dish Antenna Telephone Cord Connect the TEL LINE jack to a telephone line wall jack using the supplied telephone cord Notes The SAT A55 model is shown Connections for the SAT B55 model are the same Your Satellite Dish Antenna Installation Instructions provides detailed instructions on how to install RG 6 coaxial cable from your Satellite Dish Antenna C...

Page 9: ...F UHF IN jack see 2c below and on page 10 If your TV has A V input jacks Connect the VIDEO OUT jacks on your Digital Satellite Receiver to the A V input jacks on your TV using the supplied A V cable Be sure to match the colors on the jacks with the colored plugs on the A V cable If your TV has an S Video input Use the S Video cable instead of the yellow video connection If your TV has only one aud...

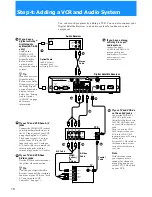
Page 10: ...EO OUT jacks of your Digital Satellite Receiver to the A V input jacks of your VCR using the supplied A V cable Then connect the A V output jacks of your VCR to the A V input jacks of your TV using an A V cable Be sure to match the colors on the jacks with the colored plugs on the A V cable If your TV and VCR have S Video jacks Use the S Video cable instead of the yellow video connection z Tip To ...

Page 11: ... the VCR Controller to the VCR CONTROL jack on the receiver If you are using a Sony SmartFile VCR to take advantage of the Program Data Download feature Use this connection instead of the VCR Controller connection For information about setting up the VCR Control feature see page 26 For details about the Program Data Download feature refer to your SmartFile VCR Operating Instructions Digital Satell...

Page 12: ... UHF IN VHF SAT UHF OUT TEL LINE AC IN 1 2 If you want to use the RF feature Connect the RF Antenna to the RF REMOTE jack of the Digital Satellite Receiver Then place the RF Antenna in a convenient location RF Antenna Digital Satellite Receiver Notes Do not place the RF Antenna directly on top of the Digital Satellite Receiver or any other metal object For best results place the RF Antenna in a vi...

Page 13: ... begin service ACCESS CARD LOW SPEED DATA VCR CONTROL DIGITAL OUT OPTICAL SATELLITE IN RF REMOTE R L MONO VIDEO OUT AUDIO VIDEO S VIDEO CH3 CH4 VHF UHF IN VHF SAT UHF OUT TEL LINE AC IN 1 2 AC Power Cord to power outlet Digital Satellite Receiver ACCESS CARD LOW SPEED DATA VCR CONTROL DIGITAL OUT OPTICAL SATELLITE IN RF REMOTE R L MONO VIDEO OUT AUDIO VIDEO S VIDEO CH3 CH4 VHF UHF IN VHF SAT UHF O...

Page 14: ... the available audio broadcasts 6 FAVORITE button Opens the Favorite Stations guide 7 INDEX button Opens the Station Index 8 VOL buttons Adjust the volume To operate your TV you must first set up the remote control see page 65 9 Joystick Moving the joystick up down left right and diagonally moves the highlight in on screen displays Press the joystick to select the highlighted item q CODE SET butto...

Page 15: ...on Opens the Main Menu w CH buttons Change channels When a program guide is open pressing the CH buttons pages through the guide wa EXIT button Closes all on screen displays including program guides and menus ws VTR3 2 DVD AMP switch Sets the remote to operate other devices in your A V system To operate these other devices you must first set up the remote control see page 65 wd TV VTR button Switc...

Page 16: ...l see page 65 4 TV SAT button Switches the output of your Digital Satellite Receiver between regular TV and satellite broadcasts To receive regular TV broadcasts you must have a local TV antenna or cable company connection see page 9 5 DISPLAY button Opens the program information display for the current program 6 INDEX button Opens the Station Index 7 JUMP button Changes channels to the previously...

Page 17: ...remote control is operating To operate your TV or VTR VCR you must first set up the remote control see page 65 qd VCR Control buttons Operate VCR features such as play record pause stop and fast wind To operate your VTR VCR you must first set up the remote control see page 65 qf 0 9 and ENTER buttons Change channels directly and enter numerical values in on screen displays qg GUIDE button Opens th...

Page 18: ...tem 1 Move the joystick in any direction to move the highlight to the item you want 0 1 2 3 4 5 6 8 7 9 SATELLITE RECEIVER 0 1 2 3 4 5 6 8 7 9 SATELLITE RECEIVER 1 Press the V v B b buttons to move the highlight to the item you want 2 Press the button to select the item Note SAT B55 model Whenever these Operating Instructions refer to using the joystick use the arrow V v B b buttons surrounding th...

Page 19: ...ton to turn on the Digital Satellite Receiver The POWER indicator lights up 2 Press the TV button to turn on the TV 3 Press the TV FUNCTION button then select the TV s input source to which you connected the Digital Satellite Receiver Depending on how you connected your Digital Satellite Receiver to your TV the input source could be channel 3 or channel 4 or you may need to use the TV VIDEO button...

Page 20: ...l 1 Press the SAT FUNCTION button 1 2 Press the CH buttons The Digital Satellite Receiver tunes to the next channel and the Station ID and channel number appear in the upper right corner of your TV screen You can also change channels by entering the three digit channel number using the 0 9 buttons and either pressing the ENTER button or waiting several seconds The Digital Satellite Receiver tunes ...

Page 21: ... Aspect Ratio Access Card Remote Control SAT A55 only GUIDES Page 35 Access the many guides that help you find the program you want Alpha List Program Guide Category Guide Station Index Favorite Stations Other Guides PREFERENCES Page 46 Adjust the way menus and information appear Display Options Custom Stations Data Services future application LOCKS LIMITS Page 53 Set limits on spending and rating...

Page 22: ...how the Main Menu Antenna Lets you find the position of the satellite and helps you get the strongest signal from your Satellite Dish Antenna see page 23 VCR Control Lets you set up and test your VCR using the VCR Controller see page 26 System Test Lets you test the connections to your Satellite Dish Antenna and telephone line see page 29 Aspect Ratio Lets you set the receiver s output to match th...

Page 23: ...ts in degraded conditions such as rain or snow Antenna Type Select Round Oval 2 Sat or Oval 3 Sat depending on your Satellite Dish Antenna type Transponder Lets you select the transponder from which the Satellite Dish Antenna receives its signal You do not need to change this setting unless instructed by your service provider Antenna Location Lets you find out the direction of the satellite from y...

Page 24: ...ker pop up appears if you have selected Round The Antenna Type display closes if you have selected Oval 2 Sat or Oval 3 Sat 3 Highlight and select On if you selected Round The Signal Seeker pop up closes to show the Antenna Display Setting Up Your Digital Satellite Receiver SYSTEM continued z Tip Selecting off in the Signal Seeker pop up may allow you to see the Signal Strength Meter if you use a ...

Page 25: ...ve a Round Satellite Dish Antenna you or your professional installer can use the azimuth and elevation readings to aim the antenna If you have an Oval 2 Sat or Oval 3 Sat Satellite Dish Antenna you or your professional installer can use the azimuth elevation and tilt readings to aim the antenna z Tip If it is more convenient for you to enter latitude and longitude select Latitude Longitude instead...

Page 26: ...AMP MENU EXIT CH CATEGORY CODE SET 1 Press the MENU button then highlight and select SYSTEM The SYSTEM pop up appears 2 Highlight and select VCR Control The VCR Control display appears MENU Manufacturer Lets you select the manufacturer code for your VCR see page 27 Auto Title Insert Lets you turn on the Auto Title Insert feature see page 28 Return Closes the VCR Control display to show the Main Me...

Page 27: ...other code for that manufacturer 4 Select Yes to perform a VCR test If you select Yes a pop up appears giving you instructions on how to perform a VCR test If the test is unsuccessful check your connections and the VCR Controller placement then repeat this procedure selecting a different VCR manufacturer code in step 3 if your VCR manufacturer has more than one code SATELLITE RECEIVER 2 8 3 4 5 6 ...

Page 28: ...w the VCR Control display When the scheduled event begins A title appears at the beginning of any Timer Rec event SATELLITE RECEIVER 2 8 3 4 5 6 9 SLEEP TV SAT TV VIDEO FUNCTION SAT CABLE AUDIO VOLUME ENTER DISPLAY MUTING CABLE ALT AUDIO JUMP GUIDE INDEX FAVORITE VOL RM Y802 VTR3 2 DVD AMP MENU EXIT CH 1 7 TV TV CATEGORY CODE SET 0 POWER SAT Note When you schedule two or more consecutive programs ...

Page 29: ... CATEGORY CODE SET 0 POWER SAT 1 Press the MENU button then highlight and select SYSTEM The SYSTEM pop up appears 2 Highlight and select System Test The System Test display appears 3 Highlight and select Test The system test begins If the system test fails check your connections before calling your service provider or Sony 4 Select Return The System Test display closes to show the Main Menu MENU R...

Page 30: ... use the Wide aspect ratio feature you must receive a 16 9 aspect ratio signal Check with your service provider to see if 16 9 programming is available RM Y802 Remote Control 1 Press the MENU button then highlight and select SYSTEM The SYSTEM pop up appears 2 Highlight and select Aspect Ratio The Aspect Ratio display appears 3 Highlight and select the aspect ratio of your TV The highlight moves to...

Page 31: ...UIDE INDEX FAVORITE VOL RM Y802 VTR3 2 DVD AMP MENU EXIT CH 1 7 TV TV CATEGORY CODE SET 0 POWER SAT 1 Press the MENU button then highlight and select SYSTEM The SYSTEM pop up appears 2 Highlight and select Access Card from the System pop up The Access Card display appears 3 Highlight and select OK The display shows instructions on how to proceed 4 Follow the instructions in each display to complet...

Page 32: ...ears 2 Highlight and select Remote Control The Remote Control display appears MENU Remote Signal Lets you select IR or RF as the type of signal the receiver accepts RF Security Control Lets you change the security code RF signals are used to control many devices You may need to change the security code so that this remote control operates the Digital Satellite Receiver only Return Closes the Remot...

Page 33: ...from the SYSTEM pop up see page 32 The Remote Control display appears 2 Highlight and select RF Security Code The confirmation pop up appears 4 Highlight and select RF The Remote Signal pop up closes to show the Remote Control display 5 Highlight and select Return The display closes to show the Main Menu and the Digital Satellite Receiver is set to receive RF signals from the remote control SATELL...

Page 34: ... button The remote control and Digital Satellite Receiver are now set to a new security code 8 Select OK to save your changes The Remote Control display appears Note If the remote control no longer operates your Digital Satellite Receiver after completing this procedure use the controls on the front panel to open the Remote Control display see page 32 Then repeat the steps in Setting the Security ...

Page 35: ...gram information for up to three days in advance see page 37 Category Guide Shows a list of categories movies sports etc and only those stations broadcasting programs that match the category you select see page 38 z Tips Be sure to press the SAT FUNCTION button before operating the Digital Satellite Receiver with the remote control You can see information about a program you are watching by pressi...

Page 36: ...t and select a category Programs appear in alphabetical order 4 Highlight and select a program If you select a current program the Alpha List guide closes For information about selecting a future program see Using One Button Timer Rec on page 60 SATELLITE RECEIVER 2 8 3 4 5 6 9 SLEEP TV SAT TV VIDEO FUNCTION SAT CABLE AUDIO VOLUME ENTER DISPLAY MUTING CABLE ALT AUDIO JUMP GUIDE INDEX FAVORITE VOL ...

Page 37: ...pped stations do not appear see page 50 GUIDE Media Window Information Area Move the joystick up and down to highlight different stations Press the CH V v buttons to move the highlight to the next page of stations List Area Move the joystick right to highlight future programs 3 Select the program you want If you select a current program the Program Guide closes For information about selecting a fu...

Page 38: ...ct a different category Skipped stations do not appear see page 50 3 Highlight and select the program you want If you select a current program the Program Guide closes For information about selecting a future program see One Button Timer Rec on page 60 SATELLITE RECEIVER 2 8 3 4 5 6 9 SLEEP TV SAT TV VIDEO FUNCTION SAT CABLE AUDIO VOLUME ENTER DISPLAY MUTING CABLE ALT AUDIO JUMP GUIDE INDEX FAVORI...

Page 39: ...light different stations Skipped stations do not appear see page 50 3 Select the station you want The Station Index closes and the program broadcast by the station you selected appears on your TV screen SATELLITE RECEIVER 2 8 3 4 5 6 9 SLEEP TV SAT TV VIDEO FUNCTION CABLE AUDIO VOLUME ENTER DISPLAY MUTING CABLE ALT AUDIO JUMP GUIDE INDEX FAVORITE VOL RM Y802 VTR3 2 DVD AMP MENU EXIT CH 1 7 TV TV C...

Page 40: ...ears in the Media Window 2 Highlight and select the Favorite Title you want The station list in the right half of the display changes as you highlight different Favorite Titles 3 Highlight and select the station you want The Favorite Stations guide closes and the program broadcast by the station you selected appears SATELLITE RECEIVER 2 8 3 4 5 6 9 SLEEP TV SAT TV VIDEO FUNCTION SAT CABLE AUDIO VO...

Page 41: ...uded in the Favorite Title and the number in the Count box increases by one 5 Repeat step 4 to add up to eight stations to this Favorite Title When you have added all the stations you want in this Favorite Title highlight and select OK SATELLITE RECEIVER 2 8 3 4 5 6 9 SLEEP TV SAT TV VIDEO FUNCTION SAT CABLE AUDIO VOLUME ENTER DISPLAY MUTING CABLE ALT AUDIO JUMP GUIDE INDEX FAVORITE VOL RM Y802 VT...

Page 42: ...highlight and select OK The Edit Title pop up closes to show the Favorite Stations guide SATELLITE RECEIVER 2 8 3 4 5 6 9 SLEEP TV SAT TV VIDEO FUNCTION SAT CABLE AUDIO VOLUME ENTER DISPLAY MUTING CABLE ALT AUDIO JUMP GUIDE INDEX FAVORITE VOL RM Y802 VTR3 2 DVD AMP MENU EXIT CH 1 7 TV TV CATEGORY CODE SET 0 POWER SAT z Tip Press the EXIT button to close the Favorite Stations guide and return to th...

Page 43: ... Other Guides display appears 3 Select the Guide Type you want The available time ranges appear 4 Select the time range you want The available categories appear SATELLITE RECEIVER 2 8 3 4 5 6 9 SLEEP TV SAT TV VIDEO FUNCTION SAT CABLE AUDIO VOLUME ENTER DISPLAY MUTING CABLE ALT AUDIO JUMP GUIDE INDEX FAVORITE VOL RM Y802 VTR3 2 DVD AMP MENU EXIT CH 1 7 TV TV CATEGORY CODE SET 0 POWER SAT MENU z Ti...

Page 44: ... you want The programs that match your selections appear in the lower half of the display 7 Highlight and select the program you want If you select a current program the Other Guides display closes For information about selecting a future program see One Button Timer Rec on page 60 Viewing Station and Program Information GUIDES continued ...

Page 45: ...play shows detailed information about the program including the cost Return Closes the Purchase Program display to show the previous screen Purchase Opens the Purchase pop up Preview Closes the Purchase Program display to show a preview of the program if available Times Opens the Other Show Times display so you can select another time to view the program Help Opens information about the Purchase P...

Page 46: ...t PREFERENCES The PREFERENCES Menu appears 2 Highlight and select the item you want to adjust MENU Return Closes the PREFERENCES Menu to show the Main Menu Display Options Lets you change the color scheme of the on screen displays choose how the stations are ordered in the guides and select what is displayed in the Media Window when surfing through the Station Index see page 47 Custom Stations Let...

Page 47: ... Display Options display appears SATELLITE RECEIVER ALT AUDIO JUMP GUIDE INDEX FAVORITE VOL RM Y802 VTR3 2 DVD AMP MENU EXIT CH CATEGORY CODE SET MENU Return Closes the Display Options display to show the Main Menu Help Opens information about the Display Options display Colors Lets you change the color of the on screen displays see page 48 Station order Lets you select the order in which stations...

Page 48: ...e you like The display changes colors as you highlight each color scheme SATELLITE RECEIVER 2 8 3 4 5 6 9 SLEEP TV SAT TV VIDEO FUNCTION SAT CABLE AUDIO VOLUME ENTER DISPLAY MUTING CABLE ALT AUDIO JUMP GUIDE INDEX FAVORITE VOL RM Y802 VTR3 2 DVD AMP MENU EXIT CH 1 7 TV TV CATEGORY CODE SET 0 POWER SAT Adjusting the Displays PREFERENCES continued RM Y802 Remote Control ...

Page 49: ... Setting When the Surf setting is On you can view the current program in the Media Window of the Station Index while viewing the program information of other programs as you highlight them in the Station Index 1 Highlight and select Surf from the Display Options display see page 47 The Surf pop up appears 2 Highlight and select On or Off The Surf pop up closes to show the Display Options display S...

Page 50: ...elect PREFERENCES The PREFERENCES Menu appears 2 Highlight and select Custom Stations The Custom Stations display appears MENU Return Closes the Custom Stations display to show the Main Menu Cancel Closes the Custom Stations display and cancels your changes Auto Scans all stations and automatically skips any stations to which you do not subscribe Clear All Removes all skip settings Help Opens info...

Page 51: ...ions 3 Highlight and select a station icon to add or remove the X mark The x mark indicates that the station will be skipped when you open the Program Guide Category Guide or Station Index or change channels using the CH buttons 4 Highlight and select Return The Custom Stations display closes to show the Main Menu ...

Page 52: ...il the AC Power Cord is disconnected If your receiver s memory is full you must delete old messages before you can receive new ones RM Y802 Remote Control 1 Press the MENU button then highlight and select MESSAGES The Messages display appears 2 Highlight and select the message you want to read The message pop up appears MENU Return Closes the Messages display to show the Main Menu Help Opens infor...

Page 53: ...ITS The Locks Limits display appears 2 Highlight and select Edit The Locks Limits edit display appears The following pages describe how to change the settings for each of these items MENU Spending Limit Sets a maximum limit on charges per event see page 54 Rating Limit Sets a maximum limit on rated content see page 55 Pay Per View Blocks access to pay per view programs see page 55 Stations Blocked...

Page 54: ...an enter a value of less than 656 3 Highlight and select OK The Spending Limit pop up closes to show the Locks Limits edit display Select Cancel to close the Spending Limit pop up without saving changes SATELLITE RECEIVER 2 8 3 4 5 6 9 SLEEP TV SAT TV VIDEO FUNCTION SAT CABLE AUDIO VOLUME ENTER DISPLAY MUTING CABLE ALT AUDIO JUMP GUIDE INDEX FAVORITE VOL RM Y802 VTR3 2 DVD AMP MENU EXIT CH 1 7 TV ...

Page 55: ...display Changing the Pay Per View Access Setting The pay per view access setting lets you block access to pay per view stations 1 Highlight and select Pay Per View from the Locks Limits edit display see page 53 The Pay Per View Access pop up appears 2 Select Yes to block access to pay per view programs Select No to allow access to pay per view programs SATELLITE RECEIVER 2 8 3 4 5 6 9 SLEEP TV SAT...

Page 56: ...ion is blocked SATELLITE RECEIVER 2 8 3 4 5 6 9 SLEEP TV SAT TV VIDEO FUNCTION SAT CABLE AUDIO VOLUME ENTER DISPLAY MUTING CABLE ALT AUDIO JUMP GUIDE INDEX FAVORITE VOL RM Y802 VTR3 2 DVD AMP MENU EXIT CH 1 7 TV TV CATEGORY CODE SET 0 POWER SAT Return Closes the Station Blocked display Cancel Closes the Stations Blocked display without saving your changes Clear All Unblocks all stations Help Opens...

Page 57: ...ke any changes to the locks or limits you have set If you forget your passcode contact your program provider for assistance RM Y802 Remote Control 1 Press the MENU button then highlight and select LOCKS LIMITS The Locks Limits display appears 2 Highlight and select Edit then select Lock The Lock Receiver pop up appears 3 Enter a four digit passcode using the 0 9 buttons Each number you enter appea...

Page 58: ...ith your passcode if you select a program from a guide and the station is locked or a limit has been reached RM Y802 Remote Control 1 Press the MENU button then highlight and select LOCKS LIMITS The Locks Limits display appears 2 Highlight and select Edit The Unlock Receiver pop up appears 3 Enter your four digit passcode using the 0 9 button Each number you enter appears as an asterisk which keep...

Page 59: ...es display appears 2 Highlight and select the purchase number you want to view The information pop up for that purchase appears MENU Return Closes the Purchases display to show the Main Menu Help Opens information about the Purchases display Cancel PPV Cancels the Pay Per View program OK Closes the information pop up to show the Purchases display 3 Highlight and select OK The information pop up cl...

Page 60: ... current week for tuning and or recording Weekly Adds the program to the Timer Rec display for tuning and or recording on the same day of the following four weeks Daily Adds the program to the Timer Rec display for tuning and or recording every day for the next 30 days z Tips You can set up the Digital Satellite Receiver to send program information to your VCR so it records the information at the ...

Page 61: ...VTR3 2 DVD AMP MENU EXIT CH CATEGORY CODE SET 1 Press the MENU button then highlight and select TIMER REC The Timer Rec display appears 2 Highlight and select the next available timer event number The Date Day field is highlighted and the current date appears MENU Program title Channel number and station name Date and day Start time End time Return Closes the Timer Rec display to show the Main Men...

Page 62: ...VERY WED EVERY THU EVERY FRI EVERY SAT MON FRI DAILY 2 Press or b to move to the next item 3 Press V v to change the starting hour Then press or b to move to the next item 4 Press V v to change the starting minute Then press or b to move to the next item 5 Press V v to change the ending hour Then press or b to move to the next item 6 Press V v to change the ending minute Then press or b to move to...

Page 63: ...ght and select TIMER REC The Timer Rec display appears 2 Highlight and select the number of the event you want to edit The edit pop up appears MENU Return Closes the edit pop up to show the Timer Rec display Delete Removes the event from the list Higher numbered events move up to fill the gap Edit Closes the edit pop up to highlight the date of that event See page 62 for instructions on how to cha...

Page 64: ...rol 1 Press the MENU button then highlight and select AUDIO The Audio display appears 2 Highlight and select the setting you want to change MENU Current Audio Opens a pop up that displays the languages available for the current program Default Audio Opens a pop up that displays the eight available default languages When a program broadcasts an audio track in the default language that language is a...

Page 65: ...et up the remote with the correct manufacturer code RM Y802 Remote Control 1 Find the code s for the manufacturer of the device you want to operate with this remote control You can find these codes on pages 66 and 67 2 Press the CODE SET button The function indicators begin flashing 3 Press the 0 9 buttons to input the manufacturer code then press the ENTER button The function indicator goes off a...

Page 66: ... Sylvania 111 112 108 Symphonic 123 139 Tenika 109 Toshiba 119 114 Videch 131 103 112 Wards 113 103 115 112 Zenith 108 110 Manufacturer Code Sony 301 302 303 Aiwa 338 Audio Dynamic 314 347 Bell Howell M Wards 330 343 Broksonic 317 319 Canon 309 308 Citizen 332 Craig 315 302 332 Curtis Mathis 304 338 309 Daewoo 341 312 309 DBX 314 336 337 Dimensia 304 Emerson 319 320 316 317 318 341 Fisher 330 334 ...

Page 67: ...4 336 337 Teac 314 336 338 337 Technics 309 308 Teknika 338 342 Toshiba 312 311 Wards 327 328 335 331 332 Yamaha 330 314 336 337 Zenith 331 Manufacturer Code Sony 601 Panasonic 604 Pioneer 605 RCA 602 Toshiba 603 Manufacturer Code Sony 501 Denon Sharp 516 517 518 Harmon 519 JVC 506 507 508 Kenwood 504 505 McIntosh 520 Onkyo 512 513 Pioneer 502 503 Technics 509 510 511 Yamaha 514 515 Manufacturer C...

Page 68: ...tor Indicates that the Timer is set 4 MESSAGE Indicator Indicates that you have a new message 5 Arrow and Buttons The arrow buttons move the highlight in the on screen displays The button selects the highlighted item 6 MENU Button Opens the Main Menu 7 GUIDE Button Opens the Program Guide POWER POWER TIMER MESSAGE MENU GUIDE 1 2 3 4 5 6 7 Location and Function of Controls ...

Page 69: ... AC Power Cord 7 TEL LINE jack Connects the Digital Satellite Receiver to a telephone outlet using a telephone line cable 8 VHF SAT UHF OUT jack Outputs audio and video signals to the VHF UHF input on your TV or VCR using coaxial cable 9 A V OUTPUT jacks Output audio and video signals to your TV and other audio video equipment using A V cables q LOW SPEED DATA Can be used for future products such ...

Page 70: ...ng the AC Power Cord 6 TEL LINE jack Connects the Digital Satellite Receiver to a telephone outlet using a telephone line cable 7 VHF SAT UHF OUT jack Outputs audio and video signals to the VHF UHF input on your TV or VCR using coaxial cable 8 A V OUTPUT jacks Output audio and video signals to your TV and other audio video equipment using A V cables 9 LOW SPEED DATA Can be used for future products...

Page 71: ...max Dimensions w h d 11 2 9 inches 280 66 5 228 5 mm Weight SAT A55 Set 6 0 lbs 2 7 kg Unit 3 6 lbs 1 6 kg SAT B55 Set 5 4 lbs 2 5 kg Unit 3 4 lbs 1 5 kg 5 8 Design and specifications are subject to change without notice Supplied Accessories Remote Control RM Y802 SAT A55 RM Y139 SAT B55 Size AA Batteries 2 Access Card 1 Audio Video Cable 1 Coaxial RF Cable 1 Telephone Line Cord 1 AC Power Cord 1 ...

Page 72: ...itch on the back of the Digital Satellite Receiver This could improve picture quality only if you are using the UHF VHF IN jack of the Digital Satellite Receiver to connect a local TV antenna or cable company service Poor picture quality or no picture when it rains or snows Heavy rain or snow may degrade the strength of the signal coming from the satellite to your Satellite Dish Antenna To limit a...

Page 73: ...he Program Guide does not appear Highlight and select the program Although the program you highlight appears in the Media Window you must press the button to complete your selection see page 37 You cannot see any Favorite Stations Set up your personal Favorite Titles before you try to use the Favorite Stations guide see page 41 Locks Limits feature not working properly Make sure that the Spending ...

Page 74: ...ge 7 Remove and then reinsert the batteries without pressing any buttons on the remote control To operate your TV or other equipment make sure that the remote control is set up to operate that equipment see page 65 If the batteries are removed or become weak you may need to set up the remote control to operate other equipment again Press the FUNCTION button on the remote control of the equipment y...

Page 75: ......

Page 76: ...t 15 of the FCC Rules These limits are designed to provide reasonable protection against harmful interference in a residential installation This equipment generates uses and can radiate radio frequency energy and if not installed and used in accordance with the instructions may cause harmful interference to radio communications However there is no guarantee that interference will not occur in a pa...

Page 77: ...rchase in the form of a bill of sale or receipted invoice which is evidence that the unit is within the Warranty period must be presented to obtain warranty service This warranty is invalid if the factory applied serial number has been altered or removed from the Product Some states do not allow the exclusion or limitation of incidental or consequential damages or allow limitations on how long an ...

Page 78: ...1 local TV off air antenna 9 RF Antenna 12 TV and VCR 10 TV with A V connectors 9 TV with RF connector 9 Controls location and Function 68 Custom stations 50 Customer support 2 Customizing the Favorite Stations guide 41 D Data services 51 Default language setting 64 DIGITAL OUT OPTICAL jack 10 69 DISPLAY button 14 16 Display options 47 Display changing the colors 48 Dolby Digital 10 64 E Editing F...

Page 79: ... control reception 32 RF REMOTE jack 69 RF security code setting 33 S Satellite Dish Antenna connecting 8 setting 23 SATELLITE IN jack 8 69 70 Scheduling programs 60 Security code See RF security code and passcode Selecting items 18 Setting up the receiver 22 the remote control 65 Signal Seeker 23 24 Signal Strength meter 23 Skipping stations 50 SLEEP button 14 Specifications 71 Spending limit 54 ...

Page 80: ...Printed in USA ...

Reviews: