background image

Summary of Contents for SAT-HD300 - High Definition Satellite Receiver

Page 1: ...7 333 21 t I fl lfl IilI ti nlllg 1J I If t lIlJDliReeeiie Operatil1g 1il tryctiollS 2003 Sony Electronics Reproduction in whole or in part without written permission is prohibited All rights reserved SAT HD300 ...

Page 2: ...e point of the cable entry as practical REGULATORY INFORMATION FCC PART 15 This equipment has been tested and found to comply with the limits for a Class Bdigital device pursuant to Part 15 of the FCC Rules These limits are designed to provide reasonable protection against harmful interference when the equipment is operated in a residential installation This equipment generates uses and can radiat...

Page 3: ...warranty information please contact Sony Electronics Inc If the product is causing harm to the telephone network the telephone company may request that you disconnect the product until the problem is resolved An FCC compliant telephone cord and modular plug is provided with this equipment This equipment is designed to be connected to the telephone network or premises wiring using a compatible modu...

Page 4: ...s has been damaged in any way such as power supply cord or plug is damaged liquid has been spilled or objects have fallen into the apparatus the apparatus has been exposed to rain or moisture does not operate normally or has been dropped 3 Heed all warnings All warnings on the product and in the operating instructions should be adhered to 4 Follow all instructions All operating and use instruction...

Page 5: ...epayment may be required Programming subject to change You must be physically located in the U S to subscribe to DIRECTV service DIRECTV services not available outside the U S DIRECTV pro gramming is sold separately and independently of DIRECTV System hardware A valid pro gramming subscription is required to operate DIRECTV System hardware Activate your DIRECTV programming today at 1 800 DIRECTV 1...

Page 6: ...ck Panel of the DIRECTV HD Receiver 20 21 3 3 General Recommendations 22 3 4 Connecting to Antennas 23 26 3 5 TV Connection 27 30 3 6 VCR Connection 31 32 3 7 Audio Connection 33 34 3 8 Remote Control RF Antenna Connection 35 4 Front Panel and 4 1 Using the Front Panel of the DIRECTV HD Receiver 36 4 2 Using the Remote Control 37 39 4 3 Programming the Remote Control 40 4 4 Remote Control Codes fo...

Page 7: ...Checking the Messages 65 8 5 Setting a Timer Record Event 66 8 6 Modifying a Timer Record Event 67 8 7 Initializing the System 68 75 8 8 Managing Channels 76 79 8 9 Setting the Clock 80 81 8 10 Setting Default Signal Out 82 8 11 Hook up Help 83 8 12 Setting the Audio 84 88 8 13 Choosing the Aspect Ratio 89 91 8 14 Setting Digital Caption 92 8 15 Setting Digital Caption Style 93 8 16 Setting Closed...

Page 8: ...iver delivers a variety of programs from DIRECTV and has a built in HD Receiver that serves as adigital receiver that makes it possible to view digital programs even on your analog TV However an analog TV will not display the HD quality The Advanced Program Guide delivered via satellite service also enables you to access and view program listings for over the air broadcasts and cable as well as DI...

Page 9: ...ing with an over the air antenna and cable service Simultaneous 480i Display Output Supporting simultaneous480i Display Output for VCR recording or viewing on an analog TV Superior Performance Crisp Picture High definition or resolution with a 16 9 aspect ratio when connected to a high definition moni tor Superior Sound Sensational sound with Dolby Digital 5 1 channels when connected to a Dolby Di...

Page 10: ...it is helpful understand the ways the program signals are sent There are two types of TV signal formats analog often called NTSC format National Television System Committee and digital ATSC format Advanced Television System Committee Digital formats are classified into three categories High Definition HD Enhanced Definition ED and Standard Definition SO according to the resolution or digital pictu...

Page 11: ...els sent at 60 interlaced frames per second 30 complete frames per second The p and i designations stand for progressive and interlaced In a progressive for mat the full picture updates every sixtieth of a second In an interlaced format half of the pic ture updates every sixtieth of a second The 480p and 480i formats are called the SO formats and 480i is roughly equivalent to a nor mal analog TV p...

Page 12: ...mat 1080i all formats 1080i 720p all formats 720p 480p all formats 480p 480i all formats 480i native 1080i 1080i 720p 720p 480p 480p 480i 480i Component DVI 480p RGB variable 1 1080i 1080i 7200 720p 4800 480i 480p variable 2 1080i 720p 1080i 480p 480i 480p variable 3 10BOi 7200 720p 1080i 480p AUTO DVI all formats changes according to monitor type OUTPUT CONNECTION AVAILABLE FORMATS YPbPr 1080i 72...

Page 13: ...rmat Standard Definition Output Format tStandard Definition antenna High Definition No Adjustment Options Letter box Choose when you want to view a wide format 16 9 picture on a nor mal screen 4 3 without squeezing I Cropped Choose when you want to view a picture filling the entire screen while keeping the wide format Left and right portions of the pic ture will not be shown Squeezed Choose when y...

Page 14: ...u want to fill the entire screen with the picture The image will be altered both horizontally stretched and vertically cropped The top and bottom portions of the picture will not be shown Zoom1 shows you the picture with a trade off between distortion and screen coverage Adjustment Required Panorama Choose when you want to evenly stretch the edges of a normal picture to fill a wide screen Standard...

Page 15: ...the Dolby Digital audio encoding system the same digital sound used in many movie theaters on DVDs and in many home theater systems When you tune to a channel the DIRECTV HD Receiver can send signals either to a Dolby Oigital decoder receiver or to apeM normal digital decoder Refer to Section 3 7 Connection for Audio for making the required external connections to your system Dolby Digital audio f...

Page 16: ...analog audio outputs may be used to drive an external Hi Fi audio system instead of the TV speakers These stereo outputs are activated by setting the Analog Mode in the Audio menu to Stereo If you set the Analog Mode to SAP Second Audio Program you can hear the program s dia log in another language such as French or Spanish if provided on the analog broadcast 15 ...

Page 17: ... a menu item by using j non your remote control and select it by pressing Theon screen menu also offers visual cues for easy guidance A hY UlI ed Program GlJide The DIREGTVAdvanced Program Guide is an on screen listing of current andfuture programs that are available from DIRECTV The DIHECTV HD Receiveroffers you acomprehensiVe pro gram list that contains information aboutprogramswith hundreds of ...

Page 18: ...s highlighted menu item to help you understand the fea tures Press and hold the HELP button to display the Help Once you release the button the Help menu disappears from the screen Second if you press the HElP button while you are viewing a program with no menus on screen the OIRECTV HD Receiver provides a comprehensive on screen user s guide It describes how to use your receiver This is in fact a...

Page 19: ...ese items listed below with the DIRECTV HD Receiver HDTV Remote Control FAVORITE FREEZE EXIT PREVCH SI E o HELP CC 0 CODE SET 00 MODE o Cables SVIDEOJack Y PB PR ComponenlJacks Batteries AA q AA q Access Card ACCESS CARD Remote Control RF Antenna 18 ...

Page 20: ...ons between components The Audio Video jacks may be color coded yellow for video red for right audio and white for left audio If your component has only one input for audio mono connect it to the left white L mono audio jack on the DIRECTV HD Receiver RF Radio Frequency Jacks and Coaxial Cables F type RF jacks are necessary for reception of over the air broadcasts cable and DIRECTV signals These j...

Page 21: ...rovides picture quality that is superior to RF connections For a better quality picture connection use the S Video jack if it is available Component Out Is used to connect to a YjPbjPr compatible monitor Three video and two audio jacks for a YjPbjPr monitor need to be connected and the TYPE switch must be set to left position RGB DVI HDTV Out Is used to connect to either an RGB compatible or DVI H...

Page 22: ...igital audio enables the viewer to experience theater quality sound using up to 5 1 audio channels when available audio in the broadcast Data Port Can be used to communicate with certain compatible devices such as Personal Video Recorders VCR Control Is used to connect the VCR Controller cable to your receiver RF Remote Is used to connect the RF Remote control antenna to your receiver Phone Jack I...

Page 23: ...se it to connect your TV to the DIRECTV HD Receiver An S VIDEO connection provides a better picture than RCA type video or RF connections Does your TV have RCA type A V connectors but no S video jack Use your TV s A V connectors to connect your components An A V connection provides better picture and audio when compared to an RF connection Although there are numerous connections possible for optim...

Page 24: ...PE OUTTOTV 0 0 0 0 0 0 0 0 OPTICAL R1 R2 Pr 1060il720p 480p 1060i 720p 460p 460i O Olco J o SATELLITE IN 23 Receiving Signals 1 Connect the JlAntenna to the JlANT IN jack on the DIRECTV HD Receiver using a coaxial RF cable 2 Connect the cable TV signal to the JlCABLE IN jack on the DIRECTV HD Receiver using a coaxial RF cable ...

Page 25: ...e dish antenna to the SATELLITE IN jack on the DIRECTV HD Receiver using acoaxial RF cable For proper dish installation refer to the Installer s Guide provided with your satel lite dish antenna 4 Connect the Phone Wall Jack to PHONE JACK on the DIRECTV HD Receiver using a phone cable While you are subscribing to a DIRECTV pro gramming package you can still view over the air and cable TV programs i...

Page 26: ... IN jack on the DIRECTV HD Receiver using a coaxial RF cable For proper dish installation refer to the Installer s Guide provided with your satellite dish antenna 4 Connect the Phone Wall Jack to PHONE JACK on the DIRECTV HD Receiver using aphone cable 25 While you are subscribing to a DIRECTV programming package you can still view over the air and cable TV programs if you make connections to the ...

Page 27: ...Receiver using a coaxial RF cable For proper dish installation refer to the Installer s Guide provided with your satellite dish antenna 4 Connect the Phone Wall Jack to PHONE JACK on the DIRECTV HD Receiver using aphone cable While you are subscribing to a DIRECTV program ming package you can still view over the air and cable TV programs if you make connections to the over the air and or cable jac...

Page 28: ...72Op1480p 1080i 720p 480p 480i Phone wall jack SATELLITE IN 27 TV Viewing 1 Connect the OUT TO TV jack on the DIRECTV HD Receiver to the ANT IN jack on your TV using acoaxial RF cable 2 Connect the AUDIO OUT and IIVIDEO OUT jacks on the DIRECTV HD Receiver to the A V IN jack on your TV using RCA type cables ...

Page 29: ...TV jack on the DIRECTV HD Receiver to the ANT IN jack on your TV using a coaxial RF cable 2 Connect the COMPONENT OUT jacks on the DIRECTV HD Receiver to the COMPONENT IN jacks of your TV using RCA type cables The TYPE switch must be set toward the Y Pb P jacks 3 Connect the L R AUDIO OUT jacks on the DIRECTV HD Receiver to the L R AUDIO IN jacks on your TV using RCA type cables 28 ...

Page 30: ...e ANT IN jack on your TV using acoaxial RF cable 2 Connect the RGB OUT jack on the DIRECTV HD Receiver to the RGB IN jack of your TV using VGA type connec tor The TYPE switch must be set toward the RGB DVI HDTV jacks 3 Connect the L R AUDIO OUT jacks on the DIRECTV HD Receiver to the L R AUDIO IN jacks on your TV using RCA type cables Note The RGB OUT jack supports 480p 720p and 1080i formats ...

Page 31: ...he TYPE switch must be set toward the RGB DVI HDTV jacks 3 Connect the L R AUDIO OUT jacks on the DIRECTV HD Receiver to the L R AUDIO IN jacks on your TV using RCA type cables Note For best access to high definition programming from DIRECTV connect the DVI HDTV output to a DVI HDTV input on your high definition TV or monitor A DVI HDTV input is one that is compliant with EIA 861 and HOCP specific...

Page 32: ...ck on the DIRECTV HD Receiver to the ANT IN jack on your VCR using a coaxial RF cable 2 Connect the AUDIO OUT and VIDEO OUT jacks on the DIRECTV HD Receiver to the AN IN jack on your VCR using a RCA type cable If your VCR is equipped with an S Video jack use the S Video jack Note The OUT TO TV and VIDEO OUT 480ij 1 2 jacks are always available no matter what display format is selected ...

Page 33: ...R Control Setup II on page 111 for information about setting up the Digital Satellite Receiver to work with your VCR 1 Connect the VCR Controller to the VCR CONTROL jack on the DIRECTV HD Receiver 2 Place the VCR Controller under and in front of the VCR The VCR controller must extend just in front of the infrared sensor of the VCR Note If the infrared sensor is not marked on your VCR shine a flash...

Page 34: ...o o Dolby Digital Connection 1 Connect the DIGITAL AUDIO our jack on the DIRECTV HD Receiver to the SPDIF IN jack on your Dolby Digital or Pro Logic decoder using a digital optical cable A digital optical cable is not supplied To enjoy Dolby Digital audio when it is available in a broadcast set the HD Receiver s Digital Output to the Dolby Digital setting see section 8 12 33 ...

Page 35: ...he DIRECTV HD Receiver to the Left and Right INPUT II jacks on your Hi Fi audio system When viewing a digital broadcast with Dolby Digital audio you will be able to hear the broadcast s audio from the analog audio left and right jacks However a digital audio con nection to a Dolby Digital audio receiver is required to enjoy Dolby Digital audio with up to 5 1 channels 34 ...

Page 36: ... 1 Plug the remote control RF cable into the RF REMOTE connector on the DIRECTV Receiver rear panel 2 Extend the cable and place the antenna in the desired location To achieve the best operating range from the remote control position the antenna as high and as far away from metal objects as possible 3 Before using the Remote Control RF Antenna the Remote Control Setup menu must be set to RF Type s...

Page 37: ...play Formats INFO Shows station and program information in the banner shown at the top of the screen To remove the banner press the button again or wait for 10 seconds You can also change the Audio language when available by pressing MENU Shows the main menu on the screen You can return to normal viewing by pressing the EXIT button e GUIDE Shows the DIRECTV Advanced Program Guide screen that shows...

Page 38: ...ee page 40 o 0 9 and ENTER buttons Change channels directly and enter numerical values in on screen displays e dot button Use with the 0 9 and ENTER buttons to select subchannels for example 2 1 if available e GUIDE button Opens the Program Guide showing ALL channels 4D FAVORITE button Opens the Favorite List G INFO button Opens the program information display for the current program CH MENU VOL 6...

Page 39: ...wide 16 9 aspect ratio in 4BOi or 4BOp format the button changes the WIDE MODE options to Letterbox Cropped or Squeezed When you view a picture with a standard 4 3 aspect ratio in 720p or 10BOi format the button changes the WIDE MODE options to Normal Wide Panorama Zoom or CINE Zoom When you view a picture with awide 16 9 aspect ratio in 720p or 10BOi format the button tem porarily changes the WID...

Page 40: ... see page 40 G VCR DVD control buttons Operate VCR and DVD basic functions such as play pause stop fast wind rewind and record To operate your VCR or DVD player you may need to first set up the remote control see page 40 AMP VOL amplifier volume buttons Adjust the volume of your audio receiver To operate your audio receiver you may need to first set up the remote control see page 40 f DVD navigati...

Page 41: ... flashing If you are setting codes for more than one VCR type move the device switch to either the AV1 or AV2 position 3 Press the 0 9 buttons to input the brand code then press the ENTER button The function indicator goes off and the remote is set up to operate that device 4 Test the remote control Press the POWER button for that equipment then press other operation controls such as the CH button...

Page 42: ...305 338 KTV 133 113 103 123 134 HQ 315 Loewe 111 Instant Replay 309 308 LXI Sears 102 103 111 125 119 112 JCPenny 309 305 304 330 314 336 337 Magnavox 111 112 113 107 JVC 314 336 337 Mitsubishi MGA 124 103 112 Kenwood 314 336 332 337 NEC 103 112 LXI Sears 323 305 333 334 330 335 338 Panasonic 118 116 117 107 Magnavox 310 308 309 Philco 111 118 109 Marantz 314 336 337 Philips 111 Marta 332 Pilot 10...

Page 43: ...337 314 336 338 337 309 308 338 342 312 311 327 328 335 331 332 330 314 336 336 337 331 Code 601 617 621 606 603 607 608 604 609 610 603 607 611 612 605 613 614 602 615 616 603 618 619 620 AMP Amplfier Codes Manufacturer Sony Aiwa Bose B K Carver Denon Fosgate Haitai Harmon Kardon JVC Kenwood Magnavox Marantz Mcintosh NAD Nakamichi Onkyo Panasonic Pioneer Sansui Sharp Technics Yamaha Code 501 521 ...

Page 44: ...ou do not have a dish you should selectHNO This means you can and cable broadcasts analog digital only off air setup process will be displayed only once you can any time in the future using the DIRECTV Initial setup menu sele tlon at 43 If you have chosen to subscribe to DIRECTV service you should contact DIRECTV at 1 800 OIHECTV 1 800 347 3288 and order programming When youorder programming you n...

Page 45: ... The iCons in the Channel Bannerrepresent the status or availability of important featur s The icons will be highlighted whelTthe featUre is activeoravailablQ as providedby the br ast er and service provider The information available on the Channel Banner is described below Program Description Rating Time program start andfinish durationll Input Channel Number Channel igh Definition Dolby Digital ...

Page 46: ...rogram is broadcast in the HD format Doby Digital Icon IllD Indicates that the currently selected audio track is Dolby Digital audio and may contain up to 5 1 channels depending on the broadcast CC Icon 1m Indicates that the current program contains the closed caption data service Channel Logo Displays the logo of the current satellite channel If a channel logo is not available the channel name wi...

Page 47: ...le the channel number is displayed instead You are also able to add or delete the logo of a channel on the favorite list by pressing the INFO button on the remote A dialog box will ask what you want to do with the highlighted logo area you can replace the highlighted logo area with the current channel or delete it You can easily move the highlight on the favorite list using y on the remote control...

Page 48: ...REEZE button again enlarges the digital video image The image can then be scanned vertically and horizontally Pressing the fREEZE button once again returns the image to live video FREEZE M de Screen Multi Freeze M de Screen The Multi Freeze mode is only available for digital channels 47 ...

Page 49: ...gram Guide provides program listings and information on analog and digital channels from over the air local stations as well as DIRECTV channels You can easily navigate and tune to hundreds of channels from various signal sources with the Advanced Program Guide If you don t subscribe to DIRECTV programming however the function of the DIRECTV HD Receiver will be limited to receiving signals only fr...

Page 50: ...ams by using the CATEGORY search of KEYWORD search func tions An explanation of each channel ist is described in Section 7 2 You can bring up or exit the Advanced Program Guide in several ways To bring up the Advanced Program Guide Press the GUIDE button on your remote control or Press the MENU button on the remote control and select the DIRECTV menu Several options will appear Choose the Guide op...

Page 51: ...ry shows program listings for all channels to which you may subscribe The guide showsDIRECTV channels that your dishanten03 can receive and over the air channels that you have selected to add into the channel list during the initial setup procedure Program details for non satellite channels may be avai lable dl mendirlO Iiteservice provider You ge e a TEG 2 I om CUSTOM Shows the program listings t...

Page 52: ...earches for programs that have or are related to a specific keyword You can choose a keyword for program titles or credit titles for example actor actress director writer awards etc see section 7 9 When accessing an on screen guide you will always return to the guide menu one of the ten channel lists or one of the two search menus that you have previously viewed After first installing satellite se...

Page 53: ...i mize your effort in navigating channels and time slots Line Scrolling You can reach other time slots or channels that are currently hidden from the screen using the arrow buttons Move horizontally to reach other time slotsand move vertically to reach other channels Page Scrolling You can move through channels faster by scrolling page by page with the CH buttons on the remote control Each button ...

Page 54: ...ighted channel in the Picture In Guide at left top window You can also quickly jump to aPicture In Guide window by pressing PREY Cli button on remote control The press moves the highlight to the Picture In Guide at the left top Pressing Cii 1 button take you to another TV channel Pressing the button take you to TV viewing Press the GUIDE button to return immediately to the guide menus the left mos...

Page 55: ...n Pay Per View If the selected program is scheduled in the future and is not a PPV you will be offered a dialog box that enables you to reserve this program for watching If you select Timer option in the Guide menu this program is put on the Timer Record List and you will be reminded by amessage at the topleft corner of the screen 10 seconds before its airing time Future Program I DIRECTV Pay Per ...

Page 56: ...shown and so on T display program details 1 Move the highlight to adesired program using A V I II on the remote control 2 Press the INFO button on the remote control to display the available additional information J To move the highlight to the left menu bar press I I on remote control And to return to the additional infor mation box press 1 4 To view this TV program move the highlight to the left...

Page 57: ...hedules for this same program move the highlight to the Showings menu located on the left side of the additional information box and press i To return to the previous guide screen Move the highlight to the Back additional information box and press located on the left side of the 56 ...

Page 58: ...ch using iA I on the remote control 2 Press the button on the remote control to display the available additional information 3 Pressing I will move the highlight to the Timer menu located on the left side of the additional information box and press 4 A dialog box will appear for your review 5 Move the highlight to the OK option in the dialog box and press to confirm A reminder message will appear ...

Page 59: ...he program guide press INFO button to see the detail information of selected program If this program is a pay per view program PURCHASE menu will be appear at left menu Selecting the PURCHASE menu will show you the dialog box 2 Move the highlight to the right to Buy in the dialog box and press Another pop up box will be displayed to verify your purchase A continuous connection to a land based phon...

Page 60: ...right column lists programs resulting from 3 Move the highlight to the category column If acategory has sub category the arrow ill be displayed at the left side Pressing will move to the sub category lisi Whenthe highlight is s ted category name pressing will move the highlight to Search button Pressing again will start the searching process The program resulting from the search will be listed in ...

Page 61: ...n the guide menu Pressing will show search sub menu Select EDIT sub menu and press The My Category Edit screen consist of two columns the first column from the left shows the cate gory names and the right column shows the selected category name 3 Select the MY CATEGORY1 or MY CATEGORY2 using And move the highlight to the category column If acat egory has sub category the arrow mark will be display...

Page 62: ...w eight candidate keywords Press 0 9 but the controltoenter aword quickly i When a word is completed or even when only a partial word is typed in you may move the highlight to the Searchputton withU And press tobegin searching 6 The prograrnsresulting from the search will be listed in the right column Programinformation will be displayed at the top region of the guide screen You can see program in...

Page 63: ...o help you go to the next level T jIbringa3pami xit the M rllIJ Press the MENlfbutton on the remote control to bring up the menu A second press of the MENU button or a press of the EXIT button will take you back to TV viewing To go to the next level Press or I on the remote controL To go back to the li evimls level Press or MENU button on the remote controL 62 ...

Page 64: ...UP Favorite Ch Edit Clock Out to TV Hook up Help Digital Output AUDIO Audio Mode Audio Language Dolby Digital Wide Mode DTV Caption PREFERENCE DTV Caption Style Closed Caption Advanced Auto Demo Lock System Block Channel LOCK Movie Rating TV Rating Children TV Rating General Spending Limit System Info System Test SYSTEM Replace Card VCR Control Setup 63 Remote Control ...

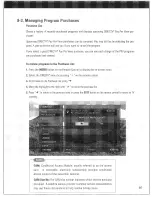
Page 65: ...n the Remote Control to display the on screen menu 2 Select the OIRECTV menu by pressing on the remote 3 Scroll down to the Purchase List using Y 4 Move the highlight to the right with to scroll the purchase list i to return to the previous level or press the EXIT button on the remote viewing programs return to TV CAM Access ModUle usually referred to as the access card A removable electronic suba...

Page 66: ...ing on the remote control 3 Scroll down to the Messages menu using v 4 Move the highlight to the right with to select amail item from the list i Press and the full text of the mail will be displayed in the pop up dialogue box 6 Select Delete on the pop up box if you want to delete it 7 Press a to return to the previous level or press the EXIT button on the remote control if you want to return to T...

Page 67: ...8 23 To add a pmgram to the Tim rlRec rd list 1 Press the MENU button on the Remote ControUodisplay the on screen menu 2 Select the DIRECTY menu by pressing on the remote control 3 Scroll down to the Timer Record menu using f 4 Press or i The pop up dialogue box will be displayed 5 Select aType option either Timer or Record Then select a Channel Date Time Duration and Repeat options 6 Pressing wil...

Page 68: ...the remote control 3 Scroll down to Timer Record List using Wf 4 Move the highlight to the right with l to select a program from the list 5 Press and the pop up dialogue box will be displayed 6 Select Delete in the pop up box if you want to cancel then the highlight will return to the list Or Select Modify in the pop up box if you want to modify type channel date time duration and repeat options T...

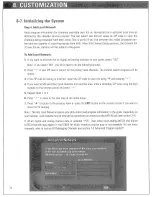
Page 69: ...the correct dish type among three different types avail able Round Dish for Satellite Network A only Oval Dish for Satellite Networks A and B or Oval Dish for Satellite Networks A B and C For advice on selecting a dish that will provide the services that you desire contact DIRECTV 1 800 DIRECTV or your local DIRECTV retail expert If you already have a dish refer to its user s guide to determine it...

Page 70: ...the initial setup Step 2 Dish P siti ning Your Location provides the coordinates of elevation azimuth and tilt based upon your ZIP code Elevation is the up down angle of the dish Azimuth is the side to side direction while tilt is the circular rotation of the dish itself around the pointing axis Full instructions for the installation of your dish are provided with your satellite dish antenna T ent...

Page 71: ... to experience picture quality degradation during adverse weather C lldlltIOllS such as heavy rain or snow A transponder is a receiver transmitter on the satellite It receiv8ssignalsfrom DIRECTV an retransmits them to your dish The DIRECTV HD Receiver is capable of displaying the signa strength of most transponders by using the following method To see thesigrul tnmgth t Move the highlight to selec...

Page 72: ...arch progress will be shown 3 If the ZIP code is missing or incorrect select the ZIP code for your city using and pressing 4 If you want to add secondary local channels from another area enter asecondary ZIP code using the digit buttons on the remote control and press 5 Repeat steps 2to 4 6 Press to move to the next step of the initial setup 1 Press lj to return to the previous level or press the ...

Page 73: ...InitiaHzi i Clu ml 1 The Setup wizardwill show the summary screen of the setup sequence The channel list automatically Aft ard p finish the Initial Setup the Han re ntraI to 72 ...

Page 74: ...ote Control to display the on screen menu 2 Select the DIRECTV menu by pressing on the remote control 3 Scroll down to the Initial Setup menu using V 4 Move the highlight to the right with liP to select Dish Setup Status 5 Move the highlight to Dish Setup Status and press The Dish Information dialogue box will be displayed 6 Press II to return to the previous menu 73 ...

Page 75: ...1t 1 ymu 10catiol1 1 Press the MENU button on the Remote Control to display the on screen menu 2 Select the DIRECTV menu by pressing on the remote control 3 Scroll down to Initial Setup using Y 4 Move the highlight to the right with p to select Dish Positioning i Move the highlight to Dish Position and press The positioning dialogue box will be dis played 6 Enter your ZIP code using the digit butt...

Page 76: ...d retransmits them to your dish The DIRECTV HD Receiver is the signal strength of most transponders by using the following met hocI l se the sig alstrefi Jth 1 Press the MENU button Remote Control display the OtHCreenmenu 2 Select the DIRECTV menu by pressing on the remote control 3L Scroll down to Initial Setup menu using V 4 Move the highlight to the right with lIP to select Signal Strength U Th...

Page 77: ...reen menu 2 Scroll down using f on the remote control 3 Select the Setup menu by pressing 4 Auto Program will be automatically highlighted 5 Move the highlight to the right with If to display the channel find box 6 Select Start button and press and the moving yellow bar will indicate the progress scan ning the channels When the scanning process begins Start will change to Next If you press Next th...

Page 78: ...amu ls missed in ymn chal il iellist 1 Press the MENU button on the remote control to display the on screen menu 2 Scroll down using on the remote control 3 Select the Setup menu by pressing 4 Scroll down to Manual Ch Add using 5 Move the highlight to the right with to display the channel add box 6 Enter the channel number desired using the digit buttons on the remote control 7 Press and the pop u...

Page 79: ...n on the remote control to display the on screen menu 2 Scroll down using T on the remote control 3 Select the Setup menu by pressing 4 Scroll down to Favorite Ch Edit using T 5 Press 1 to display the channel editing screen To create a custom list 1 Use T to move the highlight on the channel editing menu 2 Choose Shown or IIHidden by pressing 1 The screen shown at the top left will indicate if the...

Page 80: ...8 8 Managing Channels 79 ...

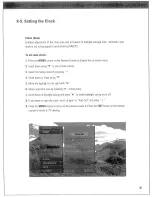
Page 81: ...f on the remote control 3 Select the Setup menu by pressing 4 Scroll down to Clock using Wf 5 Move the highlight to the right with 1 6 Select your time zone by pressing I continuously 7 Scroll down to Daylight Saving and press I to switch daylight saving on or off 8 If you want to reset the clock scroll up again to Auto Set and press l Press the MENU button to return to the previous menu or Press ...

Page 82: ...Scroll down using T on the remote control 3 Select the Setup menu by pressing 4 Scroll down to Clock using T 5 Move the highlight to the right with 6 Use AT to move the highlight in the entry boxes 7 Enter the number by using the digit buttons on the remote control 8 Press 1 to return to the previous screen or press the EXI1 button on the remote control to return to TV viewing 81 ...

Page 83: ...UT m To setOut to TV settings HhEll DIRECTV HO REllcehI Ell 1 Press the MENU button on the Remote Control to display the on screen menu 2 Scroll down using T on the remote control 3 Select the Setup menu by pressing 4 Scroll down to Out To TV using T 5 Move the highlight to with 6 Select your output channel to Channel 3or Channel 4by pressing qj D Select your signal source to Antenna or Cable by p...

Page 84: ...U button on the remote control to display the on screen menu 2 Scroll down using T on the remote control J Select the Setup menu by pressing 4 Scroll down to Hook up Help using T 5 Press I to display the Hook up Help diagrams Seven possible hook up connections will be shown 6 Scroll up and down the hook up figure options shown to determine the correct connections for your sys tem 1 Press the MENU ...

Page 85: ... Digital setting if connecting to an audio system bleOfdecoding Dolby Digital audio DoIng sOTay the high pitched noise that could potentially cause harm JljU jJil jilL is not capa tiHrdigi alaudi mode the MENU button on the Control to display the Oil screen menu 2 Scroll down using Y on the remote control rt wIll be automatically highlighted the highlight to the right with options and press to ret...

Page 86: ...own as Audio Coding 3rd Generation or 5 1 channel audio is a coding technique that provides up to five independent full frequency response audio chan nels and one low frequency bass channel Dolby Digital signals are available only when pro vided by the broadcaster Refer to section 2 5 to see more detailed information Please make sure that your AN ampli fier supports Dolby Digital decoding as not a...

Page 87: ...program s sec ond audio program is broadcast in mono if provided To Set the Analog A Bdi Mode 1 Press the MENU button on the Remote Control to display the on screen menu 2 Scroll down using v on the remote control 3 Select the Audio menu by pressing t 4 Scroll down to Audio Mode using V 5 Move the highlight to the right with 6 Select one of the three options and press to return to the previous lev...

Page 88: ...essing AWf repeatedly to select the desired language T set the digit D1 DlJdi hmglJ Dge 1 Press the MENU button on the Remote Control to display the on screen menu 2 Scroll down using Wf on the remote control J Select the Audio menu by pressing 4 Scroll down to Audio Language using Wf S Move the highlight to the right with 6 Select one of the eight language options and press to return to the previ...

Page 89: ...O TV port to connect to your TV select RF Mode To set the Dolby Digital 1 Press the MENU button on the Remote Control to display the on screen menu 2 Scroll down using T on the remote control 3 Select the Audio menu by pressing 4 Scroll down to Dolby Digital using T i Move the highlight to the right with 6 Select the Line Mode or RF Mode option and press to return to the previous level 7 Press the...

Page 90: ...pand Shrink Refer to section 2 4 Normal and Wide Format Signals Choosing the screen format f vmn TV 1 Press the MENU button on the Remote Control to display the on screen menu 2 Scroll down using T on the remote control J Select the Preference menu by pressing 4 Wide Mode will be automatically highlighted 5 Move the highlight to the right with 6 Select one of the options and press to return to the...

Page 91: ...ard definition content 4 3 WHEN OUTPUT FORMAT IS 720p OR 1DeDi MODE Normal Use for a picture with an original 4 3 aspect ratio on your 16 9 monitor with black gray bars appearing at the left and right sides Wide Use for a picture adjusted horizontally in a linear proportion to fill the entire screen Panorama Use to adjust a picture in a non linear proportion more at both sides to create a spectacu...

Page 92: ...3 ratio Black or gray bars will show at the left and right side Aspect Ratio Summary Program Format SD 480i p 4 x 3 HD 720p 1080i 16 x 9 SD 480i p 4 x 3 HD 720p 1080i 16 x 9 Output Format Available Aspect Ratio SD 480i pj4 x 3 No Adjustment Options SD 480i p 4 x 3 Letter Box Cropped Squeezed HD 720p 1080i 16 x 9 five Aspect Ratio controls Normal Wide Panorama Zoom Cine Zoom HD 720p 1080i 16 x 9 th...

Page 93: ...Primary Caption Service Services 3 6 The other services are not pre assigned It is up to the discretion of the individual caption provider to utilize the remaining service channels 10 set Digital Capthm 1 Press the MENU button on the Remote Control to display the on screen menu 2 Scroll down using 1 on the remote control 3 Select the Preference menu by pressing 4 Scroll down to Digital Caption usi...

Page 94: ...ote Control to display the on screen menu 2 Scroll down using T on the remote control 3 Select the Preference menu by pressing 4 Scroll down to DTV Caption Style using T i Move the highlight to the right with II to move to the caption style box 6 Select each value from Style to Edge Color Move the highlight using T A and Select avalue of each option with 41 11 7 Press the MENU button on the remote...

Page 95: ...guage translation such as French Spanish simplified English or displayed at aslower rate Captioi14 CCiI CC4 is another special non synchronous caption service that does not need to be in sync with the sound and may provide simplified captioning usually delayed TcxU 4 Textl 4 usually display information at the bottom position and is used for adata service generally not program related To set CI sed...

Page 96: ...g T 5 Press iii to display the Advanced Setup Menu screen 6 Select your default background Matte Color which appears with certain aspect ratio settings with Or Select atime out duration for the Information banner either Short or Long Or Select aBanner style of Small Medium or Large to be displayed when changing channels or pressing the INFO button Or Select each DVI Level between Standard which is...

Page 97: ...to display the on screen menu 2 Scroll down using V on the remote control l Select the Preference menu by pressing 4 Scroll down to Auto Demo using V 5 Press FD to display the Auto Demo screen The screen will run automatically 6 Press 1 anytime to return to the previous screen or press the EXIT button on the remote control to return to TV viewing 96 ...

Page 98: ... the Remote Control to display the on screen menu 2 Scroll down using T on the remote control 3 Select the Lock menu by pressing 4 If unlocked Lock System will be automatically highlighted otherwise requires a password To lock the svstem 1 Move the highlight to the right with in Lock On Off box 2 Switch On or Off by using Whenever you switch the lock system on you need to enter the password as a r...

Page 99: ...nu by pressing Scroll down to Block Channel using vtf 5 Press to display the Block Channel screen 6 Use vtf ll D to move the highlight in the channel editing screen 1 Joggle Blocked or Unblocked by pressing t The screen shown at the top left indicate if the highlighted channel is blocked or unblocked viewing to to the prevIous press remote control to return to TV ce nel k f sh u as nly ntal trol S...

Page 100: ...ssing 4 Scroll down to Movie Rating using V 5 Select the level you want using A V and press to return to the previous level 6 Press the EXIT button on the remote control to return to TV viewing MOVIE MPAA rating G General Audiences All ages admitted PG Parental Guidance Suggested Some material may not be suitable for children PG 1J Parents Strongly Cautioned Some material may not be appropriate fo...

Page 101: ... view those programs To block TV Iuolmms 10 Press the MENU button on the Remote Control to display the on screen 2 Scroll down using V on the remote control 30 Selectthe Lock menu by pressing f 4 Scroll down to TV Rating Children using V 5 Select Age or Content if you want to lock aTV program based on age or content Ii Select the level you want using AV and press to return to the previous level 10...

Page 102: ...you want to lock aTV program based on age or content 6 Select the level you wantusing AT and press to return to the previous level 7 Press the EXIT button on the remote control to return to TV viewing R Itil1g for General Programs General Audience parents would find this program suitable for all ages Parental Guidance Suggested program contains material that parents may find for younger children P...

Page 103: ...iver is turned off and then turned back on the lock will be reactivat ed T set the spfmdil1g limit f ei Uch PPV pwgram 1 Press the MENU button on the Remote Control to display the on screen menu 2 Scroll down using fI on the remote control 3 Select the Lock menu by pressing 4 Scroll down to Spending Limit using fI 5 Move the highlight to the right with G Enter the maximum amount of money to be spe...

Page 104: ...e on screen menu 2 Scroll down using T on the remote control 3 Select the System menu by pressing 4 System Info will be automatically highlighted 5 Move the highlight to the right with 1 to display the information option box fi General Info will be automatically highlighted 7 Press and the general information dialogue box will be displayed 8 Press the EXIT button on the remote control to return to...

Page 105: ...on the remote control J Select the System menu by pressing 4 System Info will be automatically highlighted 5 Move the highlight to the right with p to display the information option box 6 Scroll down using T on the remote control to select Feature List 7 Press and the pop up dialogue box will be displayed 8 You can see the feature list on the right side of the menu 9 Press the EXIT button on the r...

Page 106: ...2 Scroll down using T on the remote control 3 Select the System menu by pressing 4 System Info will be automatically highlighted 5 Move the highlight to the right with n to display the information option box 6 Scroll down using T on the remote control to select Tuner List 1 Press and the pop up dialogue box will be displayed 8 You can see the Tuner list on the right side of the menu 9 Press the EX...

Page 107: ...nt software version on theright The next version will be seen if OIRECTV plans to upgrade the software 8 Press the EXllbutton on the remote control to retUrfrto TV V C V Ill J The OIRECTV HO Receiver is able to receive upgrades or modifications to some of its features and functions via satellite service These modifications will automatically be made usually at times when the receiver wouldJikely b...

Page 108: ...splay the on screen menu 2 Scroll down using Y on the remote control 3 Select the System menu by pressing 4 Scroll down to System Test using Y i Move the highlight to the right with 6 Basic Test Info will be automatically highlighted 7 Press and the pop up dialogue box will be displayed 3 Press to activate the System Basic test It will run automatically from DIRECTV Tuner to Phone Connection and i...

Page 109: ...on the Remote Control to display the on screen menu 2 Scroll down using on the remote control 3 Select the System menu by pressing 4 Scroll down to System Test using Y 5 Move the highlight to the right with P to display the system test option box 6 Scroll down to Outdoor Unit Test using y on the remote control 7 Press and the pop up dialogue box will be displayed 8 Press to activate the system out...

Page 110: ...isplay the system test option box 6 Scroll down to Transponder Test using T on the remote control 7 Press and the pop up dialogue box will be displayed 8 Select one of SAT A SAT B SAT Cwith 1Ii l Move the highlight to the Start Button and press to activate the system transponder test It will run automatically and if there is any problem in your system the pop up box will be dis played 10 Press MEN...

Page 111: ...CTV HD Receiver Once you proceed past Read the old card replace card cannot be cancelled To replace the card 1 Press the MENU button on the Remote Control to display the on screen menu 2 Scroll down using V on the remote control 3 Select the System menu by pressing 4 Scroll down to Replace Card using V 5 Pressing Replace Card Wizard will be displayed 6 If you want the process to proceed follow the...

Page 112: ...he MENU button on the Remote Control to display the on screen menu 2 Scroll down using on the remote control 3 Select the System menu by pressing 4 Scroll down to VCR Control Setup using 5 Pressing VCR Control Setup Wizard will be displayed 6 If you want the process to proceed follow the instructions in the VCR Control Setup Wizard 1 Press the EXIT button on the remote control to return to TV view...

Page 113: ...10 s for IR Control or one of sixteen remote 10 s for RF Control This can be useful if you have more than one Sony satellite receiver in your home or if local RF signals cause interference to your RF Remote control To choose the Remote Contml type 1 Press the MENU button on the Remote Control to display the on screen menu 2 Scroll down using V on the remote control 3 Select the System menu by pres...

Page 114: ...r remote control if you want information about the highlighted item The information will be displayed on the right side of the TV screen Simply press and hold the HELP button to see the helpful information Pressing the HELP button on your remote control independently will activate the overall Help feature However when the MENU or the Advanced Program Guide is already displayed pressing the HELP bu...

Page 115: ...the front and back panel and an instructive note about the Menu and the Advanced Program Guide The s the Help feature 1 Press the HELP button on the remote control to display the Help screen 2 Scroll up and down to select Help menu items using W on the remote control 3 Move the highlight using Aw I The explanations of the highlighted item will be displayed on the right side or at the bottom of the...

Page 116: ... HDTV Out 1 DVI D Single Link connector 1080i 720p 480p 480i digital RGB EIA 861 Compliant HDCP 1 0 Compliant 15 pin Connector 1 1080i 720p 480p RGB Component Out 1 Phono Jack connector 1080i 720p 480p 480 YPbPr S Video Out 1 4 pin Mini DIN 480i Y C Video Out 2 Phono Jack connector 480i Composite NTSC Optical selectable Dolby D gitaF audio or PCM output Audio Out 2 Fixed Output Level Smart Card Sl...

Page 117: ...ur monitor or TV via RGBjDVI HDTV port on the back panel the flTYPE switch must be flipped to the right Otherwise you may not be able to see apicture see section 3 5 Make sure the Initial Setup process has been performed see section 8 7 Select the Auto Channel Scan or Manual Channel Add functions if you have not already done so see section 8 8 If you are only receiving afew satellite channels you ...

Page 118: ...onnected properly see section 3 7 Make sure the proper format is selected see section 2 3 Make sure the proper aspect ratio is selected see section 2 4 Make sure the video output is connected to the TV see section 3 5 Adjust the aspect ratio setting of your TV or monitor if available Check the HD Receiver s Aspect Ratio setting see section 8 13 press the WIDE MODE button on the remote control or c...

Page 119: ...er is in the ANT CABLE mode enter the master password 7777 If awhite bar is shown at the top Use the Component Output position on the display device Adjust the scan range of your display device Weak Sound If connected to aTV using the OUT TO TV jack set RF mode of Dolby Digital menu MENU Audio Dolby Digital Conflicting digital channel numbers Press the SIGNAL button on the remote control the physi...

Page 120: ...access ing settings outlined in 8 14 to 8 16 both types captioning will be dis played automatically based on broadcast provider information Custom styles described in 8 15 only are applied to some digital broad casts with Digital Captions Depending on the broadcast you may need to set the Analog captions to OFF to view the Digital Captions Dolby Digital 5 1 audio requires the use of the digital au...

Page 121: ... service the Product This war ranty does not cover Products sold AS IS or WITH ALL FAULTS This warranty is valid only in the United States Proof of purchase in the form of a bill of sale or receipted invoice which is evidence that the Product is within the Warranty period must be presented to obtain warranty service REPAIR OR REPLACEMENT AS PROVIDED UNDER THIS WARRANTY IS THE EXCLUSIVE REMEDY OF T...

Page 122: ... and transferee will be in violation of this Agreement should the transferee use the Product This license will automatically terminate upon User s failure to comply with any of these License Terms Upon termination User must stop using the Product and immediately destroy the Software together with all copies adaptations and merged portions in any form and or return it to Sony Export ReqUirements an...

Page 123: ...Features 8 FORMAT button front panel 36 FORMAT button remote control 39 Format setting 11 1080i Format 11 28 29 30 nop Format 11 28 29 30 480p Format 11 28 29 30 Variable 1 2 3 Format 11 Auto DVI Format 11 480i Format 11 27 31 Front Panel 36 Freeze Screen 47 Future Viewing 57 G Guide 62 H Help 8 17 113 114 Hook up Help 8 83 I Initial Setup 43 68 75 L Limited Warranty 120 Location 74 Locks Setting ...

Page 124: ...IRECTV with questions about service programming or billing 1 800 DIRECTV 347 3288 www D1RECTV com Contact Sony with questions about your Digital Satellite Receiver 1 800 838 S0NY 7669 Sony line www sony com www sony com support ...

Page 125: ...ediatelywithout notice if you fail to comply with any of its provisionsormake anyotheruse ofthe Access Card orSoftware and the Access Card mustbe returned promptlyto DlRECTV The Access Card and Software mayonly be used inthe United States 2 Restrictions The Access Card and Software contain trade secrets and are protected byUnited States and international copyright and otherlaws You maynot modifyth...

Page 126: ...more than 225 channels in digital quality picture and sound and a great selection of programming packages to choose from DIRECTV has something for everyone including access to 31 premium movie channels up to 55 pay per view choices a day and exclusive programming You can also receive Local Channels in many markets and we offer a sports subscription lineup that includes NFL SUNDAY TICKEpM and NBA L...

Page 127: ...w us to contact you in the unlikely event that your receiver needs adjustment or modification Please take the time to register the product at our web site http www sony com productregistration If you have any operational questions regarding your new purchase please contact your retailer For the location of a Sony dealer in your area or for any other questions please call 1 800 838 S0NY 7669 Thank ...

Page 128: ......

Page 129: ...ramento Stockton Salt Lake City San Antonio San Diego San Francisco Oakland San Jose Seattle Tacoma St Louis Tampa St Petersburg Washington D C West Palm Beach Grand Rapids Minneapolis St Paul Kalamazoo Nashville Greensboro New Orleans Greenville Spartanburg New York Hartford New Haven Norfolk t Houston Oklahoma City Indianapolis Orlando Daytona Jacksonville Philadelphia Kansas City Phoenix Knoxvi...

Page 130: ...ine 100 movies starz and 1 in hit SUPER PAIC mov es with new movies every Includes 12 channels Saturday night First run premieres with new movies every Includes 3 channels Sunday night 20 Regional Sporls Networks Over 25 Specialty and Regional Sports Networks OR GET ALL FIVE PACKAGES ROLLED INTO ONE TOTAL CHOICE PREMIER 8 99 with Local Channelst Package 7per mo Get over 190 channels including all ...

Page 131: ...subject to applicable state blackouts MULTI ROOM PROGRAMMING If you want to watch different shows in different rooms you ll need to purchase additional receivers Then pay only 4 99 mo for second and each additional receiver to enjoy your 01 RECTV programming in each additional room All receivers must be connected to the same phone line HIGH DEFINITION PROGRAMMING When you purchase an HO capable OI...

Page 132: ...n BET 329 BLACK STARZ 523 Bloomberg Television tI 353 Boomerang 297 Bravo 273 CSTV 610 Cartoon Network 296 The Church Channel 371 Cinemax East 512 Cinemax West 514 CNBC tI 355 CNBC World 357 CNN 6 202 CNNfnlCNN International 358 248 404 Comedy Central 249 309 Country Music Television CMn tI 327 Court TV tI 203 312 C SPAN 350 501 C SPAN 2 351 507 11J 6HJ 508 Daystar 369 HD509 DIRECTV Customer News ...

Page 133: ...c Choice Speed Channel 607 Contemporary Christian 843 Spice Platinum Adult 596 Music Choice Dance 813 ATaste of Spice Adult 594 Music Choice Easy Listening 833 STARZ East 520 Music Choice Gospel 842 STARZ Theater East 522 822 Music Choice Hit List STARZ West 521 Music Choice Jazz 840 Sundance Channel 549 816 Music Choice Metal Sunshine Nef ft Or C1 632 Music Choice New Wave 814 TBS Superstation 24...

Page 134: ...ator assisted orders Pay per view events are non refundable DIRECTV PROTECTION PLAN With the DIRECTV PROTECTION PLAN you ll have access to free technical troubleshooting by phone 24 hours aday 7days aweek as well as service calls by appointment from trained technicians If needed you ll even receive replacement equipment via priority delivery and unlimited dish alignments if we can1t fix the proble...

Page 135: ......

Reviews: