background image

Playing Discs

20

GB

Do the following:

1

Press CHECK repeatedly until the track
number you want to erase appears.

2

Press CLEAR.

Press CLEAR.
Each time you press the button, the last
track of the program is erased.

Press DISC SKIP +/– and  

.

/

>

 to

select the track you want to add, then press
PROGRAM. When using the remote, press
the number button of the track to be added.

Hold down CLEAR until ”CLEAR“ appears
in the display.

Listening to a CD Using a
Filter 

(Digital Filter Function) 

Z

This player is equipped with a variable coefficient (V.C.*)
digital filter. By selecting one of five types of filters
(“STD,” “1,” “2,” “3,” and “4”), you can adjust the sound
to match your listening environment and the music
source.
*V.C. is a trademark of Variable Coefficient. For details,
see “What is a variable coefficient (V.C.) digital filter?”

Note

Digital filters are effective only when you play a conventional
CD.  You cannot select the digital filter when you play a Super
Audio CD.

Press DIGITAL FILTER repeatedly until you locate
the filter you want.

If you press DIGITAL FILTER to change the type of filters
during play, the type of filter appears in the display and
the sound will be interrupted momentarily.

 DIGITAL FILTER

Creating Your Own Program (Program Play)

To

Erase a track

Erase from the last
track in the program

Add a track to the
end of the program

Erase all tracks

Summary of Contents for SCD-C333ES - Super Audio Cd Changer

Page 1: ...4 230 687 12 1 Super Audio CD Player 2000 Sony Corporation SCD C333ES Operating Instructions Mode d emploi GB FR ...

Page 2: ...is symbol is intended to alert the user to the presence of important operating and maintenance servicing instructions in the literature accompanying the appliance The shielded interface cable recommended in this manual must be used with this equipment in order to comply with limits for a digital device pursuant to Subpart B of Part 15 FCC Rules For the customers in the United States CAUTION You ar...

Page 3: ...C333ES can also play back a conventional CD with higher quality than a conventional CD player To provide enhanced quality the SCD C333ES employs various advanced technologies For example a 24 bit precision variable coefficient V C digital filter is provided for CD playback see page 20 By selecting one of five filters which have different cutoff characteristics you can adjust the tone quality in ac...

Page 4: ...mpartment with the and correctly oriented to the markings When using the remote point it at the remote sensor on the player z When to replace the batteries Under normal conditions the batteries should last for about six months When the remote no longer operates the player replace both batteries with new ones Notes Do not leave the remote in an extremely hot or a humid place Do not drop any foreign...

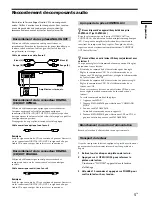
Page 5: ...on 1 Remove all the discs from the disc tray 2 Press A OPEN CLOSE to close the disc tray NO DISC appears in the display 3 Wait for 10 seconds then press POWER to turn off the player White L Red R White L Red R Connect the Super Audio CD player to an audio component Be sure to turn off the power of all components before making connections and connect securely to prevent noise Connecting via ANALOG ...

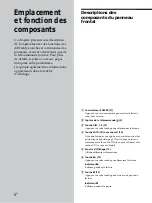
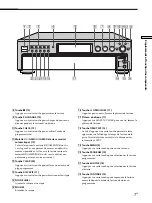
Page 6: ...ow 13 Shows various information 6 N button 12 Press to start play N indicator Lights up during playback 7 X button 12 Press to pause play X indicator Lights up during pause Location and Functions of Parts This chapter tells you about the location and functions of the various buttons and controls on the front and rear panels and the supplied remote Further details are provided on the pages indicate...

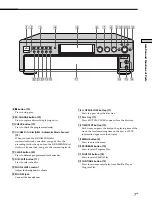
Page 7: ... Adjust the headphones volume qg PHONES jack Connect the headphones POWER PHONES LEVEL MIN MAX AMS PUSH ENTER SACD CHECK CLEAR DISC SKIP EX CHANGE DISC 1 CONTINUE DISC 2 SHUFFLE DISC 3 PROGRAM DISC 4 MENU DISC 5 TIME TEXT OPEN CLOSE qh A OPEN CLOSE button 11 Press to open close the disc tray qj Disc tray 11 Press A OPEN CLOSE to open close the disc tray qk TIME TEXT button 13 Each time you press t...

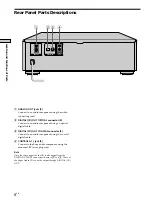
Page 8: ...igital cable 3 DIGITAL CD OUT COAXIAL connector 5 Connect to an audio component using the coaxial digital cable 4 CONTROL A1 jack 5 Connect to the Sony audio component using the monaural 2P mini plug cord Note Only the audio signals of the CD can be output from the DIGITAL CD OUT connectors shown in 2 and 3 Those of the Super Audio CD cannot be output through DIGITAL CD OUT R L OUT ANALOG CONTROL ...

Page 9: ...NAME INPUT button 23 Press to enter the name input mode 8 H button 12 Press to start play X button 12 Press to pause play x button 12 Press to stop play 9 AMS AMS Automatic Music Sensor buttons 16 Press to locate a specific track 0 m M buttons 16 Press to locate a portion you want to play within a track qa DISC SKIP buttons 11 Press to select the disc qs CD1 2 COMMAND MODE switch 5 Select the comm...

Page 10: ...the Super Audio CD Super Audio CD dual layer disc This disc consists of dual HD layers and is capable of extended play over long periods Press SACD CD repeatedly so that SACD appears in the display the SACD CD LED turns on Also as the dual layer disc consists of dual HD layers on one side only it is not necessary to turn the disc over Conventional CD This disc is the standard format Press SACD CD ...

Page 11: ...he disc tray turns and you can place the discs in the empty disc compartments The player plays the disc in front of you first CD layer HD layer Super Audio CD CD Hybrid disc This disc consists of an HD layer and a CD layer Press SACD CD to select the layer you want to listen to Also as the dual layers are on one side it is not necessary to turn the disc over You can play the CD layer using a conve...

Page 12: ...lt layer as follows 1 Press MENU 2 Turn lAMSL to select LAYER SELECT 3 Push lAMSL The current default layer appears 4 Turn lAMSL to select CD or SACD then push lAMSL again Note During playback increase the volume level gradually starting from the lowest level The output from this unit may contain band width that are out of the normal listening range This may cause damage to the speakers or ears 6 ...

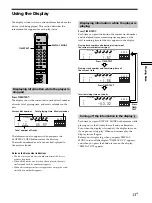
Page 13: ... pause or stop play When you resume play the display turns off again Before you start playing when you press DISPLAY MODE to turn off the display DISPLAY OFF appears and when you press the button to turn on the display DISPLAY ON appears DISCS ALL 1 4 3 3 2 S A C D CD1 DISC MIN SEC 1 2 3 4 5 6 7 8 9 10 1 2 3 4 5 DISCS ALL 1 1 1 5 6 S A C D CD1 DISC TRACK MIN SEC 1 2 3 4 5 6 7 8 9 10 1 2 3 4 5 DISC...

Page 14: ... the characters depending on the disc This player can display only the disc name artist name and track names from TEXT discs Other information cannot be displayed DISCS ALL S O N Y B A N D ART CD1 TEXT 1 2 3 4 5 6 7 8 9 10 1 2 3 4 5 DISCS ALL S O N Y H I T S CD1 TEXT 1 2 3 4 5 6 7 8 9 10 1 2 3 4 5 DISCS ALL 1 1 0 4 5 2 8 CD1 TEXT DISC TRACK INDEX MIN SEC 1 2 3 4 5 6 7 8 9 10 1 2 3 4 5 Disc title A...

Page 15: ...nts with new ones 5 Press EX CHANGE The disc tray closes Note Do not push the disc tray to close it in Step 5 as you may damage the player While the disc tray is open by pressing the EX CHANGE button If the play of the current disc ends the player stops playing If the disc is played in 1 DISC Repeat Play mode see page 17 the current disc starts playing again In ALL DISCS Shuffle Play mode see page...

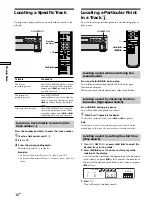
Page 16: ...cular Point in a Track Z You can locate a particular point in a track during play or play pause Locating a point while monitoring the sound Search Press and hold m M during play You will hear intermittent playback as the disc goes forward or reverses When you reach the desired point release the button Locating a point by observing the time indication High Speed Search Press m M during play pause Y...

Page 17: ...will store the last setting of repeat play REPEAT or REPEAT 1 and recall it the next time you turn on the player Repeating all the tracks on the disc Repeat All Play Press REPEAT once then press H REPEAT appears in the display and Repeat All Play starts The repeat play changes depending on the play mode you select When the play mode is The player repeats ALL DISCS Continuous Play page 12 1 DISC Co...

Page 18: ...playing all the tracks once H CONTINUE SHUFFLE Shuffle Play on one disc You can play all tracks on the specific disc in a random order 1 Press SHUFFLE repeatedly until 1 DISC appears in the display 2 Press DISC 1 5 to start 1 DISC Shuffle Play on the selected disc appears while the player is shuffling the tracks The player will stop after playing all the tracks once To resume normal play Press CON...

Page 19: ... after a while Note that if the programmed track number isn t found on the disc that step is automatically erased z The program remains even after Program Play ends Press H to play from the beginning of the program again The program remains even if you stop play z The program remains until you erase it If you replace discs the programmed disc and track numbers remain So the player plays only the e...

Page 20: ...e types of filters STD 1 2 3 and 4 you can adjust the sound to match your listening environment and the music source V C is a trademark of Variable Coefficient For details see What is a variable coefficient V C digital filter Note Digital filters are effective only when you play a conventional CD You cannot select the digital filter when you play a Super Audio CD Press DIGITAL FILTER repeatedly un...

Page 21: ...cteristics of the digital filter Sharp roll off and slow roll off Digital filters can be roughly classified into sharp roll off types and slow roll off types according to their cutoff characteristics Sharp roll off filters quickly cut off noise over 22 05 kHz generated during sampling This is a superior way of completely reproducing signals below 20 kHz and is the basic principle behind digital au...

Page 22: ...out one month You can store this information When you use Disc Name page 23 Where is the Disc Name stored The Disc Name is stored not on the disc but in the player s memory It means you cannot use the Disc Name when you play the disc on other players Erasing all Disc Names of all discs Turn off the player While holding down CLEAR press POWER to turn on the player ALL ERASE appears in the display a...

Page 23: ...hes As you turn l AMS L clockwise the characters appear in the following order Turn l AMS L counterclockwise to go back to the previous character space A B C D E F G H I J K L M N O P Q R S T U V W X Y Z a b c d e f g h i j k l m n o p q r s t u v w x y z 0 1 2 3 4 5 6 7 8 9 _ 5 Push l AMS L to select the character The selected character lights up and the flashing cursor appears to indicate the ne...

Page 24: ...put letters To input a letter press the number button corresponding to the letter you want indicated beside each number button Each time you press the button the letter changes cyclically among the ones indicated beside the button To input symbols press the number button 1 repeatedly until the symbol you want appears in the display Example To select the letter E Press the number button 3 twice To ...

Page 25: ... heat build up in the player Do not place the player on a soft surface such as a rug that might block the ventilation holes on the bottom Do not place the player in a location near heat sources or in a place subject to direct sunlight excessive dust or mechanical shock On operation If the player is brought directly from a cold to a warm location or is placed in a very damp room moisture may conden...

Page 26: ...positioned securely on the tray If not the player or the disc may be damaged On cleaning If the disc is dirty with fingerprints or dust it may lessen the quality of the audio out Before playing clean the disc with a cleaning cloth Wipe the disc from the center out Clean the disc with a soft cloth slightly moistened with water and remove moisture with a dry cloth Do not use solvents such as benzine...

Page 27: ...g guide to help you remedy the problem Should any problem persist consult your nearest Sony dealer There is no sound Check that the player is connected securely Make sure you operate the amplifier correctly When you use the headphones adjust the volume with PHONE LEVEL There is no sound from the DIGITAL CD OUT connectors The audio signals of the super audio CD cannot be output from the DIGITAL CD ...

Page 28: ...18 Super Audio CD 3 10 T U V W X Y Z TEXT 14 TOC 11 A Accessories 4 Amplifier not supplied 5 AMS Automatic Music Sensor 12 ANALOG OUT 5 B Batteries 4 C Cable Coaxial digital 5 Optical digital 5 Continuous Play 12 Cord Audio connecting 5 D E Digital filter 20 DIGITAL CD OUT 5 Disc Name 22 Displaying information 13 F G H I J K Hooking Up Audio Components 5 Power 11 L M N O Labeling a disc 23 Locatin...

Page 29: ...29GB Additional Information ...

Page 30: ...aux commandes situées sur le lecteur Vous pouvez également utiliser les commandes de la télécommande si elles portent le même nom que celles du lecteur Les icônes suivantes sont utilisées dans ce mode d emploi Indique que vous pouvez effectuer cette opération avec la télécommande Indique une astuce ou un conseil qui simplifie l opération z Z Pour les utilisateurs au Canada ATTENTION POUR PREVENIR ...

Page 31: ...urer une haute qualité sonore le SCD C333ES utilise différentes technologies de pointe Par exemple un filtre numérique à coefficient variable et d une précision de 24 bits est fourni pour la lecture de CD voir page 20 En sélectionnant l un des cinq filtres offrant chacun des caractéristiques de coupure différentes vous pouvez ajuster la qualité tonale en fonction de la source musicale ou de votre ...

Page 32: ...ande dirigez la vers le capteur de télécommande du lecteur z Quand faut il remplacer les piles Dans des conditions d utilisation normales les piles offrent une autonomie de fonctionnement d environ six mois Lorsque la télécommande n agit plus sur le lecteur remplacez les piles Remarques Ne laissez pas la télécommande à un endroit extrêmement chaud ou humide Veillez à ce qu aucun corps étranger ne ...

Page 33: ...anc L Rouge R A propos de la prise CONTROL A1 zSi vous disposez d un appareil Sony doté d une prise CONTROL A1 ou CONTROL A1 Raccordez le composant via la prise CONTROL A1 ou CONTROL A1 en utilisant un cordon miniprise monophonique 2P Vous pouvez simplifier l utilisation de systèmes audio constitués de composants Sony séparés Pour plus de détails reportez vous aux instructions complémentaires CONT...

Page 34: ... ce commutateur pour mettre le lecteur sous hors tension 2 Capteur de la télécommande 4 3 Touche DISC 1 5 12 Appuyez sur cette touche pour sélectionner le disque 4 Touche SACD CD avec voyant 10 A chaque fois que vous appuyez sur cette touche alors qu un disque hybride page 11 est chargé le lecteur commute entre la couche HD le voyant s allume et la couche CD le voyant s éteint 5 Fenêtre d affichag...

Page 35: ...che CLEAR 20 Appuyez sur cette touche pour effacer un numéro de plage programmé qd Touche DISC SKIP 11 Appuyez sur cette touche pour sélectionner le disque qf PHONE LEVEL Ajustez le volume du casque qg PHONES Branchez le casque qh Touche A OPEN CLOSE 11 Appuyez pour ouvrir fermer le plateau de lecture qj Plateau du disque 11 Appuyez sur A OPEN CLOSE pour ouvrir fermer le plateau de lecture qk Touc...

Page 36: ...cordez ce connecteur à un composant audio à l aide d un câble numérique optique 3 Connecteur DIGITAL CD OUT COAXIAL 5 Raccordez ce connecteur à un composant audio à l aide d un câble numérique coaxial 4 Prises CONTROL A1 5 Connect to the Sony audio component using the monaural 2P mini plug cord emarque Seuls les signaux audio du CD peuvent être sortis via les connecteurs DIGITAL CD OUT indiqués so...

Page 37: ...yez sur cette touche pour entrer dans le mode de saisie de nom 8 Touche H 12 Appuyez sur cette touche pour démarrer la lecture Touche X 12 Appuyez sur cette touche pour activer une pause de lecture Touche x 12 Appuyez sur cette touche pour arrêter la lecture 9 Touches AMS AMS détecteur automatique de musique 16 Appuyez sur cette touche pour localiser une plage spécifique 0 Touches m M 16 Appuyez s...

Page 38: ...per Audio CD Super Audio CD disque à double couche Ce disque est constitué d une double couche HD et offre une lecture de longue durée Appuyez plusieurs fois sur SACD CD jusqu à ce que SACD s affiche Le voyant SACD CD s allume De même comme un disque à double couche est constitué de deux couches HD sur une seule face il n est pas nécessaire de retourner le disque CD classique Ce disque est au form...

Page 39: ...e HD Lecture d un disque Les opérations de lecture normale et les opérations de base en cours de lecture sont expliquées ci après 1 Mettez l amplificateur sous tension Baissez le volume au maximum 2 Sélectionnez la source à l aide du sélecteur de source sur l amplificateur 3 Appuyez sur POWER pour mettre le lecteur sous tension 4 Appuyez sur A OPEN CLOSEpour ouvrir le plateau de lecture et placez ...

Page 40: ... défaut en suivant la procédure suivante 1 Appuyez sur MENU 2 Tournez la commande lAMSLpour sélectionner LAYER SELECT 3 Appuyez sur la commande lAMSL La couche par défaut sélectionnée actuellement apparaît 4 Tournez la commande lAMSL pour sélectionner CD ou SACD puis appuyez de nouveau sur la commande lAMSL Remarque En cours de lecture augmentez progressivement le volume en partant du niveau le pl...

Page 41: ...ro de la plage en cours de lecture et durée de lecture écoulée de la plage en cours affichage par défaut Appuyez sur TIME TEXT Durée restante totale du disque Appuyez sur TIME TEXT Utilisation de la fenêtre d affichage La fenêtre d affichage affiche différentes informations relatives au disque ou à la plage en cours de lecture Cette section décrit les informations qui apparaissent pour chaque stat...

Page 42: ...fichage Avant de commencer la lecture Affichage des informations d un disque TEXT pendant la lecture d un disque Le numéro de la plage en cours apparaît Si le titre du disque comporte plus de 15 caractères les 14 premiers caractères restent après que le titre a défilé dans la fenêtre d affichage Lors de la lecture d un disque DISCS ALL S O N Y B A N D ART CD1 TEXT 1 2 3 4 5 6 7 8 9 10 1 2 3 4 5 DI...

Page 43: ...on d endommager le lecteur Si le plateau de lecture est ouvert par une pression sur la touche EX CHANGE Lorsque la lecture du disque en cours se termine le lecteur interrompt la lecture Si le disque est reproduit en mode de lecture répétée 1 DISC voir page 17 la lecture du disque en cours recommence En mode de lecture aléatoire ALL DISCS voir page 18 les plages du disque en cours sont remélangées ...

Page 44: ...AMSL Touches numériques 10 Localisation d un passage déterminé sur une plage Z Vous pouvez localiser un passage déterminé sur une plage en cours de lecture ou de pause de lecture Localisation d un passage tout en écoutant le son recherche Maintenez la touche m M enfoncée pendant la lecture Vous entendez le son de lecture par intermittences au fur et à mesure que le disque avance ou recule Relâchez...

Page 45: ... sélectionné Lorsque le disque est reproduit en Lecture continue ALL DISCS page 12 Lecture continue 1 DISC page 12 Lecture aléatoire ALL DISCS page 18 Lecture aléatoire 1 DISC page 18 Lecture programmée page 19 H x REPEAT Pour arrêter la lecture répétée complète Appuyez sur x Pour reprendre la lecture normale Appuyez plusieurs fois de suite sur REPEAT jusqu à ce que l indication REPEAT disparaisse...

Page 46: ...etourne pas à des titres qui ont déjà été joués z Vous pouvez activer la lecture aléatoire en cours de lecture Appuyez sur SHUFFLE et la lecture aléatoire démarre à partir de la plage en cours Vous pouvez régler le lecteur pour qu il mélange les plages musicales et les reproduise dans un ordre quelconque Le lecteur lit dans un ordre aléatoire toutes les plages de tous les disques ou du disque que ...

Page 47: ...ce imprimée des disques Si vous refermez le plateau de lecture avant l étape 8 la durée totale de lecture apparaît dans la fenêtre d affichage au bout d un moment Faites attention que si le lecteur ne trouve pas le numéro de la plage programmée sur le disque cette étape est automatiquement supprimée z Le programme reste en mémoire après la fin de la lecture programmée Appuyez sur H pour recommence...

Page 48: ...cée jusqu à ce que CLEAR s affiche Ecoute d un CD avec un filtre fonction de filtre numérique Z Ce lecteur est équipé d un filtre numérique coefficient variable V C En sélectionnant l un des cinq types de filtres STD 1 2 3 ou 4 vous pouvez ajuster le son en fonction de votre environnement d écoute et de la source musicale V C est une marque commerciale de Variable Coefficient Pour plus de détails ...

Page 49: ...es Ils ne peuvent opérer de changements dans la plage de fréquences audibles comme les commandes de réglage de la tonalité de l amplificateur Par conséquent certaines combinaisons d éléments matériels et logiciels peuvent avoir pour résultat que l activation des filtres ne produit aucun effet perceptible Fréquence Hz Réponse dB Filtre à décrochage lent Filtre à décrochage rapide Caractéristiques d...

Page 50: ...t d enregistrement du nom du disque Le nom du disque ne st pas enregistré sur le disque mais dans la zone de mémoire du lecteur En d autres termes vous ne pouvez utiliser le nom du disque si vous jouez ce disque sur un autre lecteur Suppression de tout le nom du disque de tous les disques Mettez le lecteur hors tension Tout en maintenant la touche CLEAR enfoncée appuyez sur POWER pour mettre le le...

Page 51: ...om du disque clignote En tournant la commande l AMS L dans le sens horaire les caractères apparaissent dans l ordre suivant Tournez la commande l AMS L dans le sens antihoraire pour revenir au caractère précédent espace A B C D E F G H I J K L M N O P Q R S T U V W X Y Z a b c d e f g h i j k l m n o p q r s t u v w x y z 0 1 2 3 4 5 6 7 8 9 _ 5 Poussez sur l AMS L pour sélectionner le caractère L...

Page 52: ...rs Pour introduire un caractère appuyez sur la touche numérique correspondant au caractère voulu indiqué à côté de chaque touche numérique Chaque fois que vous appuyez sur cette touche les caractères indiqués à côté de la touche s affichent alternativement Pour introduire des symboles appuyez plusieurs fois de suite sur la touche numérique 1 jusqu à ce que le symbole apparaisse dans la fenêtre d a...

Page 53: ...s un lieu suffisamment ventilé afin de prévenir tout risque de surchauffe à l intérieur du boîtier N installez pas le lecteur sur une surface souple comme un tapis qui risquerait d obstruer les ouïes de ventilation situées sur la base de l appareil N installez pas le lecteur à proximité de sources de chaleur ou dans un endroit excessivement poussiéreux soumis à la lumière directe du soleil ou à de...

Page 54: ...être altérée Avant la lecture nettoyez les disques avec un chiffon de nettoyage Essuyez les disques en allant du centre vers l extérieur Nettoyez les disques avec un chiffon doux légèrement imprégné d eau et essuyez les ensuite avec un chiffon sec N utilisez pas de solvants comme de la benzine du diluant des nettoyants pour disques en vinyle ni de sprays antistatiques Introduction d un disque Il e...

Page 55: ...utilisation de ce lecteur consultez le présent guide de dépannage pour tenter de remédier au problème survenu Si le problème persiste consultez votre revendeur Sony Pas de son Vérifiez si le lecteur est correctement raccordé Assurez vous que vous exploitez correctement l amplificateur Lorsque vous utilisez un casque réglez le volume à l aide du bouton PHONE LEVEL Pas de son via les connecteurs DIG...

Page 56: ...fication du contenu du programme 20 Vérification du contenu du programme 19 Localisation d un disque déterminé 15 en contrôlant le son recherche 16 en définissant la position de début recherche temporelle 16 en introduisant le numéro de plage 16 en observant l indication de la durée rechercher à grande vitesse 16 passage déterminé 16 plage spécifique 16 N O Nom du disque 22 P Q Pause de lecture 12...

Reviews: