66
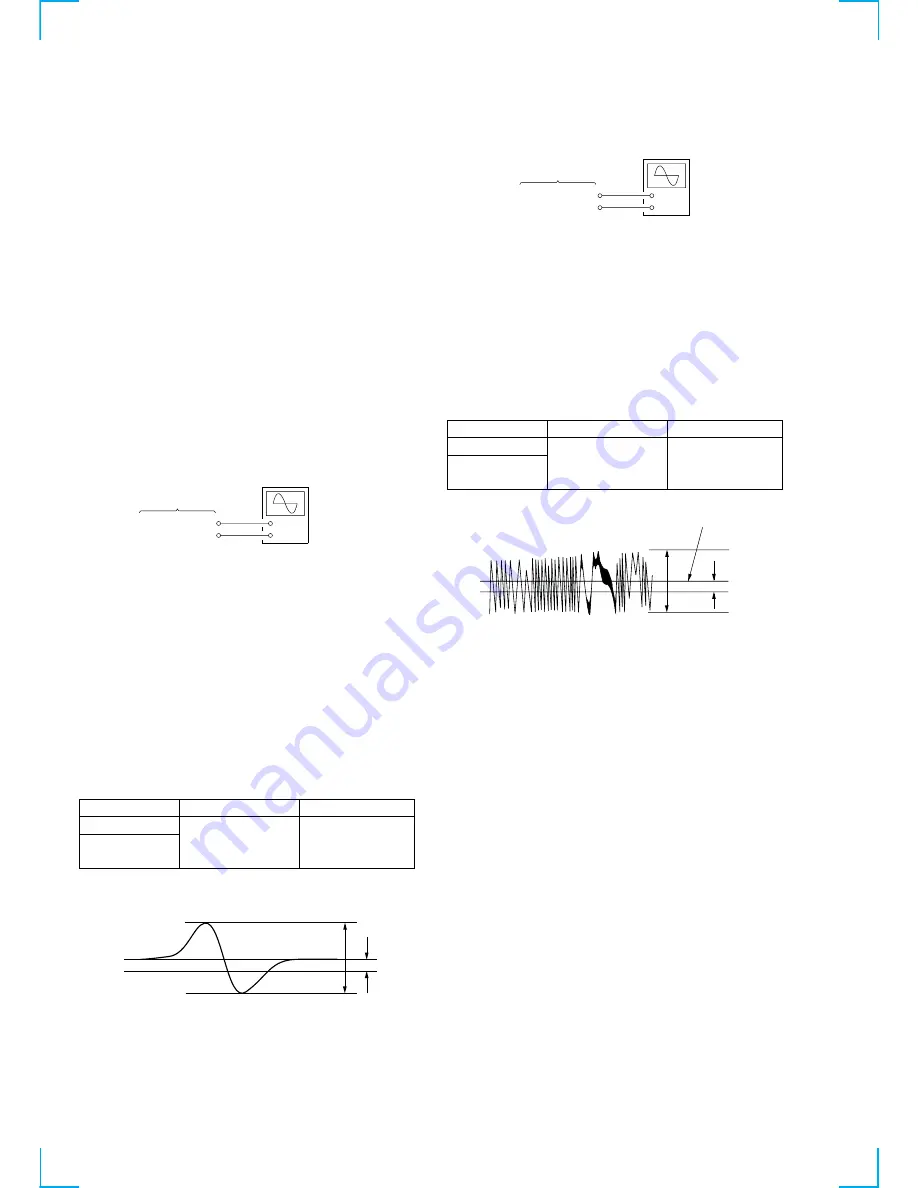
6-8. WAVEFORMS CHECK
This set performs automatic adjustment for each disc, and there-
fore the set need not be adjusted when parts are replaced, but it
requires checking following the description in this section, 6-1.
IC AND FLUORESCENT DISPLAY TUBE CHECK and 6-2.
AUTO CHECK.
For the check, the test mode is used. Wrong setting causes a trouble,
thus requiring extreme care.
BU Electrical Adjustment Mode
The BU electrical adjustment mode is used to check the S curve
waveform, traverse waveform and RF waveform. After a disc is
placed on the tray, each time the
[ AMS ]
dial is pressed,
the check mode is switched in order for S curve waveform
t
traverse waveform
t
RF waveform.
Setting Method:
After setting the test mode, rotate the
[ AMS ]
dial to select
“9C BU DENCHO” and press the
[ AMS ]
dial to enter.
“BU MEASURE” will be displayed if the BU electrical adjust-
ment mode becomes active.
S Curve Check
Connection:
Checking Method:
1. After setting the BU electrical adjustment, place the test disc
(PATD-012 or SATD-S4) on the tray and close the tray, then
press the
[ AMS ]
dial.
2. At the completion of disc type check, “CD DETECT” will be
displayed (for PATD-012 or YEDS-18).
Note:
For the SATD-S4, “SACD DETECT“ is displayed.
3. Press again the
[ AMS ]
dial, and the S curve waveform
check mode will become active and “S-J1 MODE” will be
displayed.
4. Connect an oscilloscope to the TP506 (FE) and TP504 (AVC)
on the MAIN board.
5. Check that the level
A
and
B
of waveform on the oscilloscope
satisfy the specification.
Specified Value:
Disc
A
B
SATD-04
PATD-012 or
0.7 to 1.7 Vp-p
- 0.1 to +0.1V
YEDS-18
Note:
For easier observation of this waveform, extend the sweep time
and raise the brightness.
Checking and Connecting Location : See page 68.
MAIN board
TP506 (FE)
TP504 (AVC)
+
–
oscilloscope
A
B
S curve waveform
VC
Traverse Check
Connection:
Checking Method:
1. Under the condition of S curve waveform check mode in step
5, press the
[ AMS ]
dial.
2. After “WAIT” is displayed, the traverse waveform check mode
will become active and “TRAVERSE MODE” will be dis-
played.
3. Connect an oscilloscope to the TP513 (TE) and TP504 (AVC)
on the MAIN board.
4. Check that the level
A
and
B
of waveform on the oscillo-
scope satisfy the specification.
Specified Value:
Disc
A
B
SATD-04
PATD-012 or
0.9 to 1.5 Vp-p
- 0.1 to +0.1V
YEDS-18
Checking and Connecting Location : See page 68.
MAIN board
TP513 (TE)
TP504 (AVC)
+
–
oscilloscope
A
B
VC
Center fo the waveform
Traverse waveform
l
L
l
L
l
L
l
L
l
L
l
L
Summary of Contents for SCD-C333ES - Super Audio Cd Changer
Page 18: ...SCD C333ES 18 18 4 2 SCHEMATIC DIAGRAM RF SECTION Refer to page 40 for Waveforms ...
Page 28: ...SCD C333ES 28 28 4 12 SCHEMATIC DIAGRAM AUDIO SECTION 2 3 ...
Page 29: ...SCD C333ES 29 29 4 13 SCHEMATIC DIAGRAM AUDIO SECTION 3 3 ...
Page 34: ...SCD C333ES 34 34 4 18 SCHEMATIC DIAGRAM HP SECTION ...
Page 36: ...SCD C333ES 36 36 4 20 SCHEMATIC DIAGRAM SENSOR SECTION Refer to page 45 for IC Block Diagram ...
Page 38: ...SCD C333ES 38 38 4 22 SCHEMATIC DIAGRAM POWER SECTION ...


