background image

33

Content

  Chapt

er 1  Us

e

r Guid

e

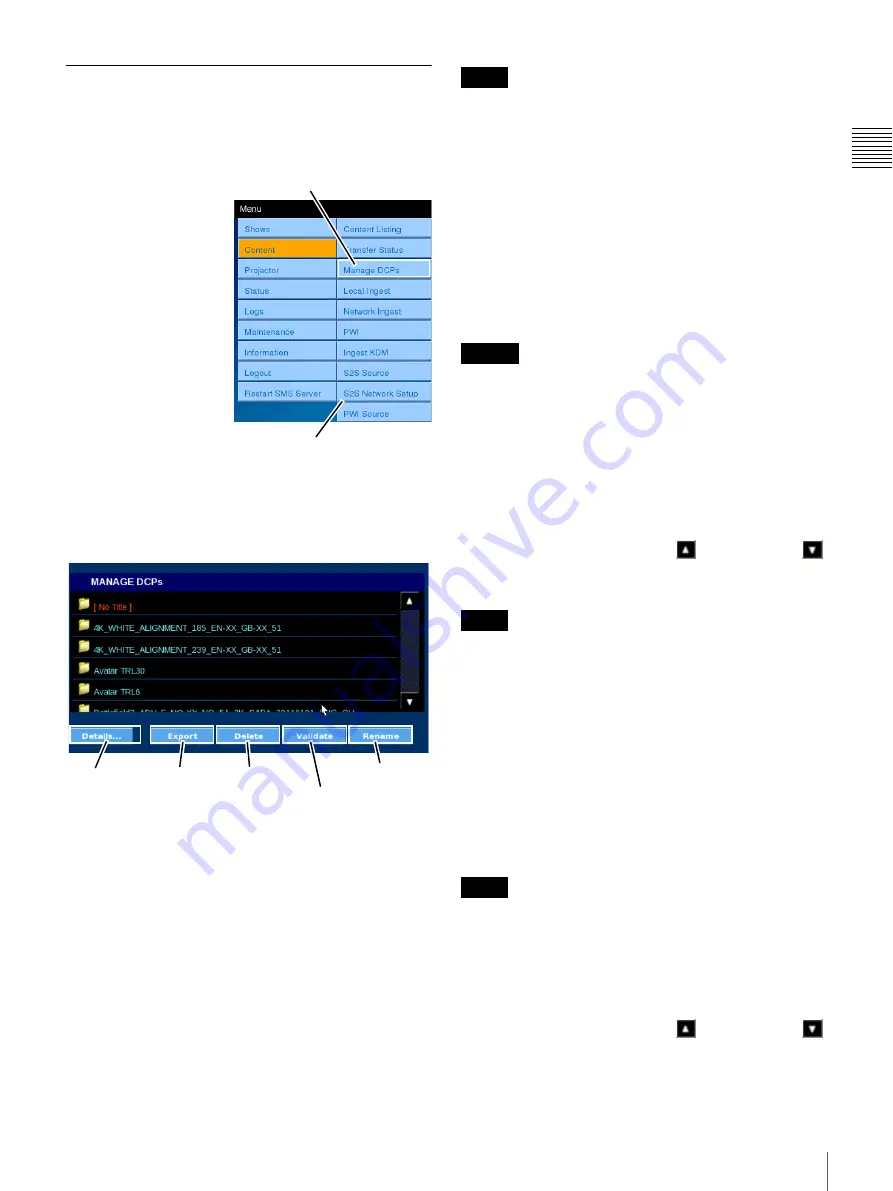
Manage DCPs

The MANAGE DCPs pane includes the ability to view the 

Details

 of a selected DCP, to 

Delete

 a selected DCP, and 

to check the 

Validate

 status of a selected DCP.

To Manage DCPs, tap 

Menu

, tap 

Content

 and 

then tap 

Manage DCPs

The MANAGE DCPs 
pane appears.

While the majority of 
DCP management will 
take place using the SMS 
Controller. However, 
similar features have 
been made available 
from the Projectionist 
Terminal to allow 
operators to perform 
DCP management tasks 
when the need arises.
You can save up to 350 DCPs on the LMT.

The functions available on the MANAGE DCPs pane are 
shown in the illustration (below). A brief description 
follows.

View DCP Details

Allows you to view details of the selected DCP. To view 
information about an existing DCP, tap 

Menu

, tap 

Content

, and then tap 

Manage DCPs

. The MANAGE 

DCPs pane appears. Tap the 

DCP

 to select, and then tap 

Details

.

Export DCP

Allows you to export a DCP from the Media Block 
controlled storage. Tap the DCP to select, and then tap 
Export, the target storage can be selected.

Delete DCP

Allows you to delete an existing DCP from the Media 
Block controlled storage.

If a DCP component (CPL) has been included in a Show 
Playlist (SPL), any attempt to remove the DCP and a 
confirmation message will appear. This is because deleting 
the DCP while an SPL exists that uses a CPL associated 
with the selected DCP would cause playback of the SPL to 
fail. Once all SPLs in use have been deleted, then the DCP 
can be deleted.

To remove an existing DCP, tap 

Menu

, tap 

Content

, and 

then tap 

Manage DCPs

. The MANAGE DCPs pane 

appears. Tap the 

DCP

 to select, and then tap 

Delete

.

A DCP can be deleted during a showing, but a DCP that is 
included in a currently playing SPL cannot be deleted.

DCP ingestion cannot be performed while a DCP is being 
deleted.

Validate DCP

The Validate DCP feature causes the Media Block to 
validate the content of the DCP packing list and then 
validate each file (essence) described in the packing list 
against a check value present in the packing list for each 
essence file. To validate a DCP, tap 

Menu

, tap 

Content

and then tap 

Manage DCPs

. The MANAGE DCPs pane 

appears. Tap either the 

Scroll Up

 or 

Scroll Down


arrow until you locate the DCP of interest, tap the 

DCP

 to 

select, and then tap 

Validate

.

The Validate process uses the same Media Block resources 
as presentation and its duration is related to the Content 
length. Content presentation will take priority, the Validate 
process is suspended during presentation and resumes 
when presentation is completed.

Rename DCP

Allows you to change the DCP Name. A DCP may or may 
not be “named” during the creation of the distribution 
package. If a name has been included in the distribution the 
name may not be one that is easily recognized by the user. 
The feature allows you to Rename the DCP for easier 
reference.

If a DCP is renamed and then subsequently ingested again 
the assigned name will be lost and the DCP name will 
revert to the name assigned (if any) when the distribution 
package was created.

To rename an existing DCP, tap 

Menu

, tap 

Content

, and 

then tap 

Manage DCPs

. The MANAGE DCPs pane 

appears. Tap either the 

Scroll Up

 or 

Scroll Down


arrow until you locate the DCP of interest, tap the 

DCP

 to 

select, and then tap 

Rename

. An on-screen keyboard 

Tap Manage DCPs

Content Menu

Details

Delete (DCP)

Validate (DCP)

Rename (DCP)

Export

Note

Caution

Note

Note

Summary of Contents for Screen Management System

Page 1: ...Screen Management System Projectionist Terminal 2011 Sony Corporation 4 291 777 14 1 User s Guide Software Version 2 50 ...

Page 2: ...he respective companies or their respective makers For projector specific information refer to projector manuals SRX Controller The SRX Controller application exercises direct control over the projector via the projector s serial control port Operations using the SRX Controller can be in conflict with operations using the Projectionist Terminal or the SMS Controller The SRX Controller application ...

Page 3: ...ws 13 Now Showing 13 Show Controls 15 Show Listing 16 Play Show 17 View Show Details 17 Manage Shows 18 View Playlist Details 19 Create Show Playlist SPL 20 Edit Show Playlist SPL 24 Delete Show Playlist SPL 27 Schedule 27 View Previous Day Next Day 28 View Today 28 Automation 28 GPI Trigger 29 Adding an SPL to the GPI SPL List 29 Deleting an SPL from the GPI SPL list 29 Content 30 Content Listing...

Page 4: ...unction Setup 43 Configure Function 43 Projection Type 46 Projector FUNCTION 47 Adjustment 47 Projection Type 2D 47 Projection Type 3D 49 Ghostbuster 51 Projector Remote Update 51 Status 52 Projector Status 53 Power 53 Peltier Thermal Devices 53 DVI signal Ballast RT Clock Battery 53 Board Lens Electrical AIr FIlter Filter Duct 53 Connection and Battery 53 Lamp Status 54 Lamp Information 54 Lamp I...

Page 5: ...NS Address Assignment 65 Time Zone 66 Clock Settings Role Restricted 67 Closed Caption Setup 68 Owner Information Role Restricted 68 eCNA Settings Role Restricted 69 Restart SMS Server 69 Restart SMS Server Application 69 System Startup 70 System Shutdown 70 Initiate System Shutdown 70 Chapter 2 Theater Setup and System Security Overview 72 Theater Setup 72 System Security 72 Theater Setup 73 Logi...

Page 6: ...6 Table of Contents System Security 79 Security Initialize 79 Set Time Source for SMS Server 79 ...

Page 7: ...SRX R320 System Status Indicator Lamps Projector Circuit Breakers Status Message Display Projector Power Lamp Status System Start Switch Caution Status Indicator Lamp Lamp Color Lamp State Meaning OFF OFF Power OFF System Shutdowna a Power OFF Power is removed from the system subsystems1 are shutdown UPS power is unavailable RED FLASHING Major Errorb b Major Error Media Block offline Enclosure tem...

Page 8: ... of a Show Playlist is intended to allow inclusion of either Content CPL other Sub Playlist s or Commands The structure of a typical Show Playlist is shown in the illustration below Composition Playlist CPL Composition Playlists CPL are shown on the right in the above illustration and are the reference files required to play the content CPLs exist on the lowest level of the Show Playlist SPL hiera...

Page 9: ...cannot be obtained due to the status of the library server or network and the buffer length playable duration drops to below 7 minutes an alert will appear in the log If the buffer length drops below 30 seconds playback will stop If playback stops it cannot be started again until the buffer length reaches 10 minutes under default settings or more The buffer length is an approximate guide and the a...

Page 10: ...Password tap Backspace to remove the last character As you enter your Password it is masked and appears above the keyboard To abort the Login process tap Cancel The Login process is cancelled and the display returns to the Login screen The Now Showing screen appears when the Login process is successful Logout Once you have Logged In to the Projectionist Terminal it remains active and available to ...

Page 11: ...dicator provides an easily viewed indication of the state of the Projector Lamp Prepare Auditorium Button The Prepare Auditorium button is a control which sets the Projector to ON from STANDBY or Lamp OFF opens the douser and enables audio output from the Media Block STATUS Alert Button The STATUS Alert button at the bottom of the screen toggles the Status Warning Selector buttons These are dual p...

Page 12: ...rol button is shown by the status label OPEN CLOSE and the status indicator When the indicator is lit label is CLOSE the projector DOUSER is closed and the screen in the auditorium is dark To re enable the projector output turn the DOUSER to open tap the DOUSER OPEN CLOSE button in the DOUSER block A confirmation dialog appears When you tap Yes the projector output returns to normal and the screen...

Page 13: ...howing Now Showing is the initial screen which appears following a successful Login Now Showing displays the status of the Current Presentation Show To view the status of the current presentation tap Menu tap Shows and then tap Now Showing The NOW SHOWING pane appears The primary Presentation Control available on Now Showing is the PLAY STOP control Secondary controls may be available based on the...

Page 14: ... Time An alternate display indicating either the Remaining Time or the Total Running Time for the current presentation Tap to change Play Indicator This indicates whether the current presentation has been started manually MANUAL as a scheduled SMS event SCHEDULE or by an external trigger input AUTOMATION Regardless of how the current presentation has been started once the presentation is stopped a...

Page 15: ...ay While Ingest title display will disappear from the Now Showing screen Show Controls The basic PLAY STOP Show Controls appear on the Now Showing pane With the exception of the Show Title and Content Title scroll buttons all controls on the Now Showing pane are current mode dependant For example when the Show is in the Play mode the only control available to the projectionist is STOP STOP Present...

Page 16: ...o rewind from the Base Offset When you tap the Accept button the presentation will resume from the specified position Offset playback is only possible in the minus direction during PWI presentations PAUSE Presentation When the current show is in progress the PAUSE control is available The PAUSE function halts the current presentation but leaves the most recent frame image presented on the screen T...

Page 17: ...s These elements may be Composition Playlists Content or Sub Playlists2 The sequence of presentation of the Playlist Elements is displayed in a SHOW DETAILS pane Show Information The Show Information group contains basic information regarding the Show This includes the Title Duration and MPAA Rating Show Titles may be lengthy and exceed the allocated space Tap when available the Scroll Left or Scr...

Page 18: ...ent When the Playlist Element of interest is a Sub Playlist then a new SHOW DETAILS popup appears The Frame Rate and HFR Content have been added as the last line Manage Shows The MANAGE SHOWS pane displays information and controls relating to Show Playlists SPL resident in the SMS From the MANAGE SHOWS pane you can create a New SPL Edit an existing SPL view Details of an existing SPL and Delete an...

Page 19: ...um Unit Other systems in the same facility may have different Valid Use Dates for the same Content CPL Close Details To close the Show Details screen for the Playlist Content tap Close This will return you to the previous level of Show Details Playlist Elements The Playlist Elements group provides a sequenced graphic representation of the individual Content and Sub Playlists that comprise the Show...

Page 20: ... from setting the correct projector FUNCTION i e a FUNCTION that is identified as a 3D FUNCTION To insure that 3D content presentation is successful the first Playlist Element in a 3D SPL should be a FUNCTION appropriate to the 3D Projection Type Add Start Offset Virtual Black Leader In film black leader is used to provide a brief interval between different content This often is used simply to pro...

Page 21: ...u locate the Content of interest tap the Content Title to select and then tap Add The added Content appears as a Playlist Element at the end of the Playlist 3D Content is identified in purple When 3D Content is added to an SPL the PLaylist Title is shown as purple in the list of Playlists When Playlist Elements already exist you may need to reposition the newly added Content to a different locatio...

Page 22: ...end of the Playlist When Playlist Elements are existing you may need to reposition the newly added Sub Playlist to a different position within the existing events To move the Sub Playlist in the right side list tap the Title to select and then tap Down or Up control illustrated to the right to move the selected Playlist Element one event position in the desired direction Continue to tap Down or Up...

Page 23: ...l setting using the same method as described for the Stop point You can specify a Playlist SPL to be played during the interval period This is the Interval SPL When you tap the Interval SPL button the Select Show pane appears Tap the desired SPL and then tap Return to Setup To specify an offset tap the Offset button The ENTER REWIND TIME pane appears The additional command lets you specify an abso...

Page 24: ...k Leader is used to provide a brief interval between different content This often is used simply to provide pacing to the sequence of content being presented e g between trailers or between the last trailer and the feature start In Digital Cinema black can be either the absence of the playback of any Content virtual black1 during presentation or it can be actual black content supplied as a CPL inc...

Page 25: ...ng Playlist Elements are adjusted to accommodate the duration of the Black Playlist Element To add Black which is actual Content then locate the Content and add it to the Playlist in the same manner as you would add other Content See Add Content on page 21 When all changes are complete tap Save CREATE PLAYLIST closes and you are returned to the MANAGE SHOWS pane Be sure to tap Save before leaving ...

Page 26: ...ylist Commands can be moved within the SPL To move a Command in the SPL tap either the Scroll Up or Scroll Down arrow until you locate the target Command tap the Command event to select the Edit button appears and then tap Edit The Enter Offset popup appears adjust the Offset value tap Accept and then tap Save Edit Playlist closes and you are returned to the MANAGE SHOWS pane Add Sub Playlist2 To ...

Page 27: ...r the Scroll Up or Scroll Down arrow until you locate the Playlist of interest tap the Playlist to select and then tap Delete The selected Playlist is removed from the system Deleting a Show Playlist does not delete the Content Commands or other Sub Playlists from the system Schedule Schedules Show Schedules which have been created using the SMS Controller are viewable from the Projectionist Termi...

Page 28: ...gin Automation From the SMS Controller you can create Automation control events linked to external controls for legacy auditorium devices Automation controls can be executed from the Projectionist Terminal To View and execute Automation controls tap Menu tap Shows and then tap Automation The AUTOMATION pane appears and contains a set of labelled buttons which can be used to trigger the external de...

Page 29: ...PI triggering is active can be set with the Association Term item Tap the Edit button and specify the Start and End points After using the Add button to register the entry in the GPI SPL LIST tap the Save button to save the setting The GPIO Profile setting for the respective GPIO input channel can be made at the SMS Controller This should be completed before setting the GPI Trigger For information...

Page 30: ...T pane for ingesting a DCP via the network Source addresses can be added via S2S Source The PWI menu selection opens the PLAY WHILE INGEST pane which allows you to control ingest of a CPL from an external library server via the network The source address can be added with the PWI Source menu selection The Ingest KDM menu selection opens the INGEST KDM pane which displays a list of predefined folde...

Page 31: ...in the list If the Title of interest is not visible tap either Scroll Up or Scroll Down until the specific Title is found Once the Title has been located tap to select the Content Title and then tap Details The CONTENT DETAILS pane appears The CONTENT DETAILS popup contains selected information about the Content CPL In addition to the Content Title and its identification UUID Content Details inclu...

Page 32: ... at least 30 seconds before resuming the job Cancel Job Allows you to Cancel the ingest of a job in progress To cancel the Ingest Job in progress locate the target DCP in the Ingest queue using the Scroll Up or Scroll Down arrow select the Job and then tap Cancel Job A confirmation message appears tap Close Once cancelled you must reschedule the Ingest of the DCP Jobs queued for Ingest but not yet...

Page 33: ...pears Tap the DCP to select and then tap Delete A DCP can be deleted during a showing but a DCP that is included in a currently playing SPL cannot be deleted DCP ingestion cannot be performed while a DCP is being deleted Validate DCP The Validate DCP feature causes the Media Block to validate the content of the DCP packing list and then validate each file essence described in the packing list agai...

Page 34: ...oll Down until you find the desired top level folder and then tap the folder view its contents Again Scroll Up or Scroll Down to locate the target DCP tap to select and then tap Ingest The DCP Ingest job is placed at the end of the Ingest queue for processing If you have more than one DCP to ingest locate the next DCP select and then tap Ingest 1 If you wish to cancel an ingest job you must use th...

Page 35: ...ny Trusted Circle on page 9 While file transfer for Network Ingest is in progress Local Ingest Network Ingest and PWI cannot be performed on the source LMT from which the files are transferred PWI Play While Ingest PWI Play While Ingest is an ingest method that allows playback of a single CPL while it is ingesting Unlike Local Ingest and Network Ingest PWI allows you to start a presentation before...

Page 36: ...ed and tap the Cancel PWI button a confirmation dialog box appears When you tap Yes Play While Ingest is canceled and a cancellation results dialog will appear after a few moments After Play While Ingest is canceled any Local Ingest or Network Ingest operations that were stopped will resume If Play While Ingest is performed again the Local Ingest or Network Ingest operations will stop again In add...

Page 37: ... all KDM contained in a folder select the target folder and then tap Ingest The Ingest process is queued and Ingest proceeds in as a background process The folder hierarchy on the transfer media may be more than one level deep Continue to navigate folders until the target KDM has been located View KDM Details To view detail information for a specific KDM locate the specific KDM in the list Tap to ...

Page 38: ...s by tapping Save Settings at the bottom right To complete the operation tap Save Settings Do not use spaces or plus signs in the Name field S2S Network Setup You can display S2S address allocation information To access the S2S NETWORK SETUP pane tap Menu Content S2S Network Setup in sequence The S2S Network Setup selection opens the S2S NETWORK SETUP pane which allows making S2S Network transfer ...

Page 39: ...pane you can register the names IP addresses account names and passwords of the library servers that will serve as the ingest sources during Play While Ingest To register a new source enter the name and IP address of the library server that will serve as the ingest source in Name and IP Address on the left and enter the name and password of the account registered to the library server in UserID an...

Page 40: ...the Luminance Offset applied to the current presentation from the Digital Cinema projection system From FUNCTION SETUP you can modify a limited number of projector settings Lamp Power Zoom Focus and Electrical V Shift and save these new settings to the Current Function From Projection Type you designate whether the projector is configure for 2D or 3D presentation From Adjustments you perform proje...

Page 41: ...ct it works in much the same way by placing an opaque blade in the output light path When you set the projector DOUSER to CLOSE the auditorium screen goes dark However this only applies to the image portion of the presentation The audio portion of the presentation continues and must be muted using the separate Audio Muting control Audio Muting The AUDIO MUTING control function in the PROJECTOR CON...

Page 42: ... the Projection Type will result in a warning message appearing and the selected FUNCTION not applied Click OK to close the message To select a Function verify the correct Projection Type is indicated adjacent to the Lamp Indicator tap Menu tap Projector tap Projector Control and then tap Change Function The Change Function pop up window appears Tap the UP ARROW or DOWN ARROW until the specific FU...

Page 43: ...able FUNCTIONs F1 through F20 The majority of the projector settings must be configured and saved to a FUNCTION using the SRX Controller1 application However some settings may require adjustment of a more immediate nature These are available to you on the FUNCTION SETUP screen Controls in the ADJUST PROJECTOR group are unavailable when the Projection Type is set to Single 3D A limited number of ad...

Page 44: ...er tap or press and hold the LEFT ARROW Lower or RIGHT ARROW Raise while viewing the projected image on the screen Lamp Power changes are made in increments of 1 The Indicator shows the current Lamp Power setting To save the adjusted Lamp Power in the Current Function tap Save to FUNCTION Once changes are saved to the Current Function THERE IS NO UNDO and the changes you have made will affect the ...

Page 45: ...ssociated CPL is included in a presentation Zoom is a mechanical adjustment of the projector lens and should not be confused with any kind of image manipulation creating a zoom effect To adjust Zoom the image size tap Menu tap Projector tap Function Setup and then either tap or press and hold the Minus or Plus button associated with Zoom while observing the projected image on the screen This adjus...

Page 46: ...e in the approximate position desired Projection Type The PROJECTION TYPE pane contains basic controls which allow you to configure the Projector for either 2D or 3D Stereoscopic operation The Auditorium Unit supports presentation of 3D Stereoscopic Content The presentation of 3D Content is realized by mounting a specially designed lens in lieu of the standard 2D lens This lens is designed to comb...

Page 47: ...pane based on a 2D Projection Type appears The ADJUSTMENT pane contains a display showing which FUNCTION is currently selected1 and controls allowing access to TEST PATTERNS and to REGISTRATION ADJUSTMENT Test Pattern Select A number of Test Patterns are available for use during the Registration Adjustment process In addition other test patterns are available for other adjustment processes e g Ima...

Page 48: ...nt range is from 2pixels to 2 pixels with an increment of adjustment of 1 pixel Tap the appropriate Plus or Minus button to align the Red Green and Blue images as observed on the auditorium screen Insure that Lens Focus is optimized prior to starting the registration process In some cases it may be beneficial to use a white sheet of paper placed flat against the screen so you can see the black whi...

Page 49: ...and then tap Test Pattern The TEST PATTERN popup appears When making a Test Pattern selection other Projector Settings remain unchanged but the selected test pattern appears on the screen Make sure that OFF is selected when adjustments are complete Test Pattern CONTRAST ADJUST is enabled only when Input C is selected Image Position 3D Adjustment Image Position Adjustments can only be performed in ...

Page 50: ...e ADJUSTMENT pane reappears 3 To assist in the process of positioning the right eye left eye images you can block the image by muting the right left or both images To block an Image tap Close Tap Picture Muting select the Image to be muted and then tap Close The ADJUSTMENT pane reappears 4 Tap Image Position and continue with the adjustment process Picture Muting To select the picture to be muted ...

Page 51: ...ed on the projector the image from the input for which you wish to change format is displayed by the current projector Ghostbuster To access GHOSTBUSTER tap Menu tapProjectorand then tap Ghostbuster The Ghostbuster function can be verify ON OFF The function can only be enabled or disabled during Lamp ON status Projector Remote Update To make settings for updating the projector software via the net...

Page 52: ...llowing status information forthe following areas and subsystems in the Auditorium Unit Projector Lamp Fan Temperature Media Block RAID Additional information may be contained in documentation specific to the various sub system To view the status information tap Menu and then tap the specific sub system from the available Status Menus The Status panes present views into the selected sub system Ind...

Page 53: ... Block originated signals Peltier1 Thermal Devices Power to the thermal control devices associated with the Red Green and Blue R G B imagers is monitored and the status is shown on this screen DVI signal Ballast RT Clock Battery Indicates the status for specific areas on the projector DVI signal Indicates that the format of an externally applied DVI D signal has been verified against the configura...

Page 54: ... the lamp at less than 100 power This value is reset to 0 zero when the lamp is replaced and a new Lamp Serial Code is entered Operation Hours The value shown for Operation Hours is the total number of hours when AC Mains are applied to the Projector Total Lamp ON Hours The value shown for Total Lamp ON Hours is the actual number of hours when the Lamp is in the ON mode The lamp should be replaced...

Page 55: ...lation fans One is located in the Lower base area and the other is located in the Upper area Both fans are monitored and their status is shown on the Enclosure indicator The indicator will display red when an error is detected Projector A number of areas in the Projector have fans dedicated to maintain operating temperatures Areas having a major affect on the quality of image presentation or lamp ...

Page 56: ...dicator will display red when an error is detected Enclosure The Enclosure Auditorium Unit contains two thermistors monitoring temperatures One is located in the Lower base area and the other is located in the Upper area Both thermistors are monitored and their status is shown on the Enclosure indicator The indicator will display red when an error is detected Projector A number of areas in the Pro...

Page 57: ...he projector or it can be Ingesting Process Component Included in the MEDIA BLOCK System group are three indicators Video Indicates the status or health of the video signal processing Audio Indicates the status or health of the audio signal processing Process Indicates the status or health of the signal image sound essence processing Battery Indicates the status or health of the internal batteries...

Page 58: ... appears On the RAID pane a consolidated status indicator for the RAID is shown along with individual icons indicating the status of each individual HDD RAID Status A single indicator provides consolidated status information for the RAID in the Media Block HDD Status The icons of individual HDD indicate the status of the specific Hard Disk Drive HDD are numbered 1 to 7 which corresponds to their l...

Page 59: ...or Code and a brief Message An example of this type of log is shown below The SMS communicates every 10 seconds with the projector and records the status Touching Refresh reads the latest status information The Alert Message Log and SMS Server Log are primarily textual in nature with an extended Date and when appropriate Time stamp and a more detailed Message as shown below When the STATUS button ...

Page 60: ...ojector pane tap Menu tap Maintenance and then tap Projector The Projector Maintenance pane appears which allows the you to Refresh the Projector data select a Test Pattern to be shown on the screen and initiate the Luminance calibration process In addition the current Lamp Information is shown Some projector setup and maintenance operations use the SRX Controller2 application An example would be ...

Page 61: ...Refresh Projector Data is a maintenance function Refreshing the SMS Server with new data from the projector takes some time and may result in unexpected projector operation should this action be taken during Show presentation LAMP INFORMATION Displays the Serial Code Lamp Serial Number and the maximum rated Lamp Power LUMINANCE ADJUSTMENT Adjust Luminance Calibration Allows you to calibrate the Lu...

Page 62: ...as a reference for adjusting lamp power to maintain the lamp brightness value stored in the FUNCTION The Luminance Adjustment process takes some time to complete and should not be undertaken without an understanding of the process Normally it is done when the lamp is replaced and periodically to insure correct tracking of lamp brightness i e screen luminance vs lamp power Essentially the process s...

Page 63: ...that the latest Alert Messages are present in the list tap Refresh To access the Security pane tap Menu tap Maintenance and then tap Security The Security pane appears It may take some minutes for the Security Services to come to a ready state following initial application or restoration of system power When the Auditorium Unit s CSS Cavity Security System has been breached the Security indicator ...

Page 64: ...ia a dedicated network connection on the SMS Server Configuration of this connection is realized using the Network Setup screen on the Projectionist Terminal Settings available on the Network Setup screen apply to the SMS Server s Theater Network connection only Typically the Screen Management System Controller is connected to the Theater Network If the Theater Network settings are incorrect then ...

Page 65: ...the Keypad and then tap Accept Automatic Network IP address To set the Automatic IP address option tap AUTOMATIC in the IP ADDRESS ASSIGNMENT group and then tap Save Settings The appropriate value for IP Address Subnet Mask and Gateway are assigned by the DHCP server Before closing this screen you must tap the Save Settings button to send the changed settings to the SMS Server If you move to anoth...

Page 66: ...gs The appropriate value for the Primary DNS IP address and Secondary DNS Server IP address are obtained from the DHCP server Before closing this screen you must tap the Save Settings button to send the changed settings to the SMS Server If you move to another screen without tapping the Save Settings button all changes will be lost Time Zone The Time Zone Settings are used to convert the date time...

Page 67: ...into two areas Time Settings SMS Server internal clock and Secure Clock Media Bock clock To set the reference source for SMS Server time synchronization select either the Synchronize with Media Block or Synchronize with NTP Server option When you select Synchronize with NTP Server the IP Address box appears where you enter the NTP source Tap the IP Address box and using the on screen keyboard ente...

Page 68: ...enance and then tap Owner Info The Owner Information screen appears The Owner Information screen contains information relating to the name of the Owner Exhibitor or Company the Geographical area the Auditorium Name ID and the Serial Number of the Projector The Projector Serial Number is automatically filled by information returned by the projector To enter new values in the available boxes tap the...

Page 69: ...so enter the separator dots Restart SMS Server The SMS System allows the operator to Restart the SMS Server application and optionally1 execute a System Shutdown from the Projectionist Terminal Access to the System Shutdown function is configured during installation Restart SMS Server Application Should restarting of the SMS Server application become necessary you can realize this from the Project...

Page 70: ...d to insure that the subsystems responsible for content storage and system control are properly cycled to a power off state This process is managed by the SMS Server and is triggered by the removal of single phase AC mains power from the Auditorium Unit In the SRX R320 based Auditorium Unit AC mains Power to the projector subsystem coming from the distribution panel is routed through circuit break...

Page 71: ...rmation message appears Tap YES to initiate the Shutdown process Once Shutdown has been confirmed there is no way to abort the process The Shutdown process can take an extended period of time if initiated while the Lamp is ON This delay is because of the requirement for cool down of the Projection Lamp Once the Projector enters STANDBY mode Lamp cooldown has completed1 the SMS Server initiates the...

Page 72: ...eable personnel Refer to the Digital Cinema Projector Service Manual for additional information Registration Adjustment The Registration Adjustment screens provide access to the electrical adjustment to the X and Y position of the Red Green and Blue images Previously the X Y adjustment of the images was realized by using the SRX Controller application Filter Timer Reset The quality of the air circ...

Page 73: ...on the keyboard and then tap Accept When you tap Accept the Password box appears 4 Using the on screen keyboard tap your Password and then tap Accept If you make an error in entering your Password tap Backspace to remove the last character As you enter your Password it is masked and appears above the keyboard To abort the Login process tap Cancel The Login process is cancelled and the display retu...

Page 74: ...eviously these required using the SRX Controller application These settings are only available through the predefined Theater Setup login thus insuring that these adjustments are only done by qualified personnel Enter Lamp Serial Code To enter a new lamp Serial Code log in as trsetup tap the Menu tap Projector and then tap Lamp Install Installation of a new lamp is a multistep process and once the...

Page 75: ...ation1 Previously Lamp Axis Adjust required using the SRX Controller application Lamp Axis Adjust is only available through the pre defined Theater Setup login thus insuring that this adjustment is only done by qualified personnel If power to the projector is turned off during Lamp Axis Adjust restart the SMS Adjust X Y Z Lamp Axis Installation of a new lamp is a multistep process and once the lam...

Page 76: ...either the Plus or Minus button five times while observing the reading on the Status Display Adjust the Z Axis for an average peak level You should use to adjust the Z axis under normal conditions There is a lag between when you tap either the Plus or Minus button and the observation of a change on the Status Display Also the readings you observe may have some variation due to the way in which the...

Page 77: ...r to performing Registration Adjustment set the Projector to ON mode To set On mode tap Menu tap Projector tap Power and then tap ON Make sure the Douser is set to OFF Allow a minimum of 30 minutes warm up to insure that the imaging devices have reach their operating temperature Also prior to performing Registration Adjustment verify that focus is optimized To adjust the focus recall the correct l...

Page 78: ...tration process In some cases it may be beneficial to use a white sheet of paper placed flat against the screen so you can see the black white transition to verify lens focus use crosshatch pattern and also to make it easier to see registration errors When the image is properly registered click Next The Registration Adjustment screen closes and you are returned to the Menu Filter Timer Reset The n...

Page 79: ...bility to initialize the system security is restricted to a trusted user This is done to insure that only responsible persons can access the interior of the Auditorium Unit and then resume decryption of encrypted Content Elements and their presentation process It you are the trusted user you will also see a popup shown to the right relating to initializing the system security To initialize Cavity ...

Page 80: ...portion of the Clock Settings pane includes the ability to adjust the secure System Clock in the Media Block To adjust the Secure Clock select the value you wish to adjust e g tap HH MM SS The value is selected and then tap the appropriate Plus or Minus button to set the desired value1 1 The maximum change is plus or minus 6 minutes per year Save Settings Media Block Time Source NTP Time Source Up...

Page 81: ...Sony Corporation ...

Reviews: