background image

16

Adjust the picture’s position manually 
(H Center /V Center)

If the picture is not in the center of the screen, adjust the picture’s 
centering as follows. 

1

Set the resolution to 1920

 × 

1200 on the computer.

2

Load the Utility Disk.

3

Start the Utility Disk and display the test pattern.
For Windows

Click [Utility] 

t

 [Windows]/[Win Utility.exe].

For Macintosh

Click [Utility] 

t

 [Mac]/[Mac Utility].

4

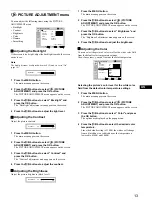
Press the MENU button.

The main menu appears on the screen.

5

Press the 

M

/

m

 buttons to select 

 (INPUT 

SETTING) and press the OK button.

The INPUT SETTING menu appears on the screen.

6

Press the 

M

/

m

 buttons to select “H Center” or “V 

Center” and press the OK button.

The “H Center” adjustment menu or “V Center” adjustment 
menu appears on the screen.

7

Press the 

M

/

m

 buttons to center the test pattern on 

the screen.

8

Click 

[END]

 on the screen to turn off the test pattern.

x

Selecting the Input Priority

When computers are connected to both of the monitor’s video 
input connectors (DVI-D and HD15) for either INPUT1 or 
INPUT2, you can choose the connector to which a signal is input 
preferentially.
For INPUT1, use “Input1 Priority,” and for INPUT2, use “Input2 
Priority.”

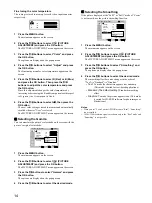
1

Press the MENU button.

The main menu appears on the screen.

2

Press the 

M

/

m

 buttons to select 

 (INPUT 

SETTING) and press the OK button.

The INPUT SETTING menu appears on the screen.

3

Press the 

M

/

m

 buttons to select either “Input1 

Priority” or “Input2 Priority” and press the OK 
button.

The options are displayed on the popup menu. 

4

Press the 

M

/

m

 buttons to select the desired mode.

DVI-D (The default setting):

 The signal input to the 

DVI-D input connector (digital RGB) is displayed 
preferentially.

HD15:

The signal input to the HD15 input connector 
(analog RGB) is displayed preferentially.

If the monitor stays in the power saving mode and does 
not resume

Carry out the following procedures if the monitor stays in the 
power saving mode and does not resume when the computer 
being activated is connected to a video input connector for 
INPUT1 or INPUT2 other than the one selected in “Input1 
Priority” or  “Input2 Priority.”

1

Press the 

1

 (power) switch.

An INFORMATION message (“No input signal”) appears on 
the screen.

2

Press the MENU button while the INFORMATION 
message is being displayed.

If you use INPUT1, the “Input1 Priority” screen appears on 
the screen. (The “Input2 Priority” screen appears, if you use 
INPUT2.)

3

Press the OK button and press the 

M

/

m

 buttons to 

select the input you want to display on the screen, 
then press the OK button again.

4

Press the MENU button to return to normal viewing.

Set

Exit

MENU

Select

OK

1: HD15

INPUT  SETTING

Auto Adjust :

On

Phase :

70

Pitch :

0

H Center :

50

V Center :

50

Input1 Priority :

DVI-D

Input2 Priority :

HD15

1920 

×

 1200/60 Hz

Summary of Contents for SDM-P232

Page 1: ...4 092 059 12 1 2002 Sony Corporation TFT LCD Color Computer Display Operating Instructions Mode d emploi Manual de instrucciones US FR ES SDM P232W JP ...

Page 2: ...for help You are cautioned that any changes or modifications not expressly approved in this manual could void your authority to operate this equipment WARNING If you have any questions about this product you may call Sony Customer Information Center 1 800 222 SONY 7669 or write to Sony Customer Information Center 1 Sony Drive Mail Drop T1 11 Park Ridge NJ 07656 Declaration of Conformity Trade Name...

Page 3: ... 2 Connect a computer equipped with an HD15 output connector analog RGB 7 Setup 3 Connect the power cord 8 Setup 4 Bundle the cords and cables 9 Setup 5 Turn on the monitor and computer 9 Setup 6 Adjust the tilt 10 Selecting the input signal INPUT button 11 Customizing Your Monitor 12 Navigating the menu 12 PICTURE ADJUSTMENT menu 13 Adjusting the Backlight 13 Adjusting the Contrast 13 Adjusting t...

Page 4: ...ecomes warm during operation This is not a malfunction Note on the LCD Liquid Crystal Display Please note that the LCD screen is made with high precision technology However black points or bright points of light red blue or green may appear constantly on the LCD screen and irregular colored stripes or brightness may appear on the LCD screen This is not malfunction Effective dots more than 99 99 Ma...

Page 5: ...adjustments made using the M m buttons 3 E INPUT button and INPUT1 INPUT2 indicators page 11 This button switches the video input signal between INPUT1 and INPUT2 when two computers are connected to the monitor and the corresponding indicator INPUT1 or INPUT2 lights up F AUTO button page 15 Press this button when the displayed picture seems poorly adjusted It makes further automatic adjustment of ...

Page 6: ...l RGB video signals that comply with DVI Rev 1 0 M DVI D input connector digital RGB for INPUT2 page 7 This connector inputs digital RGB video signals that comply with DVI Rev 1 0 N HD15 input connector analog RGB for INPUT1 page 7 This connector inputs analog RGB video signals 0 700 Vp p positive and sync signals O HD15 input connector analog RGB for INPUT2 page 7 This connector inputs analog RGB...

Page 7: ...tup 2 Connect a computer equipped with an HD15 output connector analog RGB 1 Remove the back cover Turn off the monitor and computer before connecting them When connecting the computer to the monitor s HD15 input connector analog RGB refer to Setup 2 Connect a computer equipped with an HD15 output connector analog RGB Note Do not touch the pins of the video signal cable connector as this might ben...

Page 8: ...adapter to the computer before connecting the video signal cable Setup 3 Connect the power cord 1 Connect the supplied power cord to the monitor s AC IN connector 2 Connect it to a power outlet IBM PC AT or compatible computer HD15 HD15 video signal cable analog RGB supplied to the computer s HD15 output connector analog RGB to the HD15 input connector analog RGB for INPUT1 or INPUT2 Macintosh to ...

Page 9: ...rection of the The 1 power indicator lights up in red 2 Press the 1 power switch on the front right of the monitor The 1 power indicator lights up in green 3 Turn on the computer 4 Press the INPUT button to select the desired input signal The selected input signal indicator lights up and the picture appears on the screen For more information see Selecting the input signal INPUT button on page 11 T...

Page 10: ...ects all the monitor s information No specific driver needs to be installed on the computer The first time you turn on your computer after connecting the monitor the setup Wizard may appear on the screen In this case follow the on screen instructions The Plug Play monitor is automatically selected so that you can use this monitor The vertical frequency is set to 60 Hz Since flickers are unobtrusiv...

Page 11: ...PUT1 INPUT2 Select the input signal received at the monitor s DVI D input connector digital RGB for INPUT2 or at the monitor s HD15 input connector analog RGB for INPUT2 When computers are connected to both of the monitor s video input connectors DVI D and HD15 for either INPUT1 or INPUT2 you can choose the connector to which a signal is input preferentially using Input1 Priority or Input2 Priorit...

Page 12: ... the M m buttons to make the adjustment then press the OK button When you press the OK button the setting is stored then the display returns to the previous menu 5 Close the menu Press the MENU button once to return to normal viewing If no buttons are pressed the menu closes automatically after about 45 seconds x Resetting the adjustments to the default settings You can reset the adjustments using...

Page 13: ... the M m buttons to select PICTURE ADJUSTMENT and press the OK button The PICTURE ADJUSTMENT menu appears on the screen 3 Press the M m buttons to select Brightness and press the OK button The Brightness adjustment menu appears on the screen 4 Press the M m buttons to adjust the brightness x Adjusting the Color You can select the picture s color level for the white color field from the default col...

Page 14: ...T menu appears on the screen 3 Press the M m buttons to select Gamma and press the OK button The options are displayed on the popup menu 4 Press the M m buttons to select the desired mode x Selecting the Smoothing If the picture displayed at the Full2 or Full1 mode of Zoom is not smooth use the picture smoothing function 1 Press the MENU button The main menu appears on the screen 2 Press the M m b...

Page 15: ...G menu appears on the screen 3 Press the M m buttons to select Auto Adjust and press the OK button The options are displayed on the popup menu 4 Press the M m buttons to select Off and press the OK button To resume the automatic picture quality adjustment function Select On in step 4 above Adjust the picture s sharpness manually Phase Pitch You can adjust the picture s sharpness as follows This ad...

Page 16: ...TTING and press the OK button The INPUT SETTING menu appears on the screen 3 Press the M m buttons to select either Input1 Priority or Input2 Priority and press the OK button The options are displayed on the popup menu 4 Press the M m buttons to select the desired mode DVI D The default setting The signal input to the DVI D input connector digital RGB is displayed preferentially HD15 The signal in...

Page 17: ...nge the menu position if it is blocking an image on the screen 1 Press the M m buttons to select Menu Position and press the OK button The Menu Position adjustment menu appears on the screen 2 Press the M m buttons to select the desired position You can choose one of 9 positions where the menu will appear x Language 1 Press the M m buttons to select Language and press the OK button The options are...

Page 18: ...ity picture at the center of the screen If the input signal matches the factory preset mode the picture appears on the screen automatically with the appropriate default adjustments If input signals do not match one of the factory preset modes When the monitor receives an input signal that does not match one of the factory preset modes the automatic picture quality adjustment function of this monit...

Page 19: ...ontal and vertical frequencies of the current input signal If Resolution too high Set to 1920 1200 is displayed This indicates that the resolution is not supported by the monitor s specifications 1920 1200 or less If No input signal appears on the screen This indicates that no signal is being input via the currently selected connector Go to power save The monitor will enter the power saving mode a...

Page 20: ...ected and all plugs are firmly seated in their sockets page 7 Check that the video input connector s pins are not bent or pushed in Check that the input select setting is correct page 11 xProblem caused by a connected computer or other equipment and not caused by the monitor The computer is in the power saving mode Try pressing any key on the keyboard or moving the mouse Check that your graphics b...

Page 21: ...er s refresh rate vertical frequency to obtain the best possible picture 60 Hz is recommended Picture is fuzzy Adjust the brightness and contrast page 13 Adjust the pitch and phase analog RGB signal only page 15 xProblem caused by a connected computer or other equipment and not caused by the monitor Set the resolution to 1920 1200 on your computer Picture is ghosting Eliminate the use of video cab...

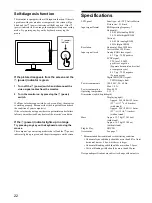
Page 22: ...screen Specifications LCD panel Panel type a Si TFT Active Matrix Picture size 23 0 inch Input signal format RGB operating frequency Horizontal 28 92 kHz analog RGB 28 75 kHz digital RGB Vertical 48 85 Hz analog RGB 60 Hz digital RGB Resolution Horizontal Max 1920 dots Vertical Max 1200 lines Input signal levels Analog RGB video signal 0 7 Vp p 75 Ω positive SYNC signal TTL level 2 2 kΩ positive o...

Page 23: ...numérique 7 Réglage 2 Raccordez un ordinateur équipé d un connecteur de sortie HD15 RVB analogique 7 Réglage 3 Branchez le câble d alimentation 8 Réglage 4 Regroupez les cordons et les câbles 9 Réglage 5 Mettez le moniteur et l ordinateur sous tension 9 Réglage 6 Réglage de l inclinaison 10 Sélection du signal d entrée Touche INPUT 11 Personnalisation de votre moniteur 12 Pilotage par menu 12 Menu...

Page 24: ...ndant un certain temps Cette image rémanente finira par disparaître Le panneau LCD s échauffe en cours d utilisation Il ne s agit pas d un dysfonctionnement Remarque sur l écran à cristaux liquides LCD Liquid Crystal Display Veuillez noter que l écran LCD est issu d une technologie de haute précision Toutefois il est possible que des points noirs ou des points brillants de lumière rouge bleu ou ve...

Page 25: ... réglages et les options de menu sélectionnés à l aide des touches M m 3 E Touche INPUT et indicateurs INPUT1 INPUT2 page 11 Cette touche commute le signal d entrée vidéo entre INPUT1 et INPUT2 lorsque deux ordinateurs sont raccordés au moniteur et l indicateur correspondant INPUT1 ou INPUT2 s allume F Touche AUTO page 15 Appuyez sur cette touche lorsque l image affichée semble mal réglée L appare...

Page 26: ...éo RVB numériques conformes à la DVI Rév 1 0 M Connecteur d entrée DVI D RVB numérique pour INPUT2 page 7 Ce connecteur transmet des signaux vidéo RVB numériques conformes à la DVI Rév 1 0 N Connecteur d entrée HD15 RVB analogique pour INPUT1 page 7 Ce connecteur transmet des signaux vidéo RVB analogiques 0 700 Vp p positifs et des signaux de synchronisation O Connecteur d entrée HD15 RVB analogiq...

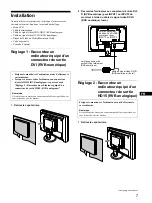
Page 27: ...teur équipé d un connecteur de sortie HD15 RVB analogique 1 Retirez le capot arrière Eteignez le moniteur et l ordinateur avant d effectuer le raccordement Lorsque vous raccordez l ordinateur au connecteur d entrée HD15 RVB analogique reportez vous à Réglage 2 Raccordez un ordinateur équipé d un connecteur de sortie HD15 RVB analogique Remarque Ne touchez pas les broches du connecteur du câble de ...

Page 28: ...rder le câble du signal vidéo Réglage 3 Branchez le câble d alimentation 1 Raccordez le cordon d alimentation fourni au connecteur AC IN du moniteur 2 Raccordez le à une prise secteur ordinateur IBM PC AT ou compatible vers le connecteur de sortie HD15 de l ordinateur RVB analogique câble de signal vidéo HD15 HD15 RVB analogique fourni vers le connecteur d entrée HD15 RVB analogique pour INPUT1 ou...

Page 29: ...r d alimentation 1 s allume en rouge 2 Appuyez sur le commutateur d alimentation 1 situé à droite à l avant du moniteur L indicateur d alimentation 1 s allume en vert 3 Mettez l ordinateur sous tension 4 Appuyez sur la touche INPUT et sélectionnez le signal d entrée souhaité L indicateur du signal d entrée s allume et l image apparaît sur l écran Pour plus d informations voir Sélection du signal d...

Page 30: ...ons relatives au moniteur Il n est pas nécessaire d installer de pilote sur l ordinateur La première fois que vous mettez sous tension votre ordinateur après avoir raccordé le moniteur l assistant de réglage peut s afficher sur l écran Dans ce cas suivez les instructions indiquées sur l écran Le moniteur Plug Play est automatiquement sélectionné afin que vous puissiez l utiliser La fréquence verti...

Page 31: ... INPUT2 sélectionne le signal d entrée reçu au niveau du connecteur d entrée DVI D RVB analogique du moniteur pour INPUT2 ou au niveau du connecteur d entrée HD15 RVB analogique pour INPUT2 du moniteur Lors du raccordement d ordinateurs aux deux connecteurs d entrée vidéo du moniteur pour INPUT1 ou INPUT2 DVI D et HD15 vous pouvez choisir le connecteur auquel un signal est transmis en priorité en ...

Page 32: ...pour procéder au réglage appuyez ensuite sur la touche OK Lorsque vous appuyez sur la touche OK le réglage est mémorisé et l appareil revient au menu précédent 5 Quittez le menu Appuyez une fois sur la touche MENU pour revenir en mode de visualisation normale Si vous n actionnez aucune touche le menu se referme automatiquement au bout d environ 45 secondes x Réinitialisation des réglages aux régla...

Page 33: ...DE L IMAGE puis appuyez sur la touche OK Le menu REGLAGE DE L IMAGE apparaît à l écran 3 Appuyez sur les touches M m pour sélectionner Luminosité puis appuyez sur la touche OK Le menu de réglage Luminosité apparaît à l écran 4 Appuyez sur les touches M m pour ajuster la luminosité x Réglage de la Couleur Vous pouvez sélectionner le niveau de couleur des zones de couleur blanche de l image à l aide...

Page 34: ...Le menu REGLAGE DE L IMAGE apparaît à l écran 3 Appuyez sur les touches M m pour sélectionner Gamma puis appuyez sur la touche OK Les options apparaissent dans le menu contextuel 4 Appuyez sur les touches M m pour sélectionner le mode de votre choix x Sélection du Lissage Si l image affichée en mode Full2 ou Full1 de la fonction Zoom n est pas lisse utilisez la fonction de lissage de l image 1 App...

Page 35: ...pal apparaît à l écran 2 Appuyez sur les touches M m pour sélectionner PARAMETRAGE ENTRÉE puis appuyez sur la touche OK Le menu PARAMETRAGE ENTRÉE apparaît à l écran 3 Appuyez sur les touches M m pour sélectionner Réglage Auto puis appuyez sur la touche OK Les options apparaissent dans le menu contextuel 4 Appuyez sur les touches M m pour sélectionner Inactif puis appuyez sur la touche OK Pour réa...

Page 36: ...uquel un signal est transmis en priorité Pour INPUT1 utilisez Priorité Entrée1 et pour INPUT2 utilisez Priorité Entrée2 1 Appuyez sur la touche MENU Le menu principal apparaît à l écran 2 Appuyez sur les touches M m pour sélectionner PARAMETRAGE ENTRÉE puis appuyez sur la touche OK Le menu PARAMETRAGE ENTRÉE apparaît à l écran 3 Appuyez sur les touches M m pour sélectionner Priorité Entrée1 ou Pri...

Page 37: ...ctionner Position Menu puis appuyez sur la touche OK Le menu de réglage Position Menu apparaît à l écran 2 Appuyez sur les touches M m pour sélectionner la position de votre choix Vous pouvez choisir l une des 9 positions pour l affichage du menu x Language 1 Appuyez sur les touches M m pour sélectionner Language puis appuyez sur la touche OK Les options apparaissent dans le menu contextuel 2 Appu...

Page 38: ...e image de haute qualité au centre de l écran Si le signal d entrée correspond au mode préréglé en usine l image apparaît automatiquement sur l écran avec le réglage par défaut approprié Si certains signaux d entrée ne correspondent à aucun mode préréglé en usine Lorsque le moniteur reçoit un signal d entrée la fonction de réglage automatique de la qualité de l image de ce moniteur est activée et ...

Page 39: ...quent les fréquences horizontales et verticales du signal d entrée en cours Si Résolution trop élevée Régler sur 1920 1200 est affiché Cela signifie que la résolution n est pas prise en charge par les spécifications du moniteur 1920 1200 ou moins Si l indication Pas de signal d entrée apparaît sur l écran Cela signifie qu aucun signal n est détecté en entrée via le connecteur actuellement sélectio...

Page 40: ...rectement raccordé et que toutes les fiches sont correctement branchées dans leur prise page 7 Vérifiez que les broches du connecteur d entrée vidéo ne sont pas pliées ou enfoncées Vérifiez que le réglage de sélection d entrée est correct page 11 xProblème causé par un ordinateur ou un autre appareil raccordé et non par le moniteur L ordinateur est en mode d économie d énergie Appuyez sur une touc...

Page 41: ...e l ordinateur fréquence verticale de manière à obtenir la meilleure image possible 60 Hz est recommandé L image est floue Réglez la luminosité et le contraste page 13 Réglez le pas et la phase signal RVB analogique uniquement page 15 xProblème causé par un ordinateur ou un autre appareil raccordé et non par le moniteur Réglez la résolution de l ordinateur sur 1920 1200 Apparition d images fantôme...

Page 42: ...ifications Panneau LCD Type de panneau a Si TFT à matrice active Taille de l image 23 0 pouces Format du signal d entrée Fréquence opérationnelle RVB Horizontale 28 92 kHz RVB analogique 28 75 kHz RVB numérique Verticale 48 85 Hz RVB analogique 60 Hz RVB numérique Résolution Horizontale max 1920 points Verticale max 1200 lignes Niveaux des signaux d entrée Signal vidéo RVB analogique 0 7 Vp p 75 Ω...

Page 43: ...ordenador equipado con un conector de salida HD15 RGB analógico 7 Paso 3 Conexión del cable de alimentación 8 Paso 4 Agrupación de los cables 9 Paso 5 Encendido del monitor y el ordenador 9 Paso 6 Ajuste de la inclinación 10 Selección de la señal de entrada botón INPUT 11 Personalización del monitor 12 Navegación por el menú 12 Menú AJUSTE DE IMAGEN 13 Ajuste de Retroilumin 13 Ajuste de Contraste ...

Page 44: ...tualmente El panel LCD se calienta durante el funcionamiento Esto no es un fallo de funcionamiento Nota sobre la pantalla LCD Pantalla de cristal líquido Tenga en cuenta que la pantalla LCD está fabricada con tecnología de alta precisión No obstante pueden aparecer de forma constante en la misma puntos negros o brillantes de luz rojos azules o verdes y ocasionalmente brillos o rayas de color irreg...

Page 45: ... y los ajustes realizados mediante los botones M m 3 E Botón INPUT e indicadores INPUT1 INPUT2 página 11 Este botón selecciona la señal de entrada de vídeo INPUT1 o INPUT2 cuando el monitor está conectado a dos ordenadores El indicador correspondiente INPUT1 o INPUT2 se ilumina F Botón AUTO página 15 Pulse este botón si la calidad de la imagen que se visualiza no es óptima Se realizarán ajustes au...

Page 46: ... de vídeo RGB digitales que cumplen con DVI Rev 1 0 M Conector de entrada DVI D RGB digital para INPUT2 página 7 Este conector introduce señales de vídeo RGB digitales que cumplen con DVI Rev 1 0 N Conector de entrada HD15 RGB analógico para INPUT1 página 7 Este conector introduce señales de vídeo RGB analógicas 0 700 Vp p positivas y de sincronización O Conector de entrada HD15 RGB analógico para...

Page 47: ...ara INPUT1 o INPUT2 Paso 2 Conexión de un ordenador equipado con un conector de salida HD15 RGB analógico 1 Retire la cubierta posterior Apague el monitor y el ordenador antes de conectarlos Al conectar el ordenador al conector de entrada HD15 RGB analógico del monitor consulte Paso 2 Conexión de un ordenador equipado con un conector de salida HD15 RGB analógico Nota No toque los terminales del co...

Page 48: ...ctar el cable de señal de vídeo Paso 3 Conexión del cable de alimentación 1 Conecte el cable de alimentación suministrado al conector AC IN del monitor 2 Conecte el otro extremo del cable a la toma de corriente ordenador IBM PC AT o compatible al conector de salida HD15 RGB analógico del ordenador cable de señal de vídeo HD15 HD15 RGB analógico suministrado al conector de entrada HD15 RGB analógic...

Page 49: ... rojo 2 Pulse el interruptor 1 alimentación situado en la parte frontal derecha del monitor El indicador 1 alimentación se ilumina en verde 3 Encienda el ordenador 4 Pulse el botón INPUT para seleccionar la señal de entrada deseada El indicador de la señal de entrada seleccionada se ilumina y la imagen aparece en la pantalla Para obtener más información consulte Selección de la señal de entrada bo...

Page 50: ...ticamente toda la información de dicho monitor No es necesario instalar controladores específicos en el ordenador La primera vez que encienda el ordenador después de conectar el monitor es posible que aparezca el asistente de instalación en pantalla En este caso siga las instrucciones en pantalla El monitor Plug Play se selecciona automáticamente para que pueda utilizarlo La frecuencia vertical se...

Page 51: ...la señal de entrada que recibe el conector de entrada DVI D RGB digital o el conector de entrada HD15 RGB analógico del monitor para INPUT2 Si conecta un ordenador a ambos conectores de entrada de vídeo del monitor DVI D y HD15 para INPUT1 o INPUT2 es posible elegir el conector que debe recibir preferentemente la señal de entrada mediante Prioridad de entrada1 o Prioridad de entrada2 del menú AJUS...

Page 52: ... botones M m para realizar el ajuste y a continuación pulse el botón OK Al pulsar el botón OK el ajuste se almacena y la pantalla regresa al menú anterior 5 Cierre el menú Pulse el botón MENU una vez para regresar a la vista normal Si no se pulsa ningún botón el menú se cierra automáticamente transcurridos 45 segundos aproximadamente x Restauración de los ajustes a los valores predeterminados Pued...

Page 53: ...r AJUSTE DE IMAGEN y pulse el botón OK El menú AJUSTE DE IMAGEN aparece en pantalla 3 Pulse los botones M m para seleccionar Brillo y pulse el botón OK El menú de ajuste Brillo aparece en pantalla 4 Pulse los botones M m para ajustar el brillo x Ajuste de Color Es posible seleccionar el nivel de color de la imagen del campo de color blanco en los ajustes predeterminados de temperatura de color Ade...

Page 54: ...USTE DE IMAGEN aparece en pantalla 3 Pulse los botones M m para seleccionar Gamma y pulse el botón OK Las opciones se muestran en el menú emergente 4 Pulse los botones M m para seleccionar el modo deseado x Selección de Suavizado Si la imagen mostrada en el modo Completa2 o Completa1 de Zoom no es uniforme utilice la función de suavizado 1 Pulse el botón MENU El menú principal aparece en pantalla ...

Page 55: ...principal aparece en pantalla 2 Pulse los botones M m para seleccionar AJUSTE DE ENTRADA y pulse el botón OK El menú AJUSTE DE ENTRADA aparece en pantalla 3 Pulse los botones M m para seleccionar Ajuste auto y pulse el botón OK Las opciones se muestran en el menú emergente 4 Pulse los botones M m para seleccionar Desact y pulse el botón OK Para reanudar la función de ajuste automático de la calida...

Page 56: ...T1 y Prioridad de entrada2 para INPUT2 1 Pulse el botón MENU El menú principal aparece en pantalla 2 Pulse los botones M m para seleccionar AJUSTE DE ENTRADA y pulse el botón OK El menú AJUSTE DE ENTRADA aparece en pantalla 3 Pulse los botones M m para seleccionar Prioridad de entrada1 o Prioridad de entrada2 y pulse el botón OK Las opciones se muestran en el menú emergente 4 Pulse los botones M m...

Page 57: ...r la posición del menú si se interpone a una imagen de la pantalla 1 Pulse los botones M m para seleccionar Posición menú y pulse el botón OK El menú de ajuste Posición menú aparece en pantalla 2 Pulse los botones M m para seleccionar la posición deseada Es posible seleccionar una de las 9 posiciones en las que puede aparecer el menú x Language 1 Pulse los botones M m para seleccionar Language y p...

Page 58: ...ta calidad en el centro de la pantalla Si la señal de entrada coincide con el modo predefinido en fábrica la imagen aparecerá automáticamente en la pantalla con los ajustes predefinidos adecuados Si las señales no coinciden con uno de los modos predefinidos en fábrica Cuando el monitor recibe una señal de entrada que no coincide con ninguno de los modos predefinidos en fábrica su función de ajuste...

Page 59: ...encias horizontal y vertical de la señal de entrada actual Si Resolución demasiado alta Ajustar en 1920 1200 aparece en pantalla Esto indica que la resolución no cumple las especificaciones del monitor 1920 1200 o inferior Si Sin señal de entrada aparece en pantalla Esto indica que el conector seleccionado no recibe ninguna señal Ir a ahorro de energía El monitor entrará en modo de ahorro de energ...

Page 60: ...ágina 16 Compruebe que el cable de señal de vídeo esté conectado correctamente y que los enchufes estén perfectamente insertados en sus receptáculos página 7 Compruebe que los terminales del conector de entrada de vídeo no estén doblados ni aplastados Compruebe que el ajuste de selección de entrada sea correcto página 11 xProblema causado por un ordenador u otro equipo conectado y no por el monito...

Page 61: ... la frecuencia de barrido del ordenador frecuencia vertical para obtener la mejor imagen posible se recomienda 60 Hz La imagen es borrosa Ajuste el brillo y el contraste página 13 Ajuste el ancho y la fase sólo para señales RGB analógicas página 15 xProblema causado por un ordenador u otro equipo conectado y no por el monitor Ajuste la resolución del ordenador en 1920 1200 Aparecen imágenes fantas...

Page 62: ...nes Panel LCD Tipo de panel Matriz activa a Si TFT Tamaño de imagen 23 0 pulg Formato de la señal de entrada Frecuencia de funcionamiento RGB Horizontal 28 92 kHz RGB analógica 28 75 kHz RGB digital Vertical 48 85 Hz RGB analógica 60 Hz RGB digital Resolución Horizontal Máx 1920 puntos Vertical Máx 1200 líneas Niveles de señal de entrada Señal de vídeo RGB analógica 0 7 Vp p 75 Ω positiva Señal de...

Page 63: ......

Page 64: ...ムの参加事業者とし て 本製品が国際エネルギース タープログラムの基準に適合 していると判断します This monitor complies with the TCO 95 guidelines 高調波ガイドライン適合品 本装置は 通産省通知の家電 汎用品 高調波抑止対策ガイドラインに適合しています オンラインアンケートご協力の お願い ソニーでは オンラインアンケートのためのホームペー ジを用意しています ホームページ http www sony co jp cs オンラインアンケートにご回答いただいたお客様のご意 見 ご感想は より一層使いやすい製品をつくり出すた めに活用させていただきます ぜひ オンラインアンケートへのご協力をお願いいたし ます ご注意 ブラウザのバージョンによっては うまく表示 できない場合があります その場合は ブラウザのバー ジョンアップなどを行ってください...

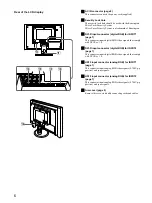
Page 65: ... 使用上のご注意 4 各部の名前とはたらき 5 接続と設定 7 準備1 DVI出力端子 デジタルRGB のある コンピュータをつなぐ 7 準備2 HD15出力端子 アナログRGB のある コンピュータをつなぐ 7 準備3 電源コードをつなぐ 8 準備4 コードをまとめる 9 準備5 電源を入れる 9 準備6 ディスプレイの向きを変える 10 入力を切り換えるには INPUTボタン 11 調整する 12 メニュー操作のしかた 12 画質調整メニュー 13 バックライトを調整する 13 コントラストを調整する 13 ブライトネスを調整する 13 色温度を調整する 13 ガンマを選択する 14 スムージングを選択する 14 入力設定メニュー 15 画像の位置と鮮明さを調整する アナログRGB信号のみ 15 優先する入力を設定する 16 オプションメニュー 17 機能 18 省電力機能 パワーセー...

Page 66: ...に元に戻ります 使用中に画面やキャビネットがあたたかくなることがあ りますが 故障ではありません 液晶ディスプレイパネルについて 本機の液晶ディスプレイパネルは非常に精密度の高い技術 でつくられていますが 黒い点が現れたり 赤と青 緑の 点が消えないことがあります また 見る角度によってす じ状の色むらや明るさのムラが見える場合があります これらは 液晶ディスプレイの構造によるもので 故障で はありません これらの点をご了承のうえ 本機をお使いください お手入れについて お手入れをする前に 必ず電源プラグをコンセントから 抜いてください 液晶の画面は特殊加工がされていますので なるべく画 面に触れないようにしてください また画面の汚れをふ きとるときは 乾いた柔らかい布でふきとってくださ い アルコール シンナー ベンジンなどは使わないでくだ さい 変質したり 塗装がはげたりすることがあり...

Page 67: ...り 調整したり するときに使います 4 OKボタン 12ページ 3 のM mボタンで選んだメニューや項目 調整値を決 定するときに押します 5 INPUT 入力切換 ボタンとINPUT1 2ランプ 11ページ 本機に入力される信号を切り換えて 見たいコンピュー タを選びます 選んだ入力のランプ INPUT1または2 が点灯します 6 AUTOボタン 15ページ 画像が完全に調整されていないと感じたときに押しま す 現在の入力信号に合わせて自動的に再度調整しま す 7 ECOボタン 18ページ 節電するときに押します 8 MAIN POWER 主電源 スイッチ 9ページ ディスプレイの主電源を入 切します 9 バックカバー 7ページ ケーブルやコードをつなぐときは このカバーを開け ます 各部の名前とはたらき 使いかたについての詳しい説明は 内のページをご覧く ださい 液晶ディスプレイ前面 ...

Page 68: ... 営業部です qs INPUT1用DVI D入力端子 デジタルRGB 7ページ DVI Rev 1 0準拠のデジタルRGB信号を入力します qd INPUT2用DVI D入力端子 デジタルRGB 7ページ DVI Rev 1 0準拠のデジタルRGB信号を入力します qf INPUT1用HD15入力端子 アナログRGB 7ページ アナログRGBの映像信号 0 700 Vp p 正極性 と同 期信号を入力します qg INPUT2用HD15入力端子 アナログRGB 7ページ アナログRGBの映像信号 0 700 Vp p 正極性 と同 期信号を入力します qh アームカバー 9ページ スタンド脚部にコードやケーブルをまとめるときは こ のカバーを開けます qh ...

Page 69: ...さい 液晶ディスプレイ 電源コード HD15 HD15ビデオ信号ケーブル アナログRGB DVI Dビデオ信号ケーブル デジタルRGB Windows用Utility Macintosh用 Utility Disk ユーティリティディスク 保証書 取扱説明書 安全のために ソニーご相談窓口のご案内 準備1 DVI出力端子 デジタル RGB のあるコンピュータをつ なぐ 本機とコンピュータの電源を切った状態でつないでく ださい コンピュータをHD15入力端子 アナログRGB につ なぐときは 準備2 HD15出力端子 アナログ RGB のあるコンピュータをつなぐ をご覧ください ご注意 ビデオ信号ケーブルのピンに 直接手を触れないでください 1 バックカバーを取りはずす コンピュータのDVI出力端子 デジタルRGB へ 次のページへつづく DVI Dビデオ 信号ケーブル デジタルRGB 付属...

Page 70: ...下のイラストから つなぐコンピュータに合った接続を してください IBM PC ATコンピュータまたは互換機につなぐ とき Macintoshコンピュータにつなぐとき 必要に応じて市販のアダプタをお使いください アダプタは 先にコンピュータに差し込んでから ビデオ信号ケーブルにつ なぎます NEC PC 98シリーズのコンピュータにつな ぐとき PC 98シリーズまたはPC H98シリーズ用変換アダプタ 市 販 が必要な場合があります コンピュータの HD15出力端子 アナログRGB へ HD15 HD15ビデオ 信号ケーブル アナロ グRGB 付属 HD15 HD15ビデオ 信号ケーブル アナロ グRGB 付属 コンピュータの 出力端子へ 1 電源入力 端子へ INPUT1用または INPUT2用HD15 入力端子 アナログ RGB へ INPUT1用または INPUT2用HD15 入力...

Page 71: ...部に通さない で そのまま下に垂らしてください MAIN POWER 赤く点灯 準備5 電源を入れる 1 本機右側面のMAIN POWER 主電源 スイッチを 側 に押す 1 電源 ランプが赤色に点灯します 2 本機正面右側の1 電源 スイッチを押す 1 電源 ランプが緑色に点灯します 3 コンピュータの電源を入れる 4 INPUT 入力切換 ボタンを押して 見たいコンピュー タの入力を選ぶ 選んだ入力のランプが点灯して コンピュータの画像が 画面に出ます くわしくは 入力を切り換えるには INPUTボタン 11ページ をご覧ください これで 本機が使えます 必要に応じて 設定や調整を 行ってください 12ページ 緑に点灯 アーム カバー バックカバー 3 2 1 ...

Page 72: ...と表示されているとき ビデオ信号ケーブルを正しくつないでいるか確認す る INPUT 入力切換 ボタンを押して 入力切り換えが 正しいか確認する 11ページ 対応していない入力信号です と表示されているとき 本機をつなぐ前につないでいたディスプレイがあるとき は そのディスプレイにつなぎ換えて 画像が出るか確 認する 画像が出たら コンピュータで以下の範囲に設定する くわしくは 本機の症状と対処のしかた 20ページ を ご覧ください モニタ用のドライバは不要です 本機はプラグ プレイ機能 DDC を搭載しており Windowsのプ ラグ プレイ機能によりモニタの情報が自動的に認識されます こ のため モニタ用の特別なドライバは通常不要です 本機とコン ピュータを初めて起動したとき 設定用のウィザードが表示され る場合は その手順に従ってください プラグ プレイモニタが自 動的に選ばれて 使...

Page 73: ...ルRGB または INPUT1用のHD15入力端子 アナログRGB からの入力 信号を選びます INPUT2 INPUT2用のDVI D入力端子 デジタルRGB または INPUT2用のHD15入力端子 アナログRGB からの入力 信号を選びます INPUT1用またはINPUT2用のそれぞれ2つの映像入力端子 DVI DとHD15 両方にコンピュータをつないだときは 入力設定メニューの 入力1優先設定 または 入力2優先設 定 を設定すると どちらの端子からの入力を優先させる かを選べます 入力の優先設定についてくわしくは 優先 する入力を設定する 16ページ をご覧ください ...

Page 74: ...を出す MENUボタンを押して メニュー画面を出す 2 調整したいメニューを選ぶ M mボタンを押して選び OKボタンを押して一番上の 項目に移動する 3 調整したい項目を選ぶ M mボタンを押して選び OKボタンを押して決定す る 4 調整する M mボタンを押して調整し OKボタンを押す OKボタンを押すと 調整値が設定されて前の画面に戻 ります MENU OK 5 メニューを消す MENUボタンを押すと メニュー画面が消える MENUボタンを押さなくても 調整後 約45秒たつと 自動的に画面は消えます お買い上げ時の状態に戻す リセット画面を使います くわしくは リセット 17 ページ をご覧ください OK OK MENU ...

Page 75: ...定 終了 MENU 選択 OK 1 HD15 画質調整 バックライト 100 コントラスト 50 ブライトネス 50 色温度 9300K ガンマ ガンマ2 スムージング スタンダード 1920 1200 60 Hz ブライトネスを調整する 画像の明るさ 黒レベル を調整します ブライトネス 50 1 MENUボタンを押す メニュー画面が出ます 2 M mボタンを押して 画質調整 を選び OKボタン を押す 画質調整メニューが出ます 3 M mボタンを押して ブライトネス を選び OKボタン を押す ブライトネス画面が出ます 4 M mボタンを押して 明るさを調整する 色温度を調整する 画像の白色の度合いを あらかじめ設定された中から選べ ます また 必要に応じて 微調整もできます MENU 決定 終了 選択 OK 1 HD15 画質調整 バックライト 100 コントラスト 50 ブライトネ...

Page 76: ... ガンマ3 1920 1200 60 Hz 1 MENU ボタンを押す メニュー画面が出ます 2 M mボタンを押して 画質調整 を選び OKボタン を押す 画質調整メニューが出ます 3 M mボタンを押して ガンマ を選び OKボタンを押 す 選択可能な設定値がポップアップメニュー上に出ます 4 M mボタンを押して 希望の設定を選ぶ スムージングを選択する ズーム の Full2 または Full1 で表示した画像がなめ らかでないときに スムージング機能を使います MENU 決定 終了 選択 OK 1 HD15 画質調整 バックライト 100 コントラスト 50 ブライトネス 50 色温度 9300K ガンマ ガンマ2 スムージング テキスト スタンダード グラフィック 1920 1200 60 Hz 1 MENU ボタンを押す メニュー画面が出ます 2 M mボタンを押して 画質調...

Page 77: ...像のずれを防止する オート 調整 1 MENUボタンを押す メニュー画面が出ます 2 M mボタンを押して 入力設定 を選び OKボタン を押す 入力設定メニューが出ます 3 M mボタンを押して オート調整 を選び OKボタンを 押す 選択可能な設定値がポップアップメニュー上に出ます 4 M mボタンを押して オフ を選び OKボタンを押す 自動画質調整機能を元に戻すには 上記手順の4で オン を選ぶ さらに手動で鮮明さを調整し直す フェーズ ピッチ 文字や画像が鮮明でないときに調整します HD15入力端 子 アナログRGB につないでいるときに調整できます 1 Utility Disk ユーティリティディスク を入れる 2 Utility Disk ユーティリティディスク を起動して テ ストパターンを表示する Windowsの場合 Utility t Windows Win Util...

Page 78: ...優先する入力を設定する INPUT1用またはINPUT2用のそれぞれ2つの映像入力端子 DVI DとHD15 両方にコンピュータをつないだときは どちらの端子からの入力を優先させるかを選べます INPUT1については 入力 1優先設定 を INPUT2につい ては 入力 2優先設定 を使って設定します MENU 決定 終了 選択 OK 1 HD15 入力設定 オート調整 オン フェーズ 20 ピッチ 0 水平位置 50 垂直位置 50 入力1優先設定 DVI D 入力2優先設定 HD15 1920 1200 60 Hz 1 MENUボタンを押す メニュー画面が出ます 2 M mボタンを押して 入力設定 を選び OKボタン を押す 入力設定メニューが出ます 3 M mボタンを押して 入力1優先設定 または 入力2優先 設定 を選び OKボタンを押す 選択可能な設定値がポップアップメニュー上に...

Page 79: ...を変えられます 1 M mボタンを押して メニュー位置 を選び OKボタン を押す メニュー位置画面が表示されます 2 M mボタンを押して 希望の設定を選ぶ 9か所があらかじめ設定されています Language 1 M mボタンを押して Language を選び OKボタンを 押す 選択可能な設定値がポップアップメニュー上に出ます 2 M mボタンを押して 言語を選ぶ English 英語 Français フランス語 Deutsch ドイツ語 Español スペイン語 Italiano イタリア語 Nederlands オランダ語 Svenska スウェーデン語 ロシア語 日本語 メニューロック 本機の調整や設定を変えられないように ボタン操作を ロックできます 1 M mボタンを押して メニューロック を選び OKボタ ンを押す 選択可能な設定値がポップアップメニュー上に出ます 2...

Page 80: ...ンを押す ECOモード オン と表示されて バックライト輝度が落 ちます ECOモード オン 表示は約5秒後に消えます 節電をやめるには もう一度 ECOボタンを押す ECOモード オフ と表示されて バックライト輝度は通 常の状態に戻ります ECOモード オフ 表示は約5秒後 に消えます 自動画質調整機能 アナログRGB信号のみ 本機は 信号を受信したときに 自動的に画像の位 置と鮮明さ フェーズ ピッチ を調整して 最適な画 像を表示します お買い上げ時に設定されている表示モード 本機には 入力信号に合わせて最適な画質で表示できるよ うに 代表的な表示モードがお買い上げ時に設定されてい ます 信号が表示モードと同じであれば 自動的にあらか じめ設定された最適な調整値で表示されます 表示モード以外の信号のときは 下記の周波数の間であれば 信号をはじめて受信したとき に自動画質調整機能が働...

Page 81: ...水平または垂直周波数が 本機の仕様に合っていま せん 数字の部分に現在入力されている信号の水平 垂直周波 数が表示されます 設定解像度が高すぎます 1920 1200に設定して ください と表示されている場合 解像度が 本機の仕様 1920 1200以下 に合ってい ません 入力信号がありません と表示されている場合 現在選んでいる入力端子の入力信号がありません パワーセーブに入ります このメッセージが表示されてから約5秒後に省電力状態 に入ります インフォメーション 対応していない入力信号です xxx x kHz xxx Hz 1 HD15 インフォメーション 入力信号がありません パワーセーブに入ります 1 HD15 ケーブルが接続されていません と表示されている場合 現在選んでいる入力端子のビデオ信号ケーブルがはずれて います パワーセーブに入ります このメッセージが表示されてから約...

Page 82: ...接続されていません と表示が出ることがあります 故障ではあ りません 優先する入力の設定が正しいか確認する 16ページ ビデオ信号ケーブルを正しくつなぐ 7ページ ビデオ信号ケーブルのピンが曲がっている まっすぐに直すか 別のケーブルを使う 入力切り換えが正しいか確認する 11ページ 本機以外 コンピュータなど が原因の場合 コンピュータが省電力状態になっている キーボードのキーのどれかを押してみるか マウスを動かし てみる コンピュータのグラフィックボードが正しくバススロットに差し込まれているか確認する コンピュータの電源を入れる 本機以外 コンピュータなど が原因の場合 入力信号の周波数が 本機の仕様に合っていない 本機をつなぐ前につないでいたディスプレイがある ときは そのディスプレイにつなぎ換えて 画像が出るか確認する 画像が出たら コンピュータで以 下の範囲に設定する 水平周波数...

Page 83: ...調整する 13ページ ピッチとフェーズを調整する アナログRGB信号のみ 15ページ 本機以外 コンピュータなど が原因の場合 コンピュータで解像度を1920 1200に設定する ビデオ信号ケーブルの延長コードやインプットセレクタの使用をやめる 接続ケーブルを端子にしっかりと差し込む ピッチとフェーズを調整する 15ページ 画像の水平位置 垂直位置を調整する 16ページ 入力信号やグラフィックボードによっては 画像が 画面全体に広がらないことがあります ズーム の設定を Full2 にする 17ページ 本機以外 コンピュータなど が原因の場合 コンピュータで解像度を1920 1200に設定する ブライトネスを調整する 13ページ バックライトを調整する 13ページ 電源を入れたあと 画面が明るくなるまでしばらく時間がかかります ガンマを調整する 14ページ ECOボタンを押した後は 画面が...

Page 84: ...サービス 保証書 この製品は保証書が添付されていますので お買い上げ の際 お買い上げ店でお受け取りください 所定事項の記入および記載内容をお確かめのうえ 大切 に保存してください 保証期間は お買い上げ日より3年間です アフターサービスについて 調子が悪いときはまずチェックを b 故障かな と思ったら の項を参考にして 故障かど うかをお調べください それでも具合が悪いときはサービス窓口へ b お買い上げ店 または添付の ソニーご相談窓口のご案 内 にある お近くのソニーサービス窓口にご相談くだ さい 保証期間中の修理は b 保証書の記載内容に基づいて修理させていただきます くわしくは保証書をご覧ください 保証期間経過後の修理は b 修理によって機能が維持できる場合は ご要望により有 料で修理させていただきます 部品の保有期間について 当社では コンピュータディスプレイの補修用性能部品 ...

Page 85: ...VI 信号 TMDS Single link 電源電圧 使用電源 AC100 240 V 50 60 Hz 消費電力 80 W 最大 1 0 A 最大 動作温度 5 35 C 最大外形寸法 幅 高さ 奥行き ディスプレイ 正立状態 約566 446 251 mm スタンド付 約566 380 114 mm スタンドなし 質量 約12 7 kg スタンド付 約10 2 kg スタンドなし プラグ プレイ機能 DDC2B 付属品 7ページをご覧ください 推奨周波数タイミング 水平同期幅率 水平周波数のタイミングの合計の4 8 以上 または0 8 µsのどちらか大きい方 水平ブランキング幅 2 5 µs以上 垂直ブランキング幅 450 µs以上 本機の仕様および外観は 改良のため予告なく変更するこ とがありますが ご了承ください 煙が出たら 変なにおいや音がしたら 内部に異物が入ったら 画面が映...

Page 86: ......

Page 87: ...gonomics and good usability On this page you will find a brief summary of the environmental requirements met by this product The complete environmental criteria document may be ordered from TCO Development Unit S 114 94 Stockholm Sweden Fax 46 8 782 92 07 Email Internet development tco se Current information regarding TCO 95 approved and labelled products may also be obtained via the Internet usin...

Page 88: ...Printed in Japan Sony Corporation ...

Reviews: