background image

88

US

Playing an MP3 audio track

Notes

• If you put the extension “.MP3” to data not in MP3 format, the player cannot recognize the 

data properly and will generate a loud noise which could damage your speaker system.

• The player cannot play audio tracks in MP3PRO format.
• The player may not be able to play some DATA CDs/DATA DVDs created in the Packet 

Write format.

• If both video data and MP3 audio tracks exist on a DATA DVD, the player recognizes only 

the video data.

• This player supports MP3 audio tracks recorded with a bit rate of 128 kbps and a sampling 

frequency of 44.1 kHz. Attempting to play MP3 audio tracks recorded with different 
specifications may result in loud noise, sound skipping or speaker damage.

• Depending on the disc contents, playback may take some time to start.

The Playback order of MP3 audio tracks

The playback order of albums and tracks recorded on a DATA CD or DATA DVD is 
as follows.

• Structure of disc contents

When you insert a DATA CD or DATA DVD and press 

H

PLAY, the numbered 

tracks are played sequentially, from 

1

 through 

7

. Any sub-albums/tracks contained 

within a currently selected album does not take priority over the next album in the 
same tree. (Example: 

E

 contains 

G

 but 

6

 is played before 

7

.)

When you press 

RETURN and the list of MP3 albums appears (page 85), the 

albums are arranged in the following order: 

A


t


B


t


D


t


E


t


F


t


G

Albums that do not contain tracks (such as album 

C

) do not appear in the list.

Tree 1

Tree 2

Tree 3

Tree 4

Tree 5

album

track

Summary of Contents for SLV-D570H - Dvd Player/video Cassette Recorder

Page 1: ...omer Information Center at 1 800 222 SONY 7669 Or write to Sony Customer Information Center 12451 Gateway Boulevard Ft Myers FL 33913 For Customers in Canada If this product is not working properly please call 1 877 602 2008 for Peace of Mind Warranty Replacement service For other product related questions please contact our Customer Information Service Center at 1 877 899 7669 or write to us at C...

Page 2: ...evice pursuant to Part 15 of the FCC Rules These limits are designed to provide reasonable protection against harmful interference in a residential installation This equipment generates uses and can radiate radio frequency energy and if not installed and used in accordance with the instructions may cause harmful interference to radio communications However there is no guarantee that interference w...

Page 3: ...ause damage to the video head tape and the optical block Should this occur the player may not operate properly When you first install the player or when you move it from a cold to a warm location remove the disc and tape and leave the player turned on for about three hours before operating the player On adjusting volume Do not turn up the volume while listening to a section with very low level inp...

Page 4: ...ther A grounding type plug has two blades and a third grounding prong The wide blade or the third prong are provided for your safety If the provided plug does not fit into your outlet consult an electrician for replacement of the obsolete outlet 10 Protect the power cord from being walked on or pinched particularly at plugs convenience receptacles and the point where they exit from the apparatus 1...

Page 5: ...guage 21 Step 5 Setting the clock 25 Step 6 Presetting channels 29 Step 7 Setting up the VCR Plus system Advanced Hookups 32 S Video Component Video HDMI hookup 34 A V Receiver hookup Basic Operations 36 Playing discs 40 Guide to the on screen display 43 Playing a tape 47 Recording TV programs 50 Recording TV programs using the timer 53 Recording TV programs using the VCR Plus system 56 Checking c...

Page 6: ...ng an MP3 audio track 90 Playing JPEG image files 94 Playing VIDEO CDs with PBC ON OFF Functions VCR Additional Operations 96 Quick Timer Recording 97 Recording stereo and bilingual programs 98 Searching using various functions 100 Changing menu options 102 Editing with another VCR Additional Information 104 General setup information 107 Troubleshooting 112 Glossary 114 Specifications 115 Index to...

Page 7: ...format of files and folders on CD ROMs defined by ISO International Organization for Standardization The player can play DVD ROMs DVD RWs DVD Rs DVD RWs DVD Rs recorded in the following formats MP3 audio tracks and JPEG image files of format conforming to UDF Universal Disk Format 8 cm DVD RW DVD RW and DVD R recorded with a DVD Video camera Icon Meaning Functions available for DVD VIDEOs and DVD ...

Page 8: ... player due to the recording quality or physical condition of the disc or the characteristics of the recording device and authoring software The disc will not play if it has not been correctly finalized For more information refer to the operating instructions for the recording device Note that some playback functions may not work with some DVD RWs DVD Rs even if they have been correctly finalized ...

Page 9: ...two sided disc product which mates DVD recorded material on one side with digital audio material on the other side However since the audio material side does not conform to the Compact Disc CD standard playback on this product is not guaranteed Note on DualDiscs ...

Page 10: ... 1 Unpacking Check that you have received the following items with the DVD VCR Note The supplied remote commander is for the exclusive use of this DVD VCR Remote commander 75 ohm coaxial cable with F type connectors Size AA R6 batteries ...

Page 11: ... can use this remote commander to operate this DVD VCR and a Sony TV Buttons on the remote commander marked with an orange dot can be used to operate your Sony TV If the TV does not have the symbol near the remote sensor this remote commander will not operate the TV To operate Set TV DVD VIDEO switch to the DVD player DVD VIDEO then press SELECT DVD and point at the remote sensor at the DVD VCR th...

Page 12: ...cause a malfunction The remote commander is preprogrammed to control non Sony TVs If your TV is listed in the following table set the appropriate manufacturer s code number Now you can use the buttons with an orange dot to control your TV When the TV VIDEO switch is set to TV the remote performs the following for Sony TV only Controlling TVs with the remote commander 1 Set TV DVD VIDEO switch at t...

Page 13: ... the remote commander the code number may change Set the appropriate code number every time you replace the batteries TV brand Code number Sony 01 default Akai 04 AOC 04 Centurion 12 Coronado 03 Curtis Mathes 12 Daewoo 22 Daytron 12 Emerson 03 04 14 Fisher 11 General Electric 06 10 LG Gold Star 03 04 17 Hitachi 02 03 J C Penney 04 12 JVC 09 KMC 03 Magnavox 03 08 12 Marantz 04 13 MGA Mitsubishi 04 ...

Page 14: ...he instructions for setup After you have completed the setup you are ready to use your DVD VCR Procedures differ depending on the hookup you used Caution Connections between the DVD VCR s VHF UHF connector and the antenna terminals of the TV receiver should be made only as shown in the following instructions Failure to do so may result in operation that violates the regulations of the Federal Comm...

Page 15: ... only need to make the connections shown on this page If you want to record regular or cable TV programs complete these connections first and then go to the following pages for antenna or cable hookups A Use this hookup if your TV has stereo jacks B Use this hookup if your TV does not have stereo jacks Notes To play a tape disc in stereo you must use the A V connection If you do not have a stereo ...

Page 16: ...ur antenna cable is a flat cable 300 ohm twin lead cable attach an external antenna connector not supplied so you can connect the cable to the IN connector If you have separate cables for VHF and UHF antennas you should use a U V band mixer not supplied page 106 Hookup 1 Plug and Play or A Rear of TV VHF UHF B VHF C VHF or Match the type of connector on your TV A B or C UHF UHF DVD VCR or A Rear o...

Page 17: ...rambled channel by selecting the channel on the VCR What you cannot do Record scrambled channels that require a cable box Rear of TV VHF UHF VHF UHF DVD VCR Match the type of connector on your TV A B or C For connector types B and C no UHF connection is required B C or or Cable box A VHF UHF Wall Connect this cable directly to your TV if you do not have a cable box continued ...

Page 18: ...V channels If the clock is incorrect or appears in the display window see Using Manual Clock Set on page 23 To add or disable channels manually see Presetting disabling channels manually on page 27 Notes If you connect the AC power cord before the antenna connections are completed the channels may be incorrectly set If this happens see Step 6 Presetting channels on page 25 Do not press any buttons...

Page 19: ...ith the cable box turned off Record one channel while watching another channel After you have completed hookup After you have completed hookup plug the DVD VCR into an AC outlet and see Step 4 Selecting a language on page 20 Hookup 2 Rear of TV VHF UHF VHF UHF DVD VCR Match the type of connector on your TV A B or C For connector types B and C no UHF connection is required B C or or Cable box A VHF...

Page 20: ...reen Set TV DVD VIDEO switch to DVD VIDEO on the remote If the DVD player is in play mode you cannot display the setup menu Stop the DVD playback 1 Press SET UP then press V v to select OPTION and press ENTER 2 Press V v to select Language then press ENTER The LANGUAGE IDIOMA LANGUE menu appears 3 Press V v to select the desired language English Spanish or French then press ENTER 4 Press SET UP to...

Page 21: ...me signal If broadcasters in your area are not sending time signals set the time manually page 23 Before you start Turn on the DVD VCR and your TV When using a cable box turn it on Set the TV to video input so that the signal from the player appears on the TV screen Set TV DVD VIDEO switch to DVD VIDEO on the remote If the DVD player is in play mode you cannot display the setup menu Stop the DVD p...

Page 22: ...gnal Most PBS member stations broadcast a time signal For the fastest response select your local PBS station For Time zone Select the time zone of your area or select Auto to have the DVD VCR automatically set your time zone The options are Auto y Atl Atlantic y East Eastern y Cen Central y Mtn Mountain y Pac Pacific y Alas Alaska y Haw Hawaii y Auto For Daylight saving Select Yes or No standard t...

Page 23: ... 2 make sure you leave the cable box on The clock display appears when VIDEO mode is selected with no tape inserted or when the DVD VCR is turned off Using Manual Clock Set Before you start Turn on the DVD VCR and your TV Set the TV to video input so that the signal from the player appears on the TV screen Set TV DVD VIDEO switch to DVD VIDEO on the remote If the DVD player is in play mode you can...

Page 24: ...he DVD VCR is turned off 3 Press V v to select Manual then press ENTER 4 Set the hour minutes month day and year in sequence by pressing B b to select the item to be set and press V v to select the digits The day of the week is set automatically 5 Press ENTER to confirm the setting 6 Press SET UP to exit the menu ...

Page 25: ...have already decided which channels you wish to preset set them directly using manual presetting methods page 27 Presetting all receivable channels automatically Before you start Turn on the DVD VCR and your TV When using a cable box turn it on Set the TV to video input so that the signal from the player appears on the TV screen Set TV DVD VIDEO switch to DVD VIDEO on the remote If the DVD player ...

Page 26: ...e TV channels Press B b to select Cable TV To preset VHF and UHF channels Press B b to select Antenna 5 Press V v to select Auto Channel Memory then press ENTER All receivable channels are preset in numerical sequence When no more receivable channels can be found presetting stops and the picture from the lowest numbered channel is displayed on the TV screen ...

Page 27: ... the signal from the player appears on the TV screen Set TV DVD VIDEO switch to DVD VIDEO on the remote If the DVD player is in play mode you cannot display the setup menu Stop the DVD playback 1 Press SET UP then press V v to select OPTION and press ENTER 2 Press V v to select Channel Setup then press ENTER The CHANNEL SETUP menu appears SET UP CH Number buttons V v B b ENTER O RETURN continued ...

Page 28: ...ress V v to select Channel Add Delete then press ENTER 4 To preset disable a channel 1 Press CH or number buttons to enter the channel number 2 Press B b to select ADD in memory or DELETE deleted 3 Press ENTER 5 Press O RETURN to confirm the setting 6 Press SET UP to exit the menu Channel to be preset Channel to be disabled ...

Page 29: ...o check that the guide channel numbers match the TV channel your VCR receives For example if HBO is listed in the Channel Line up Chart as channel 33 and your VCR receives HBO on channel 5 you need to coordinate these numbers using the following procedure If the guide and TV channel numbers are the same you can skip this procedure 5 30 6 30 PlusCode 14 2 CNN 2 3 4 5 SCIENCE AND TECHNOLOGY 1hr 15mi...

Page 30: ...ess ENTER The CHANNEL SETUP menu appears 3 Press V v to select Guide Channel Setup then press ENTER SET UP O RETURN V v B b ENTER Language Channel Setup Auto Power Off RF Output Channel Clock Set Adjust English Off 3CH RETURN OPTION SETUP SET UP ENTER v V RETURN GUIDE CHANNEL SETUP SET UP v V b B TV CH GUIDE CH Enter actual receiving channel ...

Page 31: ...the channel number that does not match the guide channel 5 If you made Hookup 1 page 16 17 18 Enter the actual number on your TV and VCR then press V v If you made Hookup 2 page 19 Enter the cable box output channel usually 2 3 or 4 then press V v 6 Repeat steps 4 and 5 for each channel number that does not match 7 Press O RETURN to confirm the setting 8 Press SET UP to exit the menu ...

Page 32: ...DIGITAL AUDIO OUT COAXIAL HDMI OUT jacks on the right side of the DVD VCR when you use S VIDEO Component Video hookup See page 34 for audio connections If your TV accepts progressive 480p format signals you must use the connection B Select pattern C when connecting to a TV projector or AV amplifier receiver equipped with HDMI input IN l Signal flow DVD only TV S VIDEO cord not supplied DVD VCR to ...

Page 33: ... When connecting to the HDMI OUT jack carefully align the HDMI connector with the jack Do not bend or apply pressure to the HDMI cord To connect to a TV with DVI input Use an HDMI DVI converter cord not supplied The DVI jack will not accept any audio signals so you have to use another audio connection in addition to this connection page 34 Furthermore you cannot connect the HDMI OUT jack to DVI ja...

Page 34: ...rect speaker location see the operating instructions supplied with the connected components HDMI OUT DVD VCR Front R Front L Subwoofer l Signal flow Rear L AV amplifier receiver with a decoder Center Rear R Stereo audio cord not supplied Speakers red white Speakers to audio input white red to LINE OUT L R AUDIO to coaxial digital HDMI input Coaxial digital cord not supplied to DIGITAL AUDIO OUT CO...

Page 35: ...lby and the double D symbol are trademarks of Dolby Laboratories 2 DTS and DTS Digital Out are trademarks of Digital Theater Systems Inc Notes After you have completed the connection using DIGITAL AUDIO OUT COAXIAL HDMI OUT be sure to set Dolby Digital to Dolby Digital and DTS to On in AUDIO SETUP menu page 59 Otherwise no sound or a loud noise will come from the speakers When you connect the play...

Page 36: ...tions supplied with your disc Before you start Turn on the DVD VCR and your TV Set the TV to video input so that the signal from the player appears on the TV screen 1 Press SELECT DVD to control the DVD player 2 Press Z to open the disc tray and place a disc on the disc tray Z H PLAY X PAUSE x STOP m M y SELECT DVD with the playback side facing down ...

Page 37: ...loses and the DVD player starts playback The display window shows the playback time Depending on the disc a menu may appear on the TV screen For DVDs see page 71 For VIDEO CDs see page 94 appears when no disc is loaded Additional operations To Press Stop play x STOP Pause play X PAUSE If you pause the DVD player for more than 5 minutes the DVD player will automatically stop Resume play after pause...

Page 38: ...anges as follows each time you press the button on the remote or depending on how long you press the button on the unit DVD fast forward PLAY t 1 4 N 1 t 1M t 2M t 3M t 4M t 5M t 6M fast reverse PLAY t 1m t 2m t 3m t 4m t 5m t 6m CD MP3 and VIDEO CD fast forward PLAY t 1M t 2M t 3M fast reverse PLAY t 1m t 2m t 3m When you find the point you want press H PLAY Watch slow motion in continuous play m...

Page 39: ...o system the consumer should take proper precautions when the analog stereo jacks of the DVD player are connected to an amplification system To enjoy DTS Digital Surround playback an external 5 1 channel decoder system must be connected to the digital jack of the DVD player Set the sound to Stereo using the AUDIO button when you play DTS sound tracks on a CD page 80 Do not play DTS sound tracks wi...

Page 40: ...ge on page 119 for the abbreviation of the language Note You cannot select disc information items when the disc is stopped You can check disc information during playback The displayed contents differ according to the type of disc being played Before you start Set TV DVD VIDEO switch to DVD VIDEO on the remote DISPLAY V v B b ENTER O RETURN Number buttons Type of disc Current title track number Cur...

Page 41: ... v during playback to select the desired item 2 Press B b to change the item 3 Press ENTER to start playback 4 Press DISPLAY or O RETURN to turn off the menu 1 Press V v during playback to select the counter position icon 2 Enter the desired elapsed playing time of the current title track using the number buttons 3 Press ENTER to start playback 4 Press DISPLAY or O RETURN to turn off the menu Indi...

Page 42: ...to select the Custom AV Mode icon 2 Press B b to change the setting Setting Video Setting Audio Setting Dynamic 1 Produces a bold dynamic picture by increasing the picture contrast and the color intensity Full modulated sound with clear treble and bass Dynamic 2 Produces a more dynamic picture than Dynamic 1 by further increasing the picture contrast and the color intensity Full modulated sound wi...

Page 43: ...D VIDEO switch to DVD VIDEO on the remote 1 Press SELECT VIDEO to control the VCR 2 Insert a tape The VCR starts playing automatically if you insert a tape with its safety tab removed 3 Press H PLAY The display window shows the playback time When the tape reaches the end it will rewind automatically Z DISPLAY H PLAY X PAUSE x STOP 1 TRACKING CLEAR m M y SELECT VIDEO Hour Minute Second continued ...

Page 44: ...t forward hold down M During rewind hold down m Play at high speed During playback briefly press M or m The tape continues to play at 5 times normal speed During playback hold down M or m The tape continues to play at 5 times normal speed When you release the button normal playback resumes Play in slow motion During pause press y Play frame by frame During pause press SKIP Replay the previous scen...

Page 45: ...lay window returns to 0 00 00 and the count starts over again No sound is output during playback at various speeds The picture may show noise when playing at high speed in reverse While playing a tape you can display the setup menu but the remote commander s function switches to DVD automatically Press O RETURN repeatedly to exit the menu When playback does not start even if you insert a tape with...

Page 46: ...y adjust the tracking Press TRACKING to display the tracking meter The distortion should disappear as you press one of the two tracking buttons To resume automatic tracking adjustment eject the tape and reinsert it Note The auto tracking adjustment cannot be guaranteed to work with tapes recorded in the LP mode on other VCRs Adjusting the picture tracking Tracking meter ...

Page 47: ... the remote Make sure the tape is longer than the total recording time 1 Press SELECT VIDEO to control the VCR 2 Insert a tape with its safety tab in place 3 Press CH to select the channel or line input video source you want to record You can select a video source from the LINE IN 1 or LINE 2 IN jacks using the INPUT SELECT button L1 or L2 appears in the display window CH z REC SP EP DISPLAY TV VI...

Page 48: ...LAY to turn off the indicators To check the remaining tape length of a tape set Tape Length in the VIDEO FUNCTION SETUP menu correctly page 100 Maximum Recording Time 4 Press SP EP to select the tape speed SP or EP EP Extended Play provides recording time three times as long as SP Standard Play However SP produces better picture and audio quality 5 Press z REC to start recording REC appears in the...

Page 49: ...ining tape length may not be indicated accurately for short tapes such as T 20 or T 30 or tapes recorded in LP mode It may take up to one minute for the VCR to calculate and display the remaining tape length after you press DISPLAY You cannot record a DVD directly to a VCR tape using your DVD VCR To watch a TV program during video recording stop disc playback 1 Set TV DVD VIDEO switch to DVD VIDEO...

Page 50: ... that the signal from the player appears on the TV screen Set TV DVD VIDEO switch to DVD VIDEO on the remote Insert a tape with its safety tab in place Make sure the tape is longer than the total recording time If the DVD player is in play mode you cannot display the setup menu Stop the DVD playback 1 Press SELECT VIDEO to control the VCR 2 Press TIMER The timer programming menu appears INPUT SELE...

Page 51: ...record from a source connected to the LINE IN 1 or LINE 2 IN jacks press INPUT SELECT or V v to display L1 or L2 in the CH position To record the same program every day or the same day every week press v while the date is flashing For details see Daily weekly recording on page 51 To use the Auto Tape Speed function press v to display Auto in the SPEED position For details see To use the Auto Tape ...

Page 52: ...ears this means that the VCR is currently recording this program You can also do the following tasks while the VCR is recording Reset the counter page 45 Display tape information on the TV screen page 48 You can also display the timer programming menu by first pressing SET UP then V v to select PROGRAM and pressing ENTER in step 2 Note The indicator flashes in the display window when you complete ...

Page 53: ... DVD VCR and your TV Set the TV to video input so that the signal from the player appears on the TV screen Set TV DVD VIDEO switch to DVD VIDEO on the remote When using a cable box turn it on Insert a tape with its safety tab in place Make sure the tape is longer than the total recording time If the DVD player is in play mode you cannot display the setup menu Stop the DVD playback 1 Press SELECT V...

Page 54: ... exit the menu The timer indicator appears in the display window and the VCR stands by for recording When using a cable box leave it on RETURN VCR PLUS SET UP ENTER Enter code with 0 9 Mode Speed 012345678 Once Auto B V v V B RETURN VCR PLUS SET UP Enter code with 0 9 Mode Speed 012345678 Once Auto B v V B b ENTER To record Select Only once Once Everyday Monday to Friday Mo Fr Every Monday to Satu...

Page 55: ... the VCR is recording Reset the counter page 45 Display tape information on the TV screen page 48 Check the timer settings page 56 Watch another TV program page 49 Tip To check change or cancel the program setting see Checking changing canceling timer settings on page 56 Notes If the VCR does not accept the PlusCode number this means that The PlusCode number is incorrect Once Daily Mo Sa Mo Fr or ...

Page 56: ... to video input so that the signal from the player appears on the TV screen Set TV DVD VIDEO switch to DVD VIDEO on the remote Insert a tape with its safety tab in place Make sure the tape is longer than the total recording time If the DVD player is in play mode you cannot display the setup menu Stop the DVD playback 1 Press SELECT VIDEO to control the VCR 2 Press TIMER The timer programming menu ...

Page 57: ...ppears the timer settings overlap You can also display the timer programming menu by first pressing SET UP then V v to select PROGRAM and pressing ENTER in step 2 3 Press V v to select setting you want to change or cancel To change the setting press B b to select the item you want to change and press V v to change it To cancel the setting press CLEAR 4 Press O RETURN to confirm the setting Press O...

Page 58: ... turns off and the indicator remains lit if there is a timer setting The DVD VCR will not work except for timer recordings To unlock the DVD VCR Hold down 1 POWER on the unit until LOCK disappears from the display window The DVD VCR is unlocked and turns on To stop timer recording while the DVD VCR is locked press x The recording stops and the DVD VCR is unlocked Note The DVD VCR will be unlocked ...

Page 59: ...onnection conditions Before you start Set TV DVD VIDEO switch to DVD VIDEO on the remote 1 Press SET UP when the DVD player is in stop mode then press V v to select DVD then press ENTER 2 Press V v to select Audio Setup then press ENTER 3 Press V v to select the setup item from the displayed list Dolby Digital DTS or Audio DRC V v B b ENTER SET UP continued ...

Page 60: ... type of audio signal output from the HDMI OUT jack 4 Press B b to select an item 5 Press SET UP to exit the menu D PCM Select this when the player is connected to an audio component lacking a built in Dolby Digital decoder Dolby Digital Select this when the player is connected to an audio component with a built in Dolby Digital decoder Off Select this when the player is connected to an audio comp...

Page 61: ...no sound will come out from the speakers affecting your ears or causing the speakers to be damaged Noise may occur in the LinearPCM double speed audio This is not a malfunction If the HDMI OUT jack is connected to equipment not compatible with DOLBY DIGITAL signals the D PCM signals will be automatically output even when you select DOLBY DIGITAL ...

Page 62: ...t TV DVD VIDEO switch to DVD VIDEO on the remote 1 Press SET UP when the DVD player is in stop mode then press V v to select DVD then press ENTER 2 Press V v to select Screen Setup then press ENTER 3 Press V v to select the setup item from the displayed list TV Type or Black Level To set the Progressive setting see page 64 V v B b ENTER SET UP ...

Page 63: ...c and your TV projector etc For details refer also to the instruction manual supplied with the TV projector etc 4 Press B b to select an item 5 Press SET UP to exit the menu The setting is applied after exitting the menu 4 3 Letter Box Select this when you connect a 4 3 screen TV Displays a wide picture with bands on the upper and lower portions of the screen 4 3 Pan Scan Select this when you conn...

Page 64: ...rsa If the playback picture becomes distorted set YCbCr to RGB Select 720 480p under HDMI Resolution if you cannot change the aspect ratio on your TV If your TV accepts progressive 480p format signals you will enjoy accurate color reproduction and high quality image YCbCr Outputs YCBCR signals RGB Outputs RGB signals To set the Progressive setting 1 Follow step 1 and 2 on page 62 then press V v to...

Page 65: ...nnect the DVD VCR to a TV that cannot accept the signal in progressive format the image quality will deteriorate In this case set Progressive to Off When you connect the DVD VCR to a TV using HDMI cord you cannot cancel the Progressive setting 4 If video signal appears OK video connection is complete Press ENTER The PROGRESSIVE indicator on the unit lights up in orange If picture is distorted pres...

Page 66: ...ou start Set TV DVD VIDEO switch to DVD VIDEO on the remote 1 Press SET UP when the DVD player is in stop mode then press V v to select DVD and press ENTER 2 Press V v to select Language Setup then press ENTER The LANGUAGE SET UP menu appears 3 Press V v to select the language setup item from the displayed list DVD Menu Audio or Subtitle Then press ENTER V v B b ENTER SET UP ...

Page 67: ...ake priority over the DVD SETUP settings and not all the functions described may work 4 Press V v to select the desired language then press ENTER DVD MENU LANGUAGE You can select the desired language for the disc s menu AUDIO LANGUAGE Switches the language of the sound track When you select Original the language given priority in the disc is selected SUBTITLE LANGUAGE Switches the language of the ...

Page 68: ... level such as the age of the users The Parental Control function allows you to set a playback limitation level Before you start Set TV DVD VIDEO switch to DVD VIDEO on the remote 1 Press SET UP when the DVD player is in stop mode then press V v to select DVD and press ENTER 2 Press V v to select Parental Setup then press ENTER Number buttons SET UP H PLAY V v B b ENTER ...

Page 69: ...lready registered a password The display for entering the password appears Enter a 4 digit password using the number buttons After registering a password if you set Use Password to No PASSWORD CHECK screen will not appear 4 Press V v to select Rating Level then press ENTER 5 Press V v to select the level you want then press ENTER The options are as follows Level 8 Adult y Level 7 y Level 6 y Level...

Page 70: ... clear the password all DVD settings below are returned to the default setting Language Setup Audio Setup Sereen Setup Parental Setup 1 Select Change Password in step 4 on page 69 The display for entering a new password appears 2 Enter a new 4 digit password using the number buttons The display for confirming the password appears 3 Re enter the new password 1 Insert the disc then press H PLAY The ...

Page 71: ...the title you want using the TOP MENU button When you play DVD VIDEOs that allow you to select items such as the language for the subtitles and the language for the sound select these items using the MENU button Before you start Set TV DVD VIDEO switch to DVD VIDEO on the remote 1 Press TOP MENU or MENU The disc s menu appears on the TV screen The contents of the menu vary from disc to disc 2 Pres...

Page 72: ...till mode To zoom into a JPEG image see Playing JPEG image files on page 90 Before you start Set TV DVD VIDEO switch to DVD VIDEO on the remote 1 Press ZOOM appears 2 Press V v B b to move to the position where you want to zoom in 3 Press ENTER repeatedly to change the magnification Each time you press the button the magnification changes as shown below 2 t 4 t 2 t normal magnification ZOOM V v B ...

Page 73: ... scene are recorded on the DVD VIDEO appears in the display window This means that you can change the viewing angle Before you start Set TV DVD VIDEO switch to DVD VIDEO on the remote 1 Press ANGLE during playback The angle number appears on the display The number after the slash indicates the total number of angles 2 Press B b repeatedly to select the angle number The scene changes to the selecte...

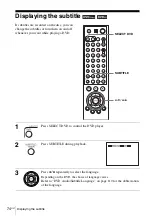
Page 74: ...n and off whenever you want while playing a DVD 1 Press SELECT DVD to control the DVD player 2 Press SUBTITLE during playback 3 Press B b repeatedly to select the language Depending on the DVD the choice of language varies Refer to DVD Audio Subtitle Language on page 119 for the abbreviation of the language SUBTITLE V v B b SELECT DVD ...

Page 75: ...title To turn off the subtitles Select Off in step 4 Note Depending on the DVD you may not be able to change the subtitles even if multilingual subtitles are recorded on it You also may not be able to turn them off 4 Press V v repeatedly to select On ...

Page 76: ...create your own program You can program up to 20 tracks To program MP3 audio tracks see page 86 Before you start Set TV DVD VIDEO switch to DVD VIDEO on the remote Notes The play mode is canceled when you open the disc tray the player enters standby mode by pressing 1 Creating your own program Program play 1 Press SELECT DVD to control the DVD player 2 Press REPEAT when the DVD player is in stop m...

Page 77: ...ep 4 The programmed track numbers are displayed in the selected order 6 Press H PLAY to start program play Program play starts When the program ends you can restart the same program again by pressing H PLAY 1 Follow steps 1 to 3 of Creating your own program Program play 2 Press v repeatedly to select Clear last track then press ENTER Each time you press the button the last programmed number is can...

Page 78: ...e 87 To return to normal play Press CLEAR until Off appears at the upper left top of the TV screen during shuffle play Tip Shuffle play will stop when all the tracks are played back Note You cannot repeat play while in shuffle play Playing in random order Shuffle play 1 Press SELECT DVD to control the DVD player 2 Press REPEAT when the DVD player is in stop mode 3 Press B b to select SHUFFLE then ...

Page 79: ...n See Playing VIDEO CDs with PBC ON OFF Functions on page 94 You cannot repeat play while in program play or shuffle play Playing repeatedly Repeat play 1 Press SELECT DVD to control the DVD player 2 Press REPEAT during playback 3 Press REPEAT or B b repeatedly to select the item to be repeated When playing a DVD Chapter repeats the current chapter Title repeats the current title on a disc When pl...

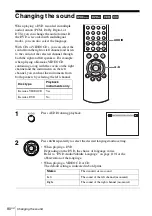
Page 80: ...als on the right channel and the instruments on the left channel you can hear the instruments from both speakers by selecting the left channel 1 Press AUDIO during playback 2 Press B b repeatedly to select the desired language audio setting When playing a DVD Depending on the DVD the choice of language varies Refer to DVD Audio Subtitle Language on page 119 for the abbreviation of the language Whe...

Page 81: ... have to make the connection using DIGITAL AUDIO OUT COAXIAL HDMI OUT page 34 When you play a DVD with DTS sound tracks set DTS to On in AUDIO SETUP menu page 59 If you set DTS audio output you cannot select surround setting page 82 You cannot perform playback quickly or slowly with sound when DTS audio output is set page 39 ...

Page 82: ...nd effects by using sound imaging to create virtual rear speakers from the sound of the front speakers without using actual rear speakers 1 Press SURROUND during playback 2 Press B b repeatedly to select Surround1 Surround2 Surround3 Surround effect increases as shown below SURROUND B b TV TV TV Surround1 Surround2 Surround3 Virtual speaker ...

Page 83: ...connected TV or amplifier receiver Make sure that your listening position is between and at an equal distance from your speakers and that the speakers are located in similar surroundings If you use the DIGITAL AUDIO OUT COAXIAL HDMI OUT jack and set Dolby Digital to Dolby Digital or DTS to On in AUDIO SETUP menu page 59 sound will come from your speakers but it will not have the surround effect Yo...

Page 84: ... the remote 1 Press SELECT DVD to control the DVD player 2 Press Z and place a DATA CD or DATA DVD on the disc tray then press Z to close the tray When you load a DATA CD or DATA DVD which contains MP3 audio tracks and JPEG image files Select a Media Type menu appears If you load a DATA CD or DATA DVD which contains only MP3 audio files the MP3 display appears Then you can skip step 3 V v B b ENTE...

Page 85: ...he previous display Press O RETURN To return to the Select a Media Type menu Press x STOP twice then press TOP MENU 3 Press V v to select MP3 then press ENTER The first track starts playing Press x STOP if necessary 4 Press O RETURN then press V v to select the desired directory in the left column then press ENTER 5 Press V v to select the desired track in the right column then press ENTER The sel...

Page 86: ...program play or shuffle play To program MP3 audio tracks 1 Press x STOP twice then press REPEAT 2 Press B b to select PROGRAM then press ENTER 3 Press V v to select the desired directory in the left column then press ENTER 4 Press V v to select the track you want to program then press ENTER 5 To program other tracks repeat step 4 The programmed tracks are displayed in the selected order Press CLEA...

Page 87: ...Joliet format and DATA DVDs of Universal Disk Format UDF for the player to recognize the tracks or files You can also play DATA CDs or DATA DVDs recorded in Multi Session or Multi Border see Note on Multi Session Border discs on page 87 Refer to the instructions supplied with the CD R CD RW DVD R DVD RW drives and the recording software not supplied for details on the recording format Note on Mult...

Page 88: ...fications may result in loud noise sound skipping or speaker damage Depending on the disc contents playback may take some time to start The Playback order of MP3 audio tracks The playback order of albums and tracks recorded on a DATA CD or DATA DVD is as follows Structure of disc contents When you insert a DATA CD or DATA DVD and press H PLAY the numbered tracks are played sequentially from 1 thro...

Page 89: ...yback order may differ from the illustration above The playback order above may not be applicable if there are more than a total of 1000 albums and tracks in the DATA CD or DATA DVD A total of up to 999 files can be recognized for discs that contain both MP3 and JPEG files Files are recognized in the order that they were recorded For example if 990 JPEG files are recorded then 100 MP3 files are re...

Page 90: ...ess SELECT DVD to control the DVD player 2 Press Z and place a DATA CD or DATA DVD on the disc tray then press Z to close the tray When you load a DATA CD or DATA DVD which contains MP3 audio tracks and JPEG image files Select a Media Type menu appears If you load a DATA CD or DATA DVD which contains only JPEG image files the Album display appears Then you can skip step 3 V v B b ENTER H PLAY Z TO...

Page 91: ...e 1 Press ENTER The selected image number appears in the display window 2 To display the next previous image press To play the Slide show 1 Press H PLAY You can also play the Slide show using the menu on the selected image For details see To enjoy the Slide show on page 92 2 Press B b to select the desired playing speed on the Interval menu then press ENTER Slide show starts from the selected imag...

Page 92: ...image during Slide show If you select in the rotated image display the images in the Album display will not be rotated But if you start the slide show the images will be rotated Correct the rotation in the menu 1 Press V v B b to select an image in the Album display then press ENTER 2 Press B b to select then press ENTER appears 3 Press V v B b to move to the position where you want to zoom in 4 P...

Page 93: ...orded the 990 JPEG files recorded first and only the first 9 MP3 files can be recognized Note on Multi Session Border discs If JPEG image files are recorded in the first session border the player will also play JPEG image files in other session border If audio tracks and images in Music CD format or Video CD format are recorded in the first session border only the first session border will be play...

Page 94: ...teractively PBC playback follows a selection menu displayed on your TV screen Before you start Set TV DVD VIDEO switch to DVD VIDEO on the remote 1 Press MENU repeatedly to select PBC ON The menu for your selection appears 2 Press V v to select the item number you want You can also use the number buttons to select the item number and track V v ENTER Number buttons O RETURN MENU ...

Page 95: ... cannot play still pictures such as a menu To return to PBC ON press MENU to select PBC ON Note Depending on the VIDEO CD Press ENTER in step 3 may appear as Press SELECT in the instructions supplied with the disc In this case press H PLAY 3 Press ENTER 4 Follow the instructions in the menu for interactive operations Refer to the instructions supplied with the disc as the operating procedure may d...

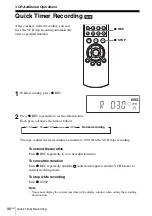
Page 96: ...ording Press x STOP Note You cannot display the current tape time in the display window when setting the recording duration time After you have started recording you can have the VCR stop recording automatically after a specified duration 1 While recording press z REC 2 Press z REC repeatedly to set the duration time Each press advances the time as follows The tape counter decreases minute by minu...

Page 97: ...sound you want The VCR records sound onto two separate tracks Hi fi audio is recorded onto the main track along with the picture Monaural sound is recorded onto the normal audio track along the edge of the tape Notes To play a tape in stereo you must use the A V connections When you play a tape recorded in monaural the sound is heard in monaural regardless of the AUDIO setting Recording stereo pro...

Page 98: ...tomatically marks the tape with an index signal at the point where each recording begins You can easily find a specific point using various search functions 1 Press SELECT VIDEO to control the VCR 2 Insert an indexed tape into the VCR 3 Press SEARCH SEARCH V v B b H PLAY SELECT VIDEO ...

Page 99: ...n plays back for about five seconds 2 Press H PLAY to view the program If you do not press H PLAY the VCR automatically searches for the next index mark or until it reaches the end of the tape Go to 0 00 00 To search for the counter 0 00 00 point Press V The VCR starts searching and automatically stops at the 0 00 00 point To mark a point on the tape that you want to find later press CLEAR to rese...

Page 100: ...settings Normally the default settings are used Change these settings if necessary Before you start Set TV DVD VIDEO switch to DVD VIDEO on the remote 1 Press SET UP when the DVD player is in stop mode 2 Press V v to select VIDEO and press ENTER 3 Press V v to select the option to change SET UP V v B b ENTER ...

Page 101: ...ength tape T 160 when using a T 160 length tape T 180 when using a T 180 or longer length tape Auto Play On to start playback automatically when you insert a tape with its safety tab removed Off to turn off Auto play You need to press H PLAY to start playback even if you insert a tape with its safety tab removed Auto Repeat On to play back a tape repeatedly The VCR rewinds a tape to the beginning ...

Page 102: ... right channel If you connected this VCR to both the LINE IN and LINE OUT jacks of the other VCR select the input correctly to prevent a humming noise You can use the LINE IN 1 jacks for editing If the other VCR is a monaural type the sound is recorded only on the channel whose jack is connected to the audio plug To record on both right and left channels connect the audio plugs to the AUDIO L R ja...

Page 103: ...R and the TV and set it to the video channel Press INPUT SELECT to display L1 or L2 in the display window Press SP EP to select the tape speed SP or EP 1 Insert a source tape with its safety tab removed into the other playback VCR Search for the point to start playback and set it to playback pause 2 Insert a tape into this recording VCR Search for the point to start recording and press X 3 Press z...

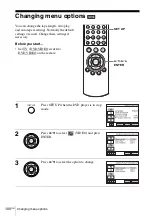
Page 104: ...DVD VIDEO on the remote 1 Press SET UP when the DVD player is in stop mode then press V v to select OPTION then press ENTER 2 Press V v to select the option to change 3 Press B b to change the setting When changing the RF Output Channel confirmation messages will appear Press ENTER to confirm the messages SET UP V v B b ENTER ...

Page 105: ...o receive the VCR signal For details see page 105 Setting the RF Output channel When connecting the DVD VCR to the TV using only the antenna cable you must set the RF Output channel in the OPTION SETUP menu so that the TV can receive the correct signal from the DVD VCR 1 Set the RF Output channel to 3CH or 4CH see page 104 to set the channel whichever channel is not used in your area If both are u...

Page 106: ...t the antenna to the DVD VCR 1 Loosen the screws on the antenna connector 2 Wind the twin leads around the screws on the antenna connector 3 Retighten the screws Attaching a VHF UHF band mixer When using both a 75 ohm coaxial cable and a 300 ohm twin lead cable for a VHF UHF antenna use a VHF UHF band separator mixer not supplied to connect the antenna to the DVD VCR 1 Loosen the screws on the mix...

Page 107: ...n the display window The clock stops if the DVD VCR is disconnected from the wall outlet Reset the clock and timer Others The remote commander does not function Make sure you are pointing the remote commander at the remote sensor on the DVD VCR Replace all the batteries in the remote commander with new ones if they are weak Make sure the TV DVD VIDEO switch is set correctly Select correctly VIDEO ...

Page 108: ...rmal interlace format page 64 COMPONENT VIDEO OUT jack is not used or Progressive of the SCREEN SETUP menu is not set correctly while the PROGRESSIVE indicator lights up in orange Check the setting page 62 and connection page 32 There is no picture or the picture noise appears when connected to the HDMI OUT jack Try the following 1Turn the DVD VCR off and on again 2Turn the connected equipment off...

Page 109: ... The disc does not play The disc is turned over Insert the disc with the playback side facing down on the disc tray The disc is skewed The player cannot play certain discs page 7 The region code on the DVD does not match the player Moisture has condensed inside the player page 3 The player cannot play a recorded disc that is not correctly finalized page 8 Make sure the TV DVD VIDEO switch is set c...

Page 110: ...be able to do some operations See the operating manual that comes with the disc The language for the sound track cannot be changed Try using the DVD s menu instead of the direct selection button on the remote page 71 Multilingual tracks are not recorded on the DVD being played The DVD prohibits the changing of the language for the sound track The subtitle language cannot be changed or turned off T...

Page 111: ... set to the channel for the VCR If you are using a monitor set it to video input Select the correct source with the INPUT SELECT or CH buttons Select a channel number when recording TV programs select L1 or L2 when recording from other equipment TV reception is poor Adjust the TV antenna The tape starts playing as soon as it is inserted The safety tab has been removed To record on this tape cover ...

Page 112: ... little deterioration is realized because all channel data processing is digital DVD page 7 A disc that contains up to 8 hours of moving pictures even though its diameter is the same as a CD The data capacity of a single layer and single sided DVD is 4 7 GB Giga Byte which is 7 times that of a CD The data capacity of a double layer and single sided DVD is 8 5 GB a single layer and double sided DVD...

Page 113: ...ection technology that incorporates coding technology for digital video signals Interlace format Interlace format shows every other line of an image as a single field and is the standard method for displaying images on television The even number field shows the even numbered lines of an image and the odd numbered field shows the odd numbered lines of an image Progressive format pages 32 and 64 Com...

Page 114: ...alanced sync negative AUDIO OUT phono jacks 2 Standard output 327 mVrms Load impedance 47 kilohms Output impedance less than 10 kilohms DIGITAL OUT COAXIAL phono jack Output signal 0 5 Vp p 75 ohms COMPONENT VIDEO OUT Y Pb Pr Phono jack Y 1 0 Vp p Pb Pr 0 7 Vp p 75 ohms S VIDEO OUT 4 pin mini DIN jack Y 1 0 Vp p unbalanced sync negative C 0 286 Vp p load impedance 75 ohms HDMI OUT Type A 19 pin Ti...

Page 115: ...High Definition Multimedia Interface indicator 63 Lights up when the HDMI OUT jack is correctly connected to a HDCP High bandwidth Digital Content Protection compliant device with HDMI or DVI Digital Visual Interface input O CHANNEL TRACKING buttons 2 46 47 P LINE 2 IN VIDEO AUDIO L MONO R jacks 102 1 This DVD VCR is based on version 1 2a of High Definition Multimedia Interface Specifications This...

Page 116: ... SURR surround indicator 82 J DTS indicator 60 K Disc indicator 37 Rear panel DVD player and VCR A AC power cord 14 18 B LINE IN 1 VIDEO AUDIO L R jacks 102 C LINE OUT VIDEO AUDIO L R jacks 15 D IN FROM ANT connector 16 E OUT TO TV connector 16 DVD player only F LINE OUT AUDIO L R jacks 34 G COMPONENT VIDEO OUT Pr Pb Y jacks 32 H HDMI OUT High Definition Multimedia Interface out jack 32 34 I S VID...

Page 117: ...IP button 37 K REPLAY button 37 L X PAUSE button 37 M H PLAY button 37 N V v B b buttons 20 ENTER button 20 O DISPLAY button 40 P TOP MENU button 71 Q 1 on standby switch 12 39 R VOL volume buttons 12 S ZOOM button 72 T ENTER button 20 U REPEAT button 76 V SURROUND button 82 W m M y buttons 37 X PREV previous NEXT button 37 Y x STOP button 37 Z O RETURN button 22 wj MENU button 71 Number 5 AUDIO a...

Page 118: ... button 48 M X PAUSE button 44 N H PLAY button 43 O V v B b buttons 20 ENTER button 20 P DISPLAY button 45 Q 1 on standby switch 12 44 R VCR Plus button 29 S CH channel TRACKING buttons 46 47 T VOL volume buttons 12 U ENTER button 20 V MUTING button 12 W SEARCH button 98 X TV VIDEO button 49 Y INPUT SELECT button 47 Z m rewind M fast forward y slow buttons 44 wj SHUTTLE button 44 wk x STOP button ...

Page 119: ...inese CRO Croatian CZE Czech DAN Danish DEU German ENG English ESP Spanish FIN Finish FRA French GRE Greek HUN Hungarian IDN Indonesian IND Hindi ISL Icelandic ITA Italian IWR Hebrew JPN Japanese KOR Korean MAL Malay NLD Dutch NOR Norwegian POL Polish POR Portuguese RUS Russian SVE Swedish THA Thai TUR Turkish VIE Vietnamese ZAF Afrikaans ...

Page 120: ... track 97 P Parental Control 68 PBC Playback control 94 Picture adjustment 46 Playback at various speeds 38 44 frame by frame 44 MP3 audio track 84 program play 76 repeat play 79 selecting the sound 97 shuffle play 78 shuttle play 44 slow motion 38 44 VIDEO CDs 94 Playback quickly or slowly with sound 39 Presetting channels 25 Program play 76 Progressive 113 R Recording bilingual programs 97 SAP b...

Page 121: ......

Page 122: ... ver detalles consulte el manual de instrucciones en inglés Procedimientos iniciales 3 Conexiones básicas 9 Selección del idioma 10 Ajuste del reloj 11 Memorización de canales 12 Conexiones avanzadas Operaciones básicas 14 Reproducción de discos 16 Reproducción de cintas 18 Grabación de programas de TV ...

Page 123: ...ón de la conexión utilizada Precaución Las conexiones entre el conector VHF UHF del Videograbadora DVD y los terminales de antena del receptor de TV deberán ser hechas solamente como se muestra en las siguientes instrucciones Si no lo hace así podrá resultar en una operación que violará los reglamentos de la Comisión de Comunicaciones Federal FCC relacionada con el uso y la operación de dispositiv...

Page 124: ...rimero estas conexiones y después siga con las páginas siguientes para realizar las conexiones de antena o cable A Utilice esta conexión si su televisor tiene tomas estéreo B Utilice esta conexión si su televisor no tiene tomas estéreo Notas Para reproducir una cinta disco en estéreo debe utilizar la conexión de A V Si no dispone de receptor estéreo conecte la toma LINE OUT AUDIO L blanca a la tom...

Page 125: ...antena es un cable plano cable bifilar de 300 ohm enchufe un conector de antena externa no suministrado para poder conectar el cable al conector IN Si tiene cables independientes para antenas VHF y UHF debe utilizar un mezclador de bandas de U V no suministrado Conexión 1 Plug and Play o A Parte posterior del televisor VHF UHF B VHF C VHF o Case con el tipo de conector de su televisor A B o C UHF ...

Page 126: ...ica algunos canales Con esta conexión podrá Grabar cualquier canal no codificado seleccionando el canal en la Videogradadora Con esta conexión no podrá Grabar canales codificados que requieran un decodificador Parte posterior del TV VHF UHF VHF UHF Videograbadora DVD Case con el tipo de conector de su televisor A B o C Para los conectores tipo B y C no se requiere conexión UHF B C o o Decodificado...

Page 127: ...al horaria ofrecida por algunos canales de TV Si el reloj es incorrecto o si aparece en el visualizador consulte Ajuste del reloj en la página 10 Notas Si conecta el cable de alimentación de CA antes de haber completado las conexiones de la antena los canales podrán ajustarse incorrectamente Si se diera el caso consulte Memorización de canales en la página 11 No presione ningún botón en la videogr...

Page 128: ...ar un canal mientras ve otro canal Después de haber completado la conexión Después de haber completado la conexión enchufe la videograbadora DVD en la toma de CA y consulte Selección del idioma en la página 9 Conexión 2 Parte posterior del televisor VHF UHF VHF UHF Videograbadora DVD Case con el tipo de conector de su televisor A B o C Para los conectores tipo B y C no se requiereconexión UHF B C ...

Page 129: ...roductor Si el reproductor de DVD está en el modo de reproducción no podrá visualizar el menú de ajustes Pare la reproducción de DVD Utilice el mando a distancia para realizar las siguientes funciones 1 Pulse SET UP después pulse V v para seleccionar OPTION y pulse ENTER 2 Pulse V v para seleccionar Language después pulse ENTER Aparecerá el menú LANGUAGE IDIOMA LANGUE 3 Pulse V v para seleccionar ...

Page 130: ...deberá ajustar el reloj con exactitud La visualización del reloj aparecerá cuando se seleccione el modo VIDEO sin cinta insertada o cuando sea apagada la Videograbadora DVD 1 Pulse SET UP después pulse V v para seleccionar OPTION y pulse ENTER 2 Pulse V v para seleccionar Ajuste de la hora después pulse ENTER Aparecerá el menú AJUSTE DE LA HORA 3 Pulse V v para seleccionar Manual y pulse ENTER 4 A...

Page 131: ...ducción no podrá visualizar el menú de ajustes Pare la reproducción de DVD Utilice el mando a distancia para realizar las siguientes funciones 1 Pulse SET UP después pulse V v para seleccionar OPTION y pulse ENTER 2 Pulse V v para seleccionar Ajuste de canales después pulse ENTER Aparecerá el menú AJUSTE DE CANALES 3 Pulse V v para seleccionar Antena Cable 4 Para memorizar los canales de TV por ca...

Page 132: ...un televisor proyector o amplificador receptor de AV equipado con entrada HDMI Para hacer conexiones de audio Utilice las tomas LINE OUT AUDIO L R o las tomas DIGITAL AUDIO OUT COAXIAL HDMI OUT del lado derecho de Videograbadora DVD cuando utilice la conexión S VIDEO Vídeo componente Conexión S Video Vídeo Componente HDMI IN l Flujo de señales DVD solamente televisor Cable S VIDEO no suministrado ...

Page 133: ... a través de la toma HDMI OUT Cuando vaya a conectar a la toma HDMI OUT alinee cuidadosamente el conector HDMI con la toma No doble ni aplique presión al cable HDMI Para conectar a un televisor con entrada DVI Utilice un cable convertidor HDMI DVI no suministrado La toma DVI no aceptará ninguna señal de audio por lo que tendrá que utilizar otra conexión de audio además de esta conexión página 12 A...

Page 134: ... reproductor podrá parar la reproducción en el punto donde esté rayado La reproducción de listas de reproducción de duración superior a 10 horas grabadas en el modo VR no está garantizada 1 Pulse SELECT DVD para controlar el reproductor de DVD 2 Pulse Z para abrir la bandeja de discos y poner un disco en ella 3 Pulse H PLAY La bandeja de discos se cerrará y el reproductor de DVD comenzará a reprod...

Page 135: ...ontinua PREV en el mando a distancia o m en la unidad Localizar un punto rápidamente m o M en el mando a distancia o mantenga pulsado m o M en la unidad La velocidad de reproducción cambia de la forma siguiente cada vez que se pulsa el botón en el mando a distancia o dependiendo del tiempo que mantenga pulsado el botón en la unidad Cuando encuentre el punto que quiera pulse H PLAY Ver a cámara len...

Page 136: ... 3 Pulse H PLAY El visualizador mostrará el tiempo de reproducción Cuando la cinta llegue al final se rebobinará automáticamente Operaciones adicionales Para Pulse Detener la reproducción x STOP Hacer pausas durante la reproducción X PAUSE Si hace una pausa en la videograbadora de más de 5 min minuto la videograbadora reanudará automáticamente la reproducción Reanudar la reproducción después de la...

Page 137: ...ión normal Durante la reproducción mantenga pulsado M o m La cinta continuará reproduciéndose a una velocidad 5 veces mayor que la reproducción normal Al dejar de pulsar el botón se reanuda la reproducción normal Reproducción a cámara lenta Durante la pausa pulse y Reproducción fotograma a fotograma Durante la pausa pulse SKIP Reproducción de la escena anterior en el modo de reproducción continua ...

Page 138: ...la grabación Pulse x STOP Notas No es posible grabar un DVD directamente a una cinta Videograbadora utilizando su Videograbadora DVD 1 Pulse SELECT VIDEO para controlar la videograbadora 2 Inserte una cinta provista de lengüeta de seguridad 3 Presione CH para seleccionar el canal o la fuente de video de entrada de línea que desee grabar 4 Pulse SP EP para seleccionar la velocidad de cinta SP repro...

Page 139: ......

Page 140: ...Sony Corporation Printed in China AK68 00927A ...

Reviews: