1-3
16
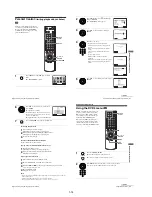
Selecting a language
Step 5 : Selecting a language
You can change the on-screen display
language.
Before you start…
• Turn on the DVD-VCR and your TV.
• Set your TV to the video channel so that
the signal from the player appears on the
TV screen.
• If the DVD player is in play mode, you
cannot display the “SETUP MENU.” Stop
DVD playback.
1
Press SET UP.
The “SETUP MENU” appears.
2
Press
V/v/B/b
to select
(LANGUAGE
SET), then press ENTER.
The “LANGUAGE SET” menu appears.
3
Press
V/v
to select the desired language, then press ENTER.
4
Press
O
RETURN to exit the menu.
V/v/B/b
ENTER
SET UP
O
RETURN
SET UP
DVD SETUP
RETURN
SETUP MENU
Vv b
B
ENTER
ENTER
English
Français
Deutsch
RETURN
LANGUAGE SET
v
V
ENTER
B
Español
Italiano
Nederlands
ENTER
RETURN
Getti
ng Sta
rt
ed
17
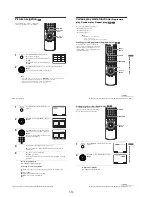
Setting the clock
Step 6 : Setting the clock
You must set the time and date on the DVD-
VCR to use the timer features properly.
The Auto Clock Set function works only if a
station in your area is broadcasting a time
signal.
Before you start…
• Turn on the DVD-VCR and your TV.
• Set your TV to the video channel so that
the signal from the player appears on the
TV screen.
• If the DVD player is in play mode, you
cannot display the “SETUP MENU.” Stop
DVD playback.
1
Press SET UP.
The “SETUP MENU” appears.
2
Press
V/v/B/b
to select
(CLOCK SET),
then press ENTER.
The “CLOCK SET” menu appears.
3
Press
V/v
to set the hour.
V/v/B/b
ENTER
SET UP
O
RETURN
SET UP
DVD SETUP
RETURN
SETUP MENU
Vv b
B
ENTER
ENTER
RETURN
INSTALLATION
1 2 : 0 0
1 / JAN / 2002
AUTO CLOCK : ON
CLOCK SET
TUE
vV
B
b
ENTER
RETURN
1 8 : 0 0
1 / JAN / 2002
AUTO CLOCK : ON
CLOCK SET
TUE
vV
B
b
continued
18
Setting the clock
Tips
• If you set “AUTO CLOCK” to “ON”, the Auto Clock Set function is activated whenever the
DVD-VCR is turned off. The time is adjusted automatically by making reference to the time
signal from the station.
• To change the digits while setting, press
B
to return to the item to be changed, and select the
digits by pressing
V
/
v
.
4
Press
b
to select the minutes and set the
minutes by pressing
V/v
.
5
Set the day, month, and year in sequence by
pressing
b
to select the item to be set, and
press
V/v
to select the digits, then press
b
.
The day of the week is set automatically.
6
Press
V/v
to select
“
ON
”
for the setting of the
Auto Clock Set function.
The DVD-VCR automatically sets the clock
according to the time signal broadcast between
the channels PR 1 to PR 5.
If you do not need the Auto Clock Set function,
select OFF.
7
Press
O
RETURN repeatedly to exit the menu.
ENTER
RETURN
1 8 : 3 0
1 / JAN / 2002
AUTO CLOCK : ON
CLOCK SET
TUE
vV
B
b
ENTER
RETURN
1 8 : 3 0
28 / SEP / 2002
AUTO CLOCK : ON
CLOCK SET
SAT
vV
B
b
ENTER
RETURN
1 8 : 3 0
28 / SEP / 2002
AUTO CLOCK : ON
CLOCK SET
SAT
vV
B
b
RETURN
Getti
ng Sta
rted
19
Presetting channels
Step 7 : Presetting channels
If some channels could not be preset using
the Auto Set Up function, you can preset
them manually.
Before you start…
• Turn on the DVD-VCR and your TV.
• Set your TV to the video channel so that
the signal from the player appears on the
TV screen.
• If the DVD player is in play mode, you
cannot display the “SETUP MENU.” Stop
DVD playback.
1
Press SET UP.
The “SETUP MENU” appears.
2
Press
V/v/B/b
to select
(INSTALLATION), then press ENTER.
The “INSTALLATION” menu appears.
V/v/B/b
ENTER
SET UP
O
RETURN
SET UP
DVD SETUP
RETURN
SETUP MENU
Vv b
B
ENTER
ENTER
RETURN
INSTALLATION
MANUAL SET UP
AUTO SET UP
VIDEO OUTPUT CH : CH21
INSTALLATION
ENTER
vV
continued
Summary of Contents for SLV-D900E
Page 39: ...3 Block Diagram 3 2E 3 1 SLV D900E D900G ...
Page 41: ...4 3 4 4 4 1 VCR Main COMPONENT SIDE ...
Page 42: ...4 6 4 5 CONDUCTOR SIDE ...
Page 43: ...4 7 4 8 4 2 DVD Main CONDUCTOR SIDE COMPONENT SIDE ...
Page 44: ...4 10E 4 9 4 3 FUNCTION Timer COMPONENT SIDE CONDUCTOR SIDE ...
Page 47: ...5 6 5 5 5 1 S M P S ...
Page 48: ...5 8 5 7 FROM TO DVD Audio Video CN4 5 2 Power Drive ...
Page 49: ...5 10 5 9 5 3 OSD VPS PDS ...
Page 50: ...5 12 5 11 5 4 NICAM ...
Page 51: ...5 14 5 13 5 5 A V ...
Page 52: ...5 16 5 15 5 6 Hi Fi ...
Page 53: ...5 18 5 17 5 7 Input Output ...
Page 54: ...5 20 5 19 5 8 TM ...
Page 55: ...5 22 5 21 5 9 SYSCON ...
Page 56: ...5 24 5 23 5 10 DVD Main Micom AV Decoder ...
Page 57: ...5 26 5 25 5 11 DVD Servo ...


