background image

Getting Started

18

PAUSE

STOP

FF

REW

PLAY

OK

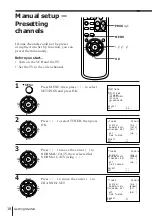
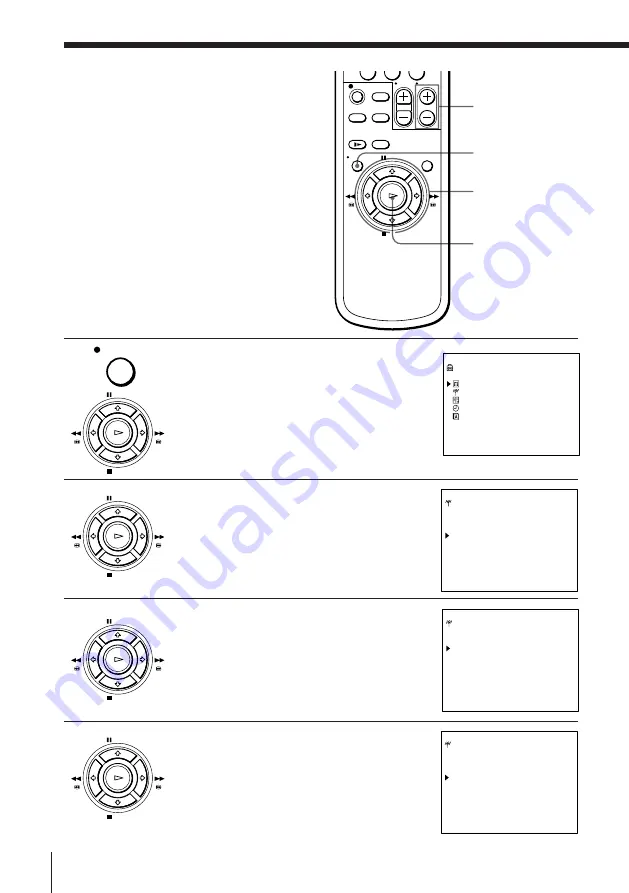
Manual setup —
Presetting
channels

If some channels could not be preset
using the Auto Set Up function, you can
preset them manually.

Before you start…

• Turn on the VCR and the TV.
• Set the TV to the video channel.

1

Press MENU, then press 

>

/

.

 to select

SETTINGS and press OK.

2

Press 

>

/

.

 to select TUNER, then press

OK.

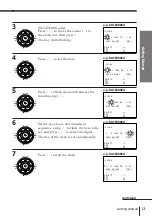
3

Press 

>

/

.

 to move the cursor ( ) to

NORMAL/CATV, then select either
NORM or CATV using 

?

/

/

.

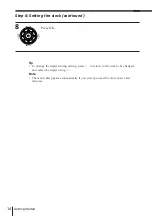
4

Press 

>

/

.

 to  move the cursor ( ) to

CHANNEL SET.

MENU

OK

>

/

.

/

?

/

/

   SETTINGS

          O P T I O N S
          T U N E R
          S H O W V I E W
          C L O C K
          L A N G U A G E

S E L E C T                           :  

V v

S E T                                      :   O K

MENU

PAUSE

STOP

FF

REW

PLAY

OK

PAUSE

STOP

FF

REW

PLAY

OK

PAUSE

STOP

FF

REW

PLAY

OK

PROG +/–

0

   T U N E R                                           P R O G 1 4

    S Y S T E M                                     [ D / K     ]
    N O R M A L / C A T V                   [ C A T V ]
    C H A N N E L     S E T                 [ S 0 1     ]

    A F T                                                 [ O N       ]
    F I N E     T U N I N G

S E L E C T                           :  

V v

S E T                                      :  

B b

   T U N E R                                           P R O G 1 4

    S Y S T E M                                     [ D / K     ]
    N O R M A L / C A T V                   [NORM]
    C H A N N E L     S E T                 [ S 0 1     ]

    A F T                                                 [ O N       ]
    F I N E     T U N I N G

S E L E C T                           :  

V v

S E T                                      :  

B b

Summary of Contents for SLV-E380EG ShowView

Page 1: ...Editing 46 L M LINE TV connection 7 LP mode 26 28 N NTSC recorded tape 25 O OPC Optimum Picture Control 43 P Picture adjustment 43 Playback 24 at various speeds 38 frame by frame 38 slow motion 38 Presetting channels 18 Q Quick timer 40 R Recording 27 saving 29 while watching another programme 29 Remote commander 5 RF channel 8 S Safety tab 29 Searching at various speeds 38 SP mode 28 T U V W X Y ...

Page 2: ...Video Cassette Recorder 1998 by Sony Corporation Operating Instructions 3 861 455 13 1 SLV E480EG SLV E477EG SLV E380EG PAL NTSC 4 43 ...

Page 3: ... sunlight excessive dust mechanical vibration or shock Do not install the unit in an inclined position It is designed to be operated in a horizontal position only Keep the unit and cassettes away from equipment with strong magnets such as microwave ovens or large loudspeakers Do not place heavy objects on the unit If the unit is brought directly from a cold to a warm location moisture may condense...

Page 4: ...27 Recording TV programmes 31 Recording TV programmes using ShowView 35 Setting the timer manually Additional Operations 38 Playing searching at various speeds 40 Recording TV programmes using the quick timer 41 Checking changing cancelling timer settings 43 Adjusting the picture 44 Changing menu options 46 Editing with another VCR Additional Information 48 Troubleshooting 51 Specifications 52 Ind...

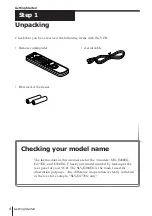
Page 5: ...odel name The instructions in this manual are for the 3 models SLV E480EG E477EG and E380EG Check your model number by looking at the rear panel of your VCR The SLV E480EG is the model used for illustration purposes Any difference in operation is clearly indicated in the text for example SLV E477EG only Remote commander R6 size AA batteries ...

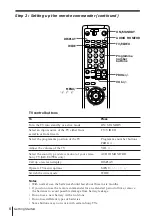
Page 6: ...first then push in and down until the positive end clicks into the position Using the remote commander You can use this remote commander to operate this VCR and a Sony TV Buttons on the remote commander marked with a dot can be used to operate your Sony TV Remote sensor To operate the VCR a Sony TV Set TV VIDEO to VIDEO and point at the remote sensor on the VCR TV and point at the remote sensor on...

Page 7: ...e stereo mono of your stereo Sony TV SLV E477EG only Call up on screen display Operate TV menu options Switch the wide mode Press ON STANDBY TV VIDEO Programme number buttons PROG VOL AUDIO MONITOR DISPLAY MENU WIDE Notes With normal use the batteries should last about three to six months If you do not use the remote commander for an extended period of time remove the batteries to avoid possible d...

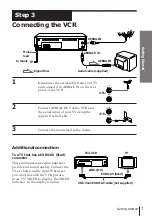
Page 8: ...that has a EURO AV Scart connector This additional connection improves picture and sound quality Connect the TV as shown on the right Whenever you want to watch the VCR picture press TV VIDEO to display the VIDEO indicator in the display window Step 3 AERIAL OUT Connecting the VCR AERIAL IN to mains Signal flow AERIAL IN Mains lead Aerial cable supplied This VCR TV VMC 2121 EURO AV cable not suppl...

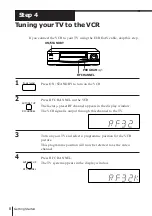
Page 9: ...l to the TV 3 Turn on your TV and select a programme position for the VCR picture This programme position will now be referred to as the video channel 4 Press RF CHANNEL The TV system appears in the display window ON STANDBY RF CHANNEL PROGRAM Tuning your TV to the VCR If you connect the VCR to your TV using the EURO AV cable skip this step RF CHANNEL AUTO SET UP RF CHANNEL AUTO SET UP ON STANDBY ...

Page 10: ... set the TV to the video channel To check to see if the TV tuning is correct Set the TV to the video channel and press PROGRAM on the VCR If the TV screen changes to a different programme each time you press PROGRAM the TV tuning is correct To obtain a clear picture from the VCR If the picture does not appear clearly in step 6 above go to step 7 to finish this procedure once Then start from step 2...

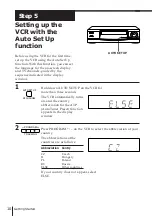
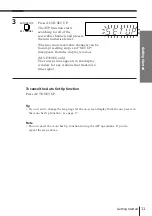
Page 11: ... window 1 Hold down AUTO SET UP on the VCR for more than three seconds The VCR automatically turns on and the country abbreviation for the ATP Auto Tuner Preset function appears in the display window 2 Press PROGRAM on the VCR to select the abbreviation of your country The abbreviations of the countries are as follows Abbreviation Contry CZ Czech H Hungary PL Poland RU Russia ELSE Other countries ...

Page 12: ...pears from the display window SLV E380EG only The current time appears in the display window for any stations that transmit a time signal To cancel the Auto Set Up function Press AUTO SET UP Tip If you want to change the language for the on screen display from the one preset in the Auto Set Up function see page 17 Note Do not cancel the Auto Set Up function during the ATP operations If you do repe...

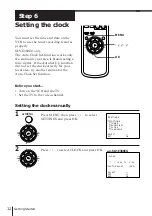
Page 13: ...ectly for your local area try another station for the Auto Clock Set function Before you start Turn on the VCR and the TV Set the TV to the video channel Setting the clock manually 1 Press MENU then press to select SETTINGS and press OK 2 Press to select CLOCK and press OK OK MENU PAUSE STOP FF REW PLAY OK PAUSE STOP FF REW PLAY OK SETTINGS OPTIONS TUNER SHOWVIEW CLOCK LANGUAGE SELECT V v SET OK M...

Page 14: ... PLAY OK PAUSE STOP FF REW PLAY OK PAUSE STOP FF REW PLAY OK PAUSE STOP FF REW PLAY OK PAUSE STOP FF REW PLAY OK continued e g SLV E380EG e g SLV E380EG e g SLV E380EG e g SLV E380EG e g SLV E380EG tCLOCK 1 1 1998 TH 0 00 AUTO ADJUST OFF CLOCK PROG 1 SELECT B b SET V v END OK tCLOCK 11 1 1998 SU 0 00 AUTO ADJUST OFF CLOCK PROG 1 SELECT B b SET V v END OK tCLOCK 11 1 1998 SU 0 00 AUTO ADJUST OFF CL...

Page 15: ... continued 8 Press OK Tip To change the digits during setting press to return to the item to be changed and select the digits using Note The menu disappears automatically if you don t proceed for more than a few minutes PAUSE STOP FF REW PLAY OK ...

Page 16: ...g the station for the Auto Clock Set function SLV E380EG only OK MENU PAUSE STOP FF REW PLAY OK PAUSE STOP FF REW PLAY OK SETTINGS OPTIONS TUNER SHOWVIEW CLOCK LANGUAGE SELECT V v SET OK tCLOCK 1 1 1998 TH 0 00 AUTO ADJUST OFF CLOCK PROG 1 SELECT V v SET B b END OK tCLOCK 11 12 1998 FR 15 30 AUTO ADJUST ON CLOCK PROG 1 SELECT V v SET B b END OK PAUSE STOP FF REW PLAY OK MENU continued ...

Page 17: ...OK Tip If you set AUTO ADJUST to ON the Auto Clock Set function is activated whenever the VCR is turned off The date and time is adjusted automatically by making reference to the time signal from the station whose programme position is displayed in the CLOCK PROG row If you do not need the Auto Clock Set function select OFF Note The menu disappears automatically if you don t proceed for more than ...

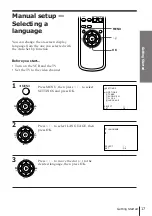
Page 18: ...n the VCR and the TV Set the TV to the video channel 1 Press MENU then press to select SETTINGS and press OK 2 Press to select LANGUAGE then press OK 3 Press to move the dot r to the desired language then press OK MENU OK SETTINGS OPTIONS TUNER SHOWVIEW CLOCK LANGUAGE SELECT V v SET OK MENU PAUSE STOP FF REW PLAY OK PAUSE STOP FF REW PLAY OK PAUSE STOP FF REW PLAY OK LANGUAGE SELECT SET V v OK ...

Page 19: ...e the cursor to NORMAL CATV then select either NORM or CATV using 4 Press to move the cursor to CHANNEL SET MENU OK SETTINGS OPTIONS TUNER SHOWVIEW CLOCK LANGUAGE SELECT V v SET OK MENU PAUSE STOP FF REW PLAY OK PAUSE STOP FF REW PLAY OK PAUSE STOP FF REW PLAY OK PROG 0 TUNER PROG14 SYSTEM D K NORMAL CATV CATV CHANNEL SET S 0 1 AFT ON FINE TUNING SELECT V v SET B b TUNER PROG14 SYSTEM D K NORMAL C...

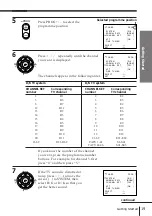
Page 20: ... OK D K TV system CHANNEL SET number 2 5 6 12 13 14 15 16 17 18 19 20 21 69 Corresponding TV channel R1 R6 R7 R12 R2 R3 R4 R5 R8 R9 R10 R11 R21 R69 B G TV system CHANNEL SET number 2 3 4 5 6 7 8 9 10 11 12 21 69 CATV 1 41 CATV 42 46 Corresponding TV channel E2 E3 E4 E5 E6 E7 E8 E9 E10 E11 E12 E21 E69 S1 S41 S01 S05 continued PAUSE STOP FF REW PLAY OK PROG TUNER PROG 7 SYSTEM D K NORMAL CATV NORM C...

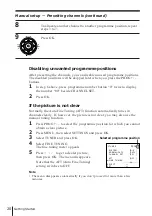
Page 21: ...Press PROG to select the programme position for which you cannot obtain a clear picture 2 Press MENU then select SETTINGS and press OK 3 Select TUNER and press OK 4 Select FINE TUNING The fine tuning meter appears 5 Press to get a clearer picture then press OK The menu disappears Note that the AFT Auto Fine Tuning setting switches to OFF Note The menu disappears automatically if you don t proceed ...

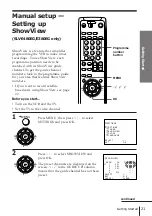
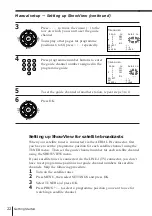
Page 22: ...ite broadcasts using ShowView see page 22 Before you start Turn on the VCR and the TV Set the TV to the video channel 1 Press MENU then press to select SETTINGS and press OK 2 Press to select SHOWVIEW and press OK The preset channels are displayed on the screen in the GUIDE CH column means that the guide channel has not been preset OK MENU Programme number button MENU PAUSE STOP FF REW PLAY OK SET...

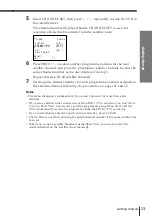
Page 23: ...hen set the guide channel number for each satellite channel using the SHOWVIEW menu If your satellite tuner is connected via the LINE 1 TV connector you don t have to set programme positions nor guide channel numbers for satellite channels Skip the following procedure 1 Turn on the satellite tuner 2 Press MENU then select SETTINGS and press OK 3 Select TUNER and press OK 4 Press PROG to select a p...

Page 24: ...lite channel following the procedures on pages 21 and 22 Notes The menu disappears automatically if you don t proceed for more than a few minutes If you use a satellite tuner connected via the LINE 1 TV connector you don t have to set up ShowView Just record a satellite programme using ShowView and the VCR automatically records the programme from the LINE 1 TV connector If you inadvertently entere...

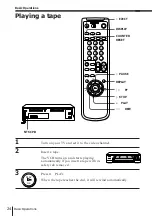
Page 25: ...nnel 2 Insert a tape The VCR turns on and starts playing automatically if you insert a tape with its safety tab removed 3 Press Æ PLAY When the tape reaches the end it will rewind automatically REPLAY 6 EJECT 03 REW P PAUSE Æ PLAY FF p STOP COUNTER RESET DISPLAY PLAY OK NTSC PB 1 2 3 4 5 6 7 8 9 0 ...

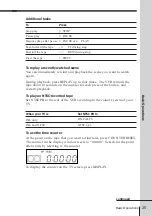
Page 26: ...p to four times The VCR rewinds the tape about 10 seconds on the counter for each press of the button and restarts playback To play an NTSC recorded tape Set NTSC PB at the rear of the VCR according to the colour system of your TV When your TV is PAL only PAL and NTSC To use the time counter At the point on the tape that you want to find later press COUNTER RESET The counter in the display window ...

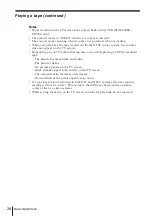
Page 27: ... following may occur while playing an NTSC recorded tape The picture becomes black and white The picture shakes No picture appears on the TV screen Black streaks appear horizontally on the TV screen The colour density increases or decreases Deterioration of the picture quality may occur If a tape has portions recorded in both PAL and NTSC systems the time counter reading will not be correct This i...

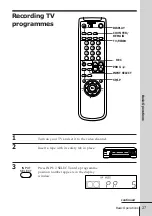
Page 28: ...our TV and set it to the video channel 2 Insert a tape with its safety tab in place 3 Press INPUT SELECT until a programme position number appears in the display window r REC SP LP INPUT SELECT DISPLAY PROG COUNTER REMAIN TV VIDEO continued 1 2 3 4 5 6 7 8 9 0 INPUT SELECT ...

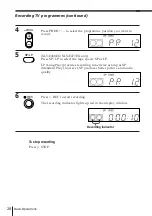
Page 29: ...477EG only Press SP LP to select the tape speed SP or LP LP Long Play provides recording time twice as long as SP Standard Play however SP produces better picture and audio quality 6 Press r REC to start recording The recording indicator lights up red in the display window To stop recording Press p STOP Recording indicator REC SP LP PROG ...

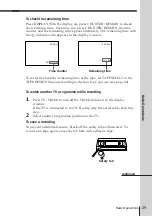
Page 30: ... To record on a tape again cover the tab hole with adhesive tape Safety tab To check the remaining time Press DISPLAY With the display on press COUNTER REMAIN to check the remaining time Each time you press COUNTER REMAIN the time counter and the remaining time appear alternately The remaining time with the indicator also appears in the display window To correctly check the remaining time of the t...

Page 31: ...ecording you can turn off the TV Notes The display does not appear during still pause mode or slow motion playback The display will not appear while playing an NTSC recorded tape If a tape has portions recorded in both PAL and NTSC systems the time counter reading will not be correct This discrepancy is due to the difference between the counting cycles of the two video systems When you insert a no...

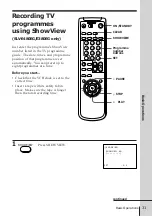
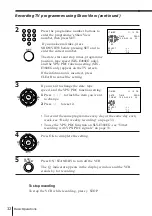
Page 32: ...amme position of that programme are set automatically You can preset up to eight programmes at a time Before you start Check that the VCR clock is set to the correct time Insert a tape with its safety tab in place Make sure the tape is longer than the total recording time SHOWVIEW CLEAR SET p STOP ON STANDBY Programme number buttons SHOWVIEW SHOWVIEW SHOWVIEW NO SET 0 9 P PAUSE Æ PLAY continued 1 ...

Page 33: ...to reset it To record the same programme every day or the same day every week see Daily weekly recording on page 33 To use the VPS PDC function on SLV E380EG see Timer recording with VPS PDC signals on page 33 4 Press OK to complete the setting 5 Press ON STANDBY to turn off the VCR The indicator appears in the display window and the VCR stands by for recording To stop recording To stop the VCR wh...

Page 34: ...use the VPS PDC function set VPS PDC to ON You can also use the VPS PDC function for a source connected to the LINE 1 TV connector To record satellite broadcasts If you connect the satellite tuner and the VCR you can record satellite programmes 1 Turn on the satellite tuner 2 On the satellite tuner select the satellite programme for which you want to make a timer setting 3 Keep the satellite tuner...

Page 35: ...ding time the tape speed is automatically changed to the LP mode Note that some interference will appear on the picture at the point the tape speed is changed If you want to keep the same tape speed set AUTO TAPE SPEED to OFF in the OPTIONS menu page 44 Note If the ShowView number is incorrect the SHOWVIEW menu appears instead of the TIMER menu after pressing SET Recording TV programmes using Show...

Page 36: ...o set the timer to record programmes Before you start Check that the VCR clock is set to the correct time Insert a tape with its safety tab in place Make sure the tape is longer than the total recording time Turn on your TV and set it to the video channel OK MENU PAUSE STOP FF REW PLAY OK p STOP continued 1 2 3 4 5 6 7 8 9 0 tTIMER 11 12 FR DATE TIME PROG TODAY 1 9 0 0 b 2 0 0 0 3 5 SP LP SP SELEC...

Page 37: ...r press INPUT SELECT to display L in the PROG position 3 Press OK 4 Press ON STANDBY to turn off the VCR The indicator appears in the display window and the VCR stands by for recording To record from a source leave the connected equipment switched on To stop recording To stop the VCR while recording press p STOP To use the VCR after setting the timer To use the VCR before a timer recording begins ...

Page 38: ...tion set VPS PDC to ON You can also use the VPS PDC function for a source connected to the LINE 1 TV connector Tips To set the programme position you can also use the PROG or programme number buttons For SLV E480EG E477EG you can also use the SP LP button to set the tape speed For SLV E480EG E477EG when you are recording a progamme in the SP mode and the remaining tape becomes shorter than the rec...

Page 39: ...ame by frame Rewind and start play Operation During fast forward hold down FF or FF During rewind hold down 03 REW or 0 REW During playback press FF or 03 REW During playback hold down FF or 03 REW To resume normal playback release the button During playback press 2 During playback or pause press SLOW During pause press FF or 03 REW Hold down the button to play one frame each second During stop pr...

Page 40: ...ause turn the CLICK SHUTTLE ring clockwise or counterclockwise Each change in the CLICK SHUTTLE ring position changes the playback mode in the following way Tip Adjust the picture using the TRACKING buttons on the VCR if streaks appear while playing in slow motion the picture shakes while pausing To set tracking to the centre position press both buttons at the same time Notes The sound is muted du...

Page 41: ...urns off automatically To extend the duration Press QUICK TIMER repeatedly to set to the new duration To stop recording To stop the VCR while recording press p STOP Using the quick timer during stop mode You can set the quick timer and start recording during stop mode by pressing QUICK TIMER To set the channel you can use the PROG or INPUT SELECT buttons Press QUICK TIMER repeatedly to set the rec...

Page 42: ... change a setting go on to the next step If you do not need to change or cancel the settings press OK then turn off the VCR to return to recording standby 3 Press to select the setting you want to change or cancel then press OK CLEAR OK MENU ON STANDBY continued 1 2 3 4 5 6 7 8 9 0 tLIST 11 12 FR DATE TIME PROG TU 1900b2000 6 13 12 0930b1000 35 11 12 0500b0530 44 MO FR 1200b1300 L MO SA 2300b2330 ...

Page 43: ...the timer settings overlap The programme that starts first has priority and the second programme starts recording only after the first programme has finished If the programmes start at the same time the programme listed first in the menu has priority tTIMER 11 12 FR DATE TIME PROG TODAY 1 9 0 0 b 2 0 0 0 3 5 SP LP LP SELECT B b SET V v OK OK Checking changing cancelling timer settings continued Pr...

Page 44: ...ator in the display window lit For details see page 44 OPC playback The OPC function automatically works on all types of tapes including rental tapes and tapes that were not recorded with OPC OPC recording Whenever you insert a tape and first start recording the VCR adjusts to the tape using the OPC function the OPC indicator flashes rapidly This adjustment is retained until the tape is ejected To...

Page 45: ...etting 4 Press OK to return to the original screen Menu choices Initial settings are indicated in bold print TAPE OPTIONS SETTINGS OPTIONS TUNER SHOWVIEW CLOCK LANGUAGE SELECT V v SET OK Menu option AUTO TAPE SPEED SLV E480EG E477EG only TAPE SELECT Set this option to ON to change the timer recording tape speed automatically to the LP mode when the remaining tape becomes shorter than the recording...

Page 46: ...ndow are on even though POWER SAVE is set to ON Menu option OPC SYSTEM Set this option to ON to switch on the OPC Optimum Picture Control function and improve picture quality OFF to switch off OPC AUTO to automatically detect the colour system and play back the tape in the appropriate mode If the picture s colour is poor manually select the colour system that the tape was recorded in PAL to play b...

Page 47: ... display L in the display window Press SP LP to select the tape speed SP or LP SLV E480EG E477EG only 1 Insert a source tape with its safety tab removed into the other playback VCR Search for the point to start playback and set it to playback pause 2 Insert a tape with its safety tab in place into this recording VCR Search for the point to start recording and press P PAUSE 3 Press r REC on this VC...

Page 48: ... press P PAUSE again to resume recording Assemble Editing Note If you start recording following the procedure above the VCR won t start recording with the OPC function To record a tape with the OPC function press r REC again during recording pause in step 3 so that the VCR analyses the tape Then when you start editing in step 4 press P PAUSE after the OPC indicator stops flashing If you press P PA...

Page 49: ...the mains lead and leave the VCR to dry for over one hour The clock stops if the VCR is disconnected from the mains for more than an hour Reset the clock and timer Make sure the TV is set to the video channel If you are using a monitor set it to video input Adjust the tracking with the TRACKING buttons The video heads are dirty see below Clean the video heads using the Sony T 25CLD E 25CLDR or T 2...

Page 50: ...s been removed To record on this tape cover the tab hole Check that the safety tab has not been removed Make sure the tape is not at its end Select the correct source with the INPUT SELECT button Select a programme position when recording TV programmes select L when recording from other equipment Check that the clock is set Make sure a tape has been inserted Check that the safety tab has not been ...

Page 51: ...t the remote sensor on the VCR Replace all the batteries in the remote commander with new ones if they are weak Make sure the TV VIDEO remote control switch is set correctly The recording condition of the tape is very poor and tracking cannot be adjusted or the NTSC system is being used Clean the cabinet panel and controls with a dry soft cloth or a soft cloth slightly moistened with a mild deterg...

Page 52: ...E 1 TV 21 pin Video input pin 20 Audio input pins 2 and 6 Video output pin 19 Audio output pins 1 and 3 General Power requirements 220 240 V AC 50 Hz Power consumption 20 W Operating temperature 5 C to 40 C Storage temperature 20 C to 60 C Dimensions Approx 355 96 285 mm w h d including projecting parts and controls Mass Approx 3 9 kg Supplied accessories Remote commander 1 R6 size AA batteries 2 ...

Page 53: ...77EG 1 ON STANDBY switch indicator 8 2 Tape compartment 3 03 REW rewind button 25 38 4 Æ PLAY button 24 38 5 FF fast forward button 25 38 6 r REC record button 28 7 p STOP button 25 8 P PAUSE button 25 9 PROGRAM TRACKING buttons 28 43 AUTO SET UP RF Radio Frequency CHANNEL button 8 10 Remote sensor 5 6 EJECT button 25 1 2 3 5 4 9 8 7 6 ...

Page 54: ...W rewind button 25 38 4 FF fast forward button 25 38 5 Æ PLAY button 24 38 6 CLICK SHUTTLE ring 39 7 r REC record button 28 8 p STOP button 25 9 P PAUSE button 25 0 PROGRAM TRACKING buttons 28 43 AUTO SET UP RF Radio Frequency CHANNEL button 8 10 Remote sensor 5 6 EJECT button 25 continued 1 2 3 4 5 6 9 8 7 ...

Page 55: ...m Picture Control indicator 43 5 VPS Video Programme System PDC Programme Delivery Control indicator SLV E380EG only 33 37 6 Tracking indicator 43 7 Time counter clock line programme position indicator 25 27 46 8 Remaining time indicator 29 9 Tape recording indicator 28 Index to parts and controls continued 1 2 3 4 5 6 9 8 7 ...

Page 56: ...ional Information Rear panel 1 Mains lead 7 2 AERIAL IN ANTENNE ENTREE connector 7 3 AERIAL OUT ANTENNE SORTIE connector 7 4 LINE 1 TV LIGNE 1 TV connector 7 46 5 NTSC PB PlayBack switch 25 continued 1 5 2 4 3 ...

Page 57: ...ord button 28 8 SP Standard Play LP Long Play button SLV E480EG E477EG only 28 9 INPUT SELECT button 27 SLOW button 38 2 button SLV E480EG E477EG only 38 Tape menu operation buttons MENU button 12 44 P PAUSE button 12 25 p STOP button 12 25 0 3 REW rewind button 13 25 FF fast forward button 14 25 Æ PLAY OK button 19 Index to parts and controls continued 1 2 3 4 5 6 7 8 9 1 2 3 4 5 6 7 8 9 0 ...

Page 58: ...REMAIN button 29 AUDIO MONITOR button SLV E477EG only 6 ƒ CLEAR button 42 SHOWVIEW button SLV E480EG E380EG only 31 Programme number buttons 22 SET button SLV E480EG E380EG only 32 ten s digit buttons 30 PROG programme buttons 28 VOL volume buttons 6 REPLAY button 25 1 2 3 4 5 6 7 8 9 0 ƒ ...

Page 59: ...58 Additional Information ...

Page 60: ...59 Additional Information ...

Reviews: