5-23
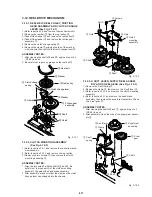
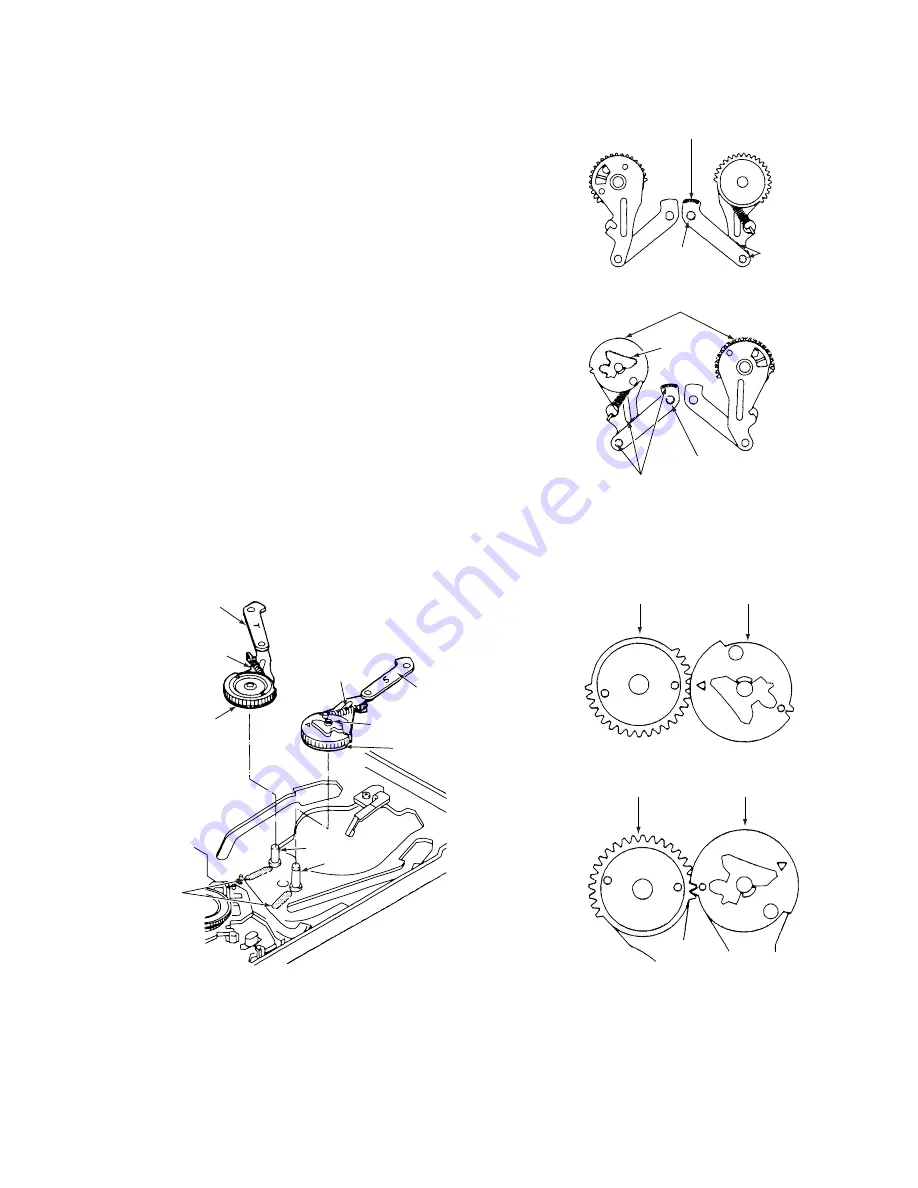
3-17. S LOAD GEAR, T LOAD GEAR,
S LOAD LEVER ASSEMBLY AND
T LOAD LEVER ASSEMBLY
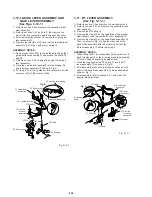
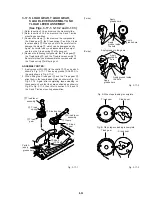
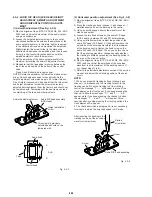
(See Figs. 3-17-1. 3-17-2 and 3-17-3)
1) Refer to section 3-16 and remove the crescent slide.
2) Refer to section 3-14-2 and remove the S and T incline
mounting assemblies.
3) Remove the clamp
1
, then remove the components:
the S load gear
2
, the S load spring
3
and the S load
lever assembly
4
. When you do this, be careful not to
damage the clamp
1
, which can be damaged easily.
Again, be careful when you disassemble the compo-
nents, as the S load spring
3
will spring out.
4) Remove the following components: the T load gear
5
,
the T load spring
6
, and the T load lever assembly
7
.
Be careful when you disassemble the components, as
the T load spring
6
will spring out.
ASSEMBLY NOTES:
1. Apply grease (SGL-505) to the shafts
8
,
9
and parts A
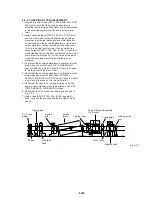
shown in Fig. 3-17-1. Then apply grease (SGL-505) to
the parts shown in Fig. 3-17-2.
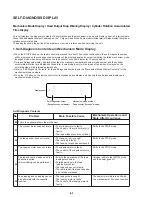
2. When fitting the S load gear
2
and the T load gear
5
align them in the tape-loaded state, as shown in Fig. A in
Fig. 3-17-3. Again, after completing tape-unloading on
these gears, check that they are positioned as shown in
Fig. B in Fig. 3-17-3, then refer to section 3-14-2 and fit
the S and T incline mounting assemblies.
4
S load lever
assembly
6
T load
spring
5
T load
gear
Parts A
(apply
grease here)
3
S load spring
1
Clamp
8
Shaft
9
Shaft
2
S load
gear
7
T load lever
assembly
Fig. 3-17-1
Apply
grease here
Apply
grease
here
Apply
grease here
Apply
grease here
Apply
grease inside
the hole
Apply grease inside
the hole
Apply grease to the gears
(T side)
(S side)
Fig. 3-17-2
Fig. B: When tape unloading is complete
Fig. A: When tape loading is complete
T load gear
S load gear
T load gear
S load gear
Fig. 3-17-3
Summary of Contents for SLV-L45AR
Page 6: ...1 2 ...
Page 7: ...1 3 ...
Page 8: ...1 4 ...
Page 9: ...1 5 ...
Page 10: ...1 6 ...
Page 11: ...1 7 ...
Page 12: ...1 8 E ...
Page 17: ...3 2 MECHANISM CONNECTION DIAGRAM ...
Page 18: ...3 3 3 4 SLV L45AR L65HFAR L75HFAR OVERALL WIRING DIAGRAM SLV L45AR ...
Page 19: ...SLV L45AR L65HFAR L75HFAR OVERALL WIRING DIAGRAM SLV L65HFAR L75HFAR 3 5 3 6 ...
Page 20: ...3 7 3 8 SLV L45AR L65HFAR L75HFAR SYSTEM CONTROL SERVO CIRCUIT DIAGRAM SLV L45AR ...
Page 21: ...3 9 3 10 SLV L45AR L65HFAR L75HFAR SYSTEM CONTROL SERVO CIRCUIT DIAGRAM SLV L65HFAR L75HFAR ...
Page 25: ...SLV L45AR L65HFAR L75HFAR 4 3 4 4 CP 1 BOARD VA A VIDEO AUDIO TUNER CIRCUIT DIAGRAM SLV L45AR ...
Page 33: ...4 19 4 20 CP 1 BOARD SY A SYSTEM CONTROL SERVO CIRCUIT DIAGRAM SLV L65HFAR L75HFAR ...


