background image

22

ES

Funciones del teléfono

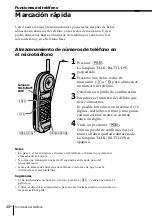
Para almacenar el número previamente marcado

Presione 

(REDIAL/PAUSE)

 directamente despues del paso 2, a continuación vaya al

paso 4.

Para almacenar un número para marcarlo mediante la
función de tablero conmutador de abonado (PBX)

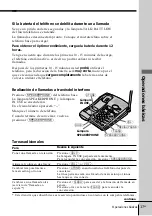
Antes de introducir el número de teléfono en el paso 3 de la página anterior, realice lo
siguiente:

1

Introduzca el dígito de acceso a la línea exterior (p. ej., 9).

2

Presione 

(REDIAL/PAUSE)

.

Para cambiar el número almacenado

Para almacenar un número nuevo, siga las instrucciones como se describió
anteriormente.

Para borrar un número de la memoria

1

Presione 

(PGM)

.

2

Presione la tecla de marcación rápida cuyo número desee borrar.

3

Vuelva a presionar 

(PGM)

.

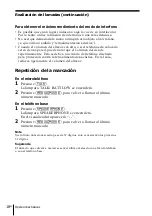
Realización de llamadas con marcación rápida desde el
microtélefono

1

Presione 

(TALK)

.

La lámpara TALK/BATT LOW se enciende.

2

Presione 

(SPEED DIAL)

.

3

Introduzca el número de marcación rápida que desee (

(0)

 a 

(9)

).

El número de teléfono almacenado en el número de marcación rápida se

marcará.

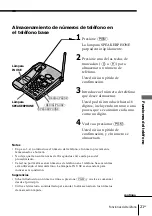
Realización de llamadas con marcación rápida desde el
télefono base

1

Presione 

(SPEAKERPHONE)

.

La lámpara SPEAKERPHONE se enciende.

2

Presione 

(SPEED DIAL)

.

3

Introduzca el número de marcación rápida que desee (

(0)

 a 

(9)

).

El número de teléfono almacenado en el número de marcación rápida se
marcará.

Marcación rápida (continuación)

Summary of Contents for SPP A946 - 900MHz Cordless Telephone

Page 1: ...3 043 640 11 1 1999 Sony Corporation ES Operating Instructions Manual de instrucciones SPP A946 US Cordless Telephone with Answering System ...

Page 2: ...n the product 11 To reduce the risk of electric shock do not disassemble this product but take it to a qualified service personnel when some service or repair work is required Opening or removing covers may expose you to dangerous voltages or other risks Incorrect reassembly can cause electric shock when the appliance is subsequently used Owner s Record The model and the serial numbers are located...

Page 3: ...attery or conductor may overheat and cause burns 5 Charge the battery pack provided with or identified for use with this product only in accordance with the instructions and limitations specified in the instruction manual provided for this product 6 Observe proper polarity orientation between the battery pack and battery charger INFORMATION FOR GENERAL TELEPHONES 1 This equipment complies with Par...

Page 4: ...changes or modifications not expressly approved in this manual could void your authority to operate this equipment Note This equipment has been tested and found to comply with the limits for a Class B digital device pursuant to Part 15 of the FCC Rules These limits are designed to provide reasonable protection against harmful interference in a residential installation This equipment generates uses...

Page 5: ...t and the base phone Intercom 27 To talk from the handset to the base phone 28 To talk from the base phone to the handset 29 Transferring a call 29 To transfer from the base phone to the handset 30 To transfer from the handset to the base phone 31 Having a three way conference 31 To join the phone conversation Answering Machine Features 32 Setting up the answering machine 32 Setting the time and d...

Page 6: ...ert the battery pack into the handset and charge it for more than 12 hours First unpack the phone and the supplied accessories Step 1 page 7 That s it Handset About the digital security code The cordless telephone uses a digital security code to provide protection against unwanted access to your base phone The security code blocks other cordless handsets to make calls through your base phone A ran...

Page 7: ...rgeable battery pack BP T18 Step 1 Checking the package contents Make sure you have received the following items in the package If anything is missing contact your local Sony dealer Directories 2 Telephone line cords 2 Wall bracket stand for base phone SPEED DIALING 1 2 3 4 5 6 7 8 9 0 ...

Page 8: ...xperience intermittent loss of audio during a conversation try moving closer to the base or move base phone away from other noise sources The cordless telephone operates at a frequency that may cause interference to nearby TVs and VCRs the base phone should not be placed near or on the top of a TV or VCR and if interference is experienced moving the cordless telephone farther away from the TV or V...

Page 9: ...the LINE jack and to a telephone outlet 2 Connect the AC power adaptor to the DC IN 9V jack and to an AC outlet 3 Raise the antenna Make sure it points towards the ceiling Connect the base phone If you want to hang the base phone on the wall see page 47 To LINE 3 To DC IN 9V To an AC outlet To the telephone outlet Telephone line cord supplied 1 AC power adaptor supplied AC T129 2 Align the f marks...

Page 10: ...ne service company for assistance Choose the dialing mode For the telephone to work properly select an appropriate dialing mode tone or pulse Depending on your dialing system set the DIAL MODE switch as follows If your dialing system is Set the switch to Tone TONE Pulse PULSE If you aren t sure of your dialing system Make a trial call with the DIAL MODE switch set to TONE If the call connects leav...

Page 11: ...orrect polarity black wire goes on left side and red wire goes on right 3 Close the battery compartment lid 4 Place the handset on the base phone The CHARGE lamp lights up when the handset is properly seated on the charge terminals of the base phone Charge the battery pack for more than 12 hours so that the battery is fully charged The CHARGE lamp remains lit even after charging is completed conti...

Page 12: ...he battery Do not place the handset on the base phone after each call The battery works best if the handset is returned to the base phone after two or three calls However do not leave the handset off the base phone for a long period of time as this will completely discharge the battery pack When to purchase a new battery pack If the battery lasts only a few minutes even after 12 hours of charging ...

Page 13: ...aling keys p 16 7 Battery compartment p 11 8 TONE button p 16 19 Allows you to switch temporarily to tone dialing 9 SPEED DIAL button p 22 Used to make a call with speed dialing 0 OFF button p 16 19 Allows you to disconnect the call qa FLASH button p 16 19 qs HOLD button p 16 19 26 Used to hold a call qd INTERCOM button p 27 Used to make an intercom call qf CHANNEL button p 16 19 Used to select a ...

Page 14: ... p 32 39 Press to repeat the current message or go back to the previous message Keep the button pressed for slow playback of messages 6 Dialing keys p 17 7 PGM Program button p 21 Used to store numbers for speed dialing 8 IN USE lamp p 17 19 25 Lights when one of the phones is in use 9 CHARGE lamp p 11 Lights while the battery is being charged 0 MIC microphone p 33 44 qa TONE button p 17 19 Allows...

Page 15: ...ed inserts a pause in the dialing sequence ws SPEED DIAL button p 22 Used to make a call with speed dialing wd FLASH button p 17 19 wf INTERCOM button p 28 Used to make an intercom call wg INTERCOM lamp p 27 Lights up during an intercom call wh SPEAKERPHONE button p 17 19 Used to make or receive a call with the base phone wj SPEAKERPHONE lamp p 17 19 Lights while making or receiving a call with th...

Page 16: ...SE lamp on the base phone go off Basics Making calls Additional tasks Notes Before dialing make sure you can hear the dial tone otherwise you cannot dial correctly When the TALK BATT LOW lamp repeats a set of two flashes the base phone is in use When you set the handset volume to H high the volume will be raised considerably Under normal circumstances set the volume to M middle Do this Press HOLD ...

Page 17: ...through the speakerphone Press SPEAKERPHONE on the base phone The SPEAKERPHONE lamp and the IN USE lamp light up appears on the display Dial the phone number When you are done talking press SPEAKERPHONE again REDIAL PAUSE SPEAKERPHONE SPEAKERPHONE lamp continued VOL IN USE lamp Additional tasks To Put a call on hold Adjust the speaker volume Switch to tone dialing temporarily Switch to another cal...

Page 18: ... volume drops suddenly This is due to a circuit in the telephone designed to protect against feedback In such cases lower the speaker volume slightly Redialing On the handset 1 Press TALK The TALK BATT LOW lamp lights up 2 Press REDIAL PAUSE to redial the number last dialed On the base phone 1 Press SPEAKERPHONE The SPEAKERPHONE lamp lights up appears on the display 2 Press REDIAL PAUSE to redial ...

Page 19: ...ase phone The TALK BATT LOW lamp on the handset and the IN USE lamp on the base phone go off Receiving calls To Put a call on hold Select a better channel Adjust the handset volume Switch to tone dialing temporarily Switch to another call call waiting service Turn on off the ringer of the handset You need to subscribe to the service from your telephone company Additional tasks Do this Press HOLD T...

Page 20: ...r up to 16 digits including a tone and a pause each of which is counted as one digit 4 Press PGM again You ll hear a confirmation beep and the number is stored The TALK BATT LOW lamp goes off Notes In step 3 if you don t enter the phone number the previously stored number will be erased Do not allow more than 20 seconds to elapse between each step of the procedure Before storing phone numbers make...

Page 21: ...ar another confirmation beep and the number is stored Notes In step 3 if you don t enter the phone number the previously stored number will be erased Do not allow more than 20 seconds to elapse between each step of the procedure You cannot store phone numbers on the base phone while the handset is being used The IN USE lamp will light up to indicate this condition Tips If you enter a wrong number ...

Page 22: ... instructions described previously To clear a number from memory 1 Press PGM 2 Press the speed dialing key you want to clear 3 Press PGM again Making calls with speed dialing on the handset 1 Press TALK The TALK BATT LOW lamp lights up 2 Press SPEED DIAL 3 Enter the desired speed dialing number 0 to 9 The phone number stored in the speed dialing number will be dialed Making calls with speed dialin...

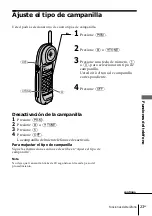
Page 23: ...lect a ringer type You ll hear the corresponding ringer tone 4 Press OFF Turning off the ringer 1 Press PGM 2 Press or TONE 3 Press 5 4 Press OFF The ringer on the handset is turned off To turn the ringer on again Follow the instructions described in Setting the ringer type Note Do not allow more than 20 seconds to elapse between each step of the procedure TONE OFF continued ...

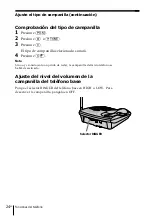
Page 24: ...urrently selected ringer sounds 4 Press OFF Note If you hear no sound only key beep the ringer on the handset has been turned off Adjusting the ringer volume level of the base phone Set the RINGER switch on the base phone to HIGH or LOW To turn the ringer off set it to OFF Setting the ringer type continued ...

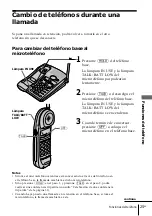
Page 25: ...e The IN USE lamp and the TALK BATT LOW lamp on the handset will light up 3 When you are done talking press OFF or replace the handset to the base phone IN USE lamp TALK BATT LOW lamp TALK OFF Notes If you pick up the handset while talking through the speakerphone on the base phone the call will be switched to the handset If you do not press HOLD in step 1 and press TALK in step 2 you can make a t...

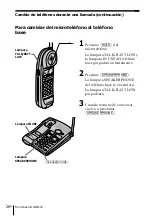
Page 26: ...nd the IN USE lamp on the base phone will flash slowly 2 Press SPEAKERPHONE The SPEAKERPHONE lamp on the base phone will light up The TALK BATT LOW lamp will flash 3 When you are done talking press SPEAKERPHONE again TALK BATT LOW lamp SPEAKERPHONE IN USE lamp SPEAKERPHONE lamp Switching the phones during a call continued ...

Page 27: ...t the base phone answers you can talk The TALK BATT LOW lamp on the handset and INTERCOM lamp will light up When you are done talking or if no one answers the phone Press OFF Tips You can receive an intercom call on the base phone even when the RINGER switch on the base phone is set to OFF The base phone will ring at a low level When a person at the base phone want to answer the intercom call with...

Page 28: ...e is an incoming call while on the intercom only the base phone rings at a low level To answer the call press TALK on the handset or SPEAKERPHONE on the base phone The intercom is canceled and you can talk to the outside caller While conversing with an outside caller via the base phone or handset you cannot make an intercom call If you press INTERCOM on the handset you will hear a busy tone If you...

Page 29: ...lashes 2 Press INTERCOM on the handset The TALK BATT LOW lamp on the handset and INTERCOM lamp on the base phone light up You can talk between the base phone and the handset 3 Press TALK on the handset to talk to the caller with the handset If no one answers the phone Press SPEAKERPHONE on the base phone Tip You can receive an intercom call on the handset even when the ringer is set to off The han...

Page 30: ... the caller with the base phone If no one answers the phone Press TALK on the handset Tips You can receive an intercom call on the base phone even when the RINGER switch on the base phone is set to OFF The base phone will ring at a low level When a person at the base phone want to answer the intercom call within 3 seconds press INTERCOM on the base phone If a person at the base phone press INTERCO...

Page 31: ...te like two extensions on the same line Both phones can operate at the same time so that you the outside caller and the person at the other phone can engage in a three way conversation When you are done talking Press OFF on the handset or press SPEAKERPHONE if you re at the base phone Tip While talking through the speakerphone on the base phone if you pick up the handset the conversation will be c...

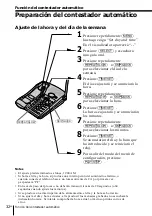
Page 32: ... 8 Press TIME SET The day and time you just entered is announced and the clock restarts 9 Press PLAY STOP to exit the menu setup mode Notes The time and day are preset to Monday 12 00 AM PF flashes when the day and time is cleared or delayed due to a power interruption or when you connect the base phone to the AC outlet for the first time Do not allow more than 20 seconds or 60 seconds when settin...

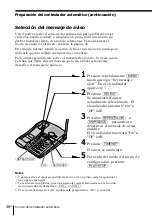
Page 33: ...nly modes See page 42 One greeting can be assigned in each mode so you record a new greeting to match for each mode When you have already recorded two greetings and you want to use a prerecorded greeting for one of the modes erase your own greeting in the mode you want to change Your own greeting in the mode you select is erased and a prerecorded greeting is set automatically 1 Press MENU repeated...

Page 34: ... outside phone on page 46 Even if a power interruption occurs your own greeting is not erased To check the greeting Press MENU repeatedly until Set greeting message is announced appears on the display Then press PLAY STOP to play back the greeting To change the greeting Record a new greeting by following the instructions on the previous page The new greeting replaces the old one To erase the greet...

Page 35: ... selected number of ring is announced 3 Press REPEAT SLOW or SKIP QUICK repeatedly to select a ring duration 2 5 or Toll Saver To answer after 2 rings select 2 To answer after 5 rings select 5 Select Toll Saver to answer after 2 rings when there are new messages and 5 rings when there are no new messages 4 Press TIME SET The ring duration setting is announced 5 Press PLAY STOP to exit the menu set...

Page 36: ...the message alert to off 1 Press MENU repeatedly until you hear Set message alert appears on the display 2 Press SELECT The present selected setting is announced The display shows On or OF off 3 Press REPEAT SLOW or SKIP QUICK to set the audible message alert on or off The display shows On or OF off 4 Press TIME SET The setting is announced 5 Press PLAY STOP to exit the menu setup mode Notes When ...

Page 37: ...tart recording a message When the caller does not select a mailbox the message is automatically recorded to MAILBOX 1 Notes If four minutes have passed while recording the incoming message the line will be disconnected automatically If the message is shorter than two seconds it will not be recorded Tip Even if a power interruption occurs the incoming messages are not erased To turn off the answeri...

Page 38: ...machine is approximately 15 minutes including the greeting messages and memo When the remaining recording time becomes less than 30 seconds FL flashes on the display and the answering machine goes into the memory full status To avoid this erase unnecessary messages see page 40 You can also erase the messages from an outside phone see page 46 ...

Page 39: ...comes in the play back will stop A time and day stamp is announced after each message if you set the time and day see page 32 The old messages will not be played back unless all new messages are played back Tips If there are no new messages all the previously reviewed messages are played back The messages are saved even after a power failure REPEAT SLOW Do this Press VOL or VOL Press a mailbox but...

Page 40: ... to 6 Erasing messages 1 Press and hold ERASE for more than one second Please select mailbox is announced 2 Press a button for the mailbox you want to erase MAILBOX 1 MAILBOX 2 or MAILBOX 3 All old messages in the selected mailbox are erased All of your messages has been erased is announced To erase individual messages Press ERASE while playing back the message that you want to erase Message has b...

Page 41: ...erased or not Be sure to erase unnecessary messages before the memory becomes full When the number of new messages exceeds 59 FL flashes on the display window If you try to erase all messages in a mailbox with any new messages remaining You hear five short error beeps and you cannot erase the messages Tip You can also listen to the messages or erase the messages from a touch tone phone see Operati...

Page 42: ...u hear Set announce only appears on the display 2 Press SELECT The present selected setting is announced The display shows On or OF off 3 Press REPEAT SLOW or SKIP QUICK to set the announcement only mode on or off 4 Press TIME SET The setting is announced 5 Press PLAY STOP to exit the menu setup mode The display shows A when the answering machine is set to the announcement only mode Notes To activ...

Page 43: ...l The message will be recorded but to hear it you will need to play back the message see page 39 To answer the call Press TALK on the handset Notes Press VOL or VOL to adjust the speaker volume If the speaker volume is set at its minimum level you will not be able to hear incoming calls The answering machine will stop automatically when the handset or a parallel phone is picked up If the answering...

Page 44: ...TOP to stop recording The message number on the display increases by one Notes If the memory becomes full the answering machine will stop recording Memory full is announced if no recording space is available when you press REC MEMO If your message is shorter than two seconds the recording will be canceled The display flashes 99 if you record a memo for more than 99 seconds If a call comes in durin...

Page 45: ...until you hear Set security code 2 Press SELECT 3 Press REPEAT SLOW or SKIP QUICK to change the remote ID code security code setting 4 Press TIME SET to confirm your choice The new remote ID code security code is announced 5 Press PLAY STOP to exit the menu setup mode To change the remote ID code Security code Enter a new remote ID code Security code The new code will replace the old one Tip Even ...

Page 46: ...isconnect Tip Cut off the Remote Control Card and carry it with you to see how to operate from an outside phone Operating from an outside phone continued Table of control codes To Key Play back messages in MAILBOX1 1 Play back messages in MAILBOX2 2 Play back messages in MAILBOX3 3 Repeat backward 4 Skip forward 6 Erase individual message 9 Erase all the messages in MAILBOX1 9 1 Erase all the mess...

Page 47: ...tothe centerofthebasephone Alignthe fmarksofthewall bracketwiththoseofthebase phone 4 Plugthetelephonelinecordto thetelephoneoutlet andhook thebasephonetothewallplate 5 PlugtheACpoweradaptorto anACoutlet Thenraisethe antennasothatitpoints towardstheceiling Tip Toremovethewallbracket pressthelowertabs Additional Information 1 3 2 4 5 Telephone line cord Hang up tab Telephone line cord AC power adap...

Page 48: ...cannot use the answering machine For the customers in the USA RECYCLING NICKEL CADMIUM BATTERIES Nickel Cadmiumbatteries arerecyclable Youcanhelp preserveourenvironment byreturningyour unwantedbatteriestoyour nearestpointforcollection recyclingorproper disposal Note Insomeareasthedisposalofnickel cadmiumbatteriesinhouseholdor businesstrashmaybeprohibited RBRC RechargeableBatteryRecycling Corporati...

Page 49: ...tion Do not use any type of abrasive pad scouring powder or solvent such as alcohol or benzine as they may damage the finish of the cabinet If the charge terminals of the base phone and handset are soiled wipe them with a soft cloth If you have any questions or problems concerning your phone please consult your nearest Sony dealer Maintenance ...

Page 50: ...ely connectedtothetelephoneoutlet Makesurethebatteryisfullycharged page11 Makesurethedialingmodeissetcorrectly page10 Beforedialing makesureyouhearadialtone Makesurethelastdialednumberisreallytheoneyou wanttodial Makesuretheringeristurnedon page23 Thebatterymaybeweak Chargethebatteryfor more than12hours page11 Makesureyouhavesetupthebasephonecorrectly page8 Movethehandsetclosertothebasephone Repla...

Page 51: ...rerecorded Theanswering machinebecomes Memoryfull statusanddoesnot recordmessages Erasemessages page40 Themessageislessthantwoseconds Theanswering machinedoesnotrecordmessageslessthantwo secondsinlength Adjustthespeakervolume page40 Thecaller smessageistoolong Thecaller svoiceistoolow Thephonedisconnects thelinewhenitdetectssevensecondsofsilence Therewasapowerinterruption Resetthetime page32 Makes...

Page 52: ...ormation When the counter shows Flashingnumber PF A F L It means Numberofmessagesnotyetplayedback Flasheswhenthedayandtimeisclearedduetoapower interruption Resetthetimecorrectly page32 Theannouncementonlymodeisselected page42 Therecordingareaisfull Eraseunnecessarymessages page41 Troubleshooting continued ...

Page 53: ...8 x 1 13 16 inches Antenna Approx 35 mm approx 1 7 16 inches Mass Approx 210 g approx 7 4 oz battery included Specifications Base phone Power source DC 9V from AC power adaptor AC T129 Dimensions Approx 170 x 65 x 220 mm w h d antenna excluded approx 6 3 4 x 2 5 8 x 8 3 4 inches Antenna Approx 150 mm approx 6 inches Mass Approx 600 g approx 1 lb 5 oz wall bracket excluded Answering machine Maximum...

Page 54: ... Speaker 17 19 40 Speed dialing 20 Stamping messages with day and time 32 39 Switching the phones during a call 25 T U Talking between the phones 27 Three way conference 31 Toll saver 35 Tone dialing dialing mode 10 switching to 16 19 Transferring a call 29 Troubleshooting 50 V W X Y Z Volume handset 16 19 speaker 17 19 40 L Location base phone 8 M Mailbox 37 Making calls 16 Memo 44 Messages pick ...

Page 55: ......

Page 56: ... de ventilación y evite dejarlo sobre la cama sofá sillón o superficie similar Este producto nunca debe colocarse cerca de un radiador o calefacción o encima de éste Este producto no debe colocarse en una instalación empotrada salvo que se provea ventilación apropiada 7 Este producto sólo debe operarse desde el tipo de fuente de alimentación indicada en la etiqueta de especificaciones Si no está s...

Page 57: ...conductor puede sobrecalentarse y ocasionar quemaduras 5 Sólo debe cargar el paquete de pilas suministrado o identificado para uso con este producto de acuerdo con las instrucciones y limitaciones especificadas en el manual de instrucciones correspondiente al producto 6 Observe la orientación de polaridad correcta entre el paquete de pilas y el cargador de pilas INFORMACIÓN GENERAL SOBRE LOS TELÉF...

Page 58: ...ier cambio o modificación no aprobado expresamente en el presente manual podría anular su autorización para operar este equipo Nota Este equipo se ha sometido a pruebas y se ha determinado que cumple los límites para un aparato digital Clase B de conformidad con la Parte 15 de las Reglas FCC Dichos límites están diseñados para brindar protección razonable contra interferencia dañina en una instala...

Page 59: ...teléfono base Intercomunicación 27 Para conversar del microteléfono al teléfono base 28 Para conversar del teléfono base al microteléfono 29 Transferencia de una llamada 29 Para transferir del teléfono base al microteléfono 30 Para transferir del microteléfono al teléfono base 31 Celebración de una conferencia tripartita 31 Para unirse a la conversación telefónica Función del contestador automátic...

Page 60: ...uridad aleatorio entre su teléfono base y el microteléfono Preparativos Teléfono base Lea esto en primer lugar Antes de utilizar su teléfono tendrá que instalarlo A continuación se indica la forma rápida de hacerlo Pasos 1 2 y 3 Paso 2 páginas 8 a 10 A continuación tendrá que hacer tres cosas para instalar el teléfono base incluyendo la búsqueda del mejor lugar para el mismo Paso 3 páginas 11 a 12...

Page 61: ...C T129 Soporte para instalación mural pedestal del teléfono base Teléfono base Batería BP T18 Paso 1 Comprobación del contenido del paquete Compruebe si con el paquete ha recibido los elementos siguientes Si falta algo póngase en contacto con su proveedor Sony Directorios 2 SPEED DIALING 1 2 3 4 5 6 7 8 9 0 ...

Page 62: ...gar central y sobre una superficie nivelada Alejado de fuentes térmicas tales como radiadores conductos de aire y la luz solar Alejado de fuentes de ruido tales como una ventana que dé a una calle con mucho tráfico PRECAUCIONES Si se producen pérdidas intermitentes de sonido durante la conversación acérquese a la teléfono base o aleje ésta de otras fuentes de ruido El teléfono inalámbrico opera co...

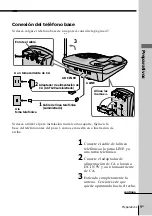
Page 63: ... mural como soporte fíjelo en la base del teléfono antes del paso 1 como se muestra en a ilustración de arriba 1 Conecte el cable de la línea telefónica a la toma LINE y a una toma telefónica 2 Conecte el adaptador de alimentación de CA a la toma DC IN 9V y a un tomacorriente de CA 3 Extienda completamente la antena Cerciórese de que quede apuntando hacia el techo Conexión del teléfono base Si des...

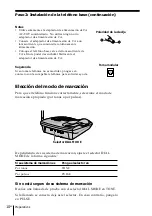
Page 64: ...n la compañía telefónica para solicitar ayuda Elección del modo de marcación Para que el teléfono funcione correctamente seleccione el modo de marcación apropiado por tonos o por pulsos Dependiendo de su sistema de marcación ajuste el selector DIAL MODE de la forma siguiente Si su sistema de marcación es Ponga el selector en Por tonos TONE Por pulsos PULSE Si no está seguro de su sistema de marcac...

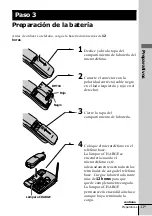
Page 65: ...el lado izquierdo y rojo en el derecho 3 Cierre la tapa del compartimiento de la batería 4 Coloque el microteléfono en el teléfono base La lámpara CHARGE se encenderá cuando el microteléfono esté adecuadamente asentado en los terminales de carga del teléfono base Cargue la batería durante más de 12 horas para que quede completamente cargada La lámpara CHARGE permanecerá encendida incluso aunque ha...

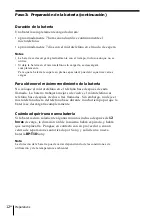
Page 66: ...eléfono base después de cada llamada La batería trabajará mejor si devuelve el microteléfono al teléfono base después de dos o tres llamadas Sin embargo no deje el microteléfono fuera del teléfono base durante mucho tiempo porque la batería se descargaría completamente Cuándo adquirir una nueva batería Si la batería dura solamente algunos minutos incluso después de 12 horas de carga la duración út...

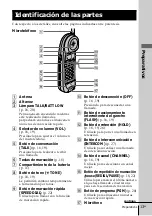
Page 67: ...itirá cambiar temporalmente a la marcación por tonos 9 Botón de marcación rápida SPEED DIAL p 22 Utilícelo para llamar con la función de marcación rápida 0 Botón de desconexión OFF p 16 19 Presiónelo para desconectar una llamada qa Botón de accionamiento intermitente del gancho FLASH p 16 19 qs Botón de retención HOLD p 16 19 26 Utilícelo para poner una llamada en retención qd Botón de intercomuni...

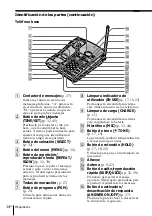
Page 68: ...jes 6 Teclas de marcación p 17 7 Botón de programa PGM p 21 Utilícelo para almacenar números de marcación rápida 8 Lámpara indicadora de utilización IN USE p 17 19 25 Permanecerá encendida mientras esté utilizando uno de los teléfonos 9 Lámpara de carga CHARGE p 11 Permanecerá encendida mientras esté cargándose la batería 0 Micrófono MIC p 33 44 qa Botón de tono TONE p 17 19 Le permitirá cambiar t...

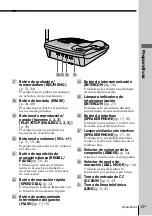
Page 69: ...Utilícelo para realizar llamadas con la función de marcación rápida wd Botón de accionamiento intermitente del gancho FLASH p 17 19 wf Botón de intercomunicación INTERCOM p 28 Utilícelo para realizar una llamada de intercomunicación wg Lámpara indicadora de intercomunicación INTERCOM p 27 Permanecerá encendido durante una llamada de intercomunicación wh Botón de interfono SPEAKERPHONE p 17 19 Util...

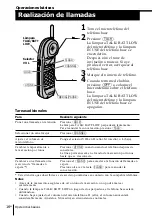
Page 70: ...iéndose en contacto con la compañía telefónica Notas Antes de la marcación asegúrese de oír un tono de marcación o no podrá marcar correctamente Cuando la lámpara TALK BATT LOW un juego de dos parpadeos el teléfono base estará utilizándose Cuando haya ajustado el volumen del microteléfono a H alto el volumen aumentará considerablemente Ajústelo a M medio en circunstancias normales Realice lo sigui...

Page 71: ...RPHONE del teléfono base La lámpara SPEAKERPHONE y la lámpara IN USE se encenderán En el visualizador aparecerá Marque el número de teléfono Cuando termine de conversar vuelva a presionar SPEAKERPHONE Tareas adicionales Para Poner una llamada en retención Ajustar el volumen de altavoz Cambiar temporalmente a la marcación por tonos Cambiar a una llamada otra servicio de llamada en espera Usted tend...

Page 72: ...ono diseñado para protección contra la retroalimentación acústica En tal caso reduzca ligeramente el volumen del altavoz Repetición de la marcación En el microteléfono 1 Presione TALK La lámpara TALK BATT LOW se encenderá 2 Presione REDIAL PAUSE para volver a llamar al último número marcado En el teléfono base 1 Presione SPEAKERPHONE La lámpara SPEAKERPHONE se encenderá En el visualizador aparecer...

Page 73: ...ar el teléfono Presione TALK o cualquiera tecla excepto OFF o Tome el microteléfono cuando esté sobre el teléfono base La lámpara TALK BATT LOW del microteléfono y la lámpara IN USE del teléfono base se encenderán 2 Cuando se termine de hablar presione OFF o coloque el microteléfono en el teléfono base Las lámparas TALK BATT LOW del microteléfono y la lámpara IN USE del teléfono base se apagarán R...

Page 74: ...o de 16 dígitos incluidos un tono y una pausa cada uno de los cuales se cuentan como un dígito 4 Vuelva a presionar PGM Oirá un pitido de confirmación y el número habrá quedado almacenado La lámpara TALK BATT LOW se apagará Notas En paso 3 si no introduce el número del teléfono el número previamente almacenado se borrará No deje que transcurran más de 20 segundos entre cada paso del procedimiento ...

Page 75: ... Usted oirá un pitido de confirmación y el número se almacenará Notas En paso 3 si no introduce el número del teléfono el número previamente lamacenado se borrará No deje que transcurran más de 20 segundos entre cada paso del procedimiento Usted no podrá almacenar números de teléfono ene l teléfono base mientras esté utilizando el microteléfono La lámpara IN USE se encenderá para indicar esta cond...

Page 76: ...eriormente Para borrar un número de la memoria 1 Presione PGM 2 Presione la tecla de marcación rápida cuyo número desee borrar 3 Vuelva a presionar PGM Realización de llamadas con marcación rápida desde el microtélefono 1 Presione TALK La lámpara TALK BATT LOW se enciende 2 Presione SPEED DIAL 3 Introduzca el número de marcación rápida que desee 0 a 9 El número de teléfono almacenado en el número ...

Page 77: ...el tono de campanilla correspondiente 4 Presione OFF Desactivación de la campanilla 1 Presione PGM 2 Presione o TONE 3 Presione 5 4 Presione OFF La campanilla del microteléfono se desactivará Para reajustar el tipo de campanilla Sigue las instrucciones como se describe en Ajuste el tipo de campanilla Nota No deje que transcurran más de 20 segundos entre cada paso del procedimiento TONE OFF Ajuste ...

Page 78: ... sonará 4 Presione OFF Nota Si no oye sonido sólo un pitido de tecla la campanilla del microteléfono se habrá desactivado Ajuste del nivel del volumen de la campanilla del teléfono base Ponga el selector RINGER del teléfono base en HIGH o LOW Para desactivar la campanilla póngalo en OFF Selector RINGER Ajuste el tipo de campanilla continuación ...

Page 79: ...USE y la lámpara TALK BATT LOW del microteléfono se encenderán 3 Cuando termine de conversar presione OFF o coloque el microteléfono en el teléfono base Notas Si toma el microteléfono mientras esté conversando a través del interfono en el teléfono base la llamada cambiará a dicho microteléfono Si no presiona HOLD en el paso 1 y presiona TALK en el paso 2 podrá realizar una conferencia tripartita c...

Page 80: ... IN USE del teléfono base parpadearán lentamente 2 Presione SPEAKERPHONE La lámpara SPEAKERPHONE del teléfono base se encenderá La lámpara TALK BATT LOW parpadeará 3 Cuando termine de conversar vuelva a presionar SPEAKERPHONE Lámpara TALK BATT LOW SPEAKERPHONE Lámpara IN USE Lámpara SPEAKERPHONE Cambio de teléfonos durante una llamada continuación ...

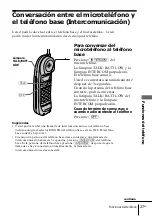
Page 81: ...base conteste podrá conversar La lámpara TALK BATT LOW del microteléfono y la lámpara INTERCOM parpadearán Cuando termine de conversar o cuando nadie conteste al teléfono Presione OFF Sugerencias Usted podrá recibir una llamada de intercomunicación en el teléfono base incluso aunque el selector RINGER del teléfono base esté en OFF El teléfono base sonará a bajo nivel Cuando una persona del teléfon...

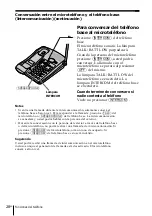
Page 82: ...te sonará el teléfono base a bajo nivel Para responder a la llamada presione TALK del microteléfono o SPEAKERPHONE del teléfono base La intercomunicación se cancelará y usted podrá hablar con la persona del exterior Durante la conversación con la persona del exterior a través del teléfono base o del microteléfono no podrá realizar una llamada de intercomunicación Si presiona INTERCOM del microtelé...

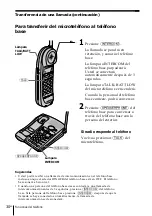
Page 83: ...LOW del microteléfono y la lámpara INTERCOM del teléfono base se encenderán Usted podrá conversar entre el teléfono base y el microteléfono 3 Presione TALK del microteléfono para conversar a través del microteléfono con la persona del exterior Si nadie responde al teléfono Vuelva a presionar SPEAKERPHONE del teléfono base Sugerencia Usted podrá recibir una llamada de intercomunicación en el microt...

Page 84: ...no base con la persona del exterior Si nadie responde al teléfono Vuelva a presionar TALK del microteléfono Sugerencias Usted podrá recibir una llamada de intercomunicación en el teléfono base incluso aunque el selector RINGER del teléfono base esté en OFF El teléfono base sonará a bajo nivel Cuando una persona del teléfono base desee contestar a una llamada de intercomunicación antes de 3 segundo...

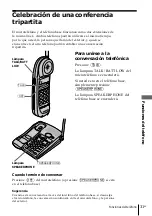
Page 85: ...versación tripartita Para unirse a la conversación telefónica Presione TALK La lámpara TALK BATT LOW del microteléfono se encenderá Si usted está en el teléfono base simplemente presione SPEAKERPHONE La lámpara SPEAKERPHONE del teléfono base se encenderá Cuando termine de conversar Presione OFF del microteléfono o presione SPEAKERPHONE si está en el teléfono base Sugerencia Cuando esté conversando...

Page 86: ...SLOW o SKIP QUICK para seleccionar los minutos 8 Presione TIME SET Se anunciarán el día y la hora que ha introducido y se reiniciará el reloj 9 Para salir del modo del menú de configuración presione PLAY STOP Notas El ajuste predeterminado es lunes 12 00 AM Si borra el día y la hora si produce una interrupción del suministro eléctrico o cuando conecte el teléfono base a un tomacorriente de CA por ...

Page 87: ...y anuncio solamente Consulte la página 42 A cada modo podrá asignarse un saludo por lo que usted podrá grabar un nuevo saludo de acuerdo con cada modo Cuando ya haya grabado dos saludos y desee utilizar un saludo pregrabado para uno de los modos borre uno de sus propios saludos del modo que desee cambiar Su saludo del modo seleccionado se borrará y el saludo pregrabado se establecerá automáticamen...

Page 88: ...o exterior de la página 46 Aunque se produzca un corte del suministro eléctrico su saludo no se borrará Para comprobar el saludo Presione repetidamente MENU hasta que se anuncie Set greeting message En el visualizador aparecerá Después presione PLAY STOP para hacer que se reproduzca el saludo Para cambiar el saludo Grabe un nuevo saludo siguiendo las instrucciones de la página anterior El nuevo sa...

Page 89: ...ción de la llamada 2 5 o Toll Saver Para contestar después de que el teléfono suene 2 veces seleccione 2 Para contestar después de que el teléfono suene 5 veces seleccione 5 Para contestar después de que el teléfono haya sonado 2 veces seleccione Toll Saver cuando haya nuevos mensajes y 5 veces cuando no haya nuevos mensajes 4 Presione TIME SET Se anunciará el ajuste de la duración del sonido de l...

Page 90: ... 1 Presione repetidamente MENU hasta que oiga Set message alert En el visualizador aparecerá 2 Presione SELECT Se anunciará el ajuste actualmente seleccionado El visualizador mostrará On u OF off 3 Presione REPEAT SLOW o SKIP QUICK paraactivaro desactivar el mensaje de aviso audible El visualizador mostrará On u OF off 4 Presione TIME SET El ajuste se anunciará 5 Para salir del modo del menú de co...

Page 91: ...ensaje se grabará automáticamente en MAILBOX 1 Notas Si transcurren cuatro minutos durante la grabación de un mensaje de entrada la línea de entrada se desconectará automáticamente Si el mensaje es más corto de dos segundos no se grabará Sugerencia Aunque se produzca un corte del suministro eléctrico los mensajes entrante no se borrarán Desactivación de la función de contestación automática Presio...

Page 92: ...s y el memorándum Cuando el tiempo de grabación restante sea inferior a 30 segundos en el visualizador parpadeará FL y el contestador automático de llamadas entrará en el estado de memoria llena Para evitar esto borre los mensajes innecesarios consulte la página 40 Usted también podrá borrar los mensajes desde un teléfono exterior consulte la página 46 Preparación del contestador automático contin...

Page 93: ...ICK durante la reproducción Para volver al modo normal suelte SKIP QUICK Reproducción de mensajes Si hay nuevos mensajes en el visualizador parpadeará el número de los mismos Si el aviso de mensaje audible está activado oirá pitidos consulte la página 36 Presione MAILBOX 1 MAILBOX 2 o MAILBOX 3 para reproducir los mensajes del buzón seleccionado Tareas adicionales cuando reproduzca mensajes Notas ...

Page 94: ...stado a 6 Borrado de mensajes 1 Mantenga presionada ERASE durante más de un segundo Se anunciara Please select mailbox 2 Presione la tecla MAILBOX 1 MAILBOX 2 o MAILBOX 3 correspondiente al buzón que desee borrar Todos los mensajes antiguos del buzón seleccionado se borrarán Se anunciará All of your messages has been erased Para borrar mensajes individuales Presione ERASE durante la reproducción d...

Page 95: ...rrado o no Cerciórese de borrar los mensajes innecesarios antes de que se llene la memoria Si el número de mensajes nuevos es superior a 59 FL parpadeará en el visualizador Si trata de borrar todos los mensajes de un buzón sin dejar ninguno oirá cinco pitidos cortos de error y no podrá borrarlos Sugerencia También es posible escuchar los mensajes o borrarlos desde un teléfono de tonos consulte Uti...

Page 96: ...2 Presione SELECT Se anunciará el ajuste actualmente seleccionado El visualizador mostrará On u OF off 3 Presione REPEAT SLOW o SKIP QUICK para activar o desactivar el modo de anuncio solamente 4 Presione TIME SET El ajuste se anunciará 5 Para salir del modo del menú de configuración presione PLAY STOP Cuando ponga el contestador automático de llamadas en el modo de anuncio solamente el visualizad...

Page 97: ...contestar a la llamada El mensaje se grabará pero para escucharlo tendrá que reproducirlo consulte la página 39 Para contestar a una llamada Presione TALK del microteléfono Notas Para ajustar el volumen del altavoz presione VOL o VOL Si ajusta el volumen del altavoz al mínimo no podrá escuchar las llamadas entrantes El contestador automático de llamadas se parará automáticamente cuando descuelgue ...

Page 98: ...producción presione PLAY STOP El número de mensajes del visualizador aumentará en uno Notas Si la memoria se llena el contestador automático de llamadas parará la grabación Si no queda espacio para grabación disponible cuando presione REC MEMO se anunciará Memory full Si sus mensajes son más cortos de dos segundos la grabación se cancelará Si graba un memorándum de más de 99 segundos en el visuali...

Page 99: ...U hasta que oiga Set security code 2 Presione SELECT 3 Presione REPEAT SLOW o SKIP QUICK para cambiar el código de identificación remoto código de seguridad 4 Presione TIME SET para confirmar su elección El nuevo código de identificación remoto código de seguridad se anunciará 5 Para salir del modo del menú de configuración presione PLAY STOP Para cambiar el código de identificación remoto código ...

Page 100: ...e que transcurran dos segundos entre cada dígito del código de identificación remoto código de seguridad y el código de control Si no conectó la alimentación del contestador de llamadas su teléfono contestará automáticamente después de haber sonado diez veces Si introduce tres veces un código de identificación código de seguridad incorrecto la línea se desconectará Si no presiona ninguna tecla dur...

Page 101: ...te mural con las del teléfono base 4 Enchufe el cable de línea telefónica en la toma telefónica y enganche el teléfono base en la placa mural 5 Enchufe el adaptador de alimentación de CA en un tomacorriente de CA Después levante la antena de forma que quede apuntando hacia el techo Sugerencia Para retirar el soporte mural presione las lengüetas inferiores Información adicional 1 2 3 4 5 Cable de l...

Page 102: ...tador de llamadas Para clientes en EE UU RECICLAJE DE PILAS DE NÍQUEL CADMIO Las pilas de níquel cadmio son reciclables Puede ayudar a conserval el medio ambiente devolviendo las pilas que no desee al punto de recogida o de reciclaje más próximo Nota En ciertas zonas el desecho de pilas de níquel cadmio en contenedores domésticos o industriales puede estar prohibido La RBRC Rechargeable Battery Re...

Page 103: ... solución de detergente neutro No utilice limpiadores abrasivos desengrasantes ni disolventes como el alcohol o la bencina ya que podrían dañar el acabado Si los terminales de carga del teléfono base y el auricular están sucios límpielos con un paño suave En caso de duda o problemas con el teléfono consulte a su proveedor Sony más próximo ...

Page 104: ...á activado página 23 La batería está débil Cárguela durante más de 12 horas página 11 Compruebe si ha instalado correctamente el teléfono base página 8 Acerque el microteléfono al teléfono base Coloque el microteléfono en el teléfono base durante cierto tiempo para que se reponga el código de seguridad aleatorio Compruebe si el cable de línea telefónica está conectado con seguridad a la toma telef...

Page 105: ...n de menos de dos segundos El contestador automático de llamadas no graba mensajes de menos de dos segundos de duración Ajuste el volumen del altavoz página 40 El mensaje de quien llamó fue demasiado largo La voz de quien llamó fue demasiado baja El teléfono desconectará la línea cuando detecte siete segundos de silencio Se produjo un corte del suministro eléctrico Reajuste la hora página 32 Reali...

Page 106: ... FL Significado Número de mensajes no escuchados Parpadeará cuando se hayan borrado el día y la fecha o se hayan atrasado debido a un corte del suministro eléctrico Reajuste correctamente el día y la hora página 32 Ha seleccionado el modo de anuncio solamente página 42 El área de grabación está llena Borre mensajes innecesarios página 41 Solución de problemas continuación ...

Page 107: ...an al prf excluyendo la antena Antena Aprox 35 mm Masa Aprox 210 g incluyendo la batería Especificaciones Teléfono base Fuente de alimentación 9 V CC del adaptador de alimentación de CA AC T129 Dimensiones Aprox 170 x 65 x 220 mm an al prf excluyendo la antena Antena Aprox 150 mm Masa Aprox 600 g excluyendo el soporte mural Contestador automático de llamadas Tiempo máximo de grabación Aprox 15 min...

Page 108: ...e teléfonos 27 R Realización de llamadas 16 Recepción de llamadas 19 Repetición de la marcación 18 Reproducción 39 S Saludo 33 Selección de llamadas 43 Solución de problemas 50 T Transferencia de una llamada 29 U Ubicación teléfono base 8 Utilización desde un teléfono exterior 45 V W X Y Z Volumen altavoz 17 19 40 microteléfono 16 19 G H Grabación memorándum 44 saludo 33 I J K L Identificación de ...

Page 109: ...55ES Información adicional Información adicional ...

Page 110: ...Información adicional 56ES ...

Page 111: ...57ES Información adicional Información adicional Para clientes en EE UU ...

Page 112: ...For the customers in the USA Sony Corporation Printed in the Philippines UCZZ01255EZ ...

Reviews: