7-18
SRW-5000/5500
1
2
3
4
5
6
A
B
C
D
E
F
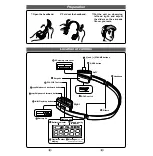
RV500
RV100
RV203
RV103
RV702
RV700
RV703
RV701
TP100
RV202
RV201
RV200
RV205
RV204
TP202
TP201
TP401
TP400
RV401
E600
TP601
RV400
TP300
RV300
TP200
TP500
E100
RV101 RV102
S100
LV400
LV600
T500
E500
S200
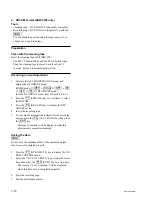
CUE-13 Board (Side A)
2. CUE Output Level Adjustment
1.
Be sure that TP101/CUE-13 (D-1) and E100/CUE-13
(C-1) are short-circuited.
2.
Connect the audio analyzer to CUE OUT connector of
the connector panel.
3.
Set the audio analyzer as follows:
Measuring mode: LEVEL, dBu
Input filter:
80 kHz LPF
4.
Play back the portion of 1 kHz,
+
4 dBu of the align-
ment tape.
5.
Check level using the audio analyzer, and then adjust
it.
Adjusting point:
1
RV104/CUE-13 (B-1)
Specification:
+
4.0
±
0.2 dBu
6.
Remove the shorting clip which is attached to TP101/
CUE-13 (D-1) and E100/CUE-13 (C-1).
3. CUE PB VCA Adjustment
1.
Connect the audio analyzer to CUE OUT connector of
the connector panel.
2.
Set the audio analyzer as follows:
Measuring mode: LEVEL, dBu
Input Filter:
80 kHz LPF
3.
Play back the portion of 1kHz,
+
4 dBu of the align-
ment tape.
4.
Check audio level using the audio analyzer, and then
adjust it.
Adjusting point:
1
RV102/CUE-13 (D-1)
Specification:
+
4.0
±
0.2 dBu
4. CUE PB Frequency Response adjustment
1.
Connect the audio analyzer to CUE OUT connector of
the connector panel.
2.
Set the audio analyzer as follows:
Measuring mode: LEVEL, dBu
Input Filter:
80 kHz LPF
3.
Play back the portion of 90 Hz to 12 kHz of the
alignment tape.
4.
Check this PB level using the audio analyzer, and then
adjust it.
Adjusting point:
1
RV203/AE-31H (D-2)
Specification:
Each frequency (3 kHz, 7 kHz, 10
kHz, 12 kHz) level:
1 kHz level
±
0.8 dB
Firstry, adjust the level of 10 kHz
until it equates with the level of 1
kHz. Then check each level of
other frequency.
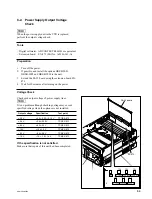
AE-31H Board (Side A)
TP100
TP101
TP102
TP103
TP104
TP105
TP300
TP301
E100
E103
RV100
RV101
RV102
RV103
RV104
RV105
RV106
S100
S101
1
2
A
B
C
D
CN100


