background image

Operating Instructions   

Page 2 _______________________________________________

Mode d'emploi   

Page 12 _______________________________________________________

Manual de instrucciones   

Página 20 __________________________________________

3-709-345-11 (1)

Black and White Monitor

SSM-125

© 1997 by Sony Corporation

F

ES

EN

Summary of Contents for SSM-125

Page 1: ...______________________ Mode d emploi Page 12 _______________________________________________________ Manual de instrucciones Página 20 __________________________________________ 3 709 345 11 1 Black and White Monitor SSM 125 1997 by Sony Corporation F ES EN ...

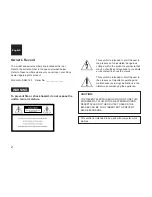
Page 2: ...e presence of uninsulated dangerous voltage within the product s enclosure that may be of sufficient magnitude to constitute a risk of electric shock to persons This symbol is intended to alert the user to the presence of important operating and maintenance servicing instructions in the literature accompanying the appliance CAUTION TO PREVENT ELECTRIC SHOCK DO NOT USE THIS POLARIZED AC PLUG WITH A...

Page 3: ...quipment Regulations CAUTION These potential hazards shall be considered common to most rack installation 1 Elevated Operating Ambient Temperature After installed the operating temperature may be greater than room ambient Consideration shall be given to the environment temperature compatible within the Manufacturer s specified limit of Ambient Temperature of 0 C 35 C 2 Reduced Air Flow After insta...

Page 4: ...es This unit can be used as a closed circuit television monitor or a video preview playback monitor Loop through connection allows up to three monitors to display the same picture Electronic circuits provide safeguards against interference noise and change of signal strength to maintain a clear and stable picture Before operating the unit please read this manual thoroughly and retain it for future...

Page 5: ...ny further Unplug the unit from the wall outlet if it is not going to be used for several days or more To disconnect the cord pull it out by the plug Never pull the cord itself Allow adequate air circulation to prevent internal heat build up Do not place the unit on surfaces rugs blankets etc or near materials curtains draperies that may block the ventilation holes Height and vertical linearity co...

Page 6: ...rtical hold control When the picture rolls up or down on the screen turn the V HOLD control until a single stationary picture is obtained 4 POWER switch and indicator To turn on the monitor depress this switch The green indicator lights up To turn off the monitor press the switch again 5 CONTRAST control Turn clockwise to increase picture contrast and counterclockwise to decrease it 6 BRIGHT brigh...

Page 7: ...video camera or another monitor for loop through connection 75Ω ON OFF switch Set this switch to ON when only the IN connector is used Set this switch to OFF when both the IN and OUT connectors are used together for a loop through connection 9 DC CLAMP ON OFF switch When the switch is set to OFF the black and white areas may become slightly gray To reproduce clear black and white definition set th...

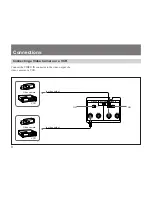
Page 8: ...ideo Camera or a VCR Connect the VIDEO IN connector to the video output of a video camera or a VCR Video camera VCR Video camera VCR ON ON to video output to video output ON OFF IN OUT IN OUT VIDEO B VIDEO A DC CLAMP ON OFF ON OFF ...

Page 9: ...ect up to three monitors Adjust the picture contrast and brightness of each monitor Video camera to video output OFF OFF ON First monitor Second monitor Third monitor ON OFF IN OUT IN OUT VIDEO B VIDEO A DC CLAMP ON OFF ON OFF ON OFF IN OUT IN OUT VIDEO B VIDEO A DC CLAMP ON OFF ON OFF ON OFF IN OUT IN OUT VIDEO B VIDEO A DC CLAMP ON OFF ON OFF ...

Page 10: ...ough 75Ω terminated Video output Composite 0 5 2 Vp p sync negative 2 Power requirements 120 V AC 50 60 Hz Power consumption Approximately 30W Operating temperature 0 C to 35 C 32 F to 95 F Storage temperature 10 C to 40 C 14 F to 104 F Dimensions 296 303 301 mm w h d 11 3 4 12 11 7 8 inches Mass Approx 9 2 kg 20 lb 5 oz Supplied Accessory Operating Instructions 1 Specifications Design and specifi...

Page 11: ...11 ...

Page 12: ...uits électroniques filtrent les interférences le bruit et s adaptent au niveau du signal pour fournir une image stable de qualité constante Avant d utiliser le moniteur veuillez lire attentivement ce manuel et le conserver à titre de référence ultérieure AVERTISSEMENT Afin d éviter tout risque d incendie ou d électrocution ne pas exposer cet appareil à la pluie ou à l humidité Des courants de haut...

Page 13: ...vice Débranchez l appareil si vous ne comptez pas l utiliser pendant plusieurs jours ou davantage Débranchez le cordon d alimentation en tirant sur la fiche jamais sur le cordon lui même Pour éviter toute surchauffe interne évitez de boucher les orifices de ventilation ou de placer l appareil à proximité de matériaux qui pourraient boucher ces orifices Les commandes de hauteur et de linéarité vert...

Page 14: ...s approprié de stabiliser le défilement vertical de l image 4 Touche et témoin de mise sous tension POWER Appuyez sur cette touche pour mettre le moniteur sous tension Le témoin vert s allume Pour éteindre l appareil appuyez à nouveau sur la touche 5 Commande de contraste CONTRAST Tournez dans le sens des aiguilles d une montre pour augmenter le contraste de l image 6 Commande de luminosité BRIGHT...

Page 15: ...arche arrêt 75 Ohms ON OFF Mettez cette touche en position marche ON lorsque vous ne voulez utiliser que l entrée vidéo IN Mettez cette touche en position arrêt lorsque vous voulez utiliser l entrée et la sortie vidéo fonctionnement en boucle 9 Touche de marche arrêt du circuit de verrouillage DC CLAMP ON OFF Lorsque la touche est en position arrêt OFF les zones de l écran comportant du blanc et d...

Page 16: ... magnétoscope Raccordez la sortie de la caméra ou du magnétoscope et l entrée du moniteur VIDEO IN Magnétoscope Magnétoscope ON Caméra vidéo Caméra vidéo ON Vers la sortie vidéo Vers la sortie vidéo ON OFF IN OUT IN OUT VIDEO B VIDEO A DC CLAMP ON OFF ON OFF ...

Page 17: ...er jusqu à trois moniteurs Réglez le contraste et la luminosité de chanque moniteur Caméra vidéo Vers la sortie vidéo OFF OFF ON Premier moniteur Deuxième moniteur Troisième moniteur ON OFF IN OUT IN OUT VIDEO B VIDEO A DC CLAMP ON OFF ON OFF ON OFF IN OUT IN OUT VIDEO B VIDEO A DC CLAMP ON OFF ON OFF ON OFF IN OUT IN OUT VIDEO B VIDEO A DC CLAMP ON OFF ON OFF ...

Page 18: ...rtie 75 Ohms Sortie vidéo Composée 0 5 2 Vcc synchro négative 2 Alimentation électrique 120 V A C 50 60 Hz Consommation électrique Env 30 W Temp de fonctionnement 0 C à 35 C 32 F à 95 F Temp de stockage 10 C à 40 C 14 F à 104 F Dimensions 296 303 301 mm l h p 11 3 4 12 11 7 8 pouces Poids Environ 9 2 kg 20 lb 5 oz Accessoire fourni Mode d emploi 1 Caractéristiques techniques La conception et les s...

Page 19: ...19 ...

Page 20: ...enidamente este manual y consérvelo para futuras referencias ADVERTENCIA Para evitar incendios o el riesgo de electrocución no exponga la unidad a la lluvia ni a la humedad Dentro de la unidad existen altas tensiones peligrosas No la abra En caso de avería solicite los servicios de personal cualificado Esta unidad no ha sido diseñada para emplearse con estaciones de trabajo de ordenadores Español ...

Page 21: ...mente Cuando no vaya a emplear el monitor durante varios días desenchúfelo de la toma de red Para desconectar el cable de alimentación tire del enchufe nunca del propio cable Coloque la unidad en un lugar adecuadamente ventilado para evitar el recalentamiento interno No sitúe el monitor sobre superficies alfombras mantas etc o cerca de materiales cortinas tapices que puedan bloquear los orificios ...

Page 22: ...hacia abajo por la pantalla gire este control hasta obtener una única imagen estable 4 Interruptor e indicador de encendido POWER Para encender el monitor pulse este interruptor El indicador verde se iluminará Para apagar el monitor vuelva a pulsar este interruptor 5 Control de contraste CONTRAST Gírelo hacia la derecha para aumentar el contraste de la imagen y hacia la izquierda para reducirlo 6 ...

Page 23: ...la entrada de vídeo de una videograbadora cámara de vídeo u otro monitor para establecer una conexión derivada Interruptor ON OFF de 75 ohmios Colóquelo en ON cuando sólo utilice el conector IN Colóquelo en OFF cuando utilice simultáneamente los conectores IN y OUT para establecer una conexión derivada 9 Interruptor DC CLAMP ON OFF Cuando este interruptor está en OFF las áreas en blanco y negro pu...

Page 24: ...ra Conecte el conector VIDEO IN a la salida de vídeo de una cámara de vídeo o una videograbadora Cámara de vídeo Videograbadora Cámara de vídeo Videograbadora A la salida de vídeo A la salida de vídeo ON ON ON OFF IN OUT IN OUT VIDEO B VIDEO A DC CLAMP ON OFF ON OFF ...

Page 25: ... ser hasta tres Ajuste el contraste y el brillo de la imagen en cada monitor A la salida de vídeo Cámara de vídeo OFF OFF ON Tercer monitor Segundo monitor Primer monitor ON OFF IN OUT IN OUT VIDEO B VIDEO A DC CLAMP ON OFF ON OFF ON OFF IN OUT IN OUT VIDEO B VIDEO A DC CLAMP ON OFF ON OFF ON OFF IN OUT IN OUT VIDEO B VIDEO A DC CLAMP ON OFF ON OFF ...

Page 26: ...Vp p sinc negativa 2 Impedancia de entrada de vídeo Alta impedancia para conexión derivada terminación de 75 ohmios Salida de vídeo Compuesta 0 5 2 Vp p sinc negativa 2 Requisitos de alimentación 120 V CA 50 60 Hz Consumo de potencia Aprox 30 W Temperatura de funcionamiento 0 C a 35 C Temperatura de almacenamiento 10 C a 40 C Dimensiones 296 303 301 mm an al prf 11 3 4 12 11 7 8 pulgadas Peso Apro...

Page 27: ...27 ...

Page 28: ...Sony Corporation Printed in Korea ...

Reviews: