42
EN
Settings and Adjustments
Adjusting the Sensitivity of the
Remote
You can select from five different sensitivity levels that
determine the speed at which the pointer moves.
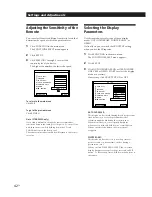
1
Click FUNCTION in the main menu.
The FUNCTION SELECT menu appears.
2
Click SET UP.
3
Click FEELING 1 through 5 to select the
sensitivity level you desire.
The higher the number, the faster the speed.
To return to the main menu
Click EXIT.
To go to the previous menu
Click RETURN.
Note (STR-DE905G only)
If you find it difficult to change the remote commander
sensitivity because the setting is too high (i.e., 5), turn off the
unit, then turn it on while holding down the CD and
PHONO buttons on the front panel.
The remote commander sensitivity will return to the factory–
set value.
Selecting the Display
Parameters
Use this procedure to select one of three display
modes: AUTO OSD ERASE, POINTER ONLY, or
DEMO.
It also allows you to switch the IR OUTPUT setting
when you use the IR repeater.
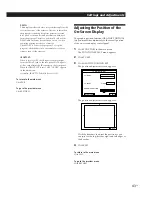
1
Click FUNCTION in the main menu.
The FUNCTION SELECT menu appears.
2
Click SET UP.
3
Click AUTO OSD ERASE ON or OFF, POINTER
ONLY SET or DEMO START to select the display
mode as necessary.
If necessary, click IR OUTPUT ON or OFF.
AUTO OSD ERASE:
This display mode is useful during laser disc operations
since it allows you to see chapter numbers that
otherwise might be hidden by the control panel.
When this mode is on, control panels disappear
whenever you click and hold down a control button.
When you release the button, the control panel
reappears.
POINTER ONLY:
This display mode allows you to use the pointer to
point to various on screen items, such as during a
presentation (etc.).
When you click POINTER ONLY SET, the on–screen
display disappears except for the pointer and an EXIT
button. To freeze the pointer, hold down the button on
the remote.
EXIT
SET UP
RETURN
AUTO PLAY
FLASHER
AUTO OSD ERASE
FEELING
POINTER ONLY
IR OUTPUT
DEMO
1 2 3 4 5
EXIT
SET UP
RETURN
AUTO PLAY
FLASHER
AUTO OSD ERASE
FEELING
POINTER ONLY
IR OUTPUT
DEMO
ON
OFF
ON
OFF
SET
START


