background image

masterpage:Left

lename[F:\Sony SEM 

HA\Revison3_DK5\JC06xxx_2656285141STRDK5_GB\2656285141\GB03CON_STR-DK5-
SP.fm]

 model name1[STR-DK5]

 [2-656-285-

14

(1)]

8

GB

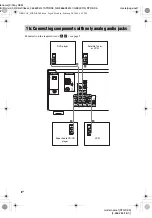
For details on the required cords (

A

C

), see page 5.

1b: Connecting components with only analog audio jacks

SA-CD/CD

AUDIO IN

AUDIO IN

VIDEO 2

AUDIO IN

VIDEO 1

AUDIO IN

DIGITAL

OPTICAL

SA-CD/ 

CD

IN

AM

ANTENNA

MIC

OUT

R

L

R

L

R

COAXIAL

DVD

AUDIO

OUT

SUB

WOOFER

DVD IN

A

A

LINE

L

R

R

OUTPUT

L

R

L

L

R

A

A

AUDIO

OUT

OUTPUT

AUDIO

OUT

OUTPUT

AUDIO

OUT

OUTPUT

L

D-LIGHT

SYNC OUT

DVD player

Super Audio CD/CD 

player

VCR

Satellite Tuner 

or VCR

GB01COV_STR-DK5-SP.book  Page 8  Monday, February 20, 2006  6:34 PM

Summary of Contents for STR-DK5 E

Page 1: ...EM HA Revison3_DK5 JC06xxx_2656285141STRDK5_GB 2656285141 GB01COV_STR DK5 SP fm masterpage Right 2006 Sony Corporation 2 656 285 14 1 FM Stereo FM AM Receiver Operating Instructions STR DK5 GB01COV_STR DK5 SP book Page 1 Monday February 20 2006 6 34 PM ...

Page 2: ...stated otherwise The instructions in this manual describe the controls on the receiver You can also use the controls on the supplied remote if they have the same or similar names as those on the receiver For details on the use of your remote see pages 33 36 This receiver incorporates Dolby Digital and Pro Logic Surround and the DTS Digital Surround System Manufactured under license from Dolby Labo...

Page 3: ...ing Surround Sound Using only the front speakers 21 Enjoying higher fidelity sound 21 AUTO FORMAT DIRECT Selecting a sound field 22 Enjoying Karaoke Using Karaoke 24 Advanced karaoke settings 25 Advanced Adjustments and Settings Switching the audio input mode for digital components 27 INPUT MODE Customizing sound fields 27 Advanced settings 29 Other Operations Naming preset stations and inputs 30 ...

Page 4: ...up all your components proceed to 2 Connecting the antennas page 9 Connectable components a Model with a DIGITAL OPTICAL OUTPUT or DIGITAL COAXIAL OUTPUT jack etc b Model equipped only with AUDIO OUT L R jacks etc Getting Started 1 Check how to hookup your components Component to be connected Page DVD player With digital audio outputa 6 With analog audio output onlyb 8 Satellite tuner With analog ...

Page 5: ...cal digital cord C Coaxial digital cord Notes Turn off the power to all components before making any connections Be sure to make connections firmly to avoid hum and noise When connecting an audio cord be sure to match the color coded pins to the appropriate jacks on the components white left audio to white and red right audio to red When connecting optical digital cords insert the cord plugs strai...

Page 6: ... the required cords A C see page 5 1a Connecting components with digital audio output jacks SA CD CD AUDIO IN AUDIO IN VIDEO 2 AUDIO IN VIDEO 1 AUDIO IN DIGITAL OPTICAL SA CD CD IN AM ANTENNA MIC OUT D LIGHT SYNC OUT R L R L L R COAXIAL DVD AUDIO OUT SUB WOOFER DVD IN A C R AUDIO OUT OUTPUT L DIGITAL COAXIAL OUTPUT DVD player GB01COV_STR DK5 SP book Page 6 Monday February 20 2006 6 34 PM ...

Page 7: ...sound is not output when you play a Super Audio CD on the Super Audio CD player connected to the SA CD CD OPTICAL IN jack on this receiver Connect to the analog input jacks SA CD CD IN jacks Refer to the operating instructions supplied with the Super Audio CD player SA CD CD AUDIO IN AUDIO IN VIDEO 2 AUDIO IN VIDEO 1 AUDIO IN DIGITAL OPTICAL AM ANTENNA MIC OUT D LIGHT SYNC OUT R L R L L R COAXIAL ...

Page 8: ...nts with only analog audio jacks SA CD CD AUDIO IN AUDIO IN VIDEO 2 AUDIO IN VIDEO 1 AUDIO IN DIGITAL OPTICAL SA CD CD IN AM ANTENNA MIC OUT R L R L R COAXIAL DVD AUDIO OUT SUB WOOFER DVD IN A A LINE L R R OUTPUT L R L L R A A AUDIO OUT OUTPUT AUDIO OUT OUTPUT AUDIO OUT OUTPUT L D LIGHT SYNC OUT DVD player Super Audio CD CD player VCR Satellite Tuner or VCR GB01COV_STR DK5 SP book Page 8 Monday Fe...

Page 9: ...e pickup keep the AM loop antenna away from the receiver and other components Be sure to fully extend the FM wire antenna After connecting the FM wire antenna keep it as horizontal as possible 2 Connecting the antennas AUDIO IN AUDIO IN VIDEO 2 AUDIO IN VIDEO 1 AUDIO IN DIGITAL OPTICAL SA CD CD IN AM ANTENNA MIC OUT R L COAXIAL DVD AUDIO OUT SUB WOOFER DVD IN R L D LIGHT SYNC OUT L R SA CD CD AM l...

Page 10: ...channel surround sound requires five speakers two front speakers a center speaker and two surround speakers and a sub woofer 5 1 channel Example of 5 1 channel speaker system configuration Tip Since the sub woofer does not emit highly directional signals you can place it wherever you want 3 Connecting speakers Front speaker Right Surround speaker Right Center speaker Front speaker Left Sub woofer ...

Page 11: ...quired cords A Speaker cords not supplied B Monaural audio cord not supplied Black AUDIO OUT SUB WOOFER R L R CENTER L L R FRONT SURROUND R L AUDIO IN A E e A E e A B E e E e A E e A SPEAKERS INPUT Sub woofer Center speaker Front speaker Left Front speaker Right Surround speaker Right Surround speaker Left GB01COV_STR DK5 SP book Page 11 Monday February 20 2006 6 34 PM ...

Page 12: ...5 14 1 12GB Connecting the AC power cord Connect the AC power cord to a wall outlet Note Install this system so that the power cord can be unplugged from the wall socket immediately in the event of trouble 4 Connecting the AC power cord ONT L L b To a wall outlet AC power cord GB01COV_STR DK5 SP book Page 12 Monday February 20 2006 6 34 PM ...

Page 13: ... speaker manually select NORM SET x SP PAT X X Speaker setup pattern When you select EASY SET select the speaker setup pattern Press B or b repeatedly to select the speaker setup pattern and press ENTER to enter the selection Check your speaker pattern using the supplied Easy Setup Guide x S W XXX Sub woofer selection YES If you connect a sub woofer select YES NO If you did not connect a sub woofe...

Page 14: ...and output the surround channel bass frequencies from the sub woofer or other LARGE speakers NO If you did not connect surround speakers select NO c Tips a c correspond to the following Dolby Pro Logic modes a NORMAL b PHANTOM c 3 STEREO The LARGE and SMALL settings for each speaker determine whether the internal sound processor will cut the bass signal from that channel When the bass is cut from ...

Page 15: ...is is because incorrect speaker placement is not conducive to the enjoyment of surround sound Please note that setting the speaker distance closer than the actual location of the speakers will cause a delay in the output of the sound from that speaker In other words the speaker will sound like it is further away For example setting the center speaker distance 1 2 meters closer than the actual spea...

Page 16: ...HI and then use the speaker distance parameter and speaker level adjustments to obtain proper balance x SP XXX Hz Speaker crossover frequency Initial setting 100 Hz Lets you adjust the bass crossover frequency of speakers in SETUP menu You can adjust the bass crossover frequency from 40 Hz to 160 Hz in 9 steps This setup item is only available when at least one speaker is set to SMALL and the corr...

Page 17: ...o not know the frequency of the station you want you can let the receiver scan all available stations in your area 1 Turn INPUT SELECTOR to select the FM or AM band The last received station is tuned in 2 Press TUNING or TUNING Press TUNING to scan from low to high press TUNING to scan from high to low The receiver stops scanning whenever a station is received In case of poor FM stereo reception I...

Page 18: ... easily tune in the stations you often listen to Presetting radio stations 1 Turn INPUT SELECTOR to select the FM or AM band The last received station is tuned in 2 Tune in the station that you want to preset using automatic tuning page 17 or direct tuning page 18 3 Press MEMORY ENTER MEMORY lights up in the display for a few seconds Do steps 4 to 5 before the display goes out 4 Press TUNING or TU...

Page 19: ...n Press SHIFT repeatedly on the remote to change the memory page Changing the information in the display You can check the sound field etc by changing the information in the display Press DISPLAY repeatedly Each time you press DISPLAY the display will change cyclically as follows Current karaoke score1 t Index name of the input2 t Selected input t Sound field currently applied When the tuner is se...

Page 20: ... DTS signals are input Note When playing a DTS format disc be sure that you have made digital connections and that INPUT MODE is not set to ANALOG page 27 G Tuner indicators Lights up when using the receiver to tune in radio stations etc See pages 17 19 for tuner operations H D RANGE Lights up when dynamic range compression is activated page 28 I COAX Lights up when the source signal is a digital ...

Page 21: ...ly select A F D AUTO If you activate the karaoke function while A F D mode is operating the system will automatically switch to A F D AUTO Decoding the input audio signal automatically In this mode the receiver automatically detects the type of audio signal being input Dolby Digital DTS standard 2 channel stereo etc and performs the proper decoding if necessary This mode presents the sound as it w...

Page 22: ...ow frequency signal for output to the sub woofer You can take advantage of surround sound simply by selecting one of the receiver s pre programmed sound fields They bring the exciting and powerful sound of movie theaters and concert halls into your home Selecting a sound field for movies Press MOVIE repeatedly to select the sound field you want The selected sound field appears in the display About...

Page 23: ...the sound field you want The selected sound field appears in the display x HALL Reproduces the acoustics of a classical concert hall x JAZZ JAZZ CLUB Reproduces the acoustics of a jazz club x CONCERT LIVE CONCERT Reproduces the acoustics of a 300 seat live house To turn off the surround effect Press 2CH to select 2CH ST or press A F D repeatedly to select A F D AUTO Tips The receiver lets you appl...

Page 24: ...igh 8 Turn ECHO to adjust the microphone echo effect To cancel the echo effect turn ECHO to MIN Note The same echo level is applied to both MIC 1 and MIC 2 To cancel the karaoke function The karaoke function will be canceled when you do the following Press KARAOKE ON OFF repeatedly to select KARA OFF the indicator turns off Set KARA XXX in the KARAOKE menu to KARA OFF Select another input Turn the...

Page 25: ...the music tone level in 3 bands Low Medium and High Using the KARAOKE menu to adjust the karaoke settings You can adjust various karaoke settings using the KARAOKE menu Use the remote for the operation 1 Press MAIN MENU repeatedly to select KARA 2 Press V or v repeatedly to select the parameter you want to adjust For details see KARAOKE menu parameters on page 25 3 Press B or b repeatedly to selec...

Page 26: ...oprano or tenor x KEY XX Key control Lets you change the pitch of the music to suit your vocal range Initial setting 0 You can adjust the key from 6 to 6 in 13 steps Tip You can also use the KEY CONTROL 2 button on the receiver Notes This parameter is valid only when the speaker setting is 2 channel or you use a sound field selected with 2CH button 2CH STEREO mode The key control will reset to ini...

Page 27: ...ected input is unavailable By adjusting the LEVEL menu you can customize the sound fields to suit your particular listening situation Note on the displayed items The setup items you can adjust in each menu vary depending on the sound field Certain setup parameters may be dimmed in the display This means that the selected parameter is either unavailable or fixed and unchangeable Adjusting the LEVEL...

Page 28: ...eful when you want to watch movies at low volumes late at night OFF The dynamic range is not compressed STD The dynamic range is compressed as intended by the recording engineer MAX The dynamic range is compressed dramatically Tip Dynamic range compressor lets you compress the dynamic range of the soundtrack based on the dynamic range information included in the Dolby Digital signal COMP STD is th...

Page 29: ...input decoding priority Lets you specify the input mode for the digital signal input to the DIGITAL IN jacks AUTO Automatically switches the input mode between DTS Dolby Digital or PCM PCM PCM signals are given priority to prevent the interruption when playback starts Even when other signals are input the sound is output However this receiver cannot decode DTS CD when set to DEC PCM Note When set ...

Page 30: ...elect a character then press b to move the cursor to the next position Tips You can select the character type as follows by pressing V or v repeatedly Alphabet upper case t Numbers t Symbols To enter a blank space press V or v repeatedly until a blank space appears in the display If you made a mistake press B or b repeatedly until the character you want to change flashes then press V or v repeated...

Page 31: ...The D LIGHT SYNC Controller will synchronize the lighting effects to the music s rhythm For details on the use of the D LIGHT SYNC Controller and the lighting devices refer to operating instructions supplied with the respective devices Enjoying the lighting effects SA CD CD AUDIO IN AUDIO IN VIDEO 2 AUDIO IN VIDEO 1 AUDIO IN DIGITAL OPTICAL SA CD CD IN AM ANTENNA MIC OUT D LIGHT SYNC OUT R L L L R...

Page 32: ...ing the MIC OUT jack on this receiver Connect the karaoke component to MIC OUT jack using an audio cord not supplied For details on the use of the karaoke component refer to operating instructions supplied with the karaoke component Note You can use the MIC 1 and MIC 2 jacks simultaneously for this operation The signal will be output from the MIC OUT jack to the connected karaoke component Optiona...

Page 33: ...f you don t use the remote for an extended period of time remove the batteries to avoid possible damage from battery leakage and corrosion The MASTER VOL numeric button 5 and H buttons have a tactile dot Use the tactile dot as a reference when operating the receiver and other audio video components Input buttons Operations Using the Remote RM AAU002 Before you use your remote Remote button descrip...

Page 34: ...e DUAL MONO 8 Receiver Selects the language you want during digital broadcast DVD 3 Receiver To watch DVD ENTER qa TV VCR Satellite tuner After selecting a channel disc or track using the numeric buttons press to enter the value Remote Button Operations Function ENTER wl Receiver VCR CD player DVD player Satellite tuner MD deck Enters the selection FM MODE 9 Receiver Selects FM monaural or stereo ...

Page 35: ...TV VOL qg TV Adjusts the volume of the TV TV 1 2 TV Turns the TV on or off VIDEO 1 ej Receiver To watch VCR VTR mode 3 VIDEO 2 eh Receiver To watch VCR VTR mode 1 Remote Button Operations Function 1 9 and 0 10 es Receiver Use with SHIFT to preset radio station or tuning to preset stations and with D TUNING for direct tuning CD player DVD player MD deck Selects track numbers 0 10 selects track 10 T...

Page 36: ...t to change for example DVD 2 Press the corresponding button of the component you want to assign to the input button for example 5 CD player The following buttons are assigned to select the input Sony VCRs are operated with a VTR 2 or 3 setting These correspond to 8 mm and VHS respectively Now you can use the DVD button to control the CD player To reset a button to its factory setting Repeat the a...

Page 37: ... is not a malfunction If you continuously use this receiver at a large volume the cabinet temperature of the top side and bottom rises considerably To avoid burning yourself do not touch the cabinet On placement Place the receiver in a location with adequate ventilation to prevent heat buildup and prolong the life of the receiver Do not place the receiver near heat sources or in a place subject to...

Page 38: ...sounds are unbalanced or reversed Check that the speakers and components are connected correctly and securely Adjust balance parameters in the LEVEL menu There is severe hum or noise Check that the speakers and components are connected securely Check that the connecting cords are away from a transformer or motor and at least 3 meters away from a TV set or fluorescent light Move your audio componen...

Page 39: ...ote does not function Point the remote at the remote sensor on the receiver Remove any obstacles in the path between the remote and the receiver Replace all the batteries in the remote with new ones if they are weak Make sure you select the correct input on the remote To activate the buttons with orange printing press TV and the button you want simultaneously Before you use the V v B b button for ...

Page 40: ...tings in the SETUP KARAOKE LEVEL CUSTOMIZE and TUNER menus The sound field memorized for each input and preset station All sound field parameters All preset stations All index names for inputs and preset stations MASTER VOLUME is set to VOL MIN MUSIC VOLUME is set to MUSIC 0 dB Tip To clear customized sound fields refer to Resetting sound fields to the initial settings on page 28 If the problem pe...

Page 41: ...iate frequency 450 kHz General Power requirements Power consumption Power consumption during standby mode 0 2 W Dimensions w h d Approx 430 145 296 mm including projecting parts and controls Mass Approx 7 0 kg Supplied accessories FM wire antenna 1 AM loop antenna 1 Remote commander RM AAU002 1 R6 size AA batteries 2 Design and specifications are subject to change without notice Area code Power re...

Page 42: ...D HIGH 2 24 MIC 2 Tone knobs LOW MID HIGH 3 24 MIC 1 VOL wg 24 MIC 2 VOL ws 24 MOVIE qf 22 28 38 MUSIC qd 23 28 38 Music Tone knobs LOW MID HIGH 7 25 MUSIC VOLUME qs 24 25 SCORE button indicator wa 26 TUNING qk 17 18 VOCAL SELECT button indicator w 26 2CH qh 21 23 28 1 power 1 13 28 40 List of button locations and reference pages How to use this page Use this page to find the location of buttons t...

Page 43: ...29 I Indexing See Naming K Karaoke adjusting the music 24 advanced settings 25 using karaoke 24 KARAOKE menu 25 L Labeling See Naming LEVEL menu 27 N Naming 30 P Preset stations how to 18 how to tune 19 R Remote commander 33 36 S Selecting component 17 sound field 22 23 SETUP menu 13 Sleep Timer 30 Sound field customizing 27 pre programmed 22 23 resetting 28 selecting 22 23 Speaker crossover frequ...

Page 44: ... F Sony SEM HA Revison3_DK5 JC06xxx_2656285141STRDK5_GB 2656285141 GB12BKC_STR DK5 SP fm Sony Corporation Printed in Malaysia model name1 STR DK5 2 656 285 14 1 GB01COV_STR DK5 SP book Page 44 Monday February 20 2006 6 34 PM ...

Reviews: