background image

51

GB

D:\NORM'S JOB\SONY HA\SO0086\STR-DN610_PMRF 2\GB\GB07BRA_STR-DN610-U2.fm

masterpage: Right

STR-DN610

4-167-824-

13

(1)


“BRA

VIA” Sy

nc
 Features

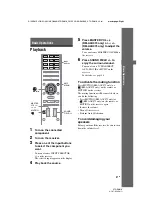
If your TV is not compatible with 
the “Control for HDMI-Easy 
Setting” function

1

Perform the steps given in “If your TV is 
compatible with the “Control for HDMI-
Easy Setting” function” (page 50).

2

Press AMP MENU.

3

Press 

V

/

v

 repeatedly to select “HDMI”, 

then press 

 or 

b

.

4

Press 

V

/

v

 repeatedly to select 

“CTRL.HDMI”, then press 

 or 

b

.

5

Press 

V

/

v

 repeatedly to select “CTRL 

ON”, then press 

.

Control for HDMI function is turned on.

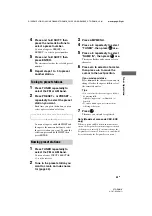
6

Set the Control for HDMI function for 
the connected component to on.

If the Control for HDMI function for the 
connected component is already set to on, 
you do not need to change the setting. 

For details on setting the TV and connected 
components, refer to the operating instructions 
of the respective components.

Notes

• Before you do the “Control for HDMI-Easy 

Setting” from the TV, be sure to turn on the TV, 
connected components and receiver. 

• If the playback components cannot function after 

you have made the settings for “Control for HDMI- 
Easy Setting”, check the Control for HDMI setting 
on your TV. 

• If the connected components do not support 

“Control for HDMI-Easy Setting”, you need to set 
the Control for HDMI function for the connected 
components to on before you perform the “Control 
for HDMI-Easy Setting” from the TV.

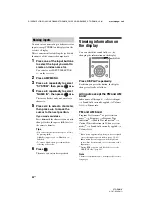
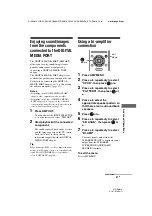
Playing back components 
with one-touch operation


(One-Touch Play)

By a simple operation (one-touch), 
components connected to the receiver with 
HDMI connections start automatically. You 
can enjoy the sound/image from connected 
components.
When you set “PASS.THRU” to “AUTO” or 
“ON”, sound and image can be output only 
from the TV while the receiver remains in 
standby mode.

When you start playback a connected 
component, the receiver and TV operation are 
simplified as follow:

Notes

• Depending on the TV, the start of the content may 

not be output.

• Depending on the settings, the receiver may not 

turns on when “PASS.THRU” is set to “AUTO” or 
“ON”.

Tip

You can also select a connected component, such as 
DVD/Blu-ray disc player using the TV menu. The 
receiver and TV will automatically switch to the 
appropriate HDMI input.

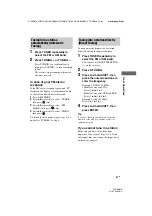
MENU

O

AMP 
MENU

,


V

/

v

/

B

/

b

Switches to appropriate HDMI input

Receiver and TV

Turns on (if in standby mode)

Summary of Contents for STR-DN610

Page 1: ...R DN610 4 167 824 13 1 filename D NORM S JOB SONY HA SO0086 STR DN610_PMRF 2 GB GB01COV_STR DN610 U2 fm masterpage Right 2010 Sony Corporation 4 167 824 13 1 Multi Channel AV Receiver Operating Instructions STR DN610 ...

Page 2: ... is not disconnected from the mains as long as it is connected to the AC outlet even if the unit itself has been turned off Excessive sound pressure from earphones and headphones can cause hearing loss This symbol is intended to alert the user to the presence of the Hot Surface that may be hot if it is touched during the normal operation For customers in Europe Disposal of Old Electrical Electroni...

Page 3: ...icable collection point for the recycling of waste batteries For more detailed information about recycling of this product or battery please contact your local Civic Office your household waste disposal service or the shop where you purchased the product Notice for customers The following information is only applicable to equipment sold in the countries applying EU Directives The manufacturer of t...

Page 4: ...7 7 212 872 other U S and worldwide patents issued pending DTS DTS Digital Surround ES and Neo 6 are registered trademarks and the DTS logos Symbol and DTS 96 24 are trademarks of DTS Inc 1996 2008 DTS Inc All Rights Reserved This receiver incorporates High Definition Multimedia Interface HDMITM technology HDMI the HDMI Logo and High Definition Multimedia Interface are trademarks or registered tra...

Page 5: ...ns 42 Using the Radio Data System RDS 44 Models of area code CEK ECE only Enjoying Surround Sound Selecting the sound field 44 Enjoying the surround effect at low volume levels NIGHT MODE 49 Resetting sound fields to the initial settings 49 BRAVIA Sync Features What is BRAVIA Sync 50 Preparing for the BRAVIA Sync 50 Playing back components with one touch operation One Touch Play 51 Enjoying the TV...

Page 6: ...ssary 71 Precautions 73 Troubleshooting 74 Specifications 79 Index 81 Supplied accessories Operating instructions this manual Quick Setup Guide FM wire antenna aerial 1 AM loop antenna aerial 1 Remote commander 1 RM AAU073 Models of area code CA2 only RM AAU075 Models of area code CEK ECE only R6 size AA batteries 2 Optimizer microphone ECM AC2 1 ...

Page 7: ...ommander C White lamp Lights up when the receiver is on Lights off when the receiver is off D Display page 8 E MUTING page 37 F INPUT SELECTOR page 37 55 G MASTER VOLUME page 36 37 H VIDEO 2 IN jacks page 29 I AUTO CAL MIC jack page 33 J DISPLAY page 38 K DIMMER page 69 L INPUT MODE page 55 M 2CH A DIRECT A F D MOVIE MUSIC page 44 N SPEAKERS page 31 O PHONES jack page 75 Front panel 1 1 2 3 4 6 7 ...

Page 8: ... COAXIAL jack OPT Lights up when INPUT MODE is set to AUTO page 55 and the source signal is a digital signal being input through the OPTICAL jack LFE Indicator and explanation D DTS ES indicators Light up when DTS signals are input DTS Lights up when the receiver is decoding DTS signals DTS ES Lights up when the receiver is decoding DTS ES signals DTS 96 24 Lights up when the receiver is decoding ...

Page 9: ...Stereo broadcast RDS Models of area code CEK ECE only A station that provides RDS services is tuned in Preset station number Note The preset station number will change according to the preset station you select For details on presetting radio stations see page 42 Indicator and explanation L Playback channel indicators The letters L C R etc indicate the channels being played back The boxes around t...

Page 10: ... IN VIDEO OUT VIDEO IN MONITOR VIDEO OUT AUDIO IN AUDIO OUT AUDIO IN BD SAT CATV AUDIO IN AUDIO IN SA CD CD CD R R VIDEO 1 L AUDIO IN AUDIO OUT AUDIO OUT TV SUBWOOFER SPEAKERS IMPEDANCE USE 8 16 1 2 1 2 2 3 5 1 4 A Audio signal section DIGITAL INPUT OUTPUT jacks page 20 23 26 27 28 HDMI IN OUT OPTICAL IN COAXIAL IN ANALOG INPUT OUTPUT jacks page 18 20 21 26 28 29 AUDIO IN OUT AUDIO OUT White L Red...

Page 11: ... ECE only to operate the receiver and to control the Sony audio video components that the remote is assigned to operate C ANTENNA section page 30 FM ANTENNA jack AM ANTENNA terminals D SPEAKERS section page 18 E DMPORT section page 21 DMPORT jack Remote commander m M X x BD DVD SAT CATV VIDEO1 VIDEO2 SA CD CD DMPORT TUNER MENU O TV HDMI 2 HDMI 3 HDMI 1 qh qj qk ql wf wg ws wd w wa 1 2 3 4 6 0 8 7 ...

Page 12: ... ENTER Name and function B 1b on standby Turns the receiver on or sets it to standby mode Saving the power in standby mode When CTRL HDMI is set to CTRL OFF page 61 C Input buttons VIDEO 1a Selects the component you want to use When you press any of the input buttons the receiver turns on The buttons are initial assigned to control Sony components Numeric buttonsc number 5a Presets or tunes to pre...

Page 13: ... to the previous menu Name and function A TV 1 on standby Turns the TV on or off C Numeric buttons number 5a Selects the TV channels ENTER RM AAU073 only Enters the selections Previous channel RM AAU075 only Returns to the previous channel watched for more than five seconds Text RM AAU075 only Displays text F DISPLAY RM AAU073 only Displays the information of TV Info Text reveal RM AAU075 only In ...

Page 14: ...ays the guide when you are watching analog or digital channel V AUDIOa RM AAU073 only a RM AAU075 only Selects the desired audio signal W DIGITAL RM AAU075 only Changes to digital mode ANALOG RM AAU075 only Changes to analog mode X THEATER RM AAU073 only THEATRE RM AAU075 only Sets the optimal picture settings automatically for watching movies when you connect a Sony TV that is compatible with the...

Page 15: ...s explained in this section may not work depending on the model The above explanation is intended to serve as an example only Therefore depending on the component the above operation may not be possible or may operate differently than described Name Blu ray disc DVD player Satellite tuner cable TV tuner VCR CD player A AV 1b Power Power Power Power C Numeric buttonsc number 5a Track Channel Channe...

Page 16: ...eakage and corrosion When you replace the batteries the remote buttons may be reset to their initial settings If this happens reassign the button again page 69 When the remote no longer operates the receiver replace all the batteries with new ones 1 Installing the speakers This receiver allows you to use a 7 1 channel system 7 speakers and one subwoofer To fully enjoy theater like multi channel su...

Page 17: ...ion and the front speakers A Place the speakers so that the difference in the length of C in the following diagram is no more than 4 5 meters 15 feet closer than the length of A Example Adjust the distance C to 1 5 meters 5 feet or more when the distance A is 6 meters 20 feet This is important because incorrect speaker placement is not conductive to the enjoyment of surround sound Please note that...

Page 18: ...ad 10 mm 13 32 L R R L TV OUT 1 N I 2 N I HDMI ASSIGNABLE INPUT ONLY ARC VIDEO OUT VIDEO IN MONITOR VIDEO OUT AUDIO IN AUDIO OUT VIDEO 1 AUDIO OUT SPEAKERS IMPEDANCE USE 8 16 R L CENTER SURROUND FRONT A SUBWOOFER Right B Left Right AMonaural audio cord not supplied BSpeaker cord not supplied Left Right Center speaker B Left B B Front A speaker Surround back Bi amplifier Front B speaker a Surround ...

Page 19: ...ther between the SPEAKERS terminals After you have install and connect your speaker be sure to select the speaker pattern from SPEAKER menu page 63 If you are not using surround back speakers you can connect the front speakers to the SPEAKERS SURROUND BACK BI AMP FRONT B terminals using a bi amplifier connection Connect the jacks on the Lo or Hi side of the front speakers to the SPEAKERS FRONT A t...

Page 20: ... or activate the TV s muting function b If your TV is compatible with the Audio Return Channel ARC function the TV sound will be output from the speakers connected to the receiver via HDMI TV OUT connection In this case set ARC to ARC ON in HDMI menu page 54 L R L R R L FRONT A CENTER SURROUND ANTENNA SAT CATV IN OPTICAL DVD IN DIGITAL COAXIAL ASSIGNABLE DMPORT DC5V 0 7A MAX VIDEO IN VIDEO IN VIDE...

Page 21: ... insert the plugs straight in until they click into place Do not bend or tie optical digital cords Tip All the digital audio jacks are compatible with 32 kHz 44 1 kHz 48 kHz and 96 kHz sampling frequencies 4a Connecting the audio components The following illustration shows how to connect a Super Audio CD player CD player CD recorder and DIGITAL MEDIA PORT adapter Before connecting cords be sure to...

Page 22: ...urned on When connecting the DIGITAL MEDIA PORT adapter be sure the connector is inserted with the arrow mark facing towards the arrow mark on the DMPORT jack Be sure to make DMPORT connections firmly insert the connector straight in As the connector of the DIGITAL MEDIA PORT adapter is fragile be sure to handle with care when placing or moving the receiver To detach the DIGITAL MEDIA PORT adapter...

Page 23: ...or audio signals will be transmitted When connecting optical digital cords insert the plugs straight in until they click into place Do not bend or tie optical digital cords Tip All the digital audio jacks are compatible with 32 kHz 44 1 kHz 48 kHz and 96 kHz sampling frequencies HDMI is the abbreviated name for High Definition Multimedia Interface It is an interface which transmits video and audio...

Page 24: ... R R L FRONT A CENTER SURROUND ANTENNA TV IN OPTICAL SAT CATV IN OPTICAL DVD IN DIGITAL COAXIAL ASSIGNABLE DMPORT DC5V 0 7A MAX PB CB PR CR Y IN 3 IN 2 IN 1 MONITOR OUT COMPONENT VIDEO ASSIGNABLE INPUT ONLY VIDEO IN VIDEO IN VIDEO OUT VIDEO IN MONITOR VIDEO OUT AUDIO IN AUDIO OUT AUDIO IN BD SAT CATV AUDIO IN AUDIO IN SA CD CD CD R R VIDEO 1 L AUDIO IN AUDIO OUT AUDIO OUT TV SUBWOOFER SPEAKERS IMP...

Page 25: ... on the receiver when video and audio signals of a playback component are being output to a TV through this receiver If you set PASS THRU to OFF video and audio signals will not be transmitted when the power is set to off DSD signals of Super Audio CD are not input and output The multi stereo area audio signals of a Super Audio CD are not output Audio signals sampling frequency bit length etc tran...

Page 26: ...o the COMPONENT VIDEO IN 2 or IN 3 jacks set V ASSIGN in the VIDEO menu page 67 To input multi channel digital audio from the Blu ray disc player set the digital audio output setting on the Blu ray disc player Refer to the operating instructions supplied with the Blu ray disc player Connecting a Blu ray disc player L R L R R L CENTER SURROUND ANTENNA TV OUT 1 N I 2 N I 3 N I HDMI ASSIGNABLE INPUT ...

Page 27: ...eceiver s display For details see Naming inputs page 38 The initial setting of the COMPONENT VIDEO IN 2 jacks are DVD player or DVD recorder If you want to connect your DVD player or DVD recorder to the COMPONENT VIDEO IN 1 or IN 3 jacks set V ASSIGN in the VIDEO menu page 67 To input multi channel digital audio from the DVD player or DVD recorder set the digital audio output setting on the DVD pl...

Page 28: ...ct your satellite tuner or cable TV tuner to the COMPONENT VIDEO IN 1 or IN 2 jacks set V ASSIGN in the VIDEO menu page 67 Connecting a satellite tuner cable TV tuner L R L R R L CENTER SURROUND ANTENNA TV OUT 1 N I 2 N I 3 N I HDMI ASSIGNABLE INPUT ONLY ARC TV IN OPTICAL DMPORT DC5V 0 7A MAX MONITOR OUT VIDEO IN VIDEO OUT VIDEO IN MONITOR VIDEO OUT AUDIO IN AUDIO OUT BD AUDIO IN AUDIO IN SA CD CD...

Page 29: ...ay For details see Naming inputs page 38 Connecting components with analog video and audio jack L R L R R L FRONT A CENTER SURROUND ANTENNA TV OUT 1 N I 2 N I 3 N I HDMI ASSIGNABLE INPUT ONLY ARC TV IN OPTICAL SAT CATV IN OPTICAL DVD IN DIGITAL COAXIAL ASSIGNABLE DMPORT DC5V 0 7A MAX PB CB PR CR Y IN 3 IN 2 IN 1 MONITOR OUT COMPONENT VIDEO ASSIGNABLE INPUT ONLY VIDEO IN VIDEO IN MONITOR VIDEO OUT ...

Page 30: ...ble 6 Connecting the AC power cord mains lead Connect the AC power cord mains lead to a wall outlet Note Before connecting the AC power cord mains lead make sure that metallic wires of the speaker cords are not touching each other between the SPEAKERS terminals 2 N I 3 N I HDMI AS TV IN OPTICAL SAT CATV IN OPTICAL DVD IN DIGITAL COAXIAL ASSIGNABLE DMPORT DC5V 0 7A MAX PB CB PR CR Y IN 3 IN 2 IN 1 ...

Page 31: ...r adjusted are reset to the initial settings Selecting the speaker system You can select the front speakers you want to drive Be sure to use the buttons on the receiver for this operation Press SPEAKERS repeatedly to select the front speaker system you want to drive To select SPK B or SPK A B set SB ASGN to SPK B in the SPEAKER menu page 65 To turn off the speaker output Press SPEAKERS repeatedly ...

Page 32: ...ing items Set up and connect the speakers page 16 18 Connect only the supplied optimizer microphone to the AUTO CAL MIC jack Do not connect other microphones to this jack Set SB ASGN to BI AMP in SPEAKER menu if you use bi amplifier connection page 65 Set SB ASGN to SPK B in SPEAKER menu if you use speakers front B connection page 65 Turn off the muting function Disconnect the headphones Remove an...

Page 33: ... that the optimizer microphone remains at the same height as your ears 1 Press AMP MENU 2 Press V v repeatedly to select A CAL then or b START appears on the display 3 Press Measurement starts in 5 seconds A count down is displayed The measurement process will take a few minutes to complete Setting up the Auto Calibration 1 Optimizer microphone Performing Auto Calibration m M X x BD DVD SAT CATV V...

Page 34: ...Press MUTING RM AAU073 only or RM AAU075 only on the remote or MUTING on the receiver Press the input buttons or INPUT SELECTOR on the receiver Change the volume level Connect the headphones When error codes appear When an error is detected during Auto Calibration an error code will appear on the display cyclically after each measurement process as follows Error code t blank display t error code t...

Page 35: ...NT B R terminals When you connect only one surround back speaker connect it to the SPEAKERS SURROUND BACK BI AMP FRONT B L terminals ERROR 23 Surround back speaker is detected but surround speakers are not connected Be sure to connect the surround speakers Error code Cause and remedy Warning code Explanation and solution WARN 40 The environment is noisy Make sure the environment is quiet during Au...

Page 36: ... tone sounds the same from each speaker For details see LEVEL menu page 62 Tips To adjust the level of all speakers at the same time press MASTER VOL RM AAU073 only or 2 RM AAU075 only You can also use MASTER VOLUME on the receiver The adjusted value are shown on the display during adjustment 6 Repeat steps 1 to 4 to select OFF You can also press any input buttons The test tone turns off When a te...

Page 37: ...njoy the surround sound You can also use 2CH A DIRECT A F D MOVIE or MUSIC on the receiver For details see page 44 To activate the muting function Press MUTING RM AAU073 only or RM AAU075 only on the remote or MUTING on the receiver The muting function will be canceled when you do the following Press MUTING RM AAU073 only or RM AAU075 only on the remote or MUTING on the receiver again Increase the...

Page 38: ...ows by pressing V v Alphabet upper case t Numbers t Symbols To enter a blank space press b without selecting a character 6 Press The name you entered is registered Viewing information on the display You can check the sound field etc by changing the information on the display Press DISPLAY repeatedly Each time you press the button the display changes cyclically as follows All inputs except the FM a...

Page 39: ... display A count down is displayed 1 minute before the receiver turns off Recording You can record from a video audio component using the receiver Refer to the operating instructions supplied with your recording component You can record onto a CD R using the receiver Refer to the operating instructions supplied with your CD recorder 1 Press one of the input buttons to select the playback component...

Page 40: ...ng In this case you may not be able to record from the source Only analog signals are output from the analog output jack for recording HDMI sound cannot be recorded Listening to FM AM radio You can listen to FM and AM broadcasts through the built in tuner Before operation make sure you have connected the FM and AM antennas aerials to the receiver page 30 Tip The tuning scale for direct tuning diff...

Page 41: ...eat steps 1 to 4 and select STEREO in step 4 You can enter the frequency of a station directly by using the numeric buttons 1 Press TUNER repeatedly to select the FM or AM band You can also use INPUT SELECTOR on the receiver 2 Press D TUNING 3 Press and hold SHIFT then press the numeric buttons to enter the frequency Example 1 FM 102 50 MHz Models of area code CA2 Select 1 b 0 b 2 b 5 Models of ar...

Page 42: ... will be erased when you change the tuning scale Presetting FM AM radio stations You can preset up to 30 FM stations and 30 AM stations Then you can easily tune in the stations you often listen to 1 Press TUNER repeatedly to select the FM or AM band You can also use INPUT SELECTOR on the receiver 2 Tune in the station that you want to preset using Automatic Tuning page 41 or Direct Tuning page 41 ...

Page 43: ... use INPUT SELECTOR on the receiver 2 Tune in the preset station you want to create an index name for page 43 3 Press AMP MENU 4 Press V v repeatedly to select TUNER then press or b 5 Press V v repeatedly to select NAME IN then press or b The cursor flashes and you can select a character 6 Press V v to select a character then press B b to move the cursor to the next position If you made a mistake ...

Page 44: ...gram service name is displayed you can check the frequency by pressing DISPLAY repeatedly page 38 Selecting the sound field This receiver can create multi channel surround sound You can select one of the optimized sound fields from the receiver s preprogrammed sound fields Press SOUND FIELD repeatedly to select the sound field you want You can also press 2CH A DIRECT A F D MOVIE or MUSIC on the re...

Page 45: ...rtainment Cary Grant Theater cinema production studio This is a standard mode great for watching almost any type of movie x C ST EX B Cinema Studio EX B DCS Reproduces the sound characteristics of the Sony Pictures Entertainment Kim Novak Theater cinema production studio This mode is ideal for watching science fiction or action movies with lots of sound effects x C ST EX C Cinema Studio EX C DCS R...

Page 46: ...s 2CH This mode is selected automatically if you use headphones except Analog Direct Standard 2 channel stereo sources completely bypass the sound field processing and multi channel surround formats are downmixed to 2 channels except LFE signals x HP DIR Headphones Direct Outputs the analog signals without processing by the equalizer sound field etc If you connect a subwoofer This receiver will ge...

Page 47: ...cted the PORTABLE is selected Tips You can identify the encoding format of DVD software etc by looking at the logo on the package When a multi channel signal is input only Dolby Pro Logic IIx decoding is effective When you select decoding modes other than Dolby Pro Logic IIx multi channel sound being encoded is output Sound fields with DCS marks use DCS technology For details on Digital Cinema Sou...

Page 48: ...Audio signals are output in another format if the playback component does not correspond to the format For details refer to the operating instructions of the playback component When connecting Blu ray disc players and other next generation HD players Audio format Maximumnumber of channels Connection of the playback component and the receiver COAXIAL OPTICAL HDMI Dolby Digital 5 1 a a Dolby Digital...

Page 49: ...dly to select AUDIO then press or b 3 Press V v repeatedly to select NIGHT M then press or b 4 Press V v repeatedly to select NIGHT ON then press Notes This function does not work in the following cases Signals with a sampling frequency of more than 48 kHz are being received Analog Direct is selected Tip While the NIGHT MODE is turned on D RANGE is automatically set to COMP MAX Resetting sound fie...

Page 50: ... is compatible with the Control for HDMI Easy Setting function If your TV is compatible with the Control for HDMI Easy Setting function you can set the receiver and playback components Control for HDMI function automatically by setting the TV page 50 If your TV is not compatible with the Control for HDMI Easy Setting function set the Control for HDMI function of the receiver playback components an...

Page 51: ... after you have made the settings for Control for HDMI Easy Setting check the Control for HDMI setting on your TV If the connected components do not support Control for HDMI Easy Setting you need to set the Control for HDMI function for the connected components to on before you perform the Control for HDMI Easy Setting from the TV Playing back components with one touch operation One Touch Play By ...

Page 52: ... from the speakers connected to the receiver However if you turn off the receiver the sound will output from the TV speakers When you adjust the TV volume the receiver s volume is adjusted simultaneously Notes If System Audio Control does not function according to your TV setting refer to the operating instructions of the TV When CTRL HDMI is set to CTRL ON the AUDIO OUT settings in the HDMI menu ...

Page 53: ...also use the receiver s remote to turn off the TV Press and hold TV then press TV 1 The TV receiver and the components connected via HDMI are turned off Notes Set the TV Standby Synchro to on before using the System Power Off function For details refer to the operating instructions of the TV Depending on the status the connected components may not be turned off For details refer to the operating i...

Page 54: ...u change the TV s input Enjoying the TV sound via an HDMI cable Audio Return Channel The Audio Return Channel ARC function enables the TV outputs the audio signals to the receiver via a HDMI cable connected to the HDMI TV OUT jack You can enjoy the TV sound from the speakers connected to the receiver without connecting the TV OPTICAL IN or TV AUDIO IN jack 1 Press AMP MENU 2 Press v V repeatedly t...

Page 55: ...ut When the Analog Direct function is selected audio input is set to ANALOG automatically and you cannot select other modes When HDMI 1 3 or DMPORT input is selected appears on the display and you cannot select other modes Select an input mode other than the HDMI 1 3 and DMPORT input then set the audio input mode Enjoying the sound images from other inputs You can reassign audio and or video signa...

Page 56: ... HDMI input to the same input You cannot reassign more than one digital audio input to the same input You cannot reassign more than one component video input to the same input Assignable input jacks Input name VIDEO1 VIDEO2 BD DVD SAT SA CD Video CMPNT 1 Component 1 a a a a a a CMPNT 2 Component 2 a a a a a a CMPNT 3 Component 3 a a a a a a HDMI1 a a a a a a HDMI2 a a a a a a HDMI3 a a a a a a COM...

Page 57: ...T You can also use the INPUT SELECTOR on the receiver to select DMPORT 2 Start playback of the connected component The sound is played back on the receiver and the image appears on the TV screen For details refer to the operating instructions supplied with the DIGITAL MEDIA PORT adapter Tip When listening to MP3 or other compressed music using a portable audio source you can enhance the sound Pres...

Page 58: ...sing the setting menu By using the amplifier menus you can make various adjustments to customize the receiver 1 Press AMP MENU 2 Press V v repeatedly to select the menu you want then press or b 3 Press V v repeatedly to select the parameter you want to adjust then press or b 4 Press V v repeatedly to select the setting you want The setting is entered automatically To return to the previous display...

Page 59: ...0 0 dB 0 5 dB step SL 0 dB Surround right speaker levela SR LVL SR 20 0 dB to SR 10 0 dB 0 5 dB step SR 0 dB Surround back speaker levela SB LVL SB 20 0 dB to SB 10 0 dB 0 5 dB step SB 0 dB Surround back left speaker levela SBL LVL SBL 20 0 dB to SBL 10 0 dB 0 5 dB step SBL 0 dB Surround back right speaker levela SBR LVL SBR 20 0 dB to SBR 10 0 dB 0 5 dB step SBR 0 dB Subwoofer levela SW LVL SW 20...

Page 60: ...ea SBR DIST SBR 1 0 m to SBR 7 0 m SBR 3 ft to SBR 22 ft 0 1 m 1 ft step SBR 3 0 m SBR 9 ft Subwoofer distancea SW DIST SW 1 0 m to SW 7 0 m SW 3 ft to SW 22 ft 0 1 m 1 ft step SW 3 0 m SW 9 ft Distance unit DIST UNIT METER FEET METERd Front speaker crossover frequencye FRT CRS CRS 40 Hz to CRS 200 Hz 10 Hz step CRS 120 Hz Center speaker crossover frequencye CNT CRS CRS 40 Hz to CRS 200 Hz 10 Hz s...

Page 61: ...O DEC PCM DEC AUTO Digital audio input assignment A ASSIGN For details see Enjoying the sound images from other inputs page 55 Night mode NIGHT M NIGHT OFF NIGHT ON NIGHT OFF VIDEO VIDEO page 67 Video input assignment V ASSIGN For details see Enjoying the sound images from other inputs page 55 HDMI HDMI page 67 Control for HDMI CTRL HDMI CTRL ON CTRL OFF CTRL ON HDMI Signal Pass Through PASS THRU ...

Page 62: ...10 0 dB in 0 5 dB steps x FL LVL x FR LVL x CNT LVL x SL LVL x SR LVL x SB LVL x SBL LVL x SBR LVL x SW LVL Note Depends on the speaker pattern setting some parameters may not be available x D RANGE Lets you compress the dynamic range of the soundtrack This may be useful when you want to watch movies at low volumes late at night Dynamic range compression is possible with Dolby Digital sources only...

Page 63: ...cted to this receiver It should be synchronized with the speakers settings For example SPEAKER menu Speaker pattern Front left right Center Surround left right Surround back left Surround back right Subwoofer 3 4 1 a a a a a a 3 4 a a a a a 2 4 1 a a a a a 2 4 a a a a 3 3 1 a a a a a 3 3 a a a a 2 3 1 a a a a 2 3 a a a 3 2 1 a a a a 3 2 a a a 2 2 1 a a a 2 2 a a 3 0 1 a a a 3 0 a a 2 0 1 a a 2 0 a...

Page 64: ...er x SUR SIZE The surround back speakers will be set to the same setting LARGE If you connect large speakers that will effectively reproduce bass frequencies select LARGE Normally select LARGE However if the front speakers are set to SMALL you cannot set the surround speakers to LARGE SMALL If the sound is distorted or you feel a lack of surround effects when using multi channel surround sound sel...

Page 65: ...r listening position to the center speaker x SL DIST x SR DIST Lets you set the distance from your listening position to the surround speakers x SB DIST x SBL DIST x SBR DIST Lets you set the distance from your listening position to the surround back speakers x SW DIST Lets you set the distance from your listening position to the subwoofer Notes Depends on the speaker pattern setting Some paramete...

Page 66: ...an set the FM station receiving mode and name the preset stations x FM MODE STEREO This receiver will decode the signal as stereo signal when the radio station is broadcast in stereo MONO This receiver will decode the signal as mono signal regardless of the broadcast signal x NAME IN Lets you set the name of preset stations For details see Naming preset stations page 43 You can make settings for t...

Page 67: ...et to DEC PCM the sound may be interrupted at the very beginning of the first track depending on the CD being played back When you play back DTS CD set DEC PRIO to DEC AUTO x A ASSIGN Lets you assign the digital audio input to other input source For details see Enjoying the sound images from other inputs page 55 x NIGHT M Lets you to retain a theater like environment at low volume levels For detai...

Page 68: ...channels and the sampling frequency etc When the TV has stereo speakers the sound output from the receiver is also stereo as that of the TV even if you play back multi channel software When you connect the receiver to an image display component projector etc sound may not be output from the receiver In this case select AMP x SW LEVEL Lets you set the level of the subwoofer to 0 dB or 10 dB when mu...

Page 69: ... mode and the Sleep Timer at the same time the Sleep Timer has priority x NAME IN Lets you set the name of inputs For details see Naming inputs page 38 Changing the input button assignments You can change the initial settings of the input buttons to suit the components in your system For example if you connect a Blu ray disc player to the DVD jack on the receiver you can set the DVD button on this...

Page 70: ...setting For details refer to the operating instructions supplied with the DVD recorders c Sony VCRs are operated with a VTR 2 or VTR 3 setting which corresponds to 8 mm and VHS respectively d RM AAU073 only e RM AAU075 only Clearing all the contents of the remote s memory RM AAU073 only While holding down MASTER VOL press 1 and INPUT RM AAU075 only While holding down 2 press 1 and The remote is re...

Page 71: ...e signal C are combined and transmitted together x Deep Color Deep Colour Video signals for which the color depth of signals passing through an HDMI jack have been raised The number of colors that could be expressed by 1 pixel was 24 bits 16 777 216 colors with the current HDMI jack However the number of colors which can be expressed by 1 pixel will be 36 bits etc when the receiver corresponds to ...

Page 72: ...t compresses audio less than Dolby Digital delivering a higher quality sound reproduction x DTS ES Format for 6 1 channel playback with surround back information There are two modes Discrete 6 1 which records all channels independently and Matrix 6 1 which matrixes surround back channel into surround left and surround right channels It is ideal for playback of motion picture soundtracks x DTS Neo ...

Page 73: ...ameplate on the back of the receiver The unit is not disconnected from the AC power source mains as long as it is connected to the wall outlet even if the unit itself has been turned off If you are not going to use the receiver for a long time be sure to disconnect the receiver from the wall outlet To disconnect the AC power cord mains lead grasp the plug itself never pull the cord The AC power co...

Page 74: ... not use any type of abrasive pad scouring powder or solvent such as alcohol or benzine If you have any questions or problems concerning your receiver please consult your nearest Sony dealer Troubleshooting If you experience any of the following difficulties while using the receiver use this troubleshooting guide to help you remedy the problem Should any problem persist consult your nearest Sony d...

Page 75: ... the INPUT MODE is not set to ANALOG page 55 Check that the Analog Direct function is not selected Check that the A ASSIGN function is not used to reassign the audio input of another source to the selected input page 55 Set ARC to ARC OFF when no sound is output from TV OPTICAL IN jack during TV input page 68 The left and right sounds are unbalanced or reversed Check that the speakers and componen...

Page 76: ...output of the connected component For example when connecting the PlayStation 3 set the BD DVD audio output format to Bitstream on the PlayStation 3 Set AUDIO OUT to AMP in the HDMI menu Recording cannot be carried out Check that the components are connected correctly Select the source component using the input buttons page 37 There is no sound from the component connected to the DIGITAL MEDIA POR...

Page 77: ...s not work Make sure that you are tuned to an FM RDS station Select a stronger FM station The RDS information that you want does not appear Contact the radio station and find out whether they actually provide the service in question If so the service may be temporarily out of order Models of area code CEK ECE only The source sound input to the HDMI jack is not output from the receiver or the TV sp...

Page 78: ...e select AMP If you cannot listen to the sound of a component connected to the receiver Change the input of the receiver to HDMI when you want to watch a program on a component connected via HDMI connection to the receiver Change the TV channel when you want to watch a TV broadcast Select the component or input you want to watch when you watch a program on the component connected to the TV Refer t...

Page 79: ...e parts may be retained Specifications Amplifier section Models of area code CA21 Minimum RMS Output Power 8 ohms 20 Hz 20 kHz THD 0 09 85 W 85 W Stereo Mode Output Power 8 ohms 1 kHz THD 1 105 W 105 W Surround Mode Output Power2 8 ohms 1 kHz THD 10 140 W per channel Models of area code CEK ECE1 Minimum RMS Output Power 8 ohms 20 Hz 20 kHz THD 0 09 85 W 85 W Stereo Mode Output Power 8 ohms 1 kHz T...

Page 80: ...eo 1 Vp p 75 ohms COMPONENT VIDEO Y 1 Vp p 75 ohms PB CB 0 7 Vp p 75 ohms PR CR 0 7 Vp p 75 ohms 80 MHz HD Pass Through General Power requirements Power output DIGITAL MEDIA PORT DC OUT 5V 0 7A MAX Power consumption Dimensions width height depth Approx 430 mm 157 5 mm 325 3 mm 17 in 6 1 4 in 12 3 4 in including projecting parts and controls Mass Approx 7 8 kg 17 lb 4 oz Design and specifications a...

Page 81: ... 27 29 E Error messages 79 H HDMI connecting 23 HDMI Signal Pass Through 67 I Initial setup 31 INPUT MODE 55 M Menu AUDIO 66 EQ 66 HDMI 67 LEVEL 62 SPEAKER 63 SURROUND 66 SYSTEM 69 TUNER 66 VIDEO 67 Movie mode 45 Music mode 46 Muting 37 N Naming 38 43 NIGHT MODE 49 O One Touch Play 51 P PlayStation 3 connecting 23 R RDS 44 Recording onto a CD R 39 onto a recording media 40 Remote commander 11 S Sa...

Page 82: ......

Page 83: ......

Page 84: ...D NORM S JOB SONY HA SO0086 STR DN610_PMRF 2 GB GB01COV_STR DN610 U2IX fm masterpage Left Sony Corporation Printed in Malaysia model name1 STR DN610 4 167 824 13 1 ...

Reviews: