background image

4-093-064-14(1)

© 2002 Sony Corporation

TFT LCD Color
Computer Display

Operating Instructions 

Mode d’emploi 

Bedienungsanleitung 

Manual de instrucciones 

Istruzioni per l’uso 

GB

DE

FR

IT

ES

SDM-S51R
SDM-S71R
SDM-S81R

Summary of Contents for StylePro SDM-S51R

Page 1: ... 064 14 1 2002 Sony Corporation TFT LCD Color Computer Display Operating Instructions Mode d emploi Bedienungsanleitung Manual de instrucciones Istruzioni per l uso GB DE FR IT ES SDM S51R SDM S71R SDM S81R ...

Page 2: ...ate this equipment for the white model for the black model WARNING IMPORTANTE Para prevenir cualquier mal funcionamiento y evitar daños por favor lea detalladamente este manual de instrucciones antes de conectar y operar este equipo If you have any questions about this product you may call Sony Customer Information Center 1 800 222 SONY 7669 or write to Sony Customer Information Center 1 Sony Driv...

Page 3: ...5 Setup 7 Step 1 Connect the display to your computer 7 Step 2 Connect the power cord 8 Step 3 Secure the cords and close the back cover 8 Step 4 Turn on the monitor and computer 9 Adjusting the tilt 9 Customizing Your Monitor 10 Navigating the menu 10 Adjusting the contrast CONTRAST 11 Adjusting the black level of an image BRIGHTNESS 11 Eliminating flicker or blurring PHASE PITCH 12 Adjusting the...

Page 4: ...ecomes warm during operation This is not a malfunction Note on the LCD Liquid Crystal Display Please note that the LCD screen is made with high precision technology However black points or bright points of light red blue or green may appear constantly on the LCD screen and irregular colored stripes or brightness may appear on the LCD screen This is not malfunction Effective dots more than 99 99 Ma...

Page 5: ...ntrast button page 11 This button displays the CONTRAST menu 4 8 brightness button page 11 This button displays the BRITGHTNESS menu 5 M m buttons page 11 These buttons function as the M m buttons when selecting the menu items and making adjustments 6 OK button page 11 This button selects the item or executes the settings in the menu 7 Security Lock Hole The security lock hole should be applied wi...

Page 6: ...ls DDC Display Data Channel is a standard of VESA qa Cable holder page 8 This part secures cables and cords to the monitor OPEN SDM S51R Open the back cover This illustration of monitor rear is the SDM S71R Pin No Signal 1 Red 2 Green SDM S51R Green Sync on Green SDM S71R S81R 3 Blue 4 ID Ground 5 DDC Ground 6 Red Ground 7 Green Ground 8 Blue Ground 9 DDC 5V 10 Ground 11 ID Ground 12 Bi Directiona...

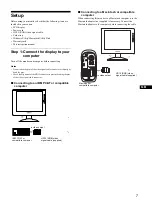
Page 7: ...ctor as this might bend the pins Check the alignment of the HD15 connector to prevent bending the pins of the video signal cable connector x Connecting to an IBM PC AT or compatible computer x Connecting to a Macintosh or compatible computer When connecting this monitor to a Macintosh computer use the Macintosh adapter not supplied if necessary Connect the Macintosh adapter to the computer before ...

Page 8: ...lder To close the back cover securely bundle the cables and cords as illustrated 3 Close the back cover Bandle the cables and cords You can bandle the cables and cords by using the supplied cord strap OPEN This illustration of monitor rear is the SDM S51R The same applies for the SDM S71R S81R model to AC IN to a power outlet power cord supplied Cable holder Illustrations of monitor rear are the S...

Page 9: ...en messages see Trouble symptoms and remedies on page 18 No need for specific drivers The monitor complies with the DDC Plug Play standard and automatically detects all the monitor s information No specific driver needs to be installed to the computer The first time you turn on your computer after connecting the monitor the setup Wizard may appear on the screen In this case follow the on screen in...

Page 10: ... after adjusting the pitch 2 PITCH page 12 Select the PITCH menu to adjust the pitch when the characters or pictures are unclear in some areas of the screen 3 H CENTER page 12 Select the H CENTER menu to adjust the picture s horizontal centering MENU 3 0 EX I T PHAS E 3 0 EX I T PHAS E 1344 EX I T P I TCH 5 0 EX I T H CENTER 4 V CENTER page 12 Select the V CENTER menu to adjustthepicture svertical...

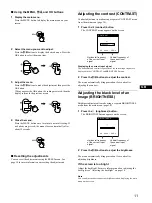
Page 11: ... Displaying the current input signal The horizontal and vertical frequencies of the current input signal are displayed in the CONTRAST and BRIGHTNESS menu 2 Press the M m buttons to adjust the contrast The menu automatically disappears about 5 seconds after adjusting the contrast Adjusting the black level of an image BRIGHTNESS Brightness adjustment is made using a separate BRIGHTNESS menu from th...

Page 12: ...that the vertical stripes disappear 7 Press the OK button The main menu appears on the screen If horizontal stripes are observed over the entire screen adjust the phase as the next step 8 Press the M m buttons to select PHASE and press the OK button The PHASE menu appears on the screen 9 Press the M m buttons until the horizontal stripes are at a minimum Adjust so that the horizontal stripes are a...

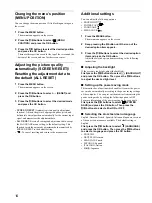
Page 13: ...en press the M m buttons to adjust the color temperature and press the OK button Since this adjustment changes the color temperature by increasing or decreasing the R and B components with respect to G green the G component is fixed If you fine tune the color temperature the new color setting is stored in memory for USER ADJUSTMENT and automatically recalled whenever USER is selected To change the...

Page 14: ...ings You can adjust the following options BACKLIGHT POWER SAVE LANGUAGE MENU LOCK 1 Press the MENU button The main menu appears on the screen 2 Keep pressing the m button until the icon of the desired option item appears 3 Press the M m buttons to select the desired option item and press the OK button Adjust the selected option item according to the following instructions x Adjusting the backlight...

Page 15: ... LOCK and press the OK button Then press the M m buttons and select ON Only the 1 power switch and MENU LOCK of the option menu will operate If any other items are selected the mark appears on the screen To cancel the menu lock Repeat the procedure above and set and MENU LOCK to OFF ...

Page 16: ...s that a clear picture appears on the screen for any timing within the monitor s frequency range horizontal 28 61 kHz SDM S51R 28 80 kHz SDM S71R S81R vertical 48 75 Hz Consequently the first time the monitor receives input signals that do not match one of the factory preset modes the monitor may take a longer time than normal for displaying the picture on the screen This adjustment data is automa...

Page 17: ... RESOLUTION XGA is displayed SDM S51R This indicates that the resolution is not supported by the monitor s specifications If RESOLUTION SXGA is displayed SDM S71R S81R This indicates that the resolution is not supported by the monitor s specifications If NO INPUT SIGNAL appears on the screen This indicates that no signal is input GO TO POWER SAVE The monitor will enter the power saving mode after ...

Page 18: ... the mouse Check that your graphic board is attached to the computer properly Check that the computer s power is on If OUT OF SCAN RANGE appears on the screen xProblems caused by the connected computer or other equipment Check that the video frequency range is within that specified for the monitor If you replaced an old monitor with this monitor reconnect the old monitor and adjust the frequency r...

Page 19: ...is not centered or sized properly Adjust the pitch and phase page 12 Adjust the picture position page 12 Note that some video modes do not fill the screen to the edges Picture is too small xProblems caused by the connected computer or other equipment Set the computer s resolution to the screen s resolution The picture is dark Adjust the brightness page 11 Adjust the backlight page 14 It takes a fe...

Page 20: ... the monitor is working properly Reconnect the video input cables and check the condition of your computer s If the color bars do not appear there is a potential monitor failure Inform your authorized Sony dealer of the monitor s condition If the 1 power indicator is flashing orange Press the 1 power switch twice to turn the monitor off and then on If the 1 power indicator lights up green the moni...

Page 21: ...024 lines Input signal levels RGB video signal 0 7 Vp p 75 Ω positive SYNC signal TTL level 2 2 kΩ positive or negative Separate horizontal and vertical or composite sync 0 3 Vp p 75Ω negative Sync on green Power requirements 100 240 V 50 60 Hz Max 1 0 A Power consumption Max 45 W SDM S71R Max 55 W SDM S81R Operating temperature 5 35 C Dimensions width height depth Display upright Approx 423 399 2...

Page 22: ...22 ...

Page 23: ...es 5 Installation 7 Etape 1 Raccordez l écran à votre ordinateur 7 Etape 2 Branchez le câble d alimentation 8 Etape 3 Vérifiez que tous les câbles et cordons sont bien raccordés et refermez le capot arrière 8 Etape 4 Mettez le moniteur et l ordinateur sous tension 9 Réglage de l inclinaison 9 Personnalisation de votre moniteur 10 Pilotage par menu 10 Réglage du contraste CONTRASTE 11 Réglage du ni...

Page 24: ...dant un certain temps Cette image rémanente finira par disparaître Le panneau LCD s échauffe en cours d utilisation Il ne s agit pas d un dysfonctionnement Remarque sur l affichage à cristaux liquides LCD Liquid Crystal Display Veuillez noter que l écran LCD est issu d une technologie de haute précision Toutefois il est possible que des points noirs ou des points brillants de lumière rouge bleu ou...

Page 25: ...e 11 Cette touche active l affichage du menu CONTRASTE 4 Touche 8 luminosité page 11 Cette touche active l affichage du menu LUMINOSITE 5 Touches M m page 11 Ces touches fonctionnent comme les touches M m lorsque vous sélectionnez des paramètres de menu et que vous effectuez des réglages 6 Touche OK page 11 Cette touche permet de sélectionner ou de valider des options dans le menu 7 Trou de verrou...

Page 26: ...t une norme de VESA qa Support de câble page 8 Cette pièce permet de maintenir les câbles et les cordons contre l appareil OPEN SDM S51R SDM S71R S81R Ouvrez le capot arrière Cette illustration est celle de la face arrière du moniteur SDM S71R Broche n Signal 1 Rouge 2 Vert SDM S51R Vert Synchronisation sur le vert SDM S71R S81R 3 Bleu 4 ID masse 5 Masse DDC 6 Masse du rouge 7 Masse du vert 8 Mass...

Page 27: ...déo car vous risquez sinon de plier les broches Vérifiez l alignement du connecteur HD15 pour ne pas tordre les broches du connecteur du câble de signal vidéo x Raccordement à un ordinateur IBM PC AT ou compatible x Raccordement à un ordinateur Macintosh ou compatible Lorsque vous raccordez ce moniteur à un ordinateur Macintosh utilisez l adaptateur Macintosh non fourni le cas échéant Raccordez l ...

Page 28: ... et les cordons en faisceau comme illustré pour fermer le capot arrière correctement 3 Refermez le capot arrière Regroupez les câbles et les cordons Vous pouvez regrouper les câbles et les cordons en utilisant l attache de cordon fournie OPEN vers AC IN vers une prise secteur Câble d alimentation fourni Cette illustration est celle de la face arrière du moniteur SDM S51R Il en est de même pour le ...

Page 29: ...emèdes à la page 18 Vous n avez besoin d aucun pilote pour ce moniteur Le moniteur prend en charge la fonction Plug Play DDC et détecte automatiquement toutes les autres informations relatives au moniteur Il n est pas nécessaire d installer de pilote pour cet ordinateur La première fois que vous mettez sous tension votre ordinateur après avoir raccordé le moniteur l assistant de réglage peut s aff...

Page 30: ...a phase après avoir réglé l horloge 2 HORLOGE page 12 Sélectionnez le menu HORLOGE pour ajuster l horloge lorsque les caractères ou les images manquent de clarté dans certaines parties de l écran MENU 3 0 EX I T PHAS E 3 0 EX I T PHAS E 1344 EX I T HOR L OGE 3 CENTRAGE H page 12 Sélectionnez le menu CENTRAGE H pour ajuster le centrage horizontal de l image 4 CENTRAGE V page 12 Sélectionnez le menu...

Page 31: ...RASTE apparaît sur l écran Affichage du signal d entrée en cours Les fréquences horizontale et verticale du signal d entrée en cours sont affichées dans les menus CONTRASTE et LUMINOSITE 2 Appuyez sur les touches M m pour régler le contraste Le menu disparaît automatiquement au bout de 5 secondes après réglage du contraste Réglage du niveau de noir de l image LUMINOSITE Le réglage de la luminosité...

Page 32: ... 7 Appuyez sur la touche OK Le menu principal apparaît sur l écran Si vous observez des rayures horizontales sur toute la surface de l écran ajustez la phase à l étape suivante 8 Appuyez sur les touches M m pour sélectionner PHASE et appuyez ensuite sur la touche OK Le menu PHASE apparaît sur l écran 9 Appuyez sur les touches M m jusqu à ce que les bandes horizontales soient réduites au minimum Aj...

Page 33: ...uge ou B bleu puis sur la touche OK appuyez sur les touches M m pour ajuster la température des couleurs et appuyez ensuite sur la touche OK Etant donné que ce réglage change la température des couleurs en augmentant ou en diminuant les composantes R et B par rapport à G vert la composante G est fixe Si vous réglez la température des couleurs le nouveau réglage des couleurs est enregistré dans la ...

Page 34: ... les options suivantes RETROECLAIRAGE MODE ECO LANGUAGE VERROU REGLAGES 1 Appuyez sur la touche MENU Le menu principal apparaît sur l écran 2 Appuyez sur la touche m jusqu à ce que l icône correspondant à l option souhaitée apparaisse 3 Appuyez sur les touches M m pour sélectionner l option de votre choix et appuyez ensuite sur la touche OK Ajustez l option sélectionnée en appliquant les instructi...

Page 35: ...r la touche OK Appuyez ensuite sur les touches M m pour sélectionner OUI Seul le commutateur 1 alimentation et VERROU REGLAGES du menu Option seront opérants Si vous sélectionnez d autres paramètres le symbole apparaît sur l écran Pour désactiver le verrouillage des réglages Répétez la procédure ci dessus et réglez VERROU REGLAGES sur NON ...

Page 36: ...hronisation dans la plage de fréquence du moniteur horizontalement 28 61 kHz SDM S51R 28 80 kHz SDM S71R S81R verticalement 48 75 Hz En conséquence la première fois que le moniteur reçoit des signaux d entrée qui ne correspondent pas à l un des modes présélectionnés par défaut il se peut que le moniteur prenne un peu plus de temps que d habitude pour afficher l image à l écran Ces données de régla...

Page 37: ...ée en cours Si RESOLUTION XGA est affiché SDM S51R Cela signifie que la résolution n est pas supportée par les spécifications du moniteur Si RESOLUTION SXGA est affiché SDM S71R S81R Cela signifie que la résolution n est pas prise en charge par les spécifications du moniteur Si l indication PAS ENTREE VIDEO apparaît sur l écran Cela signifie qu aucun signal n est entré PASSER EN MODE ECO Ce monite...

Page 38: ...la souris Vérifiez que votre carte graphique est correctement connectée à votre ordinateur Vérifiez si l alimentation de l ordinateur est réglée sur on Si l indication HORS PLAGE DE BALAYAGE apparaît sur l écran xProblèmes causés par l ordinateur ou tout autre équipement connecté Vérifiez si la plage de fréquence vidéo est comprise dans la plage spécifiée pour le moniteur Si vous avez remplacé un ...

Page 39: ...ement ni du bon format Ajustez l horloge et la phase page 12 Ajustez la position de l image page 12 Attention que certains modes vidéo ne remplissent pas l écran jusqu aux bords L image est trop petite xProblèmes occasionnés par l ordinateur raccordé ou tout autre équipement Réglez la résolution de l ordinateur en fonction de celle de l écran L image est sombre Réglez la luminosité page 11 Réglez ...

Page 40: ...anchez les câbles d entrée vidéo et contrôlez le statut de votre vos ordinateur s Si les barres de couleur n apparaissent pas c est peut être en raison d une défaillance du moniteur Informez votre revendeur Sony agréé de la condition du moniteur Si l indicateur 1 alimentation clignote en orange Appuyez deux fois sur le commutateur 1 alimentation pour mettre le moniteur hors et puis de nouveau sous...

Page 41: ...s Niveaux des signaux d entrée Signal vidéo RVB 0 7 Vp p 75 ohms positif Signal SYNC Niveau TTL 2 2 kohms positif ou négatif Horizontaletverticalséparément ou synchro composite 0 3 Vp p 75ohms négatif synchro sur le vert Puissance de raccordement 100 240 V 50 60 Hz Max 1 0 A Consomamtion électrique Max 45 W SDM S71R Max 55 W SDM S81R Température de fonctionnement 5 35 C Dimensions largeur hauteur ...

Page 42: ......

Page 43: ...e 5 Installation 7 Schritt 1 Anschließen des Bildschirms an den Computer 7 Schritt 2 Anschließen des Netzkabels 8 Schritt 3 Befestigen der Kabel und Schließen der hinteren Abdeckung 8 Schritt 4 Einschalten von Monitor und Computer 9 Einstellen von Neigung 9 Einstellen des Monitors 10 Navigieren in den Menüs 10 Einstellen des Kontrasts KONTRAST 11 Einstellen des Schwarzwerts für das Bild HELLIGKEIT...

Page 44: ... lang ein Nachbild zu sehen sein Dieses Nachbild verschwindet nach einer Weile wieder Der Bildschirm erwärmt sich bei Betrieb Dies ist keine Fehlfunktion Hinweis zum LCD Display Flüssigkristallbildschirm Bitte beachten Sie daß der LCD Bildschirm in einer Hochpräzisionstechnologie hergestellt wird Schwarze oder helle Lichtpunkte rot blau oder grün können jedoch permanent auf dem LCD Bildschirm zu s...

Page 45: ...Seite 11 Diese Taste dient zum Aufrufen des Menüs KONTRAST 4 Helligkeitstaste 8 Seite 11 Diese Taste dient zum Aufrufen des Menüs HELLIGKEIT 5 Tasten M m Seite 11 Diese Tasten fungieren beim Auswählen von Menüoptionen und beim Einstellen von Optionen als Tasten M m 6 Taste OK Seite 11 Diese Taste dient zum Auswählen von Optionen bzw zum Einstellen von Werten im Menü 7 Aussparung für die Sicherheit...

Page 46: ... Data Channel ist ein Standard der VESA qa Kabelhalter Seite 8 Mit diesem Halter können Sie Kabel sicher am Gerät befestigen OPEN SDM S51R SDM S71R S81R Öffnen Sie die hintere Abdeckung Diese Abbildung der Monitorrückseite zeigt das Modell SDM S71R Stift Nr Signal 1 Rot 2 Grün SDM S51R Grün Grünsignal mit Sync SDM S71R S81R 3 Blau 4 ID Masse 5 DDC Masse 6 Masse Rot 7 Masse Grün 8 Masse Blau 9 DDC ...

Page 47: ...Sie darauf den Stecker des Videosignalkabels korrekt am HD15 Anschluß auszurichten damit die Stifte am Stecker des Videosignalkabels nicht verbogen werden x Anschließen an einen IBM PC AT oder kompatiblen Computer x Anschließen an einen Macintosh oder kompatiblen Computer Wenn Sie diesen Monitor an einen Macintosh anschließen wollen verwenden Sie gegebenenfalls einen Macintosh Adapter nicht mitgel...

Page 48: ...Um die hintere Abdeckung richtig schließen zu können bündeln Sie die Kabel wie in der Abbildung dargestellt 3 Schließen Sie die hintere Abdeckung Bündeln der Kabel Mit der mitgelieferten Kabelklemme können Sie die Kabel problemlos bündeln OPEN an Netzsteckdose Netzkabel mitgeliefert an AC IN Diese Abbildung der Monitorrückseite zeigt das Modell SDM S51R Dasselbe gilt für das Modell SDM S71R S81R K...

Page 49: ...reiber werden nicht benötigt Dieser Monitor entspricht dem Plug and Play Standard DDC so daß alle Daten des Monitors automatisch erkannt werden Daher muß kein spezifischer Treiber auf dem Computer installiert werden Wenn Sie den Monitor an den Computer anschließen und diesen dann zum ersten Mal starten wird möglicherweise der Hardware Assistent auf dem Bildschirm angezeigt Gehen Sie in diesem Fall...

Page 50: ... Menü PITCH stellen Sie den Pitch ein wenn die Zeichenoder Bilder in bestimmten Bildschirmbereichen verschwommen erscheinen 3 BILDLAGE H Seite 12 Im Menü BILDLAGE H können Sie die horizontale Position des Bildes einstellen MENU 3 0 EX I T PHAS E 3 0 EX I T PHAS E 1344 EX I T P I TCH 5 0 EX I T H B I LDLAGE 4 BILDLAGE V Seite 12 Im Menü BILDLAGE V können Sie die vertikale Position des Bildes einste...

Page 51: ... erscheint auf dem Bildschirm Anzeigen des aktuellen Eingangssignals Die Horizontal und die Vertikalfrequenz des aktuellen Eingangssignals werden in den Menüs KONTRAST und HELLIGKEIT angezeigt 2 Stellen Sie den Kontrast mit den Tasten M m ein Das Menü wird etwa 5 Sekunden nach dem Einstellen des Kontrasts automatisch ausgeblendet Einstellen des Schwarzwerts für das Bild HELLIGKEIT Die Helligkeit w...

Page 52: ...reifen verschwinden 7 Drücken Sie die Taste OK Das Hauptmenü erscheint auf dem Bildschirm Wenn auf dem gesamten Bildschirm horizontale Streifen zu sehen sind stellen Sie im nächsten Schritt die Phase ein 8 Wählen Sie mit den Tasten M m die Option PHASE und drücken Sie dann OK Das Menü PHASE erscheint auf dem Bildschirm 9 Reduzieren Sie mit den Tasten M m die horizontalen Streifen auf ein Minimum S...

Page 53: ...n und drücken Sie dann OK Bei dieser Einstellung wird die Farbtemperatur verändert indem die Rot oder die Blaukomponente im Vergleich zur Grünkomponente G verstärkt oder abgeschwächt wird Die Grünkomponente bleibt dabei unverändert Wenn Sie die Farbtemperatur feineinstellen werden die neuen Farbeinstellungen die Sie unter BENUTZEREINST vorgenommen haben gespeichert und automatisch abgerufen wenn S...

Page 54: ...en Sie können folgende weitere Optionen einstellen HINTERGRUNDBEL STROMSPARMODUS LANGUAGE TASTATUR SPERRE 1 Drücken Sie die Taste MENU Das Hauptmenü erscheint auf dem Bildschirm 2 Halten Sie die Taste m gedrückt bis das Symbol der gewünschten Option erscheint 3 Wählen Sie mit den Tasten M m die gewünschte Option und drücken Sie dann OK Stellen Sie die ausgewählte Option dann anhand der folgenden A...

Page 55: ...ie Einstellung EIN Jetzt können Sie nur noch den Netzschalter 1 sowie TASTATUR SPERRE im Optionsmenü benutzen Wenn Sie ein anderes Bedienelement betätigen oder ein anderes Menü auswählen erscheint das Symbol auf dem Bildschirm So heben Sie die Sperrung der Bedienelemente und Menüs wieder auf Gehen Sie wie oben erläutert vor und setzen Sie TASTATUR SPERRE auf AUS ...

Page 56: ...e und Pitch fest die bei einem beliebigen Timing innerhalb des für den Monitor gültigen Frequenzbereichs für ein scharfes Bild nötig sind horizontal 28 61 kHz SDM S51R 28 80 kHz SDM S71R S81R vertikal 48 75 Hz Wenn der Monitor zum ersten Mal Eingangssignale empfängt die nicht einem der werkseitig voreingestellten Modi entsprechen dauert es daher in der Regel länger als im Normalfall bis ein Bild a...

Page 57: ...ngssignals an Wenn AUFLÖSUNG XGA auf dem Bildschirm erscheint SDM S51R Diese Meldung gibt an daß der Monitor die Auflösung nicht unterstützt Wenn AUFLÖSUNG SXGA auf dem Bildschirm erscheint SDM S71R S81R Diese Meldung gibt an daß der Monitor die Auflösung nicht unterstützt Wenn KEIN EING SIGNAL auf dem Bildschirm erscheint Diese Meldung gibt an daß kein Signal eingespeist wird IN STROMSPARMODUS Et...

Page 58: ...orrekt angeschlossen ist und alle Stecker fest in den Buchsen sitzen Seite 7 Achten Sie darauf daß am Videoeingangsanschluß keine Stifte verbogen oder eingedrückt sind xDurch den angeschlossenen Computer oder andere Geräte verursachte Probleme Der Computer befindet sich im Stromsparmodus Drücken Sie eine beliebige Taste auf der Computer Tastatur oder bewegen Sie die Maus Überprüfen Sie ob die Graf...

Page 59: ...geschlossenen Computer oder andere Geräte verursachte Probleme Stellen Sie die Auflösung am Computer auf XGA 1024 768 ein SDM S51R Stellen Sie die Auflösung am Computer auf SXGA 1280 1024 ein SDM S71R S81R Doppelbilder sind zu sehen Verwenden Sie keine Bildschirmverlängerungskabel und oder Videoschaltboxen wenn dieses Phänomen auftritt Überprüfen Sie ob alle Stecker fest in den jeweiligen Buchsen ...

Page 60: ...ließen Sie die Videoeingangskabel wieder an und überprüfen Sie den Zustand des der Computer s Wenn die Farbbalken nicht erscheinen liegt möglicherweise ein Fehler am Monitor vor Wenden Sie sich mit der Beschreibung des Problems an einen autorisierten Sony Händler Wenn die Netzanzeige 1 orange blinkt Schalten Sie den Monitor am Netzschalter 1 aus und dann wieder ein Wenn die Netzanzeige 1 jetzt grü...

Page 61: ... Zeilen Eingangssignalpegel RGB Videosignal 0 7 Vp p 75 Ohm positiv SYNC Signal TTL Pegel 2 2 kOhm positiv oder negativ separates horizontales und vertikales Signal oder zusammengesetztes Synchronisationssignal 0 3 Vp p 75 Ohm negativ Grünsignal mit Sync Betriebsspannung 100 bis 240 V 50 60 Hz bis zu 1 0 A Leistungsaufnahme bis zu 45 W SDM S71R bis zu 55 W SDM S81R Betriebstemperatur 5 35 C Abmess...

Page 62: ......

Page 63: ...pantalla al ordenador 7 Paso 2 Conexión del cable de alimentación 8 Paso 3 Fijación de los cables y cierre de la cubierta posterior 8 Paso 4 Encendido del monitor y el ordenador 9 Ajuste de la inclinación 9 Personalización del monitor 10 Navegación por el menú 10 Ajuste del contraste CONTRASTE 11 Ajuste del nivel de negro de la imagen BRILLO 11 Eliminación del parpadeo o de la borrosidad de la ima...

Page 64: ...entualmente El panel LCD se calienta durante el funcionamiento Esto no es un fallo de funcionamiento Nota sobre la pantalla LCD Pantalla de cristal líquido Tenga en cuenta que la pantalla LCD está fabricada con tecnología de alta precisión No obstante pueden aparecer de forma constante en la misma puntos negros o brillantes de luz rojos azules o verdes y ocasionalmente brillos o rayas de color irr...

Page 65: ...nú principal 3 Botón 6 contraste página 11 Este botón muestra el menú CONTRASTE 4 Botón 8 brillo página 11 Este botón muestra el menú BRILLO 5 Botones M m página 11 Estos botones funcionan como los botones M m al seleccionar los elementos de menú y realizar ajustes 6 Botón OK página 11 Este botón selecciona el elemento o ejecuta los ajustes del menú 7 Orificio de bloqueo de seguridad El orificio d...

Page 66: ... es un estándar de VESA qa Portacables página 8 Esta pieza fija los cables al monitor OPEN SDM S51R SDM S71R S81R Abra la cubierta posterior Terminal nº Señal 1 Roja 2 Verde SDM S51R Verde Sincronización en verde SDM S71R S81R 3 Azul 4 Identificación Masa 5 Masa DDC 6 Masa roja 7 Masa verde 8 Masa azul 9 DDC 5V 10 Masa 11 Identificación Masa 12 Datos bidireccionales SDA 13 Sincronización H 14 Sinc...

Page 67: ...drían doblarse Compruebe la alineación del conector HD15 para evitar que se doblen los terminales del conector del cable de señal de vídeo x Conexión de un ordenador IBM PC AT o compatible x Conexión de un ordenador Macintosh o compatible Cuando connecte este monitor a un ordenador Macintosh utilice el adaptor Macintosh no suministrado en caso de ser necesario Conecte el adaptador Macintosh al ord...

Page 68: ...ierta trasera sujete los cables como se muestra en la ilustración 3 Cierre la cubierta trasera Agrupe los cables Puede agrupar los cables mediante el clip de cables suministrado OPEN a una toma de corriente Cable de alimentación suministrado a AC IN Esta ilustración de la parte posterior del monitor corresponde al modelo SDM S51R También se aplica al modelo SDM S71R S81R Portacables Las ilustracio...

Page 69: ...oblemas y soluciones en la página 18 No es necesario instalar controladores específicos El monitor cumple con el estándar Plug Play DDC y detecta automáticamente toda la información de dicho monitor No es preciso instalar ningún controlador específico en el ordenador La primera vez que encienda el ordenador después de conectar el monitor es posible que aparezca el asistente de instalación en panta...

Page 70: ...pués de ajustar el paso 2 ANCHO página 12 Seleccione el menú ANCHO para ajustar el paso si los caracteres o las imágenes no aparecen nítidamente en algunas partes de la pantalla 3 CENTRADO H página 12 Seleccione el menú CENTRADO H para ajustar el centrado horizontal de la imagen MENU 3 0 EX I T FASE 3 0 EX I T FASE 1344 EX I T ANCHO 5 0 EX I T CENTRADO H 4 CENTRADO V página 12 Seleccione el menú C...

Page 71: ...ASTE aparecerá en pantalla Visualización de la señal de entrada actual Las frecuencias horizontal y vertical de la señal de entrada actual aparecen en el menú CONTRASTE y BRILLO 2 Pulse los botones M m para ajustar el contraste El menú desaparece automáticamente unos 5 segundos después de ajustar el contraste Ajuste del nivel de negro de la imagen BRILLO El ajuste de brillo se realiza mediante un ...

Page 72: ... de forma que las rayas verticales desaparezcan 7 Pulse el botón OK El menú principal aparecerá en pantalla Si se observan rayas horizontales en toda la pantalla ajuste la fase como el paso siguiente 8 Pulse los botones M m para seleccionar FASE y pulse el botón OK El menú FASE aparecerá en pantalla 9 Pulse los botones M m hasta que las rayas horizontales sean mínimas Realice el ajuste de forma qu...

Page 73: ...s M m para ajustar la temperatura del color y pulse el botón OK Puesto que este ajuste cambia la temperatura del color aumentando o disminuyendo los componentes R rojo y A azul con respecto a V verde el componente V será fijo Si ajusta con precisión la temperatura del color el nuevo ajuste de color se almacenará en la memoria de AJUSTE USUARIO y se recuperará automáticamente siempre que se selecci...

Page 74: ...es Es posible ajustar las siguientes opciones RETROILUMIN AHORRO ENERGÍA LANGUAGE BLOQ DE AJUSTES 1 Pulse el botón MENU El menú principal aparecerá en pantalla 2 Mantenga pulsado el botón m hasta que aparezca el icono de la opción que desee 3 Pulse los botones M m para seleccionar el elemento de opción deseado y pulse el botón OK Ajuste el elemento de opción seleccionado según las siguientes instr...

Page 75: ... pulse el botón OK Después pulse los botones M m y seleccione SI Sólo funcionarán el interruptor 1 alimentación y BLOQ DE AJUSTES del menú opción Si se selecciona algún otro elemento la marca aparecerá en pantalla Para cancelar el bloqueo del menú Repita el procedimiento anterior y ajuste BLOQ DE AJUSTES en NO ...

Page 76: ...alla de imágenes nítidas para cualquier sincronización dentro del margen de frecuencias del monitor horizontal 28 61 kHz SDM S51R 28 80 kHz SDM S71R S81R vertical 48 75 Hz Como consecuencia la primera vez que el monitor reciba señales de entrada que no coincidan con ninguno de los modos predefinidos en fábrica dicho monitor podrá tardar más tiempo del normal en mostrar la imagen en pantalla Estos ...

Page 77: ...aparece RESOLUCIÓN XGA SDM S51R Esto indica que la resolución no cumple las especificaciones del monitor Si aparece RESOLUCIÓN SXGA SDM S71R S81R Esto indica que la resolución no cumple las especificaciones del monitor Si NO SEÑAL aparece en pantalla Esto indica que no se introduce ninguna señal IR A AHORRO ENERGÍA El monitor entrará en el modo de ahorro de energía transcurridos unos 5 segundos de...

Page 78: ...orro de energía Pulse cualquier tecla del teclado o mueva el ratón Compruebe que la tarjeta gráfica está correctamente instalada en el ordenador Compruebe que la alimentación del ordenador está activada Si FUERA DE RANGO EXPLORACION aparece en pantalla xProblemas causados por el ordenador u otro equipo conectado Compruebe que el rango de frecuencia de vídeo se encuentra dentro del especificado par...

Page 79: ...ceptáculos La imagen no está centrada o su tamaño no es correcto Ajuste el paso y la fase página 12 Ajuste la posición de la imagen página 12 Tenga en cuenta que algunos modos de vídeo no llenan la pantalla hasta los bordes La imagen es demasiado pequeña xProblemas causados por el ordenador u otro equipo conectado Ajuste la resolución del ordenador en la de la pantalla La imagen es oscura Ajuste e...

Page 80: ...ctamente Vuelva a conectar los cables de entrada de vídeo y compruebe el estado del ordenador Si las barras de color no aparecen significa que existe un fallo potencial del monitor Informe a un proveedor Sony autorizado sobre el estado del monitor Si el indicador 1 alimentación parpadea en naranja Pulse el interruptor 1 alimentación dos veces para apagar el monitor y volver a encenderlo Si el indi...

Page 81: ...cal Máx 1024 líneas Niveles de señal de entrada Señal de vídeo RVA 0 7 Vp p 75 Ω positiva Señal SYNC Nivel TTL 2 2 kΩ positiva o negativa Horizontal y vertical independiente o sincronización compuesta 0 3 Vp p 75Ω negativa Sincronización en verde Requisitos de alimentación 100 240 V 50 60 Hz Máx 1 0 A EConsumo de energía Máx 45 W SDM S71R Máx 55 W SDM S81R Temperatura de funcionamiento 5 35 C Dime...

Page 82: ......

Page 83: ... Punto 2 Collegamento del cavo di alimentazione 8 Punto 3 Fissare cavi e fili e chiudere il coperchio posteriore 8 Punto 4 Accensione del monitor e del computer 9 Regolazione dell inclinazione 9 Personalizzazione del monitor 10 Come spostarsi all interno del menu 10 Regolazione del contrasto CONTRASTO 11 Regolazione del livello del nero di un immagine LUMINOSITA 11 Eliminazione dello sfarfallio e ...

Page 84: ...er un periodo prolungato potrebbe apparire momentaneamente un immagine residua che sparirà in poco tempo Durante il funzionamento il pannello LCD si scalda Ciò non indica un problema di funzionamento Nota sullo schermo LCD display a cristalli liquidi Nonostante lo schermo LCD sia stato costruito seguendo una tecnologia ad alta precisione è possibile che presenti costantemente piccoli punti neri o ...

Page 85: ...tilizzare questo tasto per visualizzare il menu CONTRASTO 4 Tasto 8 luminosità pagina 11 Utilizzare questo tasto per visualizzare il menu LUMINOSITA 5 Tasti M m pagina 11 Questi tasti dispongono della stessa funzione dei tasti M m durante la selezione delle voci di menu e durante l effettuazione delle regolazioni 6 Tasto OK pagina 11 Utilizzare questo tasto per selezionare una voce o per eseguire ...

Page 86: ...lay Data Channel è uno standard di VESA qa Fermacavo pagina 8 Utilizzare questo accessorio per fissare cavi e fili all apparecchio OPEN SDM S51R SDM S71R S81R Aprire il coperchio posteriore Questa illustrazione si riferisce alla parte posteriore del monitor SDM S71R Piedino N Segnale 1 Rosso 2 Verde SDM S51R Verde sincronismo su verde SDM S71R S81R 3 Blu 4 ID Terra 5 Terra DDC 6 Terra rosso 7 Terr...

Page 87: ... piegarli Controllare l allineamento del connettore HD15 onde evitare il piegamento dei piedini del connettore del cavo del segnale video x Collegamento ad un computer IBM PC AT o compatibile x Collegamento ad un Macintosh o ad un computer compatibile Se il presente monitor viene collegato ad un computer Macintosh utilizzare l adattatore Macintosh non in dotazione se necessario Prima di procedere ...

Page 88: ...hio posteriore avvolgere i cavi e i fili come illustrato 3 Chiudere il coperchio posteriore Avvolgere cavi e fili È possibile fissare i cavi utilizzando il fermaglio per cavi in dotazione OPEN ad una presa di rete cavo di alimentazione in dotazione a AC IN Questa illustrazione si riferisce alla parte posteriore del monitor SDM S51R Lo stesso vale per il modello SDM S71R S81R Illustrazioni relative...

Page 89: ...gi a schermo vedere Sintomi e soluzioni dei problemi a pagina 18 Non sono richiesti driver specifici Il monitor supporta lo standard Plug Play DDC e rileva automaticamente tutte le informazioni video Non è richiesta l installazione di driver specifici sul computer Alla prima accensione del computer dopo il collegamento del monitor è possibile che venga visualizzata la procedura guidata di configur...

Page 90: ...REGOLAZ PIXEL per regolare i pixel se i caratteri o le immagini non vengono visualizzatiinmodochiaro in alcune parti dello schermo MENU 3 0 EX I T FASE 3 0 EX I T FASE 1344 EX I T REGO LA Z P I XE L 3 CENTRATURA ORIZ pagina 12 Selezionare il menu CENTRATURA ORIZ per regolare la centratura orizzontale dell immagine 4 CENTRATURA VERT pagina 12 Selezionare il menu CENTRATURA VERT per regolare la cent...

Page 91: ... di ingresso corrente Le frequenze verticale e orizzontale del segnale di ingresso corrente vengono visualizzate nel menu CONTRASTO e LUMINOSITA 2 Per regolare il contrasto premere i tasti M m Il menu scompare automaticamente circa 5 secondi dopo aver effettuato la regolazione del contrasto Regolazione del livello del nero di un immagine LUMINOSITA La regolazione della luminosità viene effettuata ...

Page 92: ...emere il tasto OK Sullo schermo appare il menu principale Se sull intero schermo sono presenti delle strisce orizzontali come procedimento successivo regolare la fase 8 Premere i tasti M m per selezionare FASE quindi premere il tasto OK Sullo schermo appare il menu FASE 9 Premere i tasti M m finché le strisce orizzontali non vengono ridotte al minimo Regolare in modo che le strisce orizzontali ven...

Page 93: ... OK infine premere i tasti M m per regolare la temperatura di colore quindi premere il tasto OK Poiché questa impostazione modifica la temperatura di colore aumentando o diminuendo i componenti R e B rispetto a V verde quest ultimo componente è fisso Se si effettua la sintonia fine della temperatura di colore la nuova impostazione del colore viene memorizzata come REGOLAZ UTENTE e richiamata autom...

Page 94: ...u Impostazioni aggiuntive È possibile regolare le seguenti opzioni RETROILLUMINAZ RISPARMIO ENER LANGUAGE BLOCCO MENU 1 Premere il tasto MENU Sullo schermo appare il menu principale 2 Tenere premuto il tasto m finché non viene visualizzata l icona relativa all opzione desiderata 3 Premere i tasti M m per selezionare l opzione desiderata quindi premere il tasto OK Regolare l opzione selezionata in ...

Page 95: ...i premere i tasti M m e selezionare SI Solo l interruttore 1 alimentazione e BLOCCO MENU del menu opzioni possono essere utilizzati Qualsiasi altra voce venga selezionata sullo schermo appare il simbolo Per annullare la funzione di bloccaggio dei menu Ripetere la procedura descritta sopra quindi impostare BLOCCO MENU su NO ...

Page 96: ...ra entro la gamma di frequenza del monitor orizzontale tra 28 e 61 kHz SDM S51R tra 28 e 80 kHz SDM S71R S81R verticale tra 48 e 75 Hz Di conseguenza la prima volta che vengono immessi segnali di ingresso che non corrispondono ad alcuno dei modi preimpostati in fabbrica è possibile che il monitor impieghi più tempo del solito per visualizzare l immagine Questi dati di regolazione vengono memorizza...

Page 97: ...sualizzato RISOLUZIONE XGA SDM S51R Significa che la risoluzione non è supportata dalle caratteristiche tecniche del monitor Se viene visualizzato RISOLUZIONE SXGA SDM S71R S81R Significa che la risoluzione non è supportata dalle caratteristiche tecniche del monitor Se sullo schermo appare il messaggio NO SEGNALE INGR Significa che non è stato immesso alcun segnale oppure che non VAI A RISPARMIO E...

Page 98: ... premendo un tasto qualsiasi della tastiera o muovendo il mouse Controllare che la scheda grafica sia collegata correttamente al computer Controllare che il computer sia acceso Se sullo schermo appare il messaggio FUORI GAMMA SCANS xProblemi causati dal computer o da altri apparecchi collegati Controllare che la gamma di frequenza video rientri in quella specificata per il monitor Se con questo mo...

Page 99: ...n è delle dimensioni corrette Regolare i pixel e la fase pagina 12 Regolare la posizione dell immagine pagina 12 Si noti che alcuni modi video non riempiono lo schermo fino ai bordi L immagine è troppo piccola xProblemi causati da un altro computer o un altro apparecchio collegato Impostare la risoluzione del computer su quella di visualizzazione L immagine è scura Regolare la luminosità pagina 11...

Page 100: ...ona correttamente Collegare di nuovo i cavi di ingresso video e controllare le condizioni del i computer Se le barre di colore non vengono visualizzate si tratta di un potenziale guasto al monitor Informare un rivenditore Sony autorizzato sulle condizioni del monitor Se l indicatore 1 alimentazione lampeggia in arancio Premere due volte l interruttore 1 alimentazione per spegnere e riaccendere il ...

Page 101: ... massimo 1280 punti Verticale massimo 1024 linee Livelli dei segnali di ingresso Segnale video RVB 0 7 Vp p 75 Ω positivo Segnale SYNC Livello TTL 2 2 kΩ positivo o negativo Sincronismo orizzontale e verticale separato oppure composito 0 3 Vp p 75 Ω negativo Sincronismo su verde Requisiti di alimentazione 100 240 V 50 60 Hz massimo 1 0 A Consumo energetico massimo 45 W SDM S71R massimo 55 W SDM S8...

Page 102: ...ergonomics and good usability Below you will find a brief summary of the environmental requirements met by this product The complete environmental criteria document may be ordered from TCO Development SE 114 94 Stockholm Sweden Fax 46 8 782 92 07 Email Internet development tco se Current information regarding TCO 99 approved and labelled products may also be obtained via the Internet using the add...

Page 103: ... visual ergonomics and good usability On this page you will find a brief summary of the environmental requirements met by this product The complete environmental criteria document may be ordered from TCO Development Unit S 114 94 Stockholm Sweden Fax 46 8 782 92 07 Email Internet development tco se Current information regarding TCO 95 approved and labelled products may also be obtained via the Int...

Page 104: ...iii Sony Corporation Printed in Korea ...

Reviews: