background image

Additional Information

32

   Additional Information

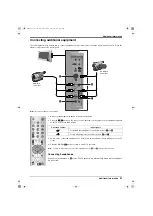
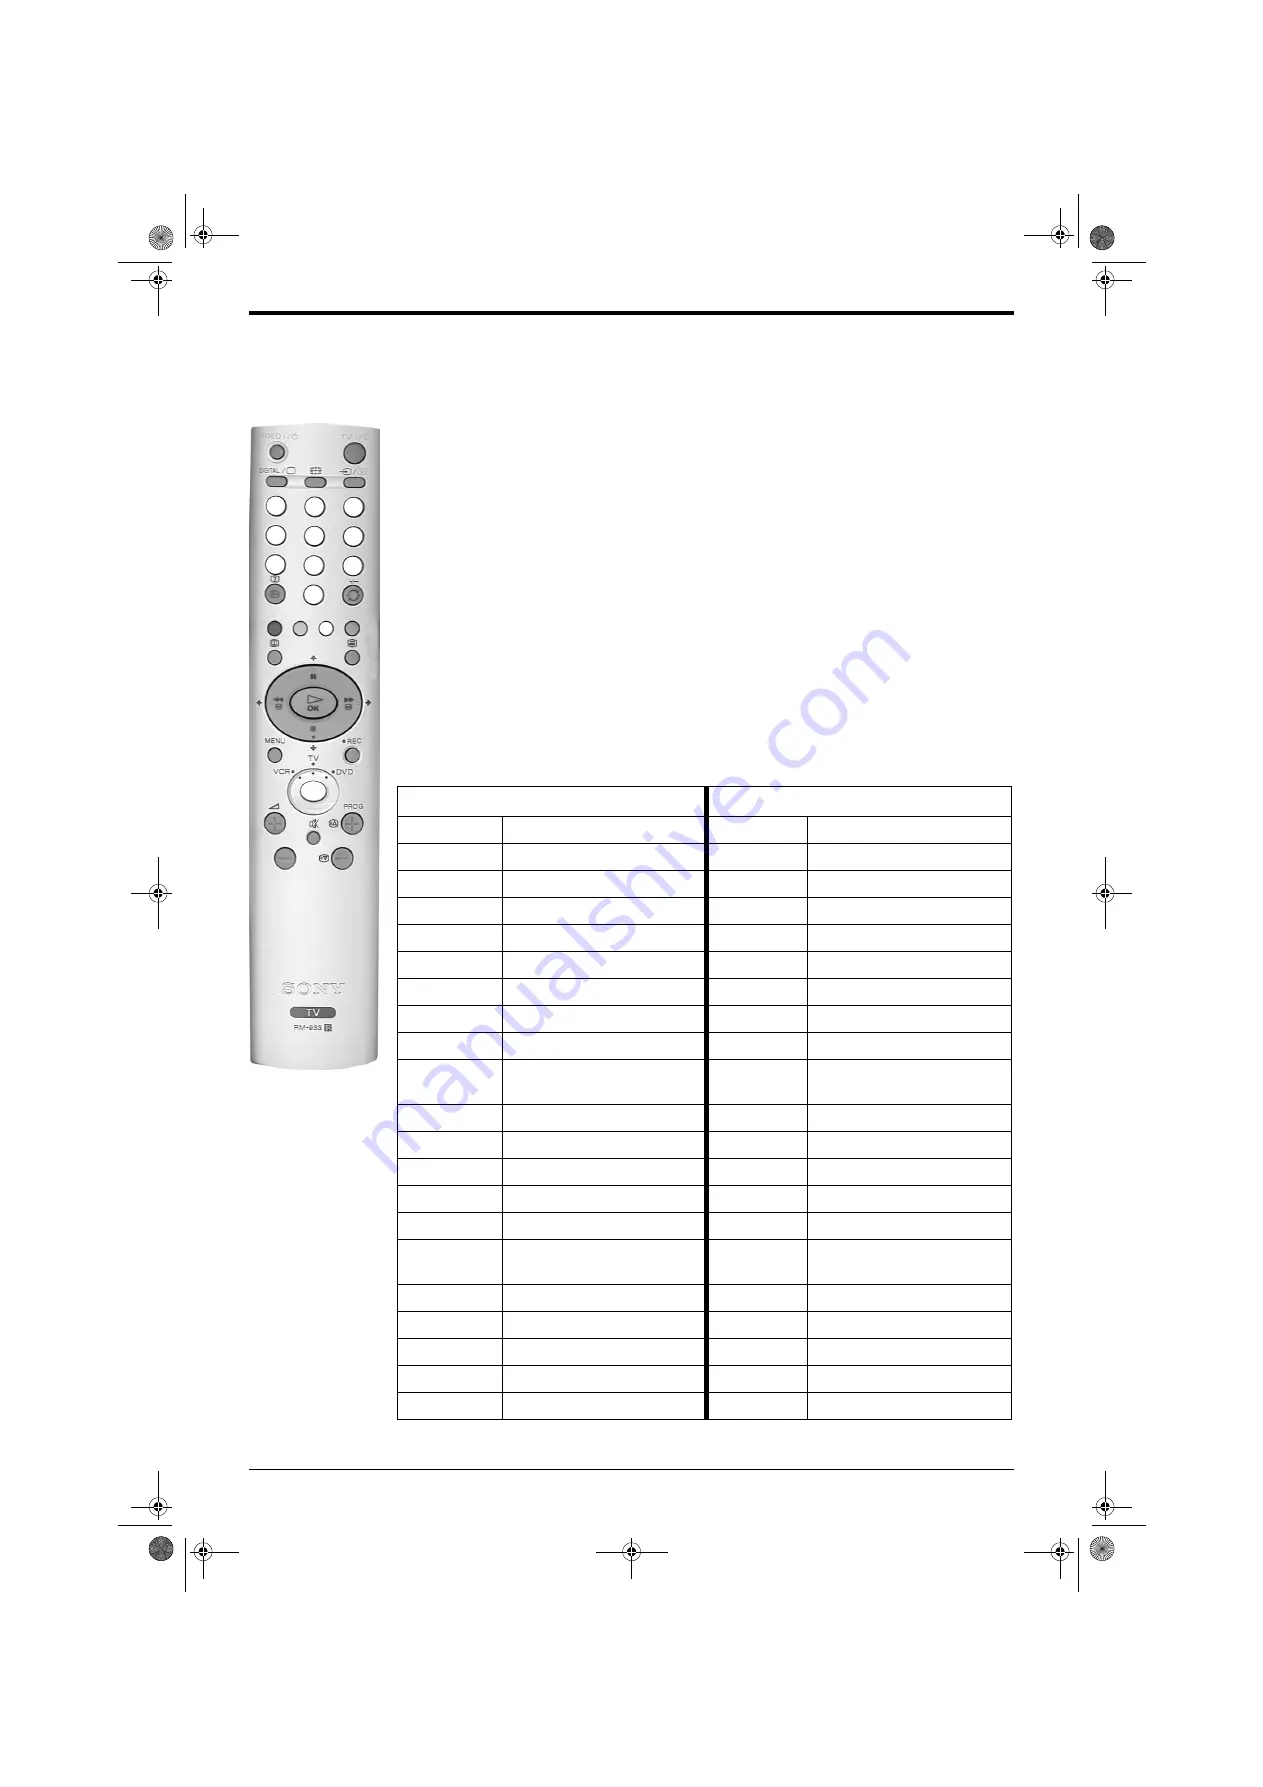
Remote control of connected equipment

This remote control can operate not only Sony DVDs and VCRs, but also those made by other
manufacturers. The following instructions will guide you through the set up procedure.

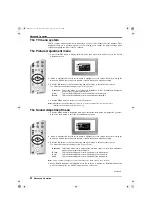
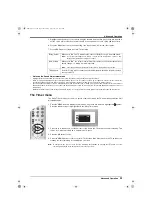
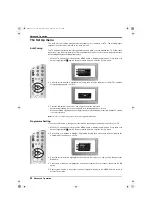
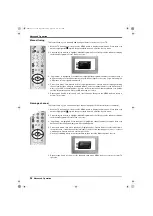
1. Find the 3 digit code for your brand from the list below. 

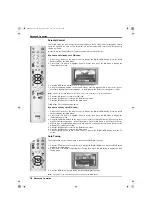
2. Press the Media Select button on the remote control until either the green VCR light is illuminated

OR

 the green DVD light is illuminated.

3. Whilst the required green light is illuminated, press and hold down the YELLOW button for

approximately 6 seconds, until the light starts to flash.

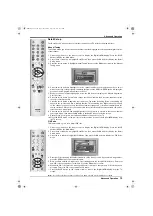
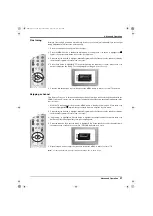
4. Use the numbered buttons to enter the 3 digit code for your DVD or VCR. Once a correct number has

been entered, all three green lights will illuminate momentarily.

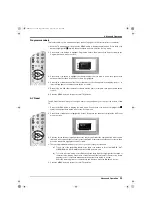
5. Turn on your DVD or VCR and check that the remote control operates the main functions. If not,

repeat steps 2 - 4 and enter the next 3 digit code allocated to your brand of VCR or DVD.

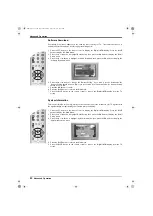
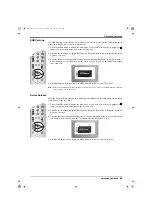
6. When you wish to use the remote control to operate the TV again, press the Media Select button

until the TV green light illuminates. Don’t forget to select VCR or DVD using the Media Select button
every time you wish to operate that equipment with this remote control. 
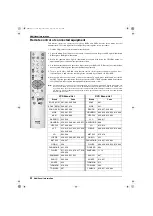
Note:

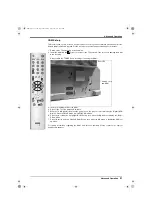
  The brand codes you set may be lost if weak batteries are not replaced immediately. Should this happen, use

the above procedure to re-enter the code. A small label has been attached to the inside of the battery cover
for you to make a note of your brand codes. Not all brands and models of DVDs or VCRs are covered in this
list, however, Sony will endeavour to update the software periodically. Please refer to the code table provided
with your remote control.

VCR Brand List

DVD Brand List

Brand

Code

Brand

Code

SONY (VHS) 301, 302, 303, 309

SONY

001

SONY (BETA) 303, 307, 310

AIWA

021

SONY (DVD) 304, 305, 306

DENON

018, 027, 020, 002

AIWA

325, 331, 351

GRUNDIG

009, 028, 023, 024, 016, 003

AKAI

326, 329, 330

HITACHI

025, 026, 015, 004

DAEWOO

342, 343

JVC

006, 017

GRUNDIG

358, 355, 360, 361, 320, 351

KENWOOD

008

HITACHI

327, 333, 334

LG

015, 014

JVC

314, 315, 322, 344, 352, 353,
354, 348, 349

LOEWE

009, 028, 023, 024, 016, 003

LG

332, 338

MATSUI

013, 016

LOEWE

358, 355, 360, 361, 320, 351

ONKYO

022

MATSUI

356, 357

PANASONIC 018, 027, 020, 002

ORION

328

PHILIPS

009, 028, 023, 024, 016, 003

PANASONIC 321, 323

PIONEER

004

PHILIPS

311, 312, 313, 316, 317, 318,
358, 359

SAMSUNG

11, 14

SAMSUNG

339, 340, 341, 345

SANYO

007

SANYO

335, 336

SHARP

019, 027

SHARP

324

THOMSON

012

THOMSON

319, 350

TOSHIBA

003

TOSHIBA

337

YAMAHA

018, 027, 020, 002

VIDEO

/

TV

/

DIGITAL

1

2

3

6

5

4

7

8

9

0

DX40 Pages 31-36.fm  Page 32  Wednesday, August 22, 2001  12:10 PM

Summary of Contents for Trinitron KD-28DX40U

Page 1: ...R 4 206 297 12 Trinitron Digital TV Operating Instructions GB KD 28DX40U KD 32DX40U 2001 by Sony Corporation Printed in UK 420629712 DX40 Cover fm Page 1 Wednesday August 22 2001 12 06 PM ...

Page 2: ...in accordance with the following instructions The wires in this mains lead are coloured in accordance with the following code Blue Neutral Brown Live As the colours of the wires in the mains lead of this apparatus may not correspond with the coloured markings identifying the terminals in your plug proceed as follows The wire which is coloured blue must be connected to the terminal which is marked ...

Page 3: ... strap 1 Disconnect the securing strap completely please refer to the instructions supplied with the stand NEVER attempt to move the TV or stand with the securing strap in place 2 Move the TV to a strong flat surface Take care not to trap your fingers 3 Move the stand to it s new location 4 Return the TV to the stand 5 Replace the securing strap DX40 Pages 1 10 fm Page 1 Wednesday August 22 2001 1...

Page 4: ...und the set Never place the TV in hot humid or excessively dusty places Do not install the TV where it may be exposed to mechanical vibrations Clean the TV with a soft lightly dampened cloth Do not use benzine thinner or any other chemicals to clean the TV Do not scratch the TV screen As a safety precaution unplug the TV before cleaning it Pull out the power lead by the plug Do not pull on the pow...

Page 5: ...teries into the remote control 4 Connecting an aerial and a VCR 5 Switching on the TV 5 Automatically tuning the TV 6 Watching a pre recorded video tape 6 Basic Operation Overview of the remote control 7 Overview of the TV buttons 8 Selecting Digital or analogue mode 9 The Programme Index table 9 The Channel Index menu 9 Watching Widescreen programmes 11 Viewing Digital Teletext 12 Teletext Analog...

Page 6: ...ies supplied Batteries Remote control RF Loopthrough cable 2 Inserting batteries into the remote control 1 2 3 Always remember to observe the correct polarity when inserting batteries dispose of batteries in an environmentally friendly way VIDEO TV DIGITAL DX40 Pages 1 10 fm Page 4 Wednesday August 22 2001 12 06 PM ...

Page 7: ...ect the VCR to the mains socket and switch on 6 Insert a pre recorded tape into the VCR and press the PLAY button This enables the TV set to locate and store the video channel during the Automatically tuning the TV procedure 2 s 4 Switching on the TV On Off button 1 Connect the TV plug to your mains socket 220 240V AC 50 Hz and switch on 2 Push in the On Off button on the front of the TV If the re...

Page 8: ...he V or v buttons on the remote control to highlight Not necessary and press the OK button b If some correction is required press the V or v buttons on the remote control to highlight Adjust now then press the OK button Correct the slant by pressing the V or v buttons then press the OK button to store Not necessary If picture slants please adjust picture rotation Adjust now OK OK Auto T uning Prog...

Page 9: ...TV button Press to switch off your TV temporarily The red standby mode indicator on the front of the TV is lit Press again to return to normal operation Video Input Hold button In TV Mode Press to select signals from equipment connected to the TV sockets refer to Connecting additional equipment In Teletext Mode Press to hold the current page Press again to cancel Previous channel button Press to r...

Page 10: ... D D D s P Auto tune button Press to start the automatic tuning process Note Take care this will totally retune the TV Programme Up or Down buttons Press to display the next or previous channel Volume control buttons Press to increase or decrease the volume Video input button Press to select signals from equipment connected to the TV sockets refer to Connecting additional equipment DX40 Pages 1 10...

Page 11: ...nnel Index menu is only available in Digital mode 1 Press the OK button on the remote control to display the Channel Index menu on the TV screen The menu contains a list of all the available channels The name of the programme currently being shown along with its start and finish times is shown for each of the available channels The current channel is previewed in the top right corner of the screen...

Page 12: ...ress the OK button The Channel Index menu will now contain only programmes of the type selected The following categories are available Favourite Contains all the programmes you have stored as a favourite see below Choice The TV will create this list based on the type of programmes you watch the most Recent Prog Contains the last 5 programmes watched All Categories Contains all available channels S...

Page 13: ... For 16 9 broadcasts Imitation of wide screen effect for 4 3 broadcasts This TV can automatically detect the type of screen format being transmitted by the broadcaster With Auto Format set to On the TV switches to the correct screen format automatically 1 Press the MENU button to display the main menu Use the v or V button to highlight the symbol Press the b button to enter the Set Up menu 2 Auto ...

Page 14: ...e Teletext channel is displayed follow the on screen instructions to access the required information Note On some pages the TV programme is also displayed Instructions on screen will tell you how to change the displayed programme 3 If when viewing the Teletext pages you are requested to select OK or Cancel press the OK button for OK and the button for Cancel 4 When you have finished viewing Telete...

Page 15: ...ired 4 Press the DIGITAL button to exit Teletext How to use Teletext features Feature How to use Hold Some pages contain sub pages which follow on automatically This feature allows you hold the current page until you are ready to proceed Press the button to hold the page currently being displayed Press again to cancel Reveal Some Teletext pages contain hidden information e g for a quiz Press the b...

Page 16: ...t a programme from the 5 channels listed press the GREEN button to display the next 5 channels or RED button to display the previous 5 channels 3 If a programme you highlight is currently being broadcast press the OK button to obtain a preview in the preview window If you have previously set a viewing age limit in the Digital Setting menu and the programme exceeds that age limit you will be asked ...

Page 17: ...k a message will be displayed reminding you to set your VCR timer Press the RED button to display the Manual Timer Record menu 2 Press the V or v buttons to select the correct date Press the b button to highlight the start time 3 Press the V or v buttons to select the start time Press the b button to highlight the stop time 4 Press the V or v buttons to select the stop time Press the b button to h...

Page 18: ... in multiple languages REC Timer If you highlight a current programme the REC feature allows you to automatically set your VCR to record the selected programme With the Digital INFO display on the TV screen press the YELLOW button to access the REC pop up menu If your VCR does not have Smartlink a message is displayed reminding you to manually set your VCR Press the RED button to continue or press...

Page 19: ...mme you want to register as a favourite press the OK button A tick appears alongside that programme in the display If you wish to cancel your selection press the OK button again 5 Repeat steps 3 and 4 to store other programmes as favourites then press the BLUE button to return to the main menu 6 Press the YELLOW button on the remote control if you wish to delete clear all Favourite settings while ...

Page 20: ...f you have already set a PIN code 1 Press the button on the remote control to display the Digital INFO display Press the BLUE button to display the Main Menu 2 Press the V or v button to highlight Parental Control then press the OK button to display the Parental Control menu 3 Using the numbered buttons on the remote control enter your 4 digit PIN code As you enter each digit it will be represente...

Page 21: ...ocated to the selected channel have been found the service selection screen is displayed 8 Press the V or v button to find and highlight the service you wish to allocate to the channel number selected in Step 4 then press the OK button to display the channel selection screen 9 Repeat Steps 4 to 8 if you wish to manually add more channels to your TV 10 Press the BLUE button on the remote control th...

Page 22: ...ld be set to Off 5 Press the OK button to confirm 6 Press the BLUE button to return to the Main menu 7 Press the BLUE button on the remote control to remove the Digital INFO display from the TV screen System Information This is an information screen only It tells you the current version of the software in your TV together with the signal strength as indicated by the coloured bar in the display 1 P...

Page 23: ... your viewing card into the CAM 4 Connect the TV to the mains and switch on 5 With the TV in Digital mode press the button on the remote control to display the Digital INFO display Press the BLUE button to display the Main Menu 6 Press the V or v button to highlight Detail Set up then press the OK button to display the Detail Set up menu 7 Press the V or v button to highlight CAM Set up then press...

Page 24: ...e Live This is a fixed setting and is recommended for live broadcasts Movie This is a fixed setting and is recommended for watching films The Sound Adjustment menu 1 Press the MENU button to display the main menu then press the v button to highlight the symbol Now press the b button to enter the Sound Adjustment menu 2 Mode is highlighted Press the v or V button to highlight one of the options the...

Page 25: ... if the mono channel is available for selection When receiving a stereo broadcast the Dual Sound option can be set to Stereo or Mono This TV has been designed to create a Virtual Dolby Surround sound effect from a Dolby Pro Logic Surround broadcast without the need for additional speakers However you can connect an external amplifier to this TV if desired see Connecting additional equipment sectio...

Page 26: ... taking place the search and store display appears on screen When all available signals have been captured and stored the display is removed and the TV returns to normal operation Notes You can cancel the tuning at any time by pressing the MENU button Programme Sorting You can use this feature to change the order in which the analogue channels are stored on your TV 1 With the TV in analogue mode p...

Page 27: ...ckets of this TV 1 Press the MENU button to display the main menu Press the v or V button to highlight the symbol then press the b button to enter the Set Up menu 2 Press the v or V buttons to highlight AV Preset then press the b button to display the AV Preset menu on screen 3 Press the v or V buttons to highlight the socket that is connected to the equipment you wish to name AV1 and AV2 represen...

Page 28: ...ps 3 and 4 to select and store other channels then press the MENU button to return to normal TV operation This feature allows you to name an analogue channel using up to 5 characters letters or numbers 1 With the TV in analogue mode press the MENU button to display the main menu Press the v or V button to highlight the symbol then press the b button to enter the Set Up menu 2 Press the v or V butt...

Page 29: ...nalogue channel positions when selecting channels with the PROG buttons However you can still select a skipped channel by using the numbered buttons on the remote control 1 With the TV in analogue mode press the MENU button to display the main menu Press the v or V button to highlight the symbol then press the b button to enter the Set Up menu 2 Press the v or V buttons to highlight Manual Program...

Page 30: ... VCR supports Smartlink this procedure is not necessary 1 Press the MENU button to display the main menu Press the v or V button to highlight the symbol then press the b button to enter the Set Up menu 2 Press the v or V buttons to highlight Detail Set Up then press the b button to display the Detail Set Up menu on screen 3 Press the v button to highlight AV2 Output then after pressing b button to...

Page 31: ... return to normal TV operation Note If there is no equipment attached to the AV1 scart socket on the rear of the TV the RGB Centring option will not be available in the menu system Picture Rotation Due to the Earth s natural magnetism the picture might slant slightly The Picture Rotation feature allows you to cancel out any such effect 1 Press the MENU button to display the main menu Press the v o...

Page 32: ... connected to the socket For Audio Video equipment connected to socket A For S VHS equipment connected to socket A 1 1 2 2 s Connecting a Smartlink VCR Smartlink is a direct link between the TV and VCR For more information on Smartlink please refer your VCR instruction manual Ensure that your Smartlink VCR is connected to the A socket using a fully wired 21 pin Scart lead Connecting to external au...

Page 33: ...emote control until the correct symbol for your equipment appears on the TV screen see table below 3 Switch on the connected equipment The picture from this equipment if any will appear on the TV screen 4 Press the DIGITAL button to return to normal TV operation Note To avoid picture distortion do not connect equipment to the E and G sockets at the same time Connecting headphones Connect your head...

Page 34: ...ipment with this remote control Note The brand codes you set may be lost if weak batteries are not replaced immediately Should this happen use the above procedure to re enter the code A small label has been attached to the inside of the battery cover for you to make a note of your brand codes Not all brands and models of DVDs or VCRs are covered in this list however Sony will endeavour to update t...

Page 35: ...5kg Rear Terminals 21 pin Euro connector CENELEC standard including audio video input RGB input TV audio video output 21 pin Euro connector CENELEC standard including audio video input S video input selectable audio video output Audio outputs phono jacks MODEM Modem connection 1 RF In Digital 2 RF In Analogue RF Out Conditional Access Module CAM socket Concealed Side Terminals Video input phono ja...

Page 36: ...ramme information without picture or sound Fault Volume control TV speakers turned off Wrong external mode selected Colour level setting Plug in the TV Press the button on the front of the TV If the indicator is on press the button or a numbered button on the remote control Check the aerial connection Select on the TV menu system then adjust the brightness picture and colour balance levels Contact...

Page 37: ...ing analogue 26 Digital 19 Media Select button 7 32 Movie mode 22 Moving the TV 1 Naming a programme 26 Noise Reduction 28 O On Off button 5 Overview of remote control 7 of the TV set buttons 8 P Q Parental control 18 Personal mode picture 22 sound 22 Picture Adjustment menu 22 Picture Rotation 29 PIN Code 19 Playstation connecting 30 Plug wiring Inside Cover Front Pop mode 22 Programme Index tabl...

Page 38: ...36 DX40 Pages 31 36 fm Page 36 Wednesday August 22 2001 12 10 PM ...

Page 39: ...DX40 Cover fm Page 3 Wednesday August 22 2001 12 06 PM ...

Page 40: ...this TV should not be lifted by less than two people When lifting always grip the TV as shown below Always assume the correct posture when lifting Take care not to trap your fingers when placing the TV on a flat surface or stand Trinitron 420629712 4 206 297 12 DX40 Cover fm Page 4 Wednesday August 22 2001 12 06 PM ...

Reviews: