background image

– 23 –

KV-T29SN81

RM-870

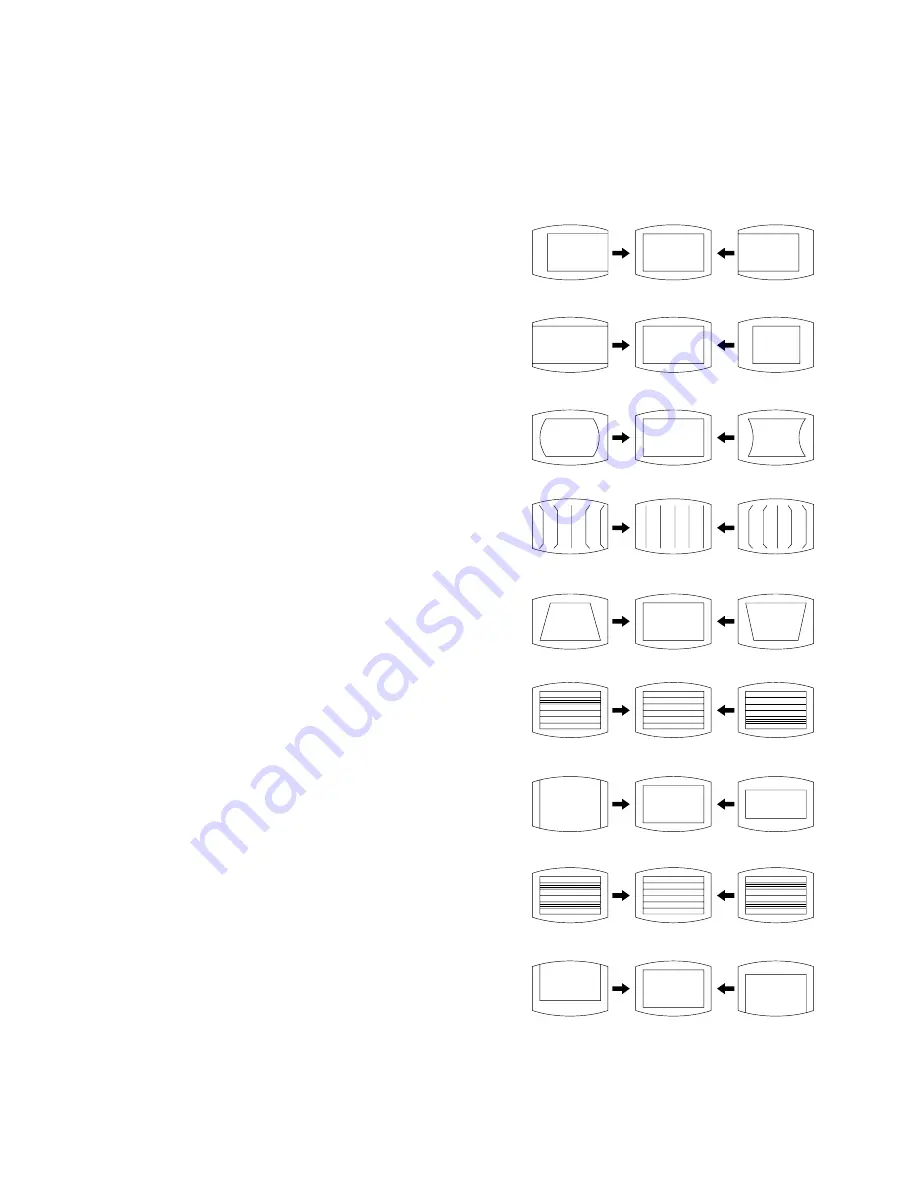
4-4. PICTURE DISTORTION ADJUSTMENT

Item Number 00 – 08

00       HSF (H SHIFT)

01       HSZ (H SIZE)

02       PAP (PIN AMP)

03       CNP (CORNER PIN)

04       TLT (TILT)

05       VSL (V SLOP)

06       VAP (V ANP)

07       SCR (S CORRECTION)

08       VSF (V SHIFT)

00 HSF (H SHIFT)

01 HSZ (H SIZE)

02 PAP (PIN AMPLITUDE)

03 CNP (CORNER PIN)

04 TLT (TILT)

05 VSL (V SLOPE)

06 VAP (V AMPLITUDE)

07 SCR (S CORRECTION)

08 VSF (V SHIFT)

4-3. A BOARD ADJUSTMENT AFTER IC003

(MEMORY) REPLACEMENT

1. Enter to Service Mode.

2. Press commander buttons 

[5]

 and 

[0]

 (Data Initialize), and 

[2]

and 

[0]

 (Data Copy) to initialize the data.

3. Call each item number, and check if the respective screen shows

the normal picture.

In case some items are not well-adjusted, give them fine

adjustment.

Write the data per each item number (

[MUTING]

 + 

[0]

).

4. Select item numbers “49” (OP0), “4A” (OP1) and "4B" (OP2)

respectively set the bit per model with command buttons 

[3]

and 

[6]

.

5. Press commander buttons 

[8]

 and 

[0]

 (Test Normal) to return to

the data that was set on the shipment from the factory.

(= Cancel Service Mode.)

Summary of Contents for TRINITRON KV-T29SN81

Page 1: ...MODEL COMMANDER DEST CHASSIS NO KV T29SN81 RM 870 New Zealand SCC K37E A SERVICE MANUAL MODEL COMMANDER DEST CHASSIS NO CHASSIS TRINITRON COLOR TV BG 1S ...

Page 2: ... IMPROPER OPERATION IS SUSPECTED Note Power requirements 110 240 V AC 50 60 Hz Power consumption W Indicated on the rear of the TV Television system B G Color system PAL PAL 60 NTSC4 43 NTSC3 58 AV IN Stereo Bilingual system NICAM Stereo Bilingual B G A2 Stereo Bilingual German B G Teletext language English German Swedish Italian French Spanish Channel coverage VHF 1 to 11 UHF E21 to E69 CATV S01 ...

Page 3: ...2 Screen and White Balance Adjustments 18 4 CIRCUIT ADJUSTMENTS 4 1 Adjustments with Commander 19 4 2 Adjustment Method 20 4 3 A Board Adjustment after IC003 Memory Replacement 23 4 4 Picture Distortion Adjustment 23 5 DIAGRAMS 5 1 Block Diagram 25 5 2 Circuit Boards Location 29 5 3 Schematic Diagrams and Printed Wiring Boards 1 Schematic Diagram of A Board 33 2 Schematic Diagrams of A3 F and V1 B...

Page 4: ... Flickering is operated by lighting the LED s for 60ss each time The flickering frequency responding to each failed device is shown below All the devices are checked one after another from the left of the table If an error is found the responding LED will start flickering So if more than 1 device have failed only the one on the left side will flicker Device Flickering Frequency NONVOLATILE MEMORY ...

Page 5: ...ECTION 1 GENERAL The operating instructions mentioned here are partial abstracts from the Operating Instructions Manual The page numbers of the Operating Instruction Manual remain as in this manual 2 3 AUTO PROGR AUTO PROGR ...

Page 6: ...black plug to AUDIO L MONO Getting Started 5 Front of TV MONITOR OUT to antenna socket Rear of TV When recording through the MONITOR OUT jacks If you change the channel or video input while recording with a VCR the channel or video input you are recording also will be changed CAUTION Do not connect the power cord until you have completed making all other connections otherwise a minimum leakage cur...

Page 7: ...tically again POWER 1 2 MANUAL PROGR COLOR SYSTEM SELECT TV SYSTEM AUTO PROGR POWER Presetting channels 1 2 3 1 AUTO PROGR POWER 1 2 Presetting channels automatically You can preset up to 80 TV channels in numerical sequence from program position 1 Front of TV 1 Press POWER When the TV is in standby mode after pressing POWER press POWER on the remote commander 2 Press AUTO PROGR To start presettin...

Page 8: ...ay appears and the WAKE UP indicator lights up 2 If you want a particular TV program or video input to be displayed using the Wake Up Timer select the TV program or video mode 3 Press POWER on the remote commander or set the Sleep Timer to turn off the TV in standby mode To cancel the Wake Up Timer press WAKE UP INDEX repeatedly until WAKE UP TIMER OFF appears or turn off the main power of the TV ...

Page 9: ... the Teletext display press TV Superimposing a Teletext page on the TV picture Press TEXT Each time you press TEXT the screen changes as follows z Teletext z Teletext and TV z TV Checking the contents of a Teletext service INDEX Press WAKE UP INDEX to display an overview of the Teletext contents and page numbers Using FASTEXT This feature allows you to quickly access a Teletext page that uses FAST...

Page 10: ...your TV To obtain the normal picture color press POWER on the TV to switch off the TV for five minutes and then switch it on again No picture No sound Press POWER Check the antenna connection Check the VCR connections Check the power cord connection Check the standby mode Good picture No sound Press VOLUME Press MUTING Press A B ENLARGE No color Adjust the COLOR level in the on screen display Chec...

Page 11: ...870 2 1 REAR COVER REMOVAL 2 2 A BOARD REMOVAL 2 3 F1 BOARD REMOVAL SECTION 2 DISASSEMBLY 2 Three screws BVTP 4 16 4 One screw BVTP 3 16 1 Three screws BVTP 4 16 2 4 SERVICE POSITION A board Lever Lever A board F1 board ...

Page 12: ...exchange with the new parts and fix them with screws BVTP respectively 2 5 1 REPLACEMENT OF MULTI BUTTON 2 5 2 REPLACEMENT OF LIGHT GUIDE POWER BUTTON 2 6 DEMAGNETIZATION COIL REMOVAL 3 Demagnetization coil 4 Tension spring Picture tube 2 DGC holder 1 DGC band Remove the claw Two screws BVTP 3 12 Cut Light guide Power button Two screws BVTP 3 12 ...

Page 13: ...mage the surface of anode caps with sharp shaped objects 2 Do not press the rubber too hard so as not to damage the inside of anode caps A metal fitting called the shatter hook terminal is built into the rubber 3 Do not turn the foot of rubber over too hard The shatter hook terminal will stick out or damage the rubber Anode Button 2 A board 4 C board 6 Deflection yoke 5 VM board Cushion 7 Four scr...

Page 14: ...nal with the pattern generator Contrast Brightness 2 Position neck assy as shown in Figure 3 1 3 Set the pattern generator raster signal to green 4 Move the deflection yoke to the rear and adjust with the purity control so that the green is at the center and the blue and the red take up equally sized areas on each side See Figures 3 1 through 3 3 5 Move the deflection yoke forward and adjust so th...

Page 15: ...ed green and blue points are on top of each other at the center of the screen 2 Moving horizontally adjust the H STAT VR magnet so that the red green and blue points are on top of each other at the center of the screen If the V STAT magnet is moved in the direction of the a and b arrows the red green and blue points move as shown below B R B R a b b b a b a b a R G B b B G R b b a a 1 2 3 G G B G ...

Page 16: ...agnet interact so be sure to perform adjustment while tracking BMC Hexapole V STAT Purity Y separation axis correction magnet adjustment 1 Receive the cross hatch signal and adjust PICTURE to MIN and BRIGHTNESS to STANDARD 2 Adjust the Y separation axis correction magnet on the neck assembly so that the horizontal lines at the top and bottom of the screen are straight Blue Red VM board Blue Red VM...

Page 17: ...oke screws 5 Install the deflection yoke spacer 3 Screen corner Convergence a d screen corner misconvergence b a c d 2 Dynamic Convergence Adjustment Preparation Before starting this adjustment adjust the horizontal static convergence and the vertical static convergence 1 Slightly loosen the deflection yoke screws 2 Remove the deflection yoke spacer R G B R G B R G B R G B R G B R G B R G B R G B ...

Page 18: ...e 3 Call the adjusted items again confirm they were adjusted Note Initial DATA 09 RDR 25 WHITE POINT R 0A GDR 20 WHITE POINT G 0B BDR 20 WHITE POINT B 3 4 G2 SCREEN AND WHITE BALANCE ADJUSTMENTS 1 G2 SCREEN ADJUSTMENT RV701 1 Set the PICTURE and BRIGHTNESS to normal 2 Put to VIDEO input mode without signals 3 Connect R G and B of the C board cathode to the oscilloscope 4 Adjust G2 RV701 volume to ...

Page 19: ...ng 7 0 The data all becomes the values in memory 8 0 User control all goes to the standard state 5 0 Service data initialization Be sure not to use usually 2 0 Write 50Hz adjustment data to 60Hz or viceversa The screen display is 1 4 Select the adjustment item 3 6 Raise lower the data MUTING Writes 0 Executes the writing MUTING TEXT VIDEO HOLD TV TEXT CLR SELECT PIC MODE A B ENLARGE WAKE UP INDEX ...

Page 20: ...on The WRITE display returns to green SERVICE Use the same method for Items Number 00 4B Use 1 and 4 to select the adjustment item use 3 and 6 to adjust write with MUTING then execute the write with 0 WRITE WRITE GREEN 0C VSF 08 SERVICE 50 50 50 GREEN 0C VSF 08 Adjusted with 3 and 6 buttons Written with MUTING Write executed with 0 GREEN The WRITE display will change back to SERVICE 0C VSF 08 Adju...

Page 21: ...375A 18 PMX 00 3F 27 PICTURE MAX DATA TDA8375A 19 PMI 00 3F 05 PICTURE MIN DATA TDA8375A 1A SBR 00 7F 4B SUB BRIGHTNESS TDA8375A 1B SHU 00 0F 07 SUB HUE TDA8375A 1C SSH 00 03 01 SUB SHARPNESS TDA8375A 1D SC1 00 3F 1F SUB COLOR LOWER TDA8375A 1E SC2 00 3F 0B SUB COLOR HIGHER TDA8375A 1F AIP 00 7F 3F ADJUSTMENT IF PLL TDA8375A 20 VZM 00 3F 19 VERTICAL ZOOM TDA8375A 21 FAW 00 FF 08 NICAM FAW THRESH M...

Page 22: ... 2 u CON NOTE Standard Data Those are the standard data values written on the microprocessor Therefore the data values of the modes are stored respectively in the memory In case of a device replacement adjustment by rewriting the data value is necessary for some items 50 50 Hz data 60 60 Hz data Standard data listed on the adjustment item table are reference values therefore it is different for ev...

Page 23: ...ER IC003 MEMORY REPLACEMENT 1 Enter to Service Mode 2 Press commander buttons 5 and 0 Data Initialize and 2 and 0 Data Copy to initialize the data 3 Call each item number and check if the respective screen shows the normal picture In case some items are not well adjusted give them fine adjustment Write the data per each item number MUTING 0 4 Select item numbers 49 OP0 4A OP1 and 4B OP2 respective...

Page 24: ... 24 KV T29SN81 RM 870 MEMO ...

Page 25: ... 64PIN NJM2903D 8PIN NJM2904D 8PIN P83C654FBP 540 40PIN SAA5281ZP E 52PIN TDA4665T V5 118 16PIN TDA8366 N3D 56PIN TDA8375A 56PIN TDA8424 20PIN TDA9821 16PIN L78LR05D MA PC123F2 SBX1981 11 SE135N CATHODE ANODE 2 2 4 1 3 1 2 4 CATHODE ANODE CATHODE ANODE 3 1 2 1 3 2 3 1 2 1 3 2 3 1 2 1 3 2 3 1 2 1 3 2 ERD29 08J RU4DS CATHODE ANODE E B C E C B E C B LETTER SIDE E C B E LETTER SIDE C B 2SC2669 0 2SC47...

Page 26: ...ON TLV 4 034 272 11 PLATE CORRECTION TLV 4 034 272 41 PLATE CORRECTION TLV 15 4 049 122 01 RIVET 16 1 452 762 31 NECKASSEMBLY NA294 17 A 1347 116 A VM BOARD COMPLETE 18 A 1331 740 A C BOARD MOUNTED 19 4 045 290 11 CUSHION 50X290 DGC 20 4 046 600 11 SPACER DY 21 3 704 372 11 HOLDER HV CABLE 22 4 369 318 61 SPRING TENSION 23 1 403 672 12 COIL DEMAGNETIZATION 24 1 900 700 10 DGC BAND 25 4 043 036 01 ...

Page 27: ... REF NO PART NO DESCRIPTION REMARK C234 1 104 664 11 ELECT 47MF 20 16V C235 1 104 664 11 ELECT 47MF 20 16V C236 1 126 948 11 ELECT 100MF 20 35V C237 1 126 933 11 ELECT 100MF 20 16V C238 1 136 167 00 FILM 0 15MF 5 50V C239 1 126 933 11 ELECT 100MF 20 16V C240 1 136 167 00 FILM 0 15MF 5 50V C241 1 126 942 61 ELECT 1000MF 20 25V C242 1 163 021 91 CERAMIC CHIP 0 01MF 10 50V C243 1 128 551 11 ELECT 22M...

Page 28: ...164 005 11 CERAMIC CHIP 0 47MF 25V C1217 1 126 933 11 ELECT 100MF 20 16V C1218 1 163 123 00 CERAMIC CHIP 180PF 5 50V C1219 1 126 933 11 ELECT 100MF 20 16V C1221 1 164 005 11 CERAMIC CHIP 0 47MF 25V C1222 1 164 005 11 CERAMIC CHIP 0 47MF 25V C1223 1 164 346 11 CERAMIC CHIP 1MF 16V C1224 1 216 295 91 SHORT 0 C1225 1 164 005 11 CERAMIC CHIP 0 47MF 25V C1226 1 126 934 11 ELECT 220MF 20 16V C1227 1 164...

Page 29: ...10 397 21 FERRITE 1 1UH FB610 1 410 396 41 FERRITE 0UH FB612 1 410 397 21 FERRITE 1 1UH FB801 1 410 397 21 FERRITE 1 1UH IC IC001 8 752 886 04 IC CXP85224A 072S IC002 8 759 805 37 IC L78LR05D MA IC003 8 759 370 34 IC ST24C08FB6 IC004 8 742 041 12 HYB IC SBX1981 11 IC201 8 759 090 21 IC TDA8424 IC202 8 759 708 12 IC NJM78L12A IC203 8 759 336 30 IC TA8223K IC300 8 759 365 26 IC TDA8375A IC351 8 759 ...

Page 30: ...CHIP 100 5 1 10W R021 1 216 065 91 RES CHIP 4 7K 5 1 10W R025 1 216 057 00 RES CHIP 2 2K 5 1 10W R027 1 216 065 91 RES CHIP 4 7K 5 1 10W R028 1 216 025 91 RES CHIP 100 5 1 10W R029 1 216 065 91 RES CHIP 4 7K 5 1 10W R031 1 216 049 91 RES CHIP 1K 5 1 10W R032 1 216 057 00 RES CHIP 2 2K 5 1 10W R033 1 216 049 91 RES CHIP 1K 5 1 10W R035 1 216 049 91 RES CHIP 1K 5 1 10W R036 1 216 049 91 RES CHIP 1K ...

Page 31: ...10W R360 1 208 291 11 RES CHIP 4 7M 5 1 10W R401 1 216 085 00 RES CHIP 33K 5 1 10W R402 1 216 081 00 RES CHIP 22K 5 1 10W R403 1 216 021 00 RES CHIP 68 5 1 10W R404 1 216 035 00 RES CHIP 270 5 1 10W R406 1 216 065 91 RES CHIP 4 7K 5 1 10W R407 1 216 063 91 RES CHIP 3 9K 5 1 10W R408 1 216 055 00 RES CHIP 1 8K 5 1 10W R409 1 216 025 91 RES CHIP 100 5 1 10W R414 1 216 041 00 RES CHIP 470 5 1 10W R41...

Page 32: ...CHIP 1K 5 1 10W R1203 1 216 089 91 RES CHIP 47K 5 1 10W R1204 1 216 089 91 RES CHIP 47K 5 1 10W R1205 1 216 023 00 RES CHIP 82 5 1 10W R1206 1 216 089 91 RES CHIP 47K 5 1 10W R1207 1 216 089 91 RES CHIP 47K 5 1 10W R1208 1 216 023 00 RES CHIP 82 5 1 10W R1209 1 216 061 00 RES CHIP 3 3K 5 1 10W R1210 1 216 061 00 RES CHIP 3 3K 5 1 10W R1211 1 216 021 00 RES CHIP 68 5 1 10W R1212 1 216 049 91 RES CH...

Page 33: ...0V C1262 1 163 251 11 CERAMIC CHIP 100PF 5 50V C1263 1 163 137 00 CERAMIC CHIP 680PF 5 50V C1264 1 163 251 11 CERAMIC CHIP 100PF 5 50V C1265 1 124 234 00 ELECT 22MF 20 16V C1266 1 124 589 11 ELECT 47MF 20 16V C1267 1 164 004 11 CERAMIC CHIP 0 1MF 10 25V C1268 1 124 584 00 ELECT 100MF 20 10V CONNECTOR CN1201 1 691 109 11 PLUG L TYPE 12P DIODE D1201 8 719 908 03 DIODE GP08D FERRITE BEAD FB1201 1 412...

Page 34: ...205 1 216 027 00 RES CHIP 120 5 1 10W R1207 1 216 053 00 RES CHIP 1 5K 5 1 10W R1209 1 216 035 00 RES CHIP 270 5 1 10W R1210 1 216 041 00 RES CHIP 470 5 1 10W R1211 1 216 015 00 RES CHIP 39 5 1 10W R1212 1 216 097 91 RES CHIP 100K 5 1 10W R1213 1 216 097 91 RES CHIP 100K 5 1 10W R1214 1 216 033 00 RES CHIP 220 5 1 10W R1217 1 216 073 00 RES CHIP 10K 5 1 10W R1218 1 216 049 91 RES CHIP 1K 5 1 10W R...

Page 35: ...STOR 2SC2785 HFE Q712 8 729 119 78 TRANSISTOR 2SC2785 HFE Q714 8 729 255 12 TRANSISTOR 2SC2551 O RESISTOR R701 1 244 941 00 CARBON 680K 5 1 2W R702 1 249 496 11 CARBON 100K 5 1 2W R703 1 249 496 11 CARBON 100K 5 1 2W R705 1 216 345 11 METAL OXIDE 0 47 5 1W F R710 1 215 899 11 METAL OXIDE 15K 5 2W F R711 1 247 760 11 CARBON 4 7K 5 1 2W R712 1 215 899 11 METAL OXIDE 15K 5 2W F R713 1 247 760 11 CARB...

Page 36: ... 20 35V C16 1 126 963 11 ELECT 4 7MF 20 50V C17 1 164 004 11 CERAMIC CHIP 0 1MF 10 25V C19 1 164 004 11 CERAMIC CHIP 0 1MF 10 25V C20 1 163 117 00 CERAMIC CHIP 100PF 5 50V C22 1 126 791 11 ELECT 10MF 20 16V C23 1 163 038 91 CERAMIC CHIP 0 1MF 25V C24 1 163 117 00 CERAMIC CHIP 100PF 5 50V C25 1 126 791 11 ELECT 10MF 20 16V C26 1 104 665 11 ELECT 100MF 20 10V C27 1 104 665 11 ELECT 100MF 20 16V C28 ...

Page 37: ...0W R43 1 216 295 91 SHORT 0 R44 1 216 083 00 RES CHIP 27K 5 1 10W R45 1 216 021 00 RES CHIP 68 5 1 10W R46 1 216 021 00 RES CHIP 68 5 1 10W R47 1 216 021 00 RES CHIP 68 5 1 10W R48 1 216 049 91 RES CHIP 1K 5 1 10W R49 1 216 049 91 RES CHIP 1K 5 1 10W R50 1 216 049 91 RES CHIP 1K 5 1 10W CRYSTAL X01 1 579 266 31 CRYSTAL VIBRATOR A 1347 116 A VM BOARD COMPLETE 4 382 854 11 SCREW M3X10 P SW CAPACITOR...

Page 38: ...CARBON 220 5 1 4W R1727 1 249 419 11 CARBON 1 5K 5 1 4W R1728 1 249 417 11 CARBON 1K 5 1 4W R1729 1 249 437 11 CARBON 47K 5 1 4W R1730 1 249 438 11 CARBON 56K 5 1 4W R1731 1 247 815 91 CARBON 220 5 1 4W R1732 1 249 419 11 CARBON 1 5K 5 1 4W R1736 1 249 419 11 CARBON 1 5K 5 1 4W R1753 1 249 425 11 CARBON 4 7K 5 1 4W R1762 1 247 815 91 CARBON 220 5 1 4W R1764 1 247 734 11 CARBON 39 5 1 2W F R1765 1 ...

Page 39: ... 1 503 902 11 SPEAKER 15X6 5 CM 1 574 358 51 CORD POWER WITH CONNECTOR 7 5A 250V 1 900 700 10 DGC BAND 1 900 700 27 LEADASSY FOCUS 8 451 467 21 DEFLECTION YOKE Y29GXA2 S 8 733 868 05 PICTURE TUBE M68KZT71X ACCESSORIES AND PACKING MATERIALS 3 701 910 00 SCREW SPECIAL DIA 3 8X20 3 861 432 62 MANUAL INSTRUCTION 4 029 168 01 BAG PROTECTION 4 053 737 01 CUSHION UPPER ASSY 4 053 740 01 CUSHION LOWER ASS...

Reviews: