background image

Installing the Printer Driver

5

Windows 2000

Printer Driver Installation Under 
Windows XP

1

Connect the UP-TX1 series printer (one only) for 
which the driver is to be installed to the computer.

2

Turn power to the connected UP-TX1 series printer 
on.

3

Turn power to the computer on, and log on as the 
system administrator or a member of the 
Administrators group.

The [Found New Hardware Wizard] appears.

• If the [Found New Hardware Wizard] screen 

looks like that shown in step 

3

, proceed to step 

4

.

• If the [Found New Hardware Wizard] screen 

looks different from that shown in step 

3

, proceed 

to step 

5

.

• If the [Found New Hardware Wizard] screen does 

not appear, perform the steps described below, 
with the UP-TX1 series printer for which the 
printer driver is to be installed turned on and 
connected to the computer. (Any other USB 
printers or previously installed UP-TX1 series 
printers should not be connected at this time.)

1

Click [Start] and select [Control Panel].

2

Double-click [System]. 
The [System Properties] dialog box opens.

3

Click the [Hardware] tab.

4

Click [Device Manager]. 
The [Device Manager] window opens.

5

Click [+] at the left of [Universal Serial Bus 
controllers].

6

Right-click [USB Printing Support], and open 
the Properties. Confirm that [UP-TX1] is 
selected for [Location], and then select 
[Uninstall] from the [Action] menu.

7

Restart the computer. 
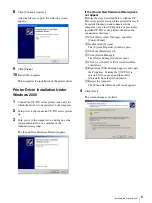
The [Found New Hardware Wizard] appears.

4

Click [No, not this time] and click [Next].

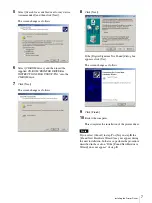
5

Select [Install from a list or specific location 
(Advanced)], and then click [Next].

The screen changes as follows.

6

Select [Search for the best driver in these locations], 
select [Search removable media (floppy, 
CD-ROM)], and then insert the supplied CD-ROM 
“PRINTER DRIVER & INSTRUCTIONS FOR 
USE UP-TX1” into the CD-ROM drive.

7

Click [Next].

The following dialog box appears.

Summary of Contents for UP-TX1 Series

Page 1: ...de This guide describes installation and use of the printer driver for Windows XP and Windows 2000 Before using the printer driver be sure to read the ReadMe file located on the CD ROM Before Using this Software 2007 Sony Corporation UP TX1 Series ...

Page 2: ... Printer Driver Installation Under Windows XP 5 Printer Driver Installation Under Windows 2000 6 Uninstalling the Printer Driver 8 Configuring the Printer 9 Paper Tab 9 Graphics Tab 10 Microsoft and Windows are registered trademarks of Microsoft Corporation Other company names and product names mentioned in this guide are also trademarks and registered trademarks ...

Page 3: ...B 2 0 driver USB 2 0 device driver produced by Microsoft Corporation Operation with other USB 2 0 drivers is not guaranteed Certified USB 2 0 cable Compatibility with all USB 2 0 devices USB 2 0 expansion boards or expansion cards cannot be guaranteed Note When the UP TX1 series printer is connected and turned on ensure that the computer does not go into standby suspended or hibernation mode Other...

Page 4: ...sting therefore when you install the driver an error message may appear preventing you from installing the driver In the Driver Signing Options dialog box select Ignore or Warn in the What action do you want Windows to take group box If you select Block you cannot install the printer driver Open the Driver Signing Options dialog box as follows 1 On the Start menu click Control Panel Under Windows ...

Page 5: ...nected to the computer Any other USB printers or previously installed UP TX1 series printers should not be connected at this time 1 Click Start and select Control Panel 2 Double click System The System Properties dialog box opens 3 Click the Hardware tab 4 Click Device Manager The Device Manager window opens 5 Click at the left of Universal Serial Bus controllers 6 Right click USB Printing Support...

Page 6: ...dware Wizard does not appear Perform the steps described below with the UP TX1 series printer for which the printer driver is to be installed turned on and connected to the computer Any other USB printers or previously installed UP TX1 series printers should not be connected at this time 1 Click Start select Settings and select Control Panel 2 Double click System The System Properties window opens...

Page 7: ... Click Next The screen changes as follows 8 Click Next If the Digital Signature Not Found dialog box appears click Yes The screen changes as follows 9 Click Finish 10 Restart the computer This completes the installation of the printer driver Note If you select Cancel in step 7 or No in step 8 the Found New Hardware Wizard may not appear during the next installation In that case perform the procedu...

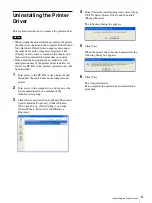
Page 8: ...TX1 series printers printer icons will be uninstalled 1 Turn power to the UP TX1 series printer off and disconnect the cable between the computer and printer 2 Turn power to the computer on and log on as the system administrator or a member of the Administrators group 3 Click Start and select Control Panel Then select Add or Remove Programs Under Windows 2000 click Start select Settings and click ...

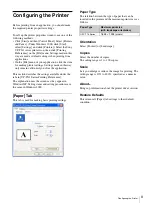
Page 9: ...lication This section describes the settings available under the tabs in UP TX1 Series Printing Preferences The explanation uses the screens as they appear in Windows XP Setting items and setting procedures are the same in Windows 2000 Paper Tab This tab is used for making basic printing settings Paper Type The relation between the type of paper that can be inserted in the printer and the maximum ...

Page 10: ...or Balance Select Color Balance from the Color Adjust combo box Adjust the items by moving the respective sliders left or right You can also directly enter values in the input fields Lightness Select Lightness from the Color Adjust combo box Adjust the items by moving the respective sliders left or right You can also directly enter values in the input fields Restore Defaults This returns all Graph...

Reviews: