Operation
24
5
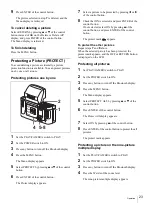
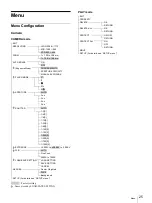
Press the MENU button.
The Menu display appears.
6
Select PROTECT by pressing
v
or
V
of the control
button.
The nine-picture multiple display appears, and the
cursor blinks at the currently selected picture.
7
Select a picture to be protected by pressing
b
,
B
,
v
or
V
of the control button, and press ENTER of the
control button.
The Protect display appears.
8
Check that ON is selected, and press ENTER of the
control button.
If ON is not selected, select ON by pressing
b
of
the control button, then press ENTER of the control
button.
The protect mark appears on the picture selected in
step
7
, and the Menu display is retrieved.
Retrieving the Menu display
Select RETURN by pressing
v
or
V
of the control
button on the Protect or Protect All display, and press
ENTER of the control button.
To finish setting the protection
Press the MENU button.
Deleting a protected picture
If you wish to delete a protected picture or pictures,
release the protection.
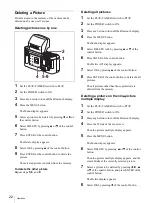
1
Display the Protect display, and select a picture
whose protection is to be released by pressing
b
or
B
of the control button, or display the Protect All
display.
For details on displaying the Protect or Protect All
display, see “Protecting pictures one by one” on
page 23, “Protecting all pictures” on page 23 or
“Protecting a picture on the nine-picture multiple
display” on page 23.
2
Check that OFF is selected, and press ENTER of
the control button.
The protect mark disappears, and the protection is
released.
Turning Off the Power
When you finish your operation, set the printer to
standby mode and turn the camera off.
Setting the printer to standby mode
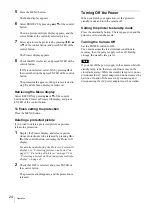
Press the on/standby button. The lamp goes out, and the
printer is set to standby mode.
Turning the Camera Off
Set the POWER switch to OFF.
The camera stores the latest internal conditions in
memory, then the power supply is shut off. During
storage, the standby lamp is lit.
Note
If you shut off the power supply to the camera while the
standby lamp is lit, the latest conditions may not be
stored in memory. While the standby lamp is lit, do not
disconnect the AC power adaptor and do not remove the
batteries. On and off the camera by connecting and
disconnecting the AC power adaptor must be avoided.
Summary of Contents for UPX-C200
Page 207: ......
Page 208: ...Sony Corporation Printed in Japan ...

