VAIO Computer Quick Start
142
5
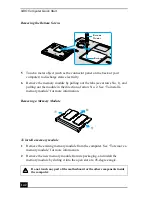
Touch a metal object (such as the connector panel on the back of your
computer) to discharge static electricity.
6
Remove the memory module by pulling out the tabs (see arrows No. 1), and
pulling out the module in the direction of arrow No. 2. See “To install a
memory module” for more information.
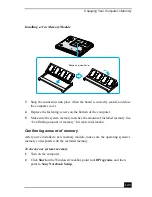
To install a memory module
1
Remove the existing memory module from the computer. See “To remove a
memory module” for more information.
2
Remove the new memory module from its packaging, and install the
memory module by sliding it into the open slot at a 45-degree angle.
Removing the Bottom Screws
Removing a Memory Module
Do not touch any part of the motherboard or the other components inside
the computer.
Screw
Screw
Driver
Summary of Contents for VAIO PCG-GRV550
Page 8: ...VAIO Computer Quick Start 8 ...
Page 52: ...VAIO Computer Quick Start 52 ...
Page 68: ...VAIO Computer Quick Start 68 ...
Page 69: ...69 Printer Connections Printing With Your Computer ...
Page 74: ...VAIO Computer Quick Start 74 ...
Page 88: ...VAIO Computer Quick Start 88 ...
Page 89: ...Changing the Window Design of Sony Programs 89 ...
Page 90: ...VAIO Computer Quick Start 90 ...
Page 91: ...91 Connecting Mice and Keyboards Using External Mice and Keyboards ...
Page 95: ...95 Floppy Disk Drives and PC Cards Using Floppy Disk Drives Using PC Cards ...
Page 138: ...VAIO Computer Quick Start 138 ...
Page 139: ...139 Memory Upgrades Changing Your Computer s Memory ...
Page 145: ...145 Using the Recovery CDs Application and System Recovery CDs Using Your Recovery CDs ...


