background image

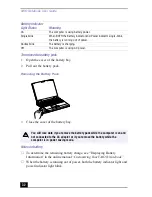
Shutting Down Your Notebook

37

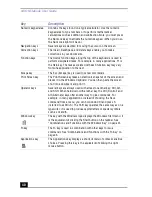
Closing your computer

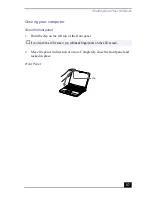
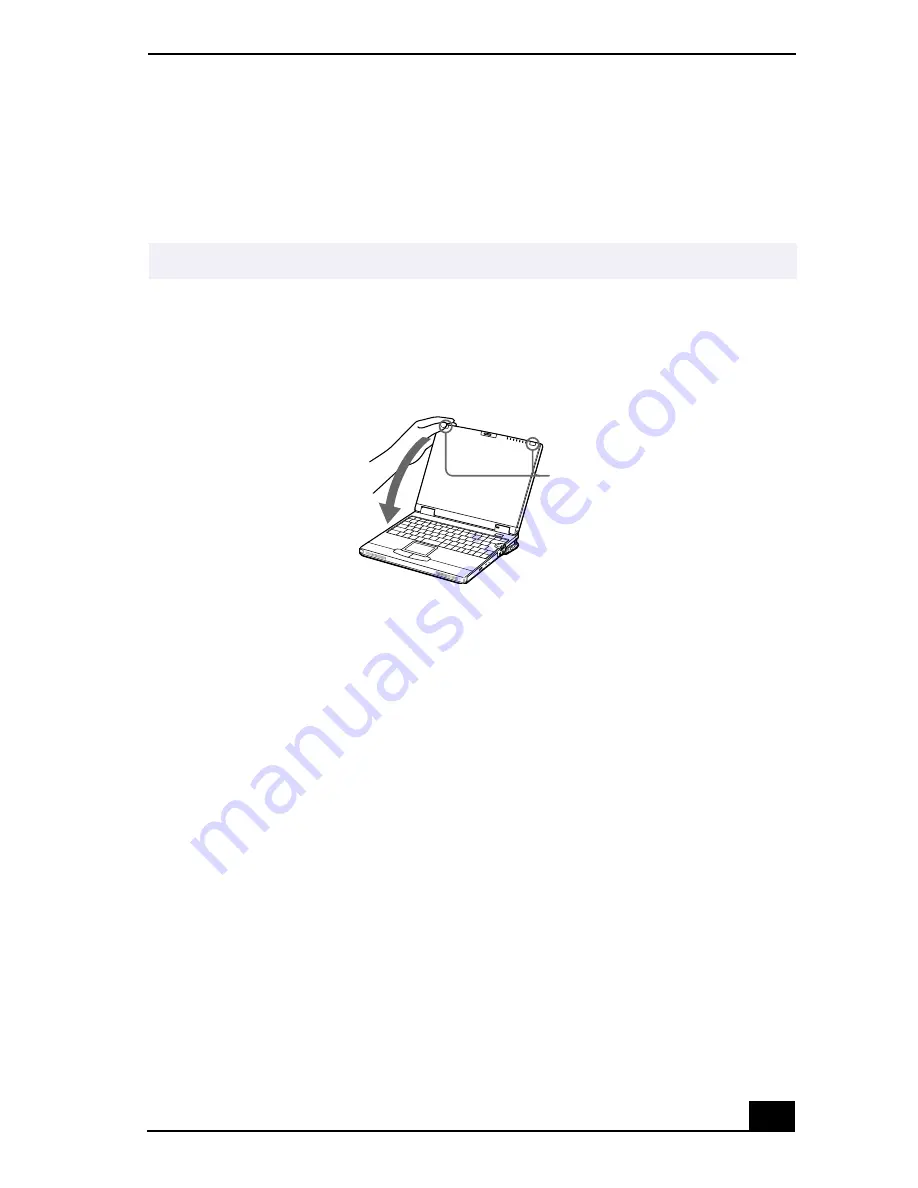
Close the front panel

1

Hold the clip on the left top of the front panel. 

2

Move the panel in direction of arrow. Completely close the front panel and 
locked in place.

If you touch the LCD screen, you will leave fingerprints on the LCD screen.

Front Panel

clip

Summary of Contents for VAIO PCG-XG500

Page 1: ...VAIO Notebook User Guide PCG XG500 PCG XG500K PCG XG700 PCG XG700K ...

Page 2: ...f this manual and the software described herein in whole or in part without written permission is prohibited All rights reserved Sony VAIO and the VAIO logo are trademarks of Sony All other trademarks are trademarks of their respective owners ...

Page 3: ...standards and logos are uniform among participating nations ENERGY STAR is a U S registered mark This product incorporates copyright protection technology that is protected by method claims of certain U S patents and other intellectual property rights owned by Macrovision Corporation and other rights owners Use of this copyright protection technology must be authorized by Macrovision Corporation a...

Page 4: ...he model and serial number when you call your Sony Service Center Model Number PCG 861A PCG 862A PCG 8612 PCG 8622 Serial Number ________________________ Safety Information WARNING To prevent fire or shock hazard do not expose your notebook to rain or moisture To avoid electrical shock do not open the cabinet Refer servicing to qualified personnel only Never install modem or telephone wiring durin...

Page 5: ...e le plus près possible d une prise murale pour en faciliter l accès To change the backup battery please contact your nearest Sony Service Center For DVD ROM Danger Visible and invisible laser radiation when open Avoid direct exposure to beam For CD RW Danger Drive emits visible and invisible laser radiation when open Avoid direct exposure to beam Caution Use only No 26 AWG or larger telecommunica...

Page 6: ...ect the equipment into an outlet on a circuit different from that to which the receiver is connected Consult the dealer or an experienced radio TV technician for help You are cautioned that any changes or modifications not expressly approved in this manual could void your authority to operate this equipment Only peripherals computer input output devices terminals printers etc that comply with FCC ...

Page 7: ... Center at 12451 Gateway Blvd Ft Myers FL 33913 or find Sony Customer Service on the web at http www sony com pcsupport Repair of this equipment should be made only by a Sony Service Center or Sony authorized agent For the Sony Service Center nearest you call 1 888 4SONYPC 1 888 476 6972 This equipment cannot be used on public coin service provided by the telephone company Connection to Party Line...

Page 8: ...y not prevent degradation of service in some situations In some areas the disposal of lithium ion batteries in household or business trash may be prohibited Do not handle damaged or leaking lithium ion batteries Ne pas manipuler les batteries au lithium ion qui fuient ou sont endommagées Danger of explosion if battery is incorrectly replaced Replace only with the same or equivalent type recommende...

Page 9: ... pas que le matériel fonctionnera à la satisfaction de l utilisateur Avant d installer ce materiel l utilisateur doit s assurer qu il est permis de le raccorder aux installations de l entreprise locale de télécommunication Le materiel doit egalement être installé en suivant une méthode acceptée de raccordement L abonné ne doit pas oublier qu il est possible que la conformité aux conditions énoncée...

Page 10: ...VAIO Notebook User Guide 10 ...

Page 11: ...67 Removing the Optional Hard Drive PCGA HDX10 68 Using Smart Connect 69 Connecting an i LINK compatible Device 71 i LINK is a trademark of Sony used only to designate that a product contains an IEEE 1394 connection The i LINK connection may vary depending on the software applications operating system and i LINK compatible devices All products with an i LINK connection may not communicate with eac...

Page 12: ... Connecting External Speakers 103 Connecting an External Microphone 104 Connecting a Universal Serial Bus USB Device Mouse or Keyboard 105 Adding Memory 107 Software Information 113 About the Software on Your Notebook 113 MovieShaker 118 PictureGear 121 For Answers to Your Software Questions 123 About Your Recovery CDs 125 Using Your Recovery CDs 126 Troubleshooting 131 Supplemental Information 14...

Page 13: ...m includes Windows Millennium Edition or Windows 2000 Professional Communications Access popular online services send and receive e mails browse the Internet and use the dialing and fax features DVD drive This new optical storage technology provides increased storage capacity and a rich multimedia computing experience DVD ROM drives play both DVD ROM and CD ROM discs CD RW drive bundled with selec...

Page 14: ...king Your VAIO Notebook Remove the following hardware items from the box 530 MB after formatting with Direct CD Main unit Power cord AC adapter Floppy disk drive cable Rechargeable battery pack Weight saver Floppy disk drive FDD DVD ROM drive or CD RW drive CD RW drive on select models only Mini docking station FDD stand ...

Page 15: ...is latest Windows operating system Software CDs Microsoft Word 2000 Allows you to reinstall Microsoft Word to the Sony computer you purchased Recovery CDs System Recovery CD s Allows you to restore the software titles that shipped with your computer if they become corrupted or are erased It can be used only to restore the hard disk of the Sony computer you purchased Application Recovery CD s Allow...

Page 16: ...VAIO Notebook User Guide 16 ...

Page 17: ...xternal mouse Let your upper arms hang naturally at your sides Take breaks during sessions with your computer Excessive use of the computer may strain muscles or tendons Furniture and posture Sit in a chair with good back support and armrests Adjust the level of the chair so your feet are flat on the floor A footrest may make you more comfortable Sit in a relaxed upright posture and avoid slouchin...

Page 18: ...chanical vibration or shock Strong magnets or speakers that are not magnetically shielded Ambient temperature of more than 95º F 35º C or less than 41º F 5º C High humidity Do not place electronic equipment near your computer The computer s electromagnetic field may cause a malfunction Provide adequate air circulation to prevent internal heat buildup Do not place your computer on porous surfaces s...

Page 19: ...all into the computer shut down your computer and then unplug it You may want to have the computer checked by qualified personnel before operating it any further Do not drop the computer or place heavy objects on top of the computer Make sure to disconnect the power cord before cleaning the computer Avoid rubbing the LCD screen as this can damage the screen Use a soft dry cloth to wipe the LCD scr...

Page 20: ...on the display filter 3 Wipe off the fingerprints left on the display filter with the filter cleaner You can use commercially available cleaners 4 Insert the bottom of the display filter into the groove at the bottom of the display as illustrated below Insert the display filter so that the clips protruding parts face left 5 Turn 90 to lock it in place Display Filter Clips Do not use solvents such ...

Page 21: ...stalling Display Filter Sony computer supplies accessories and peripherals can be purchased from your local retailer or by accessing the Sony VAIO DirectSM Website http vaio sonystyle com or by calling 1 888 315 7669 toll free clips ...

Page 22: ...VAIO Notebook User Guide 22 ...

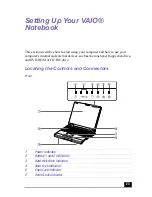
Page 23: ... use your computer s internal and external devices such as the touchpad floppy disk drive and DVD ROM or CD RW drive Locating the Controls and Connectors Front 1 Power indicator 2 Battery 1 and 2 indicators 3 Hard disk drive indicator 4 Num Lock indicator 5 Caps Lock indicator 6 Scroll Lock indicator ...

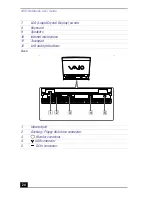
Page 24: ... LCD Liquid Crystal Display screen 8 Keyboard 9 Speakers 10 Internal microphone 11 Touchpad 12 Left and right buttons Back 1 Infrared port 2 Docking Floppy disk drive connector 3 Monitor connector 4 USB connector 5 DC In connector ...

Page 25: ...ting system and i LINK compatible devices All products with an i LINK connection may not communicate with each other Please refer to the documentation that came with your i LINK compatible device for information on operating conditions and proper connection Before connecting i LINK compatible PC peripherals to your system such as a CD RW or Hard Disk Drive confirm their operating system compatibil...

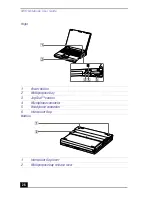
Page 26: ...tebook User Guide 26 Right 1 Power button 2 Multipurpose bay 3 Jog Dial control 4 Microphone connector 5 Headphone connector 6 Intercooler flap Bottom 1 Intercooler flap lever 2 Multipurpose bay release lever ...

Page 27: ...Using the AC Adapter 1 Slide the LCD lock lever to your right 2 Open the computer 3 Plug the cable attached to the AC adapter into the DC In connector on the back of the computer 4 Plug one end of the power cord into the AC adapter 5 Plug the other end of the power cord into an electrical outlet Opening your Computer LCD lock lever ...

Page 28: ...ed by sudden power surges such as those that may occur during an electrical storm Do not place heavy objects on the power cord To disconnect the cord pull it out by the plug Never pull the cord itself Unplug your computer from the wall outlet if you will not be using the computer for a long time When the AC adapter is not used unplug it from the AC outlet Use only the AC adapter supplied Do not us...

Page 29: ... Additional battery packs are available as a separate option The battery pack that comes with your computer is not fully charged at the time of purchase Follow the steps below to insert and charge the battery pack To insert the battery pack 1 Open the cover of the battery bay on the left side of the computer 2 Insert the battery pack into the battery bay Battery Bay Inserting Battery Pack Label si...

Page 30: ...ry bay until it clicks If the Mini Docking Station is attached to your computer do not insert or remove the battery pack Lifting and turning the computer with the Mini Docking Station attached may cause the Mini Docking Station to disconnect from the computer ...

Page 31: ...le blink pattern as the battery charges To charge the battery completely continue charging for an additional hour See Displaying Detailed Battery Information on page 152 in the online manual Customizing Your VAIO Notebook Battery Indicators Battery Indicator Meaning 1 Indicates the status of the battery pack in the battery bay on the left side of the computer 2 Indicates the status of the battery ...

Page 32: ...wer both the battery indicator light and power indicator light blink Battery Indicator Light Status Meaning On The computer is using battery power Single blink When BOTH the Battery indicator and Power indicator single blink the battery is running out of power Double blink The battery is charging Off The computer is using AC power Removing the Battery Pack You will lose data if you remove the batt...

Page 33: ...omputer may not enter System Hibernation mode when the battery life is low To avoid loss of data when using battery power you should save your data frequently and manually activate a power management mode such as System Suspend or System Hibernation Never leave the battery pack in temperatures above 140 F 60 C such as under direct sunlight or in a car parked in the sun Battery life is shorter in a...

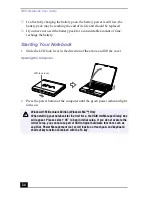
Page 34: ...arrow and lift the cover 2 Press the power button of the computer until the green power indicator light turns on Opening the Computer Windows Millennium Edition Windows Me Only When starting your notebook for the first time the VAIO InitManager dialog box will appear Please select OK to begin initial setup If you do not execute the initial setup you cannot use part of VAIO original hardware functi...

Page 35: ...nu to display the Shut Down Windows dialog box 3 Select Shut down Power Button If you press the power button for more than four seconds the computer turns off When connecting the supplied AC adapter to an AC outlet that has more than two outlets do not plug the AC adapter into an outlet that is obstructed by another adapter To prevent fire or electrical shock the adapter must be firmly plugged int...

Page 36: ...C cards Disconnecting USB devices Ending Infrared Communication 2 Restart the computer You can restart your computer by pressing Ctrl Alt Delete keys at the same time Respond to all prompts that warn you to save your documents During a period of inactivity you can conserve battery life by using System Suspend mode See System Suspend Mode on page 78 If you are still unable to shut down the computer...

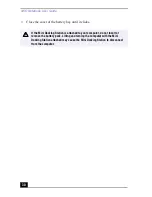
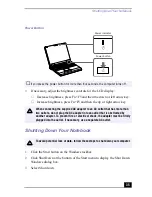
Page 37: ...Close the front panel 1 Hold the clip on the left top of the front panel 2 Move the panel in direction of arrow Completely close the front panel and locked in place If you touch the LCD screen you will leave fingerprints on the LCD screen Front Panel clip ...

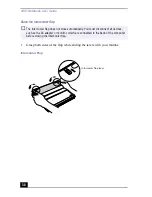
Page 38: ...ap while sliding the levers with your thumbs The intercooler flap does not close automatically You must disconnect all devices such as the AC adapter or monitor which are connected to the back of the computer before closing the intercooler flap Intercooler Flap Intercooler flap lever ...

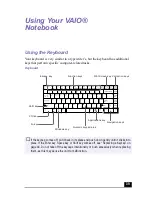
Page 39: ...ck in its place and push down gently until it clicks into place If the Enter key Space key or Shift key comes off see Replacing a Keycap on page 44 Do not take off the keycaps intentionally or push excessively when replacing them as this may cause the unit to malfunction Escape key Function keys Shift key Ctrl key Fn key Windows key Applications key Navigation keys Correction keys Print Screen key...

Page 40: ...apshot of the screen and places it in the Windows Clipboard You can then paste the screen shot into a document and print it Operator keys Several keys are always used with at least one other key Ctrl Alt and Shift When held down with another key the Ctrl Control and Alt Alternate keys offer another way to give commands For example in many applications instead of choosing the Save command from a me...

Page 41: ... then Files or Folders from the Start menu Ctrl F Displays the Windows Find Computer window where you can locate other computers This is the equivalent of selecting Find and then Computer from the Start menu M Minimizes all displayed windows Shift M Returns all minimized windows to their previous size R Displays the Run window This is the equivalent of selecting Run from the Start menu Fn Insert D...

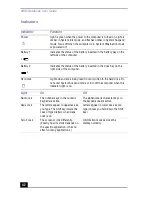
Page 42: ... Hard disk Lights when data is being read from or written to the hard drive Do not enter System Suspend mode or turn off the computer when this indicator light is on Light On Off Num Lock The number keys in the numeric keypad are active The alphanumeric character keys in the keypad area are active Caps Lock The letters appear in uppercase as you type The Shift key lowers the case of typed letters ...

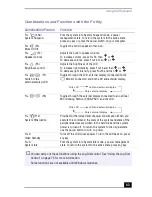
Page 43: ... LCD and external display Fn F8 Toggles through the external display connected to an optional Mini Docking Station PCGA PSX1 and the LCD Fn F12 System Hibernation Provides for the lowest level of power consumption When you execute this command the state of the system and state of the peripheral devices are written to the hard disk and the system power is turned off To return the system to the orig...

Page 44: ...e Enter keycap Shift keycap and Space keycap as described below For other keys place the keycaps in their original place and gently push down until they click To replace the enter key Enter Key Back Attaching Enter Key projections spring projections Push down ...

Page 45: ...e the shift or space key Back Attaching the Shift or Space Key Do not use force to remove the keycaps as this may result in a malfunction Do not push too hard on the keycaps when placing them projections projections spring Push down ...

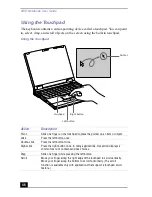
Page 46: ...ck Press the left button once Double click Press the left button twice Right click Press the right button once In many applications this action displays a shortcut menu of context sensitive choices Drag Slide one finger while pressing the left button Scroll Move your finger along the right edge of the touchpad to scroll vertically Move your finger along the bottom to scroll horizontally The scroll...

Page 47: ...on touchpad features such as clicking both buttons simultaneously adjusting touchpad speed and Easy Launcher functions To access Mouse Properties click the Start button point to Settings point to Control Panel and then click the Mouse icon in the Control Panel ...

Page 48: ...use as an external drive Connect the floppy disk drive to the computer using the floppy disk drive cable supplied with the VAIO logo facing up Align the logo on the cable with the slot connection and insert the connector straight into the slot Connecting Floppy Disk Drive While using the floppy disk drive do not put the system into power saving mode Power saving mode may not work properly and unsa...

Page 49: ...ng up Continue pushing the drive into the bay until the RELEASE lever locks into place To insert a diskette Inserting Floppy Disk Drive Do not insert the floppy disk drive while the notebook is in power saving mode You can insert a floppy disk even if the LED indicator is on If there is another drive in the multipurpose bay click on the power icon in the system task tray and choose Remove multi pu...

Page 50: ...into place To remove a diskette When you finish using the diskette wait until the LED indicator turns off and then press the Eject button to remove the diskette Inserting Diskette Ejecting Diskette Do not press the Eject button when the LED indicator is turned on as data may be lost Floppy disk drive Diskette Eject button LED indicator ...

Page 51: ...e choose Remove external FDD instead 2 Slide the RELEASE lever on the bottom of the computer in the direction of the arrow and slide the drive out of the multipurpose bay 3 Click OK on the message screen To remove the floppy disk drive using the Jog Dial control Windows Me models only 1 Rotate the Jog Dial control to PowerPanel and then press the Jog Dial control The PowerPanel window appears 2 Ro...

Page 52: ...g or Eject Hardware dialog box select the appropriate option and then click Stop 4 Confirm the device and click OK 5 A message appears informing you that the device can now be safely removed from the system 6 Slide the RELEASE lever on the bottom of the computer in the direction of the arrow and then unplug the floppy disk drive from the computer Note If your computer is turned off you do not have...

Page 53: ...o insert a disc 1 Turn on the computer 2 Press the Eject button to open the DVD ROM or CD RW drive The tray slides out When the computer is in power saving mode you cannot insert a disc See Controlling Power Management on page 147 in the online manual Customizing Your VAIO Notebook for more information on power saving modes Opening the DVD ROM or CD RW drive Eject button ...

Page 54: ... mode may not work properly causing unsaved data to be lost See Controlling Power Management on page 147 in the online manual Customizing Your VAIO Notebook for more information about power saving modes Be sure to seat the disc firmly over the DVD ROM or CD RW drive hub fingers If you do not seat the disc firmly you could damage your DVD ROM or CD RW drive and you may not be able to open the tray ...

Page 55: ...other profiles the movies are choppy As an alternative you can set the Power Management profile to Automatic Profile Selection which will select the DVD profile automatically whenever you insert a DVD See Controlling Power Management on page 147 in the online manual Customizing Your VAIO Notebook for information on how to set the Power Management profile Do not switch the Display Mode or the power...

Page 56: ...M or CD RW drive If you use Easy CD Creator to write data to a CD RW or CD R you do not have to format the disc For optimal writing speed deactivate the screen saver and exit anti virus software before writing data to a disc For best results use CD Rs that are compatible with 4x speed as DirectCD and Easy CD Creator are preset to that speed Your notebook does not support 1x writing speed If you us...

Page 57: ...RW drive You do not need to shut down the computer to insert the DVD ROM or CD RW drive into the multipurpose bay Never touch the surface of the disc Fingerprints and dust on the surface of a disc may cause writing errors Do not strike or shake the computer while writing data to a disc Always use the AC adapter as the power source for your computer when you are writing data to a CD RW or CD R Usin...

Page 58: ...use solvents such as benzine thinner commercially available cleaners or anti static spray as they may cause damage to the disc For normal cleaning hold the disc by its edge and use a soft cloth to wipe the surface from the center out If the disc is badly soiled moisten a soft cloth with water wring it out well and use it to wipe the surface of the disc from the center out Wipe off any remaining mo...

Page 59: ...d Use the lower slot for Type III PC cards 1 Pull the PC card RELEASE button away from the computer and then push it in toward the computer The PC card slots can accommodate two Type II PC cards or one Type III PC card These slots are compatible with Card Bus Use the lower slot for Type III PC cards You do not need to shut down your notebook before inserting or removing a PC card PC Card Release B...

Page 60: ...p and bottom PC card slot protectors 4 Insert the PC card into the PC card slot with the front label facing up Gently push the card into the slot until the card is fixed into the connector The RELEASE button comes out Push down the RELEASE button toward the display panel Removing PC Card Slot Protector Inserting PC Card PC card ...

Page 61: ...slot Do not force a card into the slot as this may damage the connector pins If you have difficulty inserting a card check that you are inserting the card with the correct orientation See the manual that came with your PC card for more information on use For some PC cards if you alternate between normal power operation and the System Suspend or System Hibernation power management modes while the c...

Page 62: ...s a digital still camera or other computers To use infrared communication with another computer Align the infrared ports on the two computers so that they are in a direct line When using longer PC cards Wireless LAN card etc do not move your computer while a PC card is inserted If the PC card gets a strong shock your computer may be damaged Do not use force to insert your PC card as it may damage ...

Page 63: ...tatus tag of the Infrared Monitor in the Windows Control Panel to determine if the infrared device is detected If the two devices are too far apart or too close together data transfer may be interrupted or there may be noise in the transmission Do not cover the infrared ports with your hand or any other object Avoid direct sunlight fluorescent light or flashing incandescent light near the infrared...

Page 64: ...arging by observing the battery indicator lights To insert a second battery pack 1 If another device is in the multipurpose bay remove the device See To remove the DVD ROM or CD RW drive on page 57 2 Insert the battery pack into the multipurpose bay If the battery is being used the battery 2 indicator light turns on 3 Attach the weight saver to the computer to stabilize the battery pack Insert the...

Page 65: ...ile it is connected to AC power The battery indicator flashes while the battery is charging See To charge the battery pack on page 31 for more information Attaching Weight Saver Charging Second Battery Pack Battery pack Weight saver 1 2 Second battery pack optional Battery indicators Battery pack supplied ...

Page 66: ... the weight saver and then pull out the battery pack 3 Reinsert the weight saver Removing Second Battery Pack If you attach two battery packs you can remove either of them without shutting down the computer When removing one battery pack make sure that the other battery pack indicator is on If the indicator of the battery pack you are going to remove is on right click the Power Management icon in ...

Page 67: ...e bay remove the device See Notes on CD and DVD media on page 58 for more information 2 Slide the weight saver in the direction of the arrow until it clicks To remove the Weight Saver To remove the weight saver slide the RELEASE lever on the bottom of the computer in the direction of the arrow Inserting the Weight Saver Release Lever 1 2 Multipurpose bay Weight saver RELEASE lever ...

Page 68: ...ug or Eject Hardware dialog box appears 2 In the Unplug or Eject Hardware dialog box select the appropriate device and then click Stop 3 Confirm the device and click OK 4 A message appears informing you that the device can now be safely removed from the system 5 Slide the RELEASE lever on the bottom of the computer in the direction of the arrow and then unplug the drive from the computer When the ...

Page 69: ...book to another VAIO computer that also has Smart Connect or preinstalled Windows Me You can then use one computer to edit copy or delete files on the other computer You can also print from a printer attached to either computer Connecting with an i LINK Cable i LINK is a trademark of Sony used only to designate that a product contains an IEEE 1394 connection The i LINK connection may vary dependin...

Page 70: ...ter a unique name The computers can be identified by this unique name when the two computers are networked together If you have previously purchased a VAIO computer or notebook that does not have the Windows Me operating system or Smart Connect 3 0 software preinstalled consult the Sony website for support options http www sony com pcsupport ...

Page 71: ...h end VMC IL4615 a 1 5 meter cable with a 4 pin connector at one end and a 6 pin connector at the other and VMC IL4408A a 0 8 meter cable with a 4 pin connector at each end You can purchase these cables from your local retailer through the Sony VAIO Direct Web site http vaio sonystyle com or by calling 1 888 315 7669 toll free i LINK Port The i LINK communication standard that is available in the ...

Page 72: ... i LINK are i LINK compatible See the manual that came with your i LINK compatible device for more information on installation and use Do not connect more than one digital video camera at a time The software supplied with your computer will not recognize multiple cameras The i LINK connector on the computer does not supply power to external devices If the external device requires power from the i ...

Page 73: ...re drive capacity DVgate saves files to the D partition This prevents large video captures from consuming the available space on your C partition To maintain optimum performance of DVgate you should defragment or format the D partition regularly To defragment a partition 1 Click the Start button in the Windows taskbar 2 Click Programs Accessories System Tools Disk Defragmenter The Disk Defragmente...

Page 74: ...our computer is equipped with a Jog Dial control on the right side of the unit The Jog Dial control enables you to open an application folder or document from a predefined list by rotating and pressing the Jog Dial control In addition when you press the Jog Dial control you can turn on your computer automatically and start the selected application or document If the document you select is a script...

Page 75: ...use the Jog Dial control click the Jog Dial control window or the Jog Dial control icon in the task tray Alternatively you can press the Jog Dial control while pressing the Ctrl key on the keyboard to switch to the launcher mode 1 Turn the Jog Dial control to select the item you want then press the Jog Dial control The window switches to the guide mode and shows the Jog Dial function 2 Turn or pre...

Page 76: ... support the Jog Dial control you can scroll the window or adjust the window size as described below Some software does not support these functions Action Description Maximize Window Press the Jog Dial control button to maximize the size of the active window Press again to return to normal window size Minimize Window Press the Jog Dial control button to minimize the size of the active window Press...

Page 77: ...cific time The timer can start applications even when the computer is in System Hibernation mode i LINK Interface Your computer comes equipped with an i LINK port The port is a digital interface IEEE1394 for high speed communication By using your computer a Sony Digital Handycam Camcorder or other compatible camera that supports the i LINK interface you can easily create and edit your own home vid...

Page 78: ...n it is in use The green power indicator light is on in this mode To save power you can turn off a specific device such as the LCD System Idle Mode This mode is convenient if you do not need to use your computer for a brief period The hard disk and video display enter a low power state and the CPU clock and processor stop The power indicator light is umber in this mode To activate System Idle mode...

Page 79: ...12 To return to normal mode Turn on the computer by pressing the power button The computer returns to its previous state Time to return to normal mode System Idle requires less time than System Suspend and System Suspend requires less time than System Hibernation Power consumption System Idle uses more power than System Suspend and System Suspend uses more power than System Hibernation Windows 200...

Page 80: ...VAIO Notebook User Guide 80 ...

Page 81: ...evices page 94 Printer page 99 External display page 100 External speakers page 103 External microphone page 104 Universal Serial Bus USB device page 105 Connect the power cord only after connecting all cables Turn on the computer only after turning on all peripheral devices You can select a country mode from the modem property window but you should only use US mode Using other country modes is an...

Page 82: ...d use Sony Customer Support you must connect to a phone line Connecting a Phone Line Your computer does not work with party lines cannot be connected to a coin operated telephone and may not work with multiple phone lines or a private branch exchange PBX Some of these connections might result in excess electrical current and could cause a malfunction in the internal modem If you connect a phone li...

Page 83: ...e PCGA PSX1 Mini Docking Station to connect peripheral devices such as a printer or external display You must wait for the IN USE indicator to light before using a connected peripheral device Front IN USE indicator DC IN indicator RELEASE lever UNDOCK button Docking connector Tabs ...

Page 84: ...ompatible device for information on operating conditions and proper connection Before connecting i LINK compatible PC peripherals to your system such as a CD RW or Hard Disk Drive confirm their operating system compatibility and required operating conditions 8 DC IN connector 2 S VIDEO connector 9 Mouse Keyboard connectors 3 VIDEO connector 10 OPTICAL OUT connector 4 Monitor connector 11 CONTROL A...

Page 85: ...Mini Docking Station to your computer When a charged battery is inserted in your computer you can attach and detach the Mini Docking Station without turning off your computer 1 Open the cover of your computer Connecting AC Adapter to Docking Station Use the specified AC adapter for the power rating of the Mini Docking Station If your notebook is in power saving mode switch to normal mode before at...

Page 86: ...it clicks 3 Align the connector on the Mini Docking Station with the docking floppy disk drive connector on the back of your computer 4 Firmly press the Mini Docking Station into place 5 Attach the right side tab of the Mini Docking Station to the right side hollow of your computer Push the tab into the hollow firmly until it clicks Left Tab Hollow Right Tab Hollow ...

Page 87: ... below 1 Press the UNDOCK button on the Mini Docking Station or click REMOVE on the Start menu 2 After the IN USE indicator has turned off pull the RELEASE lever on the right side of your computer and release the right tab Do not lift or move the computer by holding only the Mini Docking Station as the Mini Docking Station may separate from the computer Undocking Button Release Lever UNDOCK button...

Page 88: ...Removing Mini Docking Station When the Mini Docking Station is attached to your computer do not insert or remove the battery The Mini Docking Station may separate from the computer Do not remove the Mini Docking Station when the IN USE indicator is lit ...

Page 89: ...er You can also use one or both of the USB ports to connect a mouse and keyboard at the same time Connecting a printer to the Mini Docking Station You can connect the printer to the Mini Docking Station attached to your computer to print documents To connect a printer Use the symbol to locate the Printer connector Plug the printer cable supplied with the printer into this port on the computer Conn...

Page 90: ...connections Turn on the peripheral devices before turning on your computer If you are using a printer that does not support Windows 2000 or Windows Me it may not function properly You can connect a printer while the floppy disk drive is in use When using a USB printer connect it to the USB connector of your computer or the Mini Docking Station See the manual that came with your printer for more in...

Page 91: ...ing mode switch to normal mode before connecting a floppy disk drive to the Mini Docking Station FDD Connecting When you connect the floppy disk drive to the floppy disk drive connector of the Mini Docking Station you cannot use the PRINTER connector of the floppy disk drive cable The printer can be connected to the printer port on the Mini Docking Station Floppy disk drive cable supplied Floppy d...

Page 92: ...y disk drive stand for Mini Docking Station as illustrated below 1 Place the protrusions on the floppy disk drive stand for the Mini Docking Station into the holes in the top face of the Mini Docking Station Attaching the floppy disk stand 2 Slide the floppy disk drive stand in the direction of the arrow Protrusions on the Holes in the floppy disk drive stand Mini Docking Station ...

Page 93: ...the floppy disk drive into the floppy disk drive stand 4 Attach the floppy disk drive cable from the computer to the floppy disk drive Do not hyperextend the LCD screen when you are using the floppy disk drive stand for the Mini Docking Station ...

Page 94: ...ROL A1 or CONTROL A1 connector you can play a CD disc create your own CD database or edit an MD disc To use the CONTROL A1 connector on the Mini Docking Station switch the SERIAL CONTROL A1 switch to CONTROL A1 Connecting an MD Deck or CD Player MD deck CD player To OPTICAL OUT To Digital In To CONTROL A1 To Digital Out Optical digital cable Monaural mini plug cable To Digital In CONTROL A1 CONTRO...

Page 95: ...L OUT available by connecting to the Mini Docking Station follow these steps 1 Click the Start button point to Settings and then click Control Panel 2 Double click YAMAHA DS XG Audio Config 3 Select Digital Output and click ON All Sources Analog out is muted 4 Click OK Use monaural mini plug cables shorter than 2 meters with no resistance ...

Page 96: ...ect a CD player an active speaker or an amplifier to the LINE IN or LINE OUT connector of the Mini Docking Station to play a CD and experience higher quality audio Connecting Devices Active speaker amplifier etc CD player etc Mini Docking Station To LINE OUT To LINE IN Audio cable optional ...

Page 97: ...does not support Dolby Digital otherwise the speakers or your hearing may be damaged by the increased volume 4 Switch the Digital output to PCM when you play DVDs that support linear PCM recording on the Mini Docking Station Connecting Audio and Video Devices You can experience Dolby Digital or PCM sound from the OPTICAL OUT connector To Optical Out To Video To S Video To Video Optical digital Vid...

Page 98: ... You also need to set up the TV configuration system See Selecting the Display Mode in the Customizing Your VAIO Notebook manual for more information Unplug the connecting cable from the MONITOR connector Connecting a TV Mini Docking Station TV To S Video To Video Video cable optional To Video To Audio connector Power Audio cable optional connector To Headphone To S Video connector ...

Page 99: ... came with your printer for more information You need to set up the printer port See I cannot print on page 142 for more information about setting up the printer port To connect a printer Plug the floppy disk drive cable to the docking FDD connector on your computer Then connect the printer cable supplied with the printer to the PRINTER connector of the floppy disk drive cable Parallel Port Printe...

Page 100: ...ion properly You can connect a printer while the floppy disk drive is in use When using a USB printer connect it to the USB connector of your computer or the USB connector of the Mini Docking Station If the Mini Docking Station is connected to your notebook you may connect the printer directly to it without the floppy drive cable Turn off your computer and all peripheral devices and disconnect the...

Page 101: ...ernal microphone See To connect external speakers on page 103 and To connect an external microphone on page 104 for details on connecting external speakers and an external microphone Monitor Connector See the manual that came with your computer display for more information on installation and use Computer display Power cord To Display cable optional Monitor ...

Page 102: ...n toggle the output among the LCD the external monitor or both devices Use the Fn F7 keys to select a display See also Selecting the Display Mode in the Customizing Your VAIO Notebook manual for more information Connecting a Projector See the manual that came with your projector for more information on installation and use Projector Power cord Audio cable optional RGB signal cable optional To Moni...

Page 103: ...nector and both the LCD and external display Check that your speakers are designed for computer use Shut down the computer and all peripheral devices before connecting the cables Connect all the cables before plugging in the power cord Turn on the peripheral devices power then turn on your computer Turn down the volume of the speakers before you turn them on Do not place diskettes on the speakers ...

Page 104: ...mation on installation and use Shut down the computer and all peripheral devices before connecting the cables Connect all the cables before plugging in the power cord Turn on the peripheral devices power then turn on your computer Make sure your microphone is designed for computer use The microphone should be compliant with the plug in power microphone The microphone input is MONO Connecting Micro...

Page 105: ...PCGA UMS1 A series with this computer The USB mouse software driver is preinstalled in the computer USB Port USB devices can be connected and disconnected while the computer is on See Using the Keyboard on page 39 for more information on using the keyboard See the manual that came with your mouse or keyboard for more information on installation and use A Sony USB mouse PCGA UMS1 A series optional ...

Page 106: ...VAIO Notebook User Guide 106 ...

Page 107: ... unpainted metal portion of the chassis while performing the procedure Do not open the memory module package until you are ready to install the module The package protects the module from ESD Use the special bag for preventing ESD or use aluminum foil when you store the memory module To install a memory module 1 Shut down your computer and disconnect all peripheral devices such as your printer 2 U...

Page 108: ...the two stoppers at the bottom of the keyboard and slide the keyboard toward the LCD display then lift it away slightly Removing the Memory Module Cover Remove the screw with a screwdriver of a proper size Keyboard Stoppers screw stopper ...

Page 109: ...play Be careful not to detach the cable when lifting the keyboard 6 Remove the new memory module from its packaging 7 Install the memory module as described in the following graphic Lifting the Keyboard Installing Memory Module Tabs Cable 1 Slide the memory module into the slot 2 Press the module into place until it clicks ...

Page 110: ... To remove a memory module 1 Follow steps 1 to 5 of To install a memory module 2 Touch a metal object such as the connector panel on the back of your computer to discharge static electricity 3 Remove the memory module 4 Follow steps 8 and 9 of To install a memory module Replacing the Keyboard Memory Module Pull the tabs in the direction of the arrows The memory module is released Pull the memory m...

Page 111: ... 2 Click the Start button point to VAIO and click Sony Notebook Setup The Sony Notebook Setup screen appears 3 Click the About This Computer tab to view the system memory If the additional memory is not shown repeat steps 1 9 of To install a memory module on page 107 ...

Page 112: ...VAIO Notebook User Guide 112 ...

Page 113: ...an open file format that is intended to preserve the fidelity of documents created on all major computer platforms Adobe PhotoDeluxe Home Edition Adobe Systems Inc Create amazing photo effects with Adobe PhotoDeluxe Without learning complex software you can enhance restore and be creative with your photos Includes built in guided activities stock photos clip art and templates to assist you Adobe P...

Page 114: ...s enhancement tools and special effects for improving photos while giving you the ability to add text to any image CompuServe 2000 Windows Me only CompuServe The all new CompuServe 2000 delivers a powerful tool for Internet users who want serious and timely information in depth research and professional communities backed by state of the art technologies including high speed access and powerful e ...

Page 115: ...ee VirusScan Network Associates Inc Protect your computer from viruses VirusScan can detect viruses from floppy disks Internet downloads e mail attachments intranets shared files CD ROMs and online services Media Bar Sony Electronics Inc Media Bar software is your all in one solution for audio video playback Media Bar software handles all common computer multimedia formats and controls selected So...

Page 116: ...ord s ease of use to the Web and e mail Word 2000 also extends that ease of use to international users making it simple to create multilingual documents MovieShaker Sony Electronics Inc Sony s original MovieShaker software creates personal movies that have transitions background music and text Just import your video clips and shake with the click of a mouse Your personal movies are easy to create ...

Page 117: ...ia e mail Smart Capture manages the i LINK connection between your computer and a Sony Digital Handycam camcorder that supports the i LINK interface It allows you to capture compressed video or still images that you can save or share via e mail A smart solution to computer digital audio video and network convergence Smart Connect Windows 2000 only Sony Electronics Inc Smart Connect allows you to u...

Page 118: ...un and innovative movies without any knowledge of film editing In a few simple steps motion pictures can be combined with special effects still images pictures and music files and then saved in a format most computers can play Importing Images and Sound Clips 1 Click 2 Find the file you want to add 3 Select the file 4 Click Open The file is added to the Clip tray Main window Importing files over 7...

Page 119: ... in the Shaker tray 3 Click A thirty second scene is automatically generated and saved to the Product tray 4 To preview switch the Work Panel to Product tray mode and press play Shaker Tray Scenes created with Shaker begin with black frame and after processing are placed in the first available slot on the Product tray Limit the number of scenes placed on the Product tray to 10 or less MovieShaker ...

Page 120: ...rop the Effect you want to add from the Effects tray to the Effects palette on the Working Panel 4 See help for instructions on adjusting effect duration and replaying clips scenes Saving a Movie 1 Verify that the clip s you want to save is on the Product tray See Help for more details on saving movies 2 Click Export Working Panel To preview an Effect click on the clip in the Working panel monitor...

Page 121: ...ng Your Pictures Use the collection feature to manage your pictures 1 Click the Folder tab and browse to locate your pictures 2 Select the pictures you want to have in a collection 3 From Collection menu select Create New Collection 4 Enter a name for the collection and then click OK Creating a Photo Album 1 Select the pictures you want to use to make an album 2 From the Utilities menu select Albu...

Page 122: ...ce images should be the same size and overlap 20 How to stitch a panoramic picture 1 Gather the source images into the same folder or collection 2 Select the images you want to use 3 From the Utilities menu select Panorama Maker 4 Select the correct lens and click OK If 35mm lens is selected the prompt does not appear to select a different lens click the lens icon 5 Click the panoramic icon near t...

Page 123: ...b site http www adobe com phone 206 675 6126 fee based support e mail techdocs adobe com hours M F 6 AM 5 PM Pacific Time Web site http www aol com phone 800 827 3338 hours 7 days a week 24 hours a day Web site http www compuserve com phone 800 848 8990 Web site http www adaptec com phone 408 945 8600 hours M F 8AM 5 PM PT Web site http help earthlink net techsupport phone 800 395 8410 e mail supp...

Page 124: ...y Web site http www arcsoft com http www photoisland com phone 510 440 9901 e mail techsupport arcsoft com hours M F 8 30 AM 5 30 PM PT Web site http www prodigy com phone 800 213 0992 hours 7 AM 3 AM Eastern Time Web site http www intuit com support phone 900 555 4932 fee based support hours M F 5AM 5PM Pacific Time Web site http www sony com pcsupport phone 888 4SONYPC 888 476 6972 hours 7 days ...

Page 125: ...tronics This program allows you to reinstall individual applications and device drivers Use it to restore corrupted or accidentally erased files System Recovery CD s Sony Electronics This program allows you to restore the software titles that shipped with your computer if they become corrupted or are erased accidentally It can be used only to restore the hard disk of this Sony computer Driver Reco...

Page 126: ...ry CD s on page 127 To use the Application Recovery CD s 1 Turn on your computer If your computer is already on close all applications 2 When the Windows desktop appears insert the Sony Application Recovery CD in the DVD ROM drive The Application Recovery utility loads automatically 3 When the Application Recovery menu appears select the icon for the application you want to restore and then follow...

Page 127: ...ull Restore with Format that is it formats the hard disk drive and then restores all the original software To use the System Recovery CD s 1 Insert the Sony System Recovery CD in the DVD ROM drive 2 Shut down your computer as described in Shutting Down Your Notebook on page 35 3 Wait four seconds and turn on your computer 4 Click OK to signify you have read and accept the Microsoft End User Licens...

Page 128: ...iguration changes and exit now appears 7 Check that Yes is selected then press the Enter key The computer restarts from the Recovery CD Recovering Microsoft Word 2000 If you recover your operating system using the System Recovery CD Microsoft Word 2000 will not be recovered Use the supplied Word 2000 CD to recover this application Your system may include one or two System Recovery CDs If you have ...

Page 129: ...ns To use the Driver Recovery CD s 1 Turn on your computer If your computer is already on close all applications 2 When the Windows desktop appears insert the Driver Recovery CD in the optical drive The Driver Recovery utility loads automatically 3 When the Driver Recovery menu appears follow the on screen instructions to complete the recovery process To repair software applications using VAIO Sup...

Page 130: ...VAIO Notebook User Guide 130 ...

Page 131: ...rce and that it is turned on Check that the power indicator on the front panel of the notebook indicates that the power is on Check that the battery packs are inserted properly and that they are charged Make sure there is no diskette in the floppy disk drive Confirm that the power cord and all cables are connected firmly as described in Connecting Peripheral Devices on page 81 If you plugged the n...

Page 132: ...message Save Configuration changes and exit now appears 7 Select Yes and then press Enter The notebook restarts My notebook starts but the message Operating system not found appears and Windows does not start Make sure there is no diskette in the floppy disk drive nonbootable If a nonbootable diskette is in the drive follow these steps 1 Turn off the notebook and then remove the diskette 2 Restart...

Page 133: ...t button click Shut Down and then click Restart Windows Me If you cannot restart as described in the preceding step you can restart the notebook by pressing Ctrl Alt Delete keys at the same time twice Windows 2000 IF you cannot restart as described in the preceding step you can restart the notebook by pressing Ctrl Alt Delete keys at the same time and clicking Shut Down on Windows Security screen ...

Page 134: ...tion feature is disabled click the Enable button 4 Click OK and restart your notebook My system enters System Idle mode when System Suspend mode has been selected If you are connecting an optical drive with a PC card disconnect it by stopping the PC card See To remove a PC card on page 61 for more information Make sure the PC Card is compatible with your notebook s Windows operating system Pressin...

Page 135: ...iet This setting slows down the CPU speed See PowerPanel Help for more information The TV screen was blank when I returned from a power saving mode Select the TV display mode and remove the DVD video disc if it is inserted in the DVD ROM drive Troubleshooting the LCD screen My LCD screen is blank Check that the notebook is plugged into a power source and that it is turned on Check that the power i...

Page 136: ...the DVD disc if it is inserted in the DVD ROM drive Troubleshooting the mouse and touchpad My mouse does not work If you are using an external mouse check that the mouse is plugged into the mouse connector See Connecting a Universal Serial Bus USB Device Mouse or Keyboard on page 105 or Connecting an external mouse or keyboard on page 89 for details If you are using an optional Sony USB mouse PCGA...

Page 137: ... and hold the power button for more than four seconds to turn off the notebook If the pointer does not move while playing a disc press Ctrl Alt Delete keys at the same time to stop playback and restart the notebook Troubleshooting drives PC cards and peripheral devices I inserted a compatible device into the multipurpose drive bay but the icon does not appear in the My Computer window The device h...

Page 138: ...the drive to malfunction If a region code warning appears when you try to use your DVD ROM drive it may be that the DVD you are trying to play is incompatible with the DVD ROM drive Check the region code listing on the DVD packaging Moisture condensation may have occurred Leave the notebook idle for at least 1 hour with the notebook turned on My CD or DVD drive tray does not open Make sure the not...

Page 139: ...f this manual When I click an application icon the message You must insert the application CD into your CD ROM DVD ROM CD RW drive appears and the software does not start Some titles require specific files that are located on the application CD Insert the disc and try starting the program again Make sure you place the CD in the tray with the label side facing up i LINK is a trademark of Sony used ...

Page 140: ...provider for technical support Troubleshooting the modem My modem does not work Check that the phone line is plugged into the line jack See Connecting a Phone Line on page 82 for details Check that the phone line is working You can check the line by plugging in an ordinary phone and listening for a dial tone Check that the phone number the program is dialing is correct Check that the software you ...

Page 141: ...e minimum press Fn F4 and then press or to increase the volume or you can use the Jog Dial control to adjust the volume If nothing is displayed when you press Fn F3 or Fn F4 1 Double click System in Control Panel 2 Set the sound device to enable in Device Manager If your notebook is powered by batteries check that the battery packs are inserted properly and that they are charged If you are using a...

Page 142: ...p select the Printer tab If the printer port mode is set to ECP change it to bi directional If the printer port mode is set to bi directional change it to ECP See Displaying the Sony Notebook Setup Screen in the Customizing Your VAIO Notebook manual for details on using Sony Notebook Setup Your connected printer may not function after the computer resumes from a power saving mode If this occurs fo...

Page 143: ...uttons for mouse clicks you can tap on the touchpad to indicate mouse clicks By default the tapping feature is disabled If you wish to turn on the tapping feature click the Mouse icon in the Control Panel select the Tapping tab and click the check box to enable tapping Using Optical Out to Record Onto a MiniDisc To ensure proper operation disable the IrDA feature before using Optical Out from a Mi...

Page 144: ...essed from the Windows desktop Using advanced diagnostic technology Sony s VAIO Support Agent runs scheduled protections of your applications network settings and other important software settings When your software is protected you can use VAIO Support Agent to repair software problems by restoring your software to any of the previously protected states 5 Sony PC Support Provides instant access t...

Page 145: ... up to 24X max variable transfer rate Reads DVD data up to 8X max variable transfer rate CD RW Drive Reads CD data up to 20X max variable transfer rate Writes CD R data up to 4X max variable transfer rate Writes CD RW data up to 4X max variable transfer rate The CD RW drive is optional on PCG XG500K Laser Diode Properties DVD ROM drive wave length 780 nm and 650 nm laser output 30 2 µW CD RW drive...

Page 146: ...yboard Control A1 II S Video output Video output Serial port Line in Line out Two USB ports Parallel printer port Floppy disk drive Type II 1 III PC Cards Supplied Accessories Floppy disk drive Rechargeable battery AC adapter and power cord Weight Saver FDD cable FDD stand for Mini Docking Station DVD ROM drive CD RW drive for PCG XG700 XG700K only Mini Docking Station Power Requirements 73 2 watt...

Page 147: ...n code indicators such as a 1 or ALL are labeled on some DVDs to indicate what type of player can play the discs Unless a 1 or ALL is identified on your DVDs or on the packaging you cannot play the disc on this player Maximum speed for faxing is 14 4 kbps Your 56K V 90 compatible modem is capable of downloading at 53 kbps Your online service or Internet Service Provider however may not support thi...

Page 148: ...VAIO Notebook User Guide 148 ...

Page 149: ...s adjusting 35 43 built in speakers See also speakers 43 buttons Eject 53 54 Start 35 Start Windows 35 C cables power cord 27 canceling commands 40 Caps Lock indicator light 42 CD ROMs cleaning 58 handling 58 charging battery packs 31 65 choosing power source 29 cleaning CD ROMs and DVD ROMs 58 Closing your computer intercooler flap 38 coin operated telephones 82 computer 144 handling 19 starting ...

Page 150: ... disposal of lithium ion battery 8 Dolby Digital Decoder 97 Dolby Digital Decoder 97 Driver Recovery CD 129 drives installing additional hard disk 59 DVD ROM discs ejecting 54 inserting 53 DVD ROM drive closing tray 54 opening tray 53 using 53 DVD ROM drive tray troubleshooting 138 DVD ROMs cleaning 58 handling 58 E Eject button 50 53 54 ejecting battery packs 66 diskettes 50 DVD ROM discs 54 elec...

Page 151: ...roubleshooting 63 input devices 6 Insert key 40 inserting battery pack 29 diskettes into drive 50 DVD ROM discs 53 installation 18 installing hard drives 59 hardware 81 peripherals 81 Intercooler flap closing 38 interference 6 J Jog Dial control 74 using 75 K keyboard 40 L LCD lock lever 34 selecting to display output 102 troubleshooting 135 136 LCD screen handling 19 lever LCD 34 weight saver rel...

Page 152: ...g help 47 features 47 MovieShaker instructions 118 multiple phone lines 82 N navigation keys 40 network connecting 59 Num Lock indicator light 42 numeric keypad area 40 O online help 144 opening DVD ROM drive tray 53 operator keys 40 output devices 6 P party phone lines 82 PBX 82 PC card inserting 59 release button 59 removing 61 slot protector 60 slots 59 troubleshooting 139 Type III 59 Periphera...

Page 153: ...Docking Station 87 replacing battery packs 64 restoring data 126 S Scroll Lock indicator light 42 second battery pack 29 64 selecting display 102 LCD 102 monitor 102 power source 29 setting up your PC support 144 Shift key 40 Shut Down Windows dialog box 35 Shutting Down 35 Sony Fax on Demand service 144 Sony Service Center 125 speakers external 103 switching 43 troubleshooting 141 volume 43 Speci...

Page 154: ...ce 6 TV or a video deck 98 U USB connector 24 26 V VAIO Action Setup 74 118 Video Standby mode 43 W weight saver attaching 64 Windows Control Panel 63 Explorer 41 Find window 41 help 41 key 40 key combinations 41 Start button 35 taskbar 35 133 ...

Reviews: