background image

49

n

N

Using Your VAIO Computer

Inserting an ExpressCard Module

!

Your computer is delivered with a slot protector in the ExpressCard slot. Remove the slot protector before you use the slot for the first time.

Use care when inserting or removing the ExpressCard module from the slot. Do not force it in or out of the slot.

You do not need to shut down your computer before inserting or removing the ExpressCard module.

To insert an ExpressCard module

1

Push the ExpressCard slot protector to pop it out.

2

Gently take hold of the ExpressCard slot protector and pull it out of the slot.

3

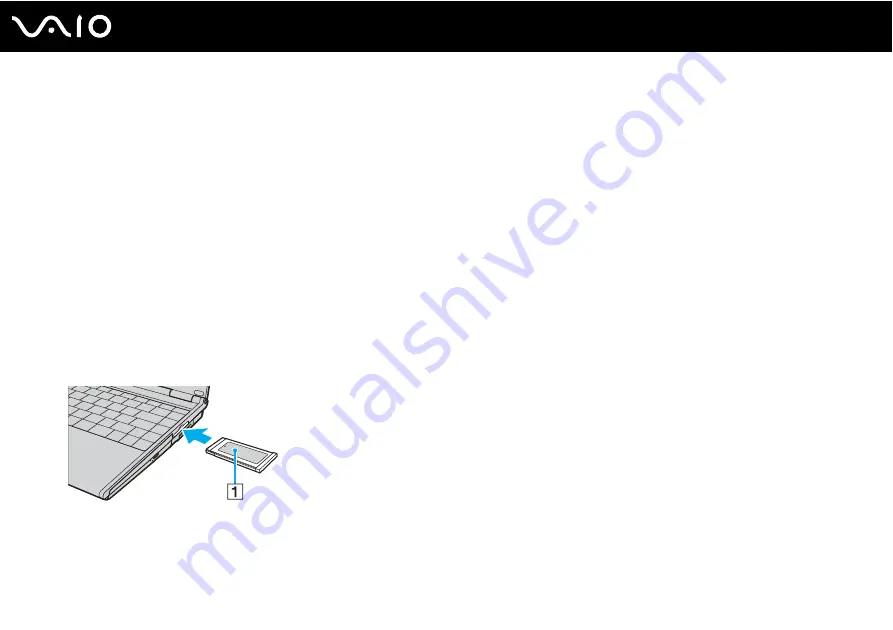
Hold the ExpressCard module with the arrow facing upward and pointing toward the ExpressCard slot.

4

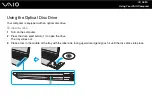
Carefully slide the ExpressCard module (1) into the slot until it clicks into place.
Do not force it into the slot.

Summary of Contents for VAIO VGN-SZ4WX

Page 1: ...N User Guide Personal Computer V G N S Z s e r i e s ...

Page 2: ...g a Power Source 23 Using the Battery Pack 24 Shutting Down Your Computer Safely 29 Using Your VAIO Computer 30 Using the Keyboard 31 Using the Touch Pad 33 Using Special function Buttons 34 Using the Built in MOTION EYE Camera 35 Using the Optical Disc Drive 36 Using PC Cards 45 Using the ExpressCard Module 48 Using the Memory Stick Media 52 Using Other Memory Cards 58 ...

Page 3: ...l Microphone 95 Connecting a Universal Serial Bus USB Device 96 Connecting a Printer 99 Connecting an i LINK Device 100 Connecting to a Network LAN 102 Customizing Your VAIO Computer 104 Selecting Performance Modes 105 Setting the Password 106 Using Fingerprint Authentication 113 Using Trusted Platform Module TPM 139 Setting Up Your Computer with VAIO Control Center 146 Using the Power Saving Mode...

Page 4: ...N EYE Camera 171 On Handling Floppy Disks 172 On Handling Discs 173 On Using the Battery Pack 174 On Using Headphones 175 On Handling Memory Stick Media 176 On Handling the Hard Disk 177 On Handling the Memory Card Adapter 178 Troubleshooting 179 Computer 181 System Security 188 Battery 189 Built in MOTION EYE Camera 191 Internet 194 Networking 196 Bluetooth Technology 199 Optical Discs 203 Displa...

Page 5: ...1 Mouse 212 Speakers 213 Touch Pad 214 Keyboard 215 Floppy Disks 216 PC Cards 217 Audio Video 219 Memory Stick Media 220 Peripherals 221 Docking Station 222 Support Options 223 Sony Support Information 223 e Support 224 Trademarks 226 ...

Page 6: ... computer and welcome to the on screen User Guide Sony has combined leading edge technology in audio video computing and communications to provide state of the art personal computing External views illustrated in this manual may look slightly different from those of your computer ...

Page 7: ...ness for any particular purpose with regard to this manual the software or such other information In no event shall Sony Corporation be liable for any incidental consequential or special damages whether based on tort contract or otherwise arising out of or in connection with this manual the software or other information contained herein or the use thereof In the manual the or marks are not specifi...

Page 8: ...g you need to get the most from your computer The user guides are collected under Documentation which can be shown by clicking the VAIO Documentation icon on the desktop or following these steps 1 Click Start All Programs and My Club VAIO 2 Click Documentation 3 Select the guide you want to read You can manually browse to the user guides by going to Computer VAIO C your C drive Documentation Docum...

Page 9: ...s Safety Regulations Modem Regulations Wireless LAN Regulations Bluetooth Regulations End User Software License Agreement and Sony Support services Non printed Documentation User Guide this manual Contains features of your computer It also includes information about the software programs included with your computer as well as information on solving common problems Specifications The online Specifi...

Page 10: ...t Center Important information about your computer in the form of notices and announcements In My Club VAIO you can also find Accessories Want to expand the capabilities of your computer Click this icon and have a look at your compatible accessories Software Feeling creative Click this icon for an overview of your software and check out our upgrade options Wallpapers Click this icon and check out ...

Page 11: ...ndows Help resources including those that are on the Internet To access Windows Help and Support click Start and Help and Support Or go to Windows Help and Support by pressing and holding the Microsoft Windows key and pressing the F1 key Further Sources Consult the help files on the software you are using for detailed information on features and troubleshooting Go to http www club vaio com to find...

Page 12: ...p your forearms horizontal 2 with your wrists in a neutral comfortable position 3 while using the keyboard touch pad or external mouse Let your upper arms hang naturally at your sides Have breaks during sessions with your computer Excessive use of the computer may strain muscles or tendons Furniture and posture Sit in a chair with good back support Adjust the level of the chair so your feet are fl...

Page 13: ...e display as well Lighting Choose a location where windows and lights do not create glare and reflection on the display Use indirect lighting to avoid bright spots on the display Proper lighting adds to your comfort and work effectiveness Positioning an external display When using an external display set the display at a comfortable viewing distance Make sure the display screen is at eye level or ...

Page 14: ...section describes how to get started with using your VAIO computer Locating Controls and Ports page 15 About the Indicator Lights page 21 Connecting a Power Source page 23 Using the Battery Pack page 24 Shutting Down Your Computer Safely page 29 ...

Page 15: ... that the illustrations in this manual may not necessarily apply to your model Front A Built in MOTION EYE camera page 35 B Built in MOTION EYE camera indicator page 21 C Built in microphone monaural D LCD screen page 167 E Built in speakers stereo F Keyboard page 31 G Touch pad page 33 H Fingerprint sensor page 113 On selected models only ...

Page 16: ... Wireless LAN indicator page 21 E Bluetooth indicator page 21 F S1 S2 buttons page 34 G STAMINA mode indicator page 21 H Performance selector switch page 105 I SPEED mode indicator page 21 J WIRELESS switch page 62 K Num lock indicator page 21 L Caps lock indicator page 21 M Scroll lock indicator page 21 N Power button ...

Page 17: ...17 n N Getting Started Back A DC IN port page 23 B Battery connector page 24 C Air vents D Security slot ...

Page 18: ...ndicator page 21 C Manual eject hole page 203 D Drive eject button page 36 E ExpressCard 34 slot 1 page 48 F Hi Speed USB USB 2 0 ports 2 page 96 G Network Ethernet port page 102 H Modem port page 61 1 Referred to as the ExpressCard slot hereinafter 2 Supports high full low speeds ...

Page 19: ...port page 100 E Monitor VGA port page 88 F PC Card slot page 45 G PC Card release button page 47 H Memory Stick Duo PRO Duo media indicator page 21 I Memory Stick Duo PRO Duo media slot page 53 Your computer supports Memory Stick Duo media and Memory Stick PRO Duo media with high speed and high capacity capabilities ...

Page 20: ...20 n N Getting Started Bottom A Docking station connector page 78 B Air vents ...

Page 21: ...a Illuminates while the built in MOTION EYE camera is in use Optical disc drive Illuminates when data is read from or written to the optical disc When the indicator is off the optical disc is not being used STAMINA mode Illuminates when the computer is in STAMINA mode to conserve battery power SPEED mode Illuminates when the computer is in SPEED mode to provide faster performance Hard disk drive I...

Page 22: ...oll lock indicator is off The Scr Lk key functions differently depending on the program you are using and does not work with all programs Bluetooth technology Illuminates when the WIRELESS switch is set to ON and Bluetooth technology is enabled Wireless LAN Illuminates when the wireless LAN function is running Indicator Functions ...

Page 23: ...wer cord into an AC outlet 2 3 Plug the cable attached to the AC adapter 3 into the DC IN port 4 on the computer or on the optional docking station The shape of the DC In plug varies depending on the AC adapter To disconnect your computer completely from AC power unplug the AC adapter Make sure that the AC outlet is easily accessible If you do not use your computer for a long period of time place ...

Page 24: ... is not fully charged at the time of purchase Installing the Battery Pack To install the battery pack 1 Turn off the computer and close the LCD screen lid 2 Slide the battery lock switch 1 to the UNLOCK position 3 Slide the battery pack into the battery compartment until it clicks into place ...

Page 25: ... to AC power and has a battery pack installed it uses power from the AC outlet Certain rechargeable batteries do not meet Sony quality and safety standards For safety reasons this computer only functions with genuine Sony batteries designed for this model When installing another kind of battery the battery will not be charged and the computer will not function ...

Page 26: ...omputer The computer automatically charges the battery pack the battery indicator light flashes in a double blink pattern as the battery pack charges When the battery pack is about 85 charged the battery indicator turns off Battery indicator light status Meaning On The computer is using battery power Blinks The battery pack is running out of power Double blinks The battery pack is charging Off The...

Page 27: ...t battery life The battery indicator light is on while you use the battery pack as a power source When battery life is nearly depleted both the battery and power indicator lights start flashing For some software applications and some peripheral devices your computer may not enter Hibernate mode even when battery life is low To avoid loss of data when using battery power you should save your data f...

Page 28: ...t connected to the AC adapter or if you remove the battery pack while the computer is in Sleep mode To remove the battery pack 1 Turn off the computer and close the LCD screen lid 2 Slide the battery lock switch 1 to the UNLOCK position 3 Slide and hold the battery release latch 2 and slide the battery pack away from the computer ...

Page 29: ... as described below To shut down your computer 1 Turn off any peripherals connected to the computer 2 Click Start the arrow next to the Lock button and Shut Down 3 Respond to any prompts warning you to save documents or to consider other users and wait for the computer to turn off automatically The power indicator light turns off ...

Page 30: ... Touch Pad page 33 Using Special function Buttons page 34 Using the Built in MOTION EYE Camera page 35 Using the Optical Disc Drive page 36 Using PC Cards page 45 Using the ExpressCard Module page 48 Using the Memory Stick Media page 52 Using Other Memory Cards page 58 Using the Internet page 61 Using Wireless LAN WLAN page 62 Using the Bluetooth Functionality page 69 ...

Page 31: ...F2 speaker switch Turns on and off the built in speakers and the headphones Fn 2 F3 F4 volume Adjusts the volume level To increase the volume press Fn F4 and then M or or keep pressing Fn F4 To decrease the volume press Fn F3 and then m or or keep pressing Fn F3 Fn 8 F5 F6 brightness control Adjusts the LCD brightness of your computer screen To increase lightness intensity press Fn F6 and then M o...

Page 32: ...lution The location and size of software windows may change when the screen view is magnified or the standard view is restored because pressing this key combination changes the resolution When your computer s screen view is magnified switching the view to the external display disables the function and restores the standard view Fn F12 Hibernate Provides for the lowest level of power consumption Wh...

Page 33: ...2 on an item or object Click Press the left button 3 once Double click Press the left button twice Right click Press the right button 4 once In many applications this action displays a shortcut menu Drag Slide one finger on the touch pad while pressing the left button Scroll Move your finger along the right edge of the touch pad to scroll vertically Move your finger along the bottom to scroll hori...

Page 34: ...2 buttons By default the S1 button launches VAIO Help and Support Center and the S2 button lowers the CPU speed to reduce the fan noise You can change these button assignments on the window for changing the S button assignments To display this window press and hold either button or launch and navigate through VAIO Control Center See the help file on VAIO Control Center for the S button assignments...

Page 35: ...ging or video editing software does not activate or deactivate the built in MOTION EYE camera respectively Make sure that the camera is activated before using the software The built in MOTION EYE camera cannot be shared by more than one software application If another software application is using the camera exit the application before using the built in MOTION EYE camera The viewer window may sho...

Page 36: ...is equipped with an optical disc drive To insert a disc 1 Turn on the computer 2 Press the drive eject button 1 to open the drive The tray slides out 3 Place a disc in the middle of the tray with the label side facing upward and gently push it until the disc clicks into place ...

Page 37: ... gently Do not remove the optical disc when your computer is in a power saving mode Sleep or Hibernate Doing so may cause the computer to malfunction If you plan to use an external optical disc drive connect the drive before you launch any preinstalled CD DVD program ...

Page 38: ...P PR 1 2 PR PR 5 PR 6 CD RW DVD ROM P P P P PR P P P P P P DVD ROM P P P P P P P P P P P 1 Supports writing data to DVD R discs compliant with DVD R for General Version 2 0 2 1 2 Supports writing data to DVD RW discs compliant with DVD RW Version 1 1 1 2 3 The DVD RW RAM disc drive on your computer does not support the DVD RAM cartridge Use non cartridge discs or discs with removable cartridge 4 W...

Page 39: ...DAMAGE TO YOUR VAIO PC OR CREATE SOFTWARE CONFLICTS AND CAUSE SYSTEM HANGING For inquiries about disc formats contact the individual publisher of the pre recorded disc or the manufacturer of the recordable disc 8cm disc writing is not supported PR playable and recordable P playable but not recordable not playable or recordable CD ROM Video CD Music CD CD Extra CD R RW DVD ROM DVD Video BD ROM DVD ...

Page 40: ...t high bit rates Region settings are required for Movies and BD ROM contents If the region setting and the region of the disc do not match playback is not possible Unless your external display is compliant with the High bandwidth Digital Content Protection HDCP standard you cannot play or view the contents of copyright protected Blu ray Discs Some contents may restrict video output to be standard ...

Page 41: ...hile writing data to a disc This may cause your computer to malfunction When using your software application to burn discs make sure you exit and close all other applications Never touch the surface of the disc Fingerprints and dust on the surface of a disc may cause writing errors Do not switch power modes while using the preinstalled software and while using the CD burning software Never affix a...

Page 42: ...ring and the speakers Reduce the volume before playing a DVD Do not switch to power saving modes while your computer is playing a DVD Region codes indicators are labeled on the DVDs to indicate in which region and on what type of player you can play the disc Unless a 2 Europe belongs to region 2 or all this means that you can play this DVD in most regions of the world is labeled on your DVD disc o...

Page 43: ...appears click to select an option Copying Files to CDs To copy files to a disc Do not strike or shake your computer while writing data to a disc 1 Insert a disc into the optical disc drive If the AutoPlay window appears click Burn files to disc and follow the on screen instructions until the empty disc folder appears 2 Open the folder that contains the file s you want to copy and drag them to the ...

Page 44: ...are to play the DVD For instructions on how to use the software see the help file on your DVD software Copying Files to DVDs To copy files to a disc 1 Connect the AC adapter to the computer 2 Insert a disc into the optical disc drive 3 If nothing appears on the desktop then click Start All Programs and the desired DVD software to copy files to the disc For instructions on how to use the software s...

Page 45: ...d To insert a PC Card 1 Push the PC Card release button so that the release button pops out 2 Push the PC Card release button a second time so that the PC Card slot protector pops out 3 Gently take hold of the protector and pull it out of the slot 4 Insert the PC Card into the PC Card slot with the front label facing upward 5 Gently push the PC Card into the slot all the way to the end The PC Card...

Page 46: ...that a device connected to your system is not recognized Restart your system to correct the problem Restarting will restore the original state of your computer While the card is inserted your computer may not enter Hibernate mode It may enter Sleep mode We recommend that you remove the card before the computer enters Hibernate mode Make sure you use the most recent software driver provided by the ...

Page 47: ...hardware you want to unplug 3 Click Stop The Stop a Hardware device window appears 4 Confirm that the device can be safely removed from the system 5 Click OK A message appears stating it is now safe to remove the hardware device 6 Click OK 7 Click Close to close the Safely Remove Hardware window 8 Push the PC Card release button so that the release button pops out 9 Push the PC Card release button...

Page 48: ...ameras camcorders music players and other audio video devices The former can accommodate either an ExpressCard 34 34 mm wide or ExpressCard 54 54 mm wide module as shown below and the latter an ExpressCard 34 module only Your computer is equipped with an ExpressCard 34 slot Hereinafter referred to as the ExpressCard slot and the ExpressCard module ExpressCard 34 module ExpressCard 54 module ...

Page 49: ... in or out of the slot You do not need to shut down your computer before inserting or removing the ExpressCard module To insert an ExpressCard module 1 Push the ExpressCard slot protector to pop it out 2 Gently take hold of the ExpressCard slot protector and pull it out of the slot 3 Hold the ExpressCard module with the arrow facing upward and pointing toward the ExpressCard slot 4 Carefully slide...

Page 50: ...ressCard module Before moving your computer make sure to insert the ExpressCard slot protector into the slot If the module or adapter does not go into the slot easily remove it gently and verify you are inserting it in the proper direction Make sure you use the most recent software driver provided by the ExpressCard module manufacturer ...

Page 51: ...k the Safely Remove Hardware icon on the taskbar The Safely Remove Hardware window appears 2 Select the hardware you want to unplug 3 Click Stop The Stop a Hardware device window appears 4 Confirm that the device can be safely removed from the system 5 Click OK A message appears stating it is now safe to remove the device 6 Click OK 7 Click Close to close the Safely Remove Hardware window 8 Push i...

Page 52: ...the Memory Stick media visit the Memory Stick Web site at http www memorystick com en Your computer has been tested and found compatible with the Sony branded Memory Stick media with capacity of up to 4 GB that are available as of September 2006 However not all Memory Stick media that meet the same conditions as the compatible media are guaranteed of compatibility Inserting a Memory Stick media wi...

Page 53: ... you need the supplied memory card adapter See Using the ExpressCard Module page 48 and Using Other Memory Cards page 58 for more information To insert a Memory Stick media using the Memory Stick Duo PRO Duo media slot 1 Hold the Memory Stick media with the arrow facing upward and pointing toward the Memory Stick Duo PRO Duo media slot 2 Carefully slide the Memory Stick media into the slot until i...

Page 54: ...lot Improper insertion of the media may damage both your computer and the media Your computer supports Memory Stick Duo media and is equipped with the Memory Stick Duo PRO Duo slot that is only compatible with the duo size media For more information on the Memory Stick Duo media visit the Memory Stick Web site at http www memorystick com en To view the contents of the Memory Stick media 1 Click St...

Page 55: ... media Avoid accidental erasure of your valuable data Do not remove the Memory Stick media from the slot while formatting the media This could cause a malfunction 1 Carefully slide the Memory Stick media into the slot until it clicks into place 2 Click Start and Computer to open the Computer window 3 Right click the Memory Stick media icon and select Format 4 Click Restore device defaults The size...

Page 56: ...N Using Your VAIO Computer 6 At the confirmation prompt click OK The formatting process starts It may take time to format the Memory Stick media depending on the media 7 Once completed click OK 8 Click Close ...

Page 57: ...ck media in toward the computer The Memory Stick media ejects 3 Pull the Memory Stick media out of the slot Always remove the Memory Stick media gently or it may pop out unexpectedly Do not remove the Memory Stick media while the Memory Stick Duo PRO Duo media indicator is turned on If you do you may lose data Large volumes of data may take time to load so be sure the indicator is off before remov...

Page 58: ...Stick PRO media is not supported The copyright protection and high speed data transfer features of the SD memory card are not supported SD memory cards with capacity of over 2 GB such as SD High Capacity SDHC memory cards are not supported As for the Memory Stick PRO media only Sony branded media is recommended to use with the adapter Your computer has been tested and found compatible only with ma...

Page 59: ...Insert any one of the memory cards 2 to the memory card adapter 1 Make sure to insert a memory card into the memory card adapter in the correct direction to avoid possible damage to the memory card adapter 2 See Inserting an ExpressCard Module page 49 to insert the memory card adapter into the ExpressCard slot ...

Page 60: ...remove a memory card from the memory card adapter See Removing an ExpressCard Module page 51 to remove the memory card adapter from the ExpressCard slot Then firmly grasp the extended part of the memory card and carefully pull it out of the memory card adapter ...

Page 61: ...wall jack 2 Your computer does not work with party lines cannot be connected to a coin operated telephone and may not work with multiple telephone lines or a private branch exchange PBX Some of these connections may result in excess electrical current and could cause a malfunction in the internal modem If you connect a telephone cable coming through a splitter the modem or connected device may not...

Page 62: ...pull cables or wires through walls and ceilings The Sony WLAN supports all normal Ethernet activities but with the added benefits of mobility and roaming You can still access information Internet intranet and network resources even in the middle of a meeting or as you move from one place to another You can communicate without an access point which means that you can communicate between a limited n...

Page 63: ...ual private networks and authentication WPA2 the second generation of WPA provides stronger data protection and network access control and is also designed to secure all versions of 802 11 devices including 802 11b 802 11a and 802 11g multi band and multi mode In addition based on the ratified IEEE 802 11i standard WPA2 provides government grade security by implementing the National Institute of S...

Page 64: ...stence of obstacles between such devices the radio conditions the ambient environment that includes existence of walls and materials of such walls and the software in use Deploying IEEE 802 11b and IEEE 802 11g products on the same wireless network may reduce the communication speed due to radio interference Taking this into consideration the IEEE 802 11g products are designed to reduce the commun...

Page 65: ... controller or access point Each device communicates directly with other devices in the network You can set up an ad hoc network easily at home If the wireless connection is initiated by the VAIO computer channel 11 will be selected If the wireless connection is initiated by peer wireless LAN equipment the wireless LAN communication will make use of the channel selected by the peer wireless LAN eq...

Page 66: ...e Switch window Select your desired wireless option s and click OK 2 Click Start and Control Panel 3 Click View network status and tasks under Network and Internet 4 Click Set up a connection or network on the left pane The Set up a connection or network window appears 5 Select an option to specify the ad hoc network settings and click Next 6 Follow the on screen instructions See the online Specif...

Page 67: ...he Sony Access Point The access point bridges the wireless and wired LAN and acts as a central controller for the wireless LAN The access point coordinates transmission and reception from multiple wireless devices within a specific range The access point will select which channel to use on an infrastructure network For details on how to select the channel that will be used by the access point see ...

Page 68: ...ess option s and click OK 3 Click Start and Control Panel 4 Click View network status and tasks under Network and Internet 5 Click Manage wireless networks 6 Click Add 7 Follow the on screen instructions See the online Specifications to see whether your model supports the Bluetooth functionality and or the IEEE 802 11a b g standard To disconnect from a wireless network Turn off the WIRELESS or WIR...

Page 69: ...oth devices such as another computer or a mobile phone You can transfer data between these devices without cables and up to 10 meters range in open space To connect to a Bluetooth device 1 Turn on the WIRELESS switch 2 Double click on the taskbar to display the Wireless Device Switch window 3 Select the Enable Bluetooth Device option 4 Click OK ...

Page 70: ...same time on your computer Size of file being exchanged Note that due to limitations of the Bluetooth standard large files may occasionally be corrupted during continuous transfer due to electromagnetic interference from the environment All Bluetooth devices must be certified to make sure that the applicable standard requirements are maintained Even if standards are met individual device performan...

Page 71: ...d by third party companies As general characteristics of Bluetooth technology connecting multiple Bluetooth devices to your computer may cause bandwidth congestion resulting in poor performance of the devices Bluetooth Security The Bluetooth wireless technology has an authentication function which allows you to determine with whom you choose to communicate With the authentication function you can ...

Page 72: ...IO Computer Communicating with Another Bluetooth Device You can connect your computer to a Bluetooth device such as another computer a mobile phone a PDA a headset a mouse or a digital camera without the use of any cables ...

Page 73: ...uetooth functionality For setting up and using the Bluetooth functionality see the help file on the Bluetooth utility software To see the help file 1 Right click the Bluetooth icon on the taskbar and select Help from the menu Stopping the Bluetooth Connection To stop the Bluetooth connection turn off the WIRELESS switch The Bluetooth indicator turns off ...

Page 74: ...ooth icon on the taskbar and select Bluetooth Settings from the menu The Bluetooth Settings window appears and Add New Connection Wizard automatically starts 4 If the Add New Connection Wizard window does not appear click New Connection The Add New Connection Wizard window appears 5 Select Express Mode Recommended and then click Next The wizard searches for Bluetooth devices in range and lists ava...

Page 75: ...ect the headset from your computer 1 Right click the Bluetooth icon on the taskbar and select Bluetooth Settings from the menu The Bluetooth Settings window appears 2 Right click the headset icon and select Disconnect from the menu 3 Click Yes ...

Page 76: ...g Station page 77 Connecting External Speakers page 86 Connecting an External Display page 87 Selecting Display Modes page 91 Using the Multiple Monitors Function page 93 Connecting an External Microphone page 95 Connecting a Universal Serial Bus USB Device page 96 Connecting a Printer page 99 Connecting an i LINK Device page 100 Connecting to a Network LAN page 102 ...

Page 77: ...d only through the AC adapter supplied with your computer Do not unplug the AC adapter from the docking station and the AC outlet while using the docking station this may cause data damage or hardware malfunctions A DC IN indicator Illuminates when the docking station is powered B IN USE indicator page 82 C UNDOCK button page 82 D DC IN port page 78 E Network Ethernet port 1000BASE T 100BASE TX 10...

Page 78: ...ttach your computer to the docking station To prevent loss of unsaved data be sure to turn off your computer before attaching it to the docking station 1 Disconnect all peripherals from the computer 2 Plug one end of the power cord 1 into the AC adapter 2 and the other end into an AC outlet 3 Plug the cable attached to the AC adapter 2 into the DC IN port 3 on the docking station 4 ...

Page 79: ...79 n N Using Peripheral Devices 4 Slide open the docking station connector cover on the bottom of the computer ...

Page 80: ...80 n N Using Peripheral Devices 5 Align the rear bottom corners and the left side of the computer with the guides on the docking station ...

Page 81: ... down the computer until it clicks into place 7 Turn on the computer Use the AC adapter supplied with your computer Do not move your computer while attached to the docking station this may detach the docking station and cause damage to both units ...

Page 82: ...omputer while the IN USE indicator is lit may result in loss of unsaved data or a failure of the computer When the battery pack is running out of power disconnecting your computer from the docking station may result in loss of unsaved data Do not disconnect your computer from the docking station during video playback Be sure to close video playback software before disconnection Once you have compl...

Page 83: ... you do not have to press the UNDOCK button Pressing the UNDOCK button while your computer is in a power saving mode returns the computer to Normal mode first and then initiates the disconnection process Once you have placed your computer back in Normal mode make sure to place your computer off the docking station Use of the computer still on the docking station may cause unstable operations ...

Page 84: ...84 n N Using Peripheral Devices 2 Lift the computer away from the docking station 3 Close the docking station connector cover on the bottom of the computer ...

Page 85: ...rns off and then lift the computer away from the docking station 3 Close the docking station connector cover on the bottom of the computer It is extremely important to close the docking station connector cover after disconnecting your computer from the docking station If the cover is left open dust may get inside and damage the computer To disconnect the docking station completely from AC power un...

Page 86: ... external speakers 1 Plug the speaker cable 1 into the headphones jack 2 i 2 Plug the other end of the speaker cable to the external speaker 3 3 Turn down the volume of the speakers before you turn them on Make sure your speakers are designed for computer use Do not place floppy disks on the speakers their magnetic field may damage the data on the disks ...

Page 87: ...lied to your computer For example you can use the computer with a computer display or a projector Connect the power cord after connecting all other cables Connected external displays are used as secondary screens On the Windows operating system you can also use an external display to set up multiple monitors ...

Page 88: ...o the monitor VGA port 3 a on the computer or on the docking station 3 If you want to connect a TFT DVI monitor plug the display cable not supplied into the DVI D port on the docking station DVI D stands for Digital Visual Interface Digital It is a type of DVI connector that supports only digital video signals no analog video signals It has 24 pins A DVI I connector Digital Visual Interface Integr...

Page 89: ...e optional docking station To connect a multimedia computer display 1 Plug the power cord of your multimedia computer display 1 into an AC outlet 2 Plug the display cable 2 not supplied into the monitor VGA port 3 a on the computer or on the docking station 3 Plug the speaker cable 4 into the headphones jack 5 i on the computer 4 Plug the microphone cable 6 into the microphone jack 7 m on the comp...

Page 90: ...king station To connect a projector 1 Connect the power cord 1 of your projector into an AC outlet 2 Plug an RGB signal cable 2 not supplied into the monitor VGA port 3 a on the computer or on the docking station 3 Plug an audio cable 4 not supplied into the headphones jack 5 i 4 Plug the RGB signal cable and the audio cable into the jack and port on the projector 6 ...

Page 91: ...ch display to be used as the primary monitor when an external display desktop monitor etc is connected to your computer If you want to work on your computer screen and the external display at the same time see Using the Multiple Monitors Function page 93 for more information ...

Page 92: ...he same contents on your computer screen and the external display or projector at the same time depending on the type of your external display or projector Before turning on your computer turn on the peripheral devices When using the NVIDIA video controller SPEED mode 1 Click Start and Control Panel 2 Click Additional Options 3 Click NVIDIA Control Panel 4 Click Display 5 Click Change Display Conf...

Page 93: ...o drag objects such as an open application window or a toolbar from one display to the other Your external display may not support the Multiple Monitors function Certain software applications may not be compatible with Multiple Monitors settings Make sure that your computer does not enter Sleep or Hibernate mode while you are using Multiple Monitors mode otherwise the computer may not return to No...

Page 94: ...Click NVIDIA Control Panel 4 Click Display 5 Click Change Display Configuration 6 Follow the on screen instructions to change the settings For selecting a video controller see Selecting Performance Modes page 105 You can also change one of the S button assignments to activate the Multiple Monitors mode with the corresponding S button To change the S button assignments press and hold any S button t...

Page 95: ... need to use a sound input device for example to chat over the Internet you need to plug in an external microphone not supplied To connect an external microphone Plug the microphone cable 1 into the microphone jack 2 m Make sure your microphone is designed for computer use ...

Page 96: ...en moving the computer with USB devices connected avoid any shock or force to the USB ports Do not put the computer into a bag or carrying case when it has USB devices connected Connecting a USB Mouse To connect a USB mouse 1 Choose the USB port 1 you prefer to use 2 Plug the USB mouse cable 2 into the USB port You can now use your USB mouse not supplied 3 ...

Page 97: ... connect it to your computer To connect a USB floppy disk drive 1 Choose the USB port 1 you prefer to use 2 Plug the USB floppy disk drive cable 2 into the USB port Your USB floppy disk drive 3 is now ready for use When using a USB floppy disk drive do not apply force on the USB port This may cause a malfunction ...

Page 98: ... a USB floppy disk drive 1 Close all programs accessing the floppy disk drive 2 Double click the Safely Remove Hardware icon on the taskbar The Safely Remove Hardware window appears 3 Select the floppy disk drive you want to unplug 4 Click Stop The Stop a Hardware device window appears 5 Confirm that the floppy disk drive can be safely removed from the system 6 Click OK A message appears stating i...

Page 99: ...ter Using the USB Port You can connect a USB printer compatible with your version of Windows to the computer To connect a printer using the USB port 1 Plug the power cord 1 of your printer into an AC outlet 2 Choose the USB port 3 you prefer to use 3 Plug one end of a USB printer cable 2 not supplied into the USB port and the other end to your printer ...

Page 100: ...sfer rates up to 400 Mbps however the actual transfer rate depends on the transfer rate of the external device The optional i LINK cables may not be available depending on the country or area of your residency An i LINK connection with other compatible devices is not fully guaranteed The i LINK connection varies depending on the software applications operating system and i LINK compatible devices ...

Page 101: ...r end into the DV In Out ports 3 on the digital video camcorder 2 Launch the DVgate Plus software On Sony digital video cameras ports labeled DV Out DV In Out or i LINK are i LINK compatible The Sony digital video camcorder shown here is an example your digital video camcorder may need to be connected differently You cannot access the pictures stored on a Memory Stick media when using an i LINK co...

Page 102: ... or the optional docking station and the other end to your network For detailed settings and devices needed to connect to the network ask your network administrator Available only via the network Ethernet port on the optional docking station Your computer can be connected to the network with the default settings When your computer is attached to the optional docking station you need to select whic...

Page 103: ...nnector is connected to the telephone lines mentioned below high electric current to the connector may cause damage overheating or fire Home intercom speakerphone or business use telephone lines multi line business telephone Public telephone subscriber line PBX private branch exchange Do not plug a telephone cable into the network port ...

Page 104: ... the look of your Sony software and utilities etc Selecting Performance Modes page 105 Setting the Password page 106 Using Fingerprint Authentication page 113 Using Trusted Platform Module TPM page 139 Setting Up Your Computer with VAIO Control Center page 146 Using the Power Saving Modes page 147 Managing Power with VAIO Power Management page 152 Configuring Your Modem page 155 Protecting the Har...

Page 105: ...performance mode with the performance selector switch you must restart your computer to place it into the selected mode A window appears to prompt you for computer restart STAMINA mode Uses the Intel Graphics Media Accelerator to conserve battery power SPEED mode Uses the NVIDIA video controller to provide faster performance You can find the current performance mode by the lit indicator on either ...

Page 106: ...he BIOS setup screen as well as to start the computer The user password is provided for other standard users to allow for changing some of the BIOS setup options as well as starting the computer To set the user password you must first set the machine password Once you have set the power on password you cannot start your computer without entering the password Make sure not to forget the password Wr...

Page 107: ...select Security to display the Security tab select Set Machine Password and then press the Enter key 4 On the password entry screen enter the password twice and press the Enter key The password can be up to 32 alphanumeric characters including spaces long 5 Select Password when Power On under Security Press the space bar to change the setting from Disabled to Enabled 6 Press the or key to select E...

Page 108: ...l times when the VAIO logo appears 3 Enter the machine password for Enter Password and press the Enter key 4 Press the or key to select Security to display the Security tab select Set User Password and then press the Enter key 5 On the password entry screen enter the password twice and press the Enter key The password can be up to 32 alphanumeric characters including spaces long 6 Press the or key...

Page 109: ...machine password for Enter Password and press the Enter key 4 Press the or key to select Security to display the Security tab select Set Machine Password and then press the Enter key 5 On the password entry screen enter the current password once and a new password twice and then press the Enter key To remove the password leave the Enter New Password and Confirm New Password fields blank and press ...

Page 110: ...nter Password and press the Enter key 4 Press the or key to select Security to display the Security tab select Set User Password and then press the Enter key 5 On the password entry screen enter the current password once and a new password twice and then press the Enter key To remove the password leave the Enter New Password and Confirm New Password fields blank and press the Enter key 6 Press the...

Page 111: ...e set the Windows password in conjunction with the fingerprint authentication functionality you can substitute fingerprint recognition for password entry when turning on your computer For more information see Using Fingerprint Authentication page 113 To add the Windows password 1 Click Start and Control Panel 2 Click the User Accounts and Family Safety icon 3 Click the User Accounts icon 4 Click C...

Page 112: ...assword 5 In the Current password field enter your current password 6 In the New password and Confirm new password fields enter a new password 7 Click Change password To remove the Windows password 1 Click Start and Control Panel 2 Click the User Accounts and Family Safety icon 3 Click the User Accounts icon 4 Click Remove my password 5 In the Current password field enter the current password that...

Page 113: ...ering the power on and Windows passwords If you share a computer with other people you can skip user selection as well Quick Web site access Once you have registered your user information user accounts passwords etc for Web sites in the password bank you can substitute fingerprint authentication for entering required information and access the password protected Web sites Access to the data in the...

Page 114: ...for any loss or modification of your data that might have occurred during the course of repair In case the hard disk has to be initialized for example after the repair work the fingerprint templates will be lost You will have to enroll them all over again The maintenance and management of data concerning fingerprint authentication must be carried out at your own risk Sony assumes no liabilities fo...

Page 115: ...int sensor Keep your finger in contact with the fingerprint sensor while swiping Let the fingerprint sensor take about one second to scan your fingerprint It may be hard to enroll or recognize your fingerprint if your finger is dry or wet wrinkled injured dirty The soiled fingerprint sensor may cause poor recognition performance Wipe off the fingerprint sensor regularly with a soft cloth Use a len...

Page 116: ...nrolled for logging onto your system using the Power on Security feature You can also select the finger of which fingerprint you want to use for the Power on Security feature later 1 Click Start All Programs Protector Suite QL and Control Center The Fingerprint Control Center window appears 2 Click Fingerprints and Initialize 3 Read the license agreement select I Accept the terms of the License Ag...

Page 117: ...word registration will be prompted 1 Click Yes on the prompt window 2 Enter your password twice and click OK 7 Enter the Windows password and click Next The Enrollment Hints window appears 8 Select the Run interactive tutorial check box and click Next The Fingerprint Tutorial window appears 9 Read the tutorial information and click Next ...

Page 118: ...rint sensor four times to perform a swipe test and then click Next The Enrollment window appears See To scan a fingerprint page 120 for the scan procedure Swipe the same finger for the swipe test If you fail a swipe test four times click Try again and perform the swipe test again ...

Page 119: ...erprints and Enroll or Edit Fingerprints The Welcome window appears 3 Click Next 4 Enter the Windows password and click Next You can substitute fingerprint authentication for the Windows password entry Swipe the finger with the enrolled fingerprint across the fingerprint sensor 5 Go to step 8 in To enroll a fingerprint page 116 and follow the rest of the procedures To add a fingerprint click a but...

Page 120: ...120 n N Customizing Your VAIO Computer To scan a fingerprint 1 Place the top joint of your finger on the fingerprint sensor 1 2 Swipe your finger perpendicularly across the fingerprint sensor ...

Page 121: ...Scan your fingerprint from the top joint of the finger to the fingertip Keep your finger in contact with the fingerprint sensor while swiping Fingerprint enrollment may fail if you move your finger too fast or too slow Let the fingerprint sensor take about one second to swipe your finger across the sensor ...

Page 122: ...Windows passwords see Setting the Password page 106 To log onto Windows If your fingerprints are enrolled for your user account you will be able to substitute fingerprint authentication for password entry when logging onto Windows 1 Swipe the finger with the enrolled fingerprint across the fingerprint sensor when the Windows log on window appears Windows launches You can log onto your user account...

Page 123: ...if you have not set the power on password in advance 3 Select the Enable power on security using fingerprints check box and click OK 4 Click Fingerprint and Enroll or Edit Fingerprints The Welcome window appears 5 Click Next 6 Enter the Windows password and click Next 7 Click to cancel the Run interactive tutorial check box and click Next The Power on Security message box appears if the power on f...

Page 124: ...ower on Security feature Once the Power on Security feature has been enabled any additional fingerprints you enroll will be used for fingerprint authentication with the feature To exclude such fingerprints from authentication follow these steps You need to set the power on password and enable the Power on Security feature in advance to exclude fingerprints 1 Click Start All Programs Protector Suit...

Page 125: ...need to add a password bank entry for the Web site To add an entry to the password bank 1 Visit the desired password protected Web site to display the user account and password entry window 2 Enter your user information user account password etc 3 Swipe the finger with the enrolled fingerprint across the fingerprint sensor to display the menu 4 Select Register 5 Click Continue on the displayed win...

Page 126: ...sword protected Web site to display the user account and password entry window A message balloon appears to indicate that you have a password bank entry for the site 2 Swipe the finger with the enrolled fingerprint across the fingerprint sensor 3 Click Yes on the confirmation window If a security warning window appears click Yes or OK to proceed You can always type your user information that has b...

Page 127: ...rams Protector Suite QL and Control Center The Fingerprint Control Center window appears 2 Click Settings and User Settings 3 Swipe the finger with the enrolled fingerprint across the fingerprint sensor The User Settings window appears 4 Click the Registrations tab 5 Select the desired entry name from the list and click Export 6 Enter a file name and click Save 7 Enter a password twice and click O...

Page 128: ...int Control Center window appears 2 Click Settings and User Settings 3 Swipe the finger with the enrolled fingerprint across the fingerprint sensor The User Settings window appears 4 Click the Registrations tab 5 Click Import 6 Select an exported file and click Open 7 Enter the password that you used for export and click OK 8 Click OK ...

Page 129: ...les or Keep original files depending on whether you want to remove or retain the original file or folder The archive extension will be uea for the archive including encrypted multiple files or folders or ueaf for the archive including a single encrypted file To add a file or folder to the existing encrypted archive 1 Right click the desired file or folder and select Add to existing encrypted archi...

Page 130: ...u 2 Swipe the finger with the enrolled fingerprint across the fingerprint sensor Unlocking the archive enables you to access the files or folders included in the archive To lock the encrypted archive 1 Right click the desired archive and select Lock from the menu For more information see the help file on the Protector Suite QL software ...

Page 131: ...he application launcher feature you must assign an application to the enrolled fingers in advance To assign an application to your finger 1 Click Start All Programs Protector Suite QL and Control Center The Fingerprint Control Center window appears 2 Click Settings and User Settings 3 Swipe the finger with the enrolled fingerprint across the fingerprint sensor The User Settings window appears 4 Cl...

Page 132: ... will display the menu Changing an Application Assignment to Your Finger To change an application assignment to your finger 1 Click Start All Programs Protector Suite QL and Control Center The Fingerprint Control Center window appears 2 Click Settings and User Settings 3 Swipe the finger with the enrolled fingerprint across the fingerprint sensor The User Settings window appears 4 Click the Applic...

Page 133: ...1 Click Start All Programs Protector Suite QL and Control Center The Fingerprint Control Center window appears 2 Click Settings and User Settings 3 Swipe the finger with the enrolled fingerprint across the fingerprint sensor The User Settings window appears 4 Click the Applications tab 5 Select the desired finger and click Delete 6 Click OK ...

Page 134: ...eed to enter the Personal Identification Number PIN when logging onto Windows depending on the settings In addition if you change the settings for the TPM or the TPM fails you may not be able to use the fingerprint authentication functionality Note that using fingerprint authentication with the TPM has such drawbacks Sony assumes no liabilities for any problems and damages arising out of your use ...

Page 135: ... Protector Suite QL and Control Center The Fingerprint Control Center window appears 2 Click Elevate administrative privilege for user The window closes and reappears 3 Click Settings and System Settings The Protector Suite Settings window appears 4 Click Reinitialize TPM on the TPM tab The Advanced Security Initialization Wizard window appears 5 Click Next 6 Upon completion click Finish ...

Page 136: ...ndow appears 7 Select the Enable Advanced Security for the current user check box 8 Read the information about the type under Advanced Security type and select the desired type 9 Set the backup password You can skip this step However if you do not set the password you may lose data when the TPM fails and if you set the password the security level is decreased Be sure to keep it safe and private fr...

Page 137: ...ress closes on the Windows log on screen 2 Swipe the finger with the enrolled fingerprint across the fingerprint sensor 3 Enter the PIN if you set it Windows launches You can log onto your user account just by swiping the finger with the enrolled fingerprint even if your computer is shared by multiple users ...

Page 138: ...rd disk To erase the enrolled fingerprints 1 Turn on the computer 2 Press the F2 key when the VAIO logo appears The BIOS setup screen appears If not restart the computer and press the F2 key several times when the VAIO logo appears 3 Press the or key to select Security to display the Security tab 4 Press the m key to select Clear Fingerprint Data and press the Enter key The fingerprint data enroll...

Page 139: ...d data Make sure to write down the passwords and keep them safe and private from other people Make sure to make backup copies of the latest emergency recovery archive file emergency recovery token file password reset token file and personal secret file and keep them safe and private from other people before sending your computer for repair The data stored in the TPM that is embedded on the motherb...

Page 140: ...kup now check box is displayed after the setup select the check box and update the backup files The restore process using the backup files may fail if you do not set up the automatic backup operations The maintenance and management of TPM protected data must be carried out at your own risk Sony assumes no liabilities for any defects arising out of your data maintenance and management ...

Page 141: ...functionality has been enabled in user initialization process With the default settings the files in the folders below cannot be encrypted because they have system attributes Do not change the system attributes of the files in the folders below The following folders are invisible by default Folders containing basic user keys and others C username All Users Infineon TPM Software 2 0 BackupData C us...

Page 142: ...ays the userfolder Documents Security Platform window Storage folder for automatic backup data Default file name SPSystemBackup The folder is created as the subfolder for the SPSystemBackup xml file Token file for decryption Default file name SPEmRecToken xml Default path Removable media FD USB memory etc Key and certificate backup file Default file name SpBackupArchive xml Default path None Click...

Page 143: ...them Sony assumes no liabilities for any troubles and damages arising out of your careless encryption of the following files and folders including them Password reset token file Default file name SPPwdResetToken xml Default path Removable media FD USB memory etc Password reset secret file Default file name SPPwdResetSecret xml Default path Removable media FD USB memory etc ...

Page 144: ...lect Enabled for Change TPM State 4 Press the or key to select Exit and then Exit Setup and press the Enter key 5 After your system restarts click Execute in the Physical Presence Operations window Before enabling the TPM make sure to set the power on password to protect against unauthorized modification of the TPM configuration If the TPM is enabled it will take longer before the VAIO logo appear...

Page 145: ... click Start All Programs Infineon Security Platform Solution and Help The maintenance and management of TPM protected data must be carried out at your own risk Sony assumes no liabilities for any defects arising out of your data maintenance and management After completing the TPM initialization wizard be sure to follow these steps to set up the automatic backup operations 1 Right click the TPM ic...

Page 146: ...ter 1 Click Start All Programs and VAIO Control Center The VAIO Control Center window appears 2 Select the desired control item and change the settings 3 Once finished click OK The setting of the desired item has been changed For more information about each option click Help on the VAIO Control Center window to display the help file Some of the control items will not be visible if you open VAIO Co...

Page 147: ... you should be aware that the computer will automatically enter Hibernate mode if the remaining battery charge becomes short regardless of the power management setting you select If the battery level falls below 10 percent you should either attach the AC adapter to recharge the battery pack or shut down your computer and install a fully charged battery pack Using Normal Mode This is the normal sta...

Page 148: ... When your computer is in Sleep mode you cannot insert a disc Your computer comes out of Sleep mode quicker than out of Hibernate mode Sleep mode uses more power than Hibernate mode You can use VAIO Control Center to configure your computer to return to Normal mode when you open the LCD screen lid This power resuming preference will be lost if you remove both the AC adapter and the battery pack Se...

Page 149: ...eep mode To avoid this you can change the Sleep mode settings To change the Sleep mode settings 1 Right click the power status icon on the taskbar and select Power Options 2 Click Change plan settings under the current power plan 3 Change the time to put the computer to sleep and click Save Changes ...

Page 150: ...s mode To activate Hibernate mode Press the Fn F12 keys The Hibernating screen appears and the computer enters Hibernate mode Alternatively you can click Start the arrow next to the Lock button and Hibernate to place the computer to Hibernate mode To return to Normal mode Press the power button The computer returns to its previous state If you press and hold the power button for more than four sec...

Page 151: ...an Sleep mode to be activated It takes more time to return to Normal mode from Hibernate mode than from Sleep mode Hibernate mode uses less power than Sleep mode You can use VAIO Control Center to configure your computer to return to Normal mode when you open the LCD screen lid This power resuming preference will be lost if you remove both the AC adapter and the battery pack See Setting Up Your Co...

Page 152: ...nagement When you start the computer a power status icon appears on the taskbar This icon indicates what kind of power source you are using at that time for example AC power Click this icon to display the window showing your power status VAIO Power Management functionalities are added to the Windows Power Options Properties To activate VAIO Power Management 1 Right click the power status icon on t...

Page 153: ...m maximum power management to no power management To activate a VAIO Power Management power scheme 1 Right click the power status icon on the taskbar and select Power Options 2 Select a power plan The power scheme has been activated If necessary you can change advanced power settings Follow these steps 3 Click Change plan settings under the current power plan 4 Click Change advanced power settings...

Page 154: ...he viewer To change the power scheme Select the desired power scheme from the drop down list on VAIO Power Management Viewer To view performance with the power scheme modified with VAIO Power Management When both VAIO Power Management and VAIO Power Management Viewer are running VAIO Power Management Viewer shows performance with the power scheme that was modified with VAIO Power Management Use VA...

Page 155: ...nd Modem Options The Location Information window appears 4 Enter the required information and then click OK The Phone and Modem Options window appears 5 Select your location on the Dialing Rules tab 6 Click the Edit button to change the current configuration The Edit Location window appears Or Click the New button to configure your modem The New Location window appears 7 Check the country region s...

Page 156: ...at your modem is listed on the Modems tab If your modem is not listed click Add and follow the wizard 10 Click Apply OK Your modem is configured Before applying new country settings please make sure your phone cable is disconnected from your computer ...

Page 157: ...tection 1 Click Start All Programs and VAIO Control Center 2 Click Security on the Categories tab and double click Hard Disk Drive Protection Settings The setup window appears 3 Select the Activate hard disk drive protection check box 4 Select one of the desired sensitivity level 5 Click OK For more information click Help on the setup window to open the help file VAIO HDD Protection is designed to...

Page 158: ...ng your product warranty period we recommend that You contact your dealer to install a new memory module You do not install it yourself if you are not familiar with upgrading memory on a computer You do not touch the connectors or open the memory module compartment cover For the type of module and the amount of memory installed on your model see the online Specifications Contact VAIO Link if you n...

Page 159: ...ule ensure the following The procedures described in this document assume familiarity with the general terminology associated with personal computers and with the safety practices and regulatory compliance required for using and modifying electronic equipment Turn off your computer and disconnect it from its power source that is battery pack or AC adapter and from any telecommunication links netwo...

Page 160: ...o the computer and any repair costs will not be covered by the warranty Do not place the memory module in a location subject to Heat sources such as radiators or air ducts Direct sunlight Excessive dust Mechanical vibration or shock Strong magnets or speakers that are not magnetically shielded Ambient temperature of more than 35 C or less than 5 C High humidity Handle the memory module with care T...

Page 161: ...t all peripheral devices 2 Unplug the computer and remove the battery pack 3 Wait until the computer cools down 4 Unscrew the screws indicated by the arrows below on the bottom of the computer and remove the memory module compartment cover 5 Touch a metal object such as the connector panel on the back of the computer to discharge static electricity ...

Page 162: ...162 n N Upgrading Your VAIO Computer 6 Grasp the insulation sheet 1 tab and flip open the sheet The insulation sheet is equipped for module protection Do not pull it too hard to damage the sheet ...

Page 163: ...ve the memory module Pull the latches in the direction of the arrows 1 The memory module is released Make sure that the memory module tilts up and then pull it out in the direction of the arrow 2 8 Remove the new memory module from its packaging ...

Page 164: ... in until it clicks into place Do not touch any other components on the motherboard Do not damage the insulation sheet equipped for module protection 10 Replace the memory module compartment cover 11 Tighten the screws on the bottom of the computer 12 Reinstall the battery pack and turn on the computer ...

Page 165: ...l Programs and VAIO Control Center 3 Double click the System Information folder in the VAIO Control Center window 4 Double click the System Information icon in the System Information folder You can view the amount of system memory If the additional memory does not appear repeat the whole installation procedure and restart the computer ...

Page 166: ...en page 167 On Using the Power Source page 168 On Handling Your Computer page 169 On Using the Built in MOTION EYE Camera page 171 On Handling Floppy Disks page 172 On Handling Discs page 173 On Using the Battery Pack page 174 On Using Headphones page 175 On Handling Memory Stick Media page 176 On Handling the Hard Disk page 177 On Handling the Memory Card Adapter page 178 ...

Page 167: ... images The LCD screen becomes warm during operation This is normal and does not indicate a malfunction The LCD screen is manufactured using high precision technology You may however see tiny black points and or bright points red blue or green that continuously appear on the LCD screen This is a normal result of the manufacturing process and does not indicate a malfunction Avoid rubbing the LCD sc...

Page 168: ...sudden power surges in an electrical storm for example Do not place heavy objects on the power cord To disconnect the cord pull it out by the plug Never pull the cord itself Unplug your computer from the AC outlet if you are not planning to use the computer for a long period of time Make sure that the AC outlet is easily accessible When the AC adapter is not used unplug it from the AC outlet Use t...

Page 169: ...ation subject to Heat sources such as radiators or air ducts Direct sunlight Excessive dust Moisture or rain Mechanical vibration or shock Strong magnets or speakers that are not magnetically shielded Ambient temperature of more than 35 C or less than 5 C High humidity Do not place electronic equipment near your computer The electromagnetic field of the computer may cause a malfunction Provide ade...

Page 170: ...s brought directly from a cold location to a warm one moisture may condense inside the computer In this case allow at least one hour before turning on the computer If any problems occur unplug the computer and contact VAIO Link Make sure you disconnect the power cord before cleaning your computer To avoid losing data if your computer is damaged back up your data regularly ...

Page 171: ...f the built in MOTION EYE camera regardless of your computer s power state as it may cause a malfunction of the camera The built in MOTION EYE camera is disabled while videos or still images are imported from an i LINK compatible device connected to the i LINK port Clean the front mirror plate over the lens of the built in MOTION EYE camera with a blower brush or a soft brush If the lens is extrem...

Page 172: ...of heat Keep floppy disks away from any liquid Do not let them get wet When you are not using your floppy disk always remove it from the floppy disk drive and use a storage case If the floppy disk comes with an adhesive label make sure that the label is properly affixed If the edge of the label is curled up the label may stick to the inside of the floppy disk drive and cause a malfunction or damag...

Page 173: ...solvents such as benzine thinner alcohol commercially available cleaners or anti static spray which may cause damage to the disc For normal cleaning hold the disc by its edge and use a soft cloth to wipe the surface from the center out If the disc is badly soiled moisten a soft cloth with water wring it out well and use it to wipe the surface of the disc from the center out Wipe off any remaining ...

Page 174: ...ot be charged and the computer will not function While the battery pack is in use or being charged heat builds up in the battery pack This is normal and is not cause for concern Keep the battery pack away from all sources of heat Keep the battery pack dry Do not open or try to disassemble the battery pack Do not expose the battery pack to any mechanical shock If you are not using your computer for...

Page 175: ...ffic hazard and is illegal in some areas It can also be potentially dangerous to play loud music while walking especially at pedestrian crossings Preventing hearing damage Avoid using headphones at high volume Hearing experts advise against continuous loud and extended play If you experience a ringing in your ears reduce the volume or discontinue use ...

Page 176: ... Do not let Memory Stick media get wet Do not use or store Memory Stick media in a location subject to Extremely high temperatures such as in a car parked in the sun Direct sunlight High humidity Corrosive substances Use the storage case supplied with the Memory Stick media Be sure to make a backup copy of your valuable data Keep the Memory Stick media out of reach of children There is a risk of s...

Page 177: ...careful when handling your computer To avoid damaging your hard disk Do not subject your computer to sudden movements Keep your computer away from magnets Do not place your computer in a location subject to mechanical vibration or in an unstable position Do not move your computer while the power is on Do not turn off the power or restart your computer while reading or writing data to the hard disk...

Page 178: ...r as a label Do not bend drop or apply strong shock to the memory card adapter Do not disassemble or modify the memory card adapter Do not let the memory card adapter get wet Do not use or store the memory card adapter in a location subject to Extremely high temperatures such as in a car parked in the sun Direct sunlight High humidity Corrosive substances Use the storage case supplied with the mem...

Page 179: ... before contacting VAIO Link Computer page 181 System Security page 188 Battery page 189 Built in MOTION EYE Camera page 191 Internet page 194 Networking page 196 Bluetooth Technology page 199 Optical Discs page 203 Display page 207 Printing page 210 Microphone page 211 Mouse page 212 Speakers page 213 Touch Pad page 214 Keyboard page 215 Floppy Disks page 216 PC Cards page 217 Audio Video page 21...

Page 180: ...180 n N Troubleshooting Memory Stick Media page 220 Peripherals page 221 Docking Station page 222 ...

Page 181: ... it is plugged into a power source and turned on Make sure the brightness and contrast controls are adjusted correctly See the manual that came with your display for more information Disconnect the AC adapter and remove the battery pack Wait three to five minutes Reinstall the battery pack reattach the AC adapter and then press the power button to turn on your computer Condensation may cause your ...

Page 182: ...select the Exit tab and then press the F9 key At the confirmation prompt press the Enter key 5 Select Exit Setup and press the Enter key At the confirmation prompt press the Enter key Your computer restarts If this occurs frequently contact VAIO Link What should I do if the power indicator Green lights but my screen stays blank Follow these steps 1 Press and hold the power button for more than fou...

Page 183: ...your computer does not turn off press the Ctrl Alt Delete keys and click the arrow next to the Shut down button and Shut Down If the Windows Security window appears click Shut Down Turning off your computer with the Ctrl Alt Delete keys or the power button may cause loss of unsaved data If your computer still does not turn off press and hold the power button until the computer turns off Remove the...

Page 184: ...estart 4 If this procedure does not work press and hold the power button until the computer turns off Turning off your computer with the power button may cause loss of unsaved data What should I do if the battery indicator is flashing and my computer does not start This symptom could be due to the battery pack not being installed properly To resolve this symptom turn off your computer and remove t...

Page 185: ...omputer s CPU utilizes a type of CPU speed controlling technology for power conservation purposes System Properties may display the CPU s current speed instead of the maximum speed What should I do if Windows does not start showing a message when I start my computer If you enter a wrong power on password three times consecutively the Enter Onetime Password message appears If you enter a wrong powe...

Page 186: ...O Link to reset it A reset fee will be charged Why does it take time before my computer starts If Norton Internet Security s Personal Firewall is active it may take some time before the desktop screen appears due to network security checkups If the TPM is enabled it will take longer before the VAIO logo appears due to security checks at computer startup Why doesn t my screen turn off when the time...

Page 187: ...ey to select the drive of which boot device order you want to change 5 Press the key or the Shift keys to change the boot device order Your computer will boot from the drive with the highest boot device order 6 Press the or key to select Exit select Exit Setup and then press the Enter key At the confirmation prompt press the Enter key What should I do if I cannot boot my computer from the USB flop...

Page 188: ...indows updates by doing the following Your computer must be connected to the Internet before you can receive updates 1 Connect to the Internet 2 Double click the Windows Security Alerts icon on the taskbar 3 Follow the on screen instructions to set up automatic or scheduled updates How do I keep my antivirus software updated You can keep the Norton Internet Security software program current with t...

Page 189: ... AC power even if the battery pack is installed When should I recharge the battery pack When the battery level falls below 10 percent When both the battery and power indicators blink When you have not used the battery pack for a long period of time When should I replace the battery pack If the battery power is still low after charging it the battery pack may be reaching the end of its life and sho...

Page 190: ...e using battery power Your computer can enter Hibernate mode while using battery power but some software programs and peripheral devices prevent the system from entering Hibernate mode If you are using a program that prevents the system from entering Hibernate mode save your data frequently to avoid losing data See Using Hibernate Mode page 150 for information on how you can manually activate Hibe...

Page 191: ...s not indicate a malfunction If the problem persists restart your computer Why are captured images poor in quality The images captured under the fluorescent lamp may show reflection of the light A dark portion in captured images may appear as a noise If the front mirror plate over the lens is dirty you cannot take a clear shot Clean the lens See On Using the Built in MOTION EYE Camera page 171 Why...

Page 192: ...tween lighting output frequency and shutter speed To reduce flicker noise change the pointing direction of the camera or the brightness of camera images In some software applications you can set an appropriate value to one of the camera properties e g LightSource Flickness etc to eliminate flicker noise Why is the video input from the built in MOTION EYE camera suspended for a few seconds The vide...

Page 193: ...art Control Panel Hardware and Sound and Device Manager 2 Double click Imaging devices 3 Right click the device name for your camera and click Update Driver Software What should I do if my computer becomes unstable when it enters a power saving mode while the built in MOTION EYE camera is in use Do not place your computer into Sleep or Hibernate mode while you are using the built in MOTION EYE cam...

Page 194: ...the telephone number the program is dialing is correct Make sure the software you are using is compatible with your computer s modem All preinstalled Sony programs are compatible Make sure the modem is the only device connected to your telephone line Follow these steps to check the settings 1 Click Start and Control Panel 2 Click Hardware and Sound 3 Click Phone and Modem Options 4 On the Modems t...

Page 195: ... properly to other PC based modems fax machines or your Internet Service Provider ISP do any of the following Ask your telephone company to verify your telephone line is free of any line noise If your problem is fax related make sure there are no problems with the fax machine you are calling and that it is compatible with fax modems If you are having a problem connecting with your ISP make sure th...

Page 196: ...s under Network and Internet 3 Click Connect to a network to confirm that your access point is selected Make sure the encryption key is correct Make sure Maximum Performance is selected for Wireless Adapter settings in the Power Options window Selecting any other option may result in a communication failure To change the settings follow these steps 1 Right click the power status icon on the taskba...

Page 197: ...he wireless LAN data transfer speed is affected by distance and obstructions between devices and access points Other factors include device configurations radio conditions and software compatibility To maximize the data transfer speed move your computer away from obstructions or closer to any access point you may be using If you are using a wireless LAN access point the device may be temporarily o...

Page 198: ...a communication failure Follow the steps in What should I do if my computer cannot connect to a wireless LAN access point page 196 to change the settings What are channels Wireless LAN communication occurs on divided frequency bands known as channels Third party wireless LAN access point channels may be preset to different channels from Sony devices If you are using a wireless LAN access point see...

Page 199: ...you may not be able to communicate with the device What should I do if I cannot find the Bluetooth device with which I want to communicate Check that the Bluetooth functionality of the device with which you want to communicate is on See the other device s manual for more information If the device with which you want to communicate is already communicating with another Bluetooth device it may not b...

Page 200: ... a custom Bluetooth security level is selected click the Default level button 4 Click OK The data transfer distance can be shorter than 10 meters depending on existing obstacles between the two devices on radio wave quality and on the operating system or the software in use Move your computer and Bluetooth devices closer to each other If the device with which you want to communicate is already com...

Page 201: ...cted by distance and obstructions You may need to move your computer away from obstructions or closer to the device to which it is connected Identify and remove obstacles between your computer and the device to which it is connected Note that due to limitations of the Bluetooth standard large files may occasionally be corrupted during continuous transfer due to electromagnetic interference from th...

Page 202: ...a dynamic IP address to the device and fails Do not specify IP addresses when using a PAN Why can t I use the Bluetooth functionality when I log onto my computer as a user with a standard user account The Bluetooth functionality may not be available to a user with a standard user account on your computer Log onto the computer as a user with administrator rights Why can t I connect to a Bluetooth d...

Page 203: ...isc for dirt or damage If the disc is dirty see On Handling Discs page 173 for instructions on how to clean it What should I do if the drive tray does not open Make sure your computer is on Press the drive eject button If the drive eject button does not work click Start and Computer Right click the optical disc drive icon and select Eject from the shortcut menu If none of the above options work in...

Page 204: ...see On Handling Discs page 173 for instructions If you are playing a disc and cannot hear sound do any of the following Right click the volume icon on the taskbar and click Open Volume Mixer to check the settings Check the volume setting in the audio mixer If you are using external speakers check the volume settings on the speakers and the connections between the speakers and your computer Make su...

Page 205: ...o a disc Adhesive labels can come off while the disc is in the optical disc drive and damage the drive or cause it to malfunction If a region code warning appears the disc may be incompatible with the optical disc drive Check the DVD package to make sure the region code is compatible with the optical disc drive If you notice condensation on your computer do not use the computer for at least one ho...

Page 206: ... R RW disc with an adhesive label affixed replace it with one with no affixed adhesive label Using a disc with an affixed adhesive label could cause a write error or other damage What should I do if I cannot write data to DVD media Make sure you are using the correct DVD recordable media Check which DVD recordable format is compatible with your optical disc drive Note the possibility that some bra...

Page 207: ...Power Saving Modes page 147 for more information Make sure your computer is securely plugged into a power source and turned on Make sure the power indicator shows the power is on If your computer is using battery power make sure the battery pack is installed properly and is charged See Using the Battery Pack page 24 for more information If the display mode is set to the external display press the ...

Page 208: ...playing high resolution videos In this case lower the resolution of the LCD screen To change the screen resolution follow these steps 1 Right click the desktop and select Personalize from the shortcut menu 2 Click Display Settings The Display Settings window appears 3 Move the slider under Resolution to the left to reduce or to the right to increase the screen resolution You can confirm the value ...

Page 209: ...e check box for enabling the automatic function to select the external display for the output Then try the Fn F7 keys to change the display output How do I run Windows Aero This Q A entry applies to selected models only To run Windows Aero follow these steps 1 Click Start and Control Panel 2 Click Customize colors under Appearance and Personalization 3 Click Open classic appearance properties for ...

Page 210: ...nter is not functioning after your computer resumes from a power saving mode Sleep or Hibernate then restart the computer If the bidirectional communication functions are provided with your printer disabling the functions on your computer may enable printing Follow these steps 1 Click Start and Control Panel 2 Click Printer under Hardware and Sound 3 Right click the printer icon and select Propert...

Page 211: ...bleshooting Microphone What should I do if my microphone does not work If you are using an external microphone make sure the microphone is turned on and is properly plugged into the microphone jack on your computer ...

Page 212: ...re application is running press the Alt F4 keys to close the application window If the Alt F4 keys do not work click Start the arrow next to the Lock button and Restart to restart your computer If your computer does not restart press the Ctrl Alt Delete keys and click the arrow next to the Shut down button and Restart If the Windows Security window appears click Restart If this procedure does not ...

Page 213: ...ake sure the speakers are connected to a power source See the manual that came with your speakers for more information What should I do if I cannot hear sound from my speakers If your computer is using battery power make sure the battery pack is properly installed and is charged If you are using a program that has its own volume control make sure the volume control is properly set See the program ...

Page 214: ...g press the Alt F4 keys to close the application window If the Alt F4 keys do not work click Start the arrow next to the Lock button and Restart to restart your computer If your computer does not restart press the Ctrl Alt Delete keys and click the arrow next to the Shut down button and Restart If the Windows Security window appears click Restart If this procedure does not work press and hold the ...

Page 215: ...ed To change the keyboard configuration follow these steps 1 Click Start and Control Panel 2 Click Clock Language and Region and click Regional and Language Options 3 Change the settings as desired What should I do if I cannot enter certain characters with the keyboard If you cannot enter U I O P J K L M and so on the Num Lk key may be activated Check that the Num lock indicator is off If the Num ...

Page 216: ... indicator on the floppy disk drive to turn off 3 Push the eject button to remove the disk and disconnect the USB floppy disk drive from your computer 4 Reconnect the floppy disk drive by inserting the USB connector with the USB icon facing upward into the USB port 5 Restart the computer by clicking Start the arrow next to the Lock button and Restart What should I do if I cannot write data to a fl...

Page 217: ...PC Card for more information You may need to install driver software if you are not using a Sony PC Card If your PC Card which worked normally before does not work you may need to install the most recent driver software Follow these steps 1 Click Start and Control Panel 2 Click System and Maintenance 3 Click System 4 Click Device Manager on the left pane The Device Manager window appears 5 Double ...

Page 218: ... the PC Card slot your computer may not recognize the PC Card or the connected device Restart the computer Why can t I insert my PC Card Make sure you are inserting the card correctly See Inserting a PC Card page 45 for more information You may not be able to use some PC Cards or some functions of the PC Card on your computer See the manual that came with your PC Card for more information ...

Page 219: ...y used only to designate that a product contains an IEEE 1394 connection The procedure to establish an i LINK connection may vary depending on a software application an operating system and a compatible i LINK device Not all products with an i LINK connection can communicate with each other See the manual that came with your compatible i LINK device for more information on operating conditions and...

Page 220: ...rmat a Memory Stick media page 55 Why can t I save music files onto my Memory Stick media Copyright protected music cannot be checked out to any Memory Stick media other than those with the MagicGate logo Use of recorded music requires permission from the copyright holders Sony is not responsible for music files that cannot be recorded from a CD or downloaded from other sources Can I copy images f...

Page 221: ...t Try using another USB port on your computer The driver could be installed to the specific port you used the first time you connected the device See the manual that came with your USB device for more information You may need to install software before you connect the device Try connecting a simple low powered device such as a mouse to test if the port is working at all USB hubs may prevent a devi...

Page 222: ...NDOCK button or select Undock Computer from the Start menu When any device inserted or connected to the docking station is in use you cannot disconnect your computer from the docking station Save unsaved data exit applications using such devices and then try again If the above does not work shut down your computer and disconnect it from the docking station Make sure to return to the original log o...

Page 223: ...If you have any problem with the computer you can access the VAIO Link Web site for troubleshooting Go to http www vaio link com e Support This interactive part of our Web site http www vaio link com allows you to get in contact with our dedicated support team over the Internet Using a personalized account you can log your technical queries with ease VAIO Link help lines Before contacting VAIO Lin...

Page 224: ...VAIO Link e Support Web Portal How can I access the e Support portal When you register your computer you will automatically receive an email with the link to the e Support Web Portal your Customer ID and some basic explanation a few hours later All you need to do is activate your account by clicking on the provided link in the email You are now ready to create your first case You can access the e ...

Page 225: ...es from Monday till Friday between 8am and 6pm Is there a cost involved for using e Support No this is a complete free of charge service offered to all registered VAIO customers How do I know when the e Support Team has handled my query case As soon as your case has been dealt with by our e Support Team you will receive an email notifying you that your case has been updated ...

Page 226: ...ains an IEEE 1394 connection Adobe Adobe Acrobat Elements Adobe Reader Adobe Premiere Elements and Adobe Photoshop Elements are trademarks of Adobe Systems Incorporated Norton Internet Security 2007 is a trademark or a registered trademark of Symantec Corporation Roxio Easy Media Creator is a trademark of Sonic Solutions WinDVD for VAIO and WinDVD BD for VAIO are trademarks of InterVideo Inc Sun J...

Page 227: ...poration MultiMediaCard is a trademark of MultiMediaCard Association xD Picture Card is a trademark of Fuji Photo Film Co Ltd All other names of systems products and services are trademarks of their respective owners In the manual the or marks are not specified Specifications are subject to change without notice All other trademarks are trademarks of their respective owners Please see the online S...

Page 228: ... 2007 Sony Corporation n ...

Reviews: