background image

156

n

N

Upgrading Your VAIO Computer

8

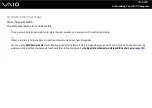
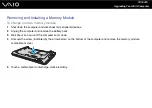
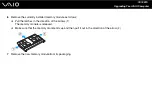
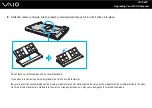
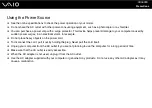
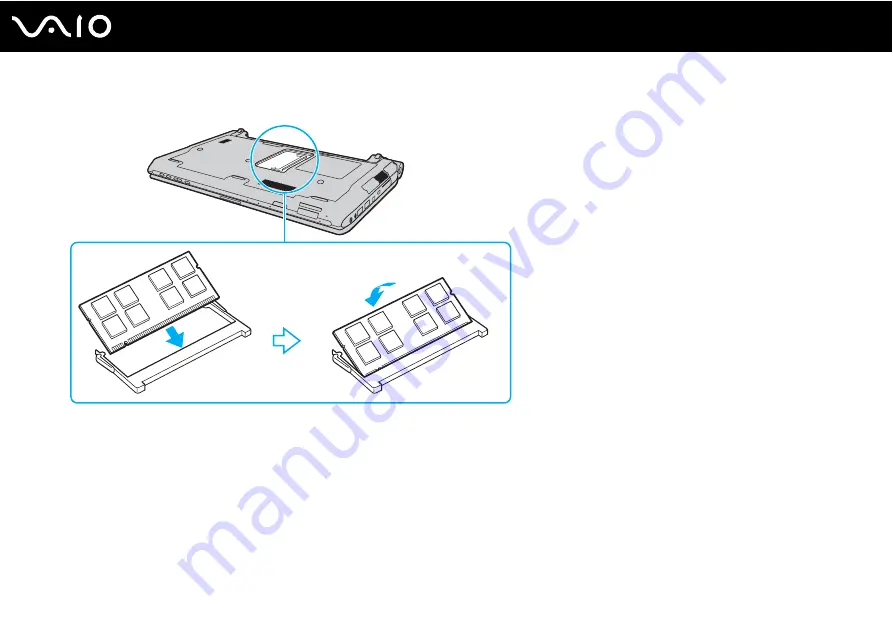
Slide the memory module into the memory module slot and push it in until it clicks into place.

!

Do not touch any other components on the motherboard.

If you want to install only one memory module, be sure to use the lower slot.

Be sure to insert the connector edge of the memory module into the slot while aligning the notch on the module with the small projection in the open 
slot. Do not force the memory module into the slot in a wrong orientation, as it may cause damage to the slot and the module.

Summary of Contents for VAIO VGN-TT Series

Page 1: ...N User Guide Personal Computer V G N T T s e r i e s ...

Page 2: ...urce 23 Using the Battery Pack 24 Shutting Down Your Computer Safely 32 Using Your VAIO Computer 33 Using the Keyboard 34 Using the Touch Pad 35 Using Special function Buttons 36 Using the Built in MOTION EYE Camera 37 Using the Optical Disc Drive 40 Using the ExpressCard Module 50 Using the Memory Stick 54 Using the SD Memory Card 60 Using the Internet 63 Using the Network LAN 65 ...

Page 3: ...iple Monitors Function 105 Connecting an External Microphone 107 Connecting a Universal Serial Bus USB Device 108 Connecting a Printer 111 Connecting an i LINK Device 112 Customizing Your VAIO Computer 114 Setting the Password 115 Using Fingerprint Authentication 127 Using the Trusted Platform Module TPM 135 Setting Up Your Computer with the VAIO Control Center 142 Using the Power Saving Modes 143...

Page 4: ...ilt in MOTION EYE Camera 165 Handling Floppy Disks 166 Handling Discs 167 Using the Battery Pack 168 Using Headphones 169 Handling the Memory Stick 170 Handling the Hard Disk 171 Updating Your Computer 172 Troubleshooting 173 Computer 175 System Security 183 Battery 184 Built in MOTION EYE Camera 186 Networking 188 Bluetooth Technology 193 Optical Discs 197 Display 202 Printing 206 ...

Page 5: ...rophone 207 Mouse 208 Speakers 209 Touch Pad 211 Keyboard 212 Floppy Disks 213 Audio Video 214 Memory Stick 218 Peripherals 219 Docking Station 220 Support Options 221 Sony Support Information 221 Trademarks 222 ...

Page 6: ...e state of the art personal computing experience External views illustrated in this manual may look slightly different from those of your computer Information in the supplied manuals including this User Guide is intended for users of the VAIO computers with the Microsoft Windows Vista 32 bit operating system You may find differences in the information when your computer comes preinstalled with the...

Page 7: ...is manual the software or other information contained herein or the use thereof In the manual the or marks are not specified Sony Corporation reserves the right to make any modification to this manual or the information contained herein at any time without notice The software described herein is governed by the terms of a separate user license agreement Sony Corporation is not liable and will not ...

Page 8: ...starting up your VAIO Troubleshooting and Recovery Guide Contains solutions to problems other than those you encounter during normal operation Regulations Guarantee EULA and Service Support Contains Sony guarantee conditions safety regulations modem regulations wireless LAN regulations wireless WAN regulations Bluetooth regulations end user software license agreement and Sony support services info...

Page 9: ...o read You can manually browse to the user guides by going to Computer VAIO C your C drive Documentation Documentation and opening the folder for your language To go to web sites described in this manual by clicking their respective URLs beginning with http your computer must be connected to the Internet Specifications The online specifications describe the hardware and software configurations of ...

Page 10: ...rations to help you learn to use your computer Use the search feature index or table of contents to view all Windows Help resources including those on the Internet To access Windows Help and Support click Start and Help and Support Or go to Windows Help and Support by pressing and holding the Microsoft Windows key and pressing the F1 key ...

Page 11: ...rther Sources Consult the help files included with the software you are using for detailed information on features and troubleshooting Go to http www club vaio com to find online tutorials about your favorite VAIO software ...

Page 12: ...your forearms horizontal 2 with your wrists in a neutral comfortable position 3 while using the keyboard touch pad or external mouse Let your upper arms hang naturally at your sides Take frequent breaks while using your computer Excessive use of the computer may strain eyes muscles or tendons Furniture and posture Sit in a chair with good back support Adjust the level of the chair so your feet are...

Page 13: ...he display as well Lighting Choose a location where windows and lights do not cause glare and reflection on the display Use indirect lighting to avoid bright spots on the display Proper lighting adds to your comfort and work efficiency Positioning an external display When using an external display set the display at a comfortable viewing distance Make sure the display screen is at eye level or sli...

Page 14: ...section describes how to get started with using your VAIO computer Locating Controls and Ports page 15 About the Indicator Lights page 22 Connecting a Power Source page 23 Using the Battery Pack page 24 Shutting Down Your Computer Safely page 32 ...

Page 15: ...so vary in some countries or areas Front A Num lock indicator page 22 B Caps lock indicator page 22 C Scroll lock indicator page 22 D Built in MOTION EYE camera page 37 E Built in MOTION EYE camera indicator page 22 F LCD screen page 160 G Ambient light sensor page 203 Measures ambient light intensity for automatically adjusting the LCD brightness to the optimum level H Keyboard page 34 I Touch pa...

Page 16: ... WIRELESS switch page 67 I Built in speakers stereo J Muting button page 36 K Volume control buttons page 36 L S1 button page 36 M Drive eject button page 36 page 40 1 Your computer supports both the standard size Memory Stick and the Duo size Memory Stick 2 The storage device configuration of your computer may include a built in flash memory storage drive depending on the model you purchased See ...

Page 17: ...17 n N Getting Started Back A Battery connector page 24 ...

Page 18: ...g Started Right A Optical disc drive page 40 B Manual eject hole page 197 C Optical disc drive indicator page 22 D Substitute drive eject button page 40 E Monitor port page 97 F Power button Power indicator page 22 ...

Page 19: ...95 page 81 1 Support high full low speeds 2 The headphones jack in this shape is equipped on models with the noise canceling headphones supplied Otherwise the ordinary round shaped jack is equipped Although you can connect headphones or speakers with a stereo mini plug to the jack in this shape it is recommended that you connect the supplied noise canceling headphones to take full advantage of the...

Page 20: ...Port cover Open the port cover to access the ports behind it Push out the top edge of the port cover and gently pull the cover until it is completely out of the socket B Network Ethernet port page 65 C HDMI output port page 97 ...

Page 21: ...21 n N Getting Started Bottom A Air vents B Docking station connector page 88 C Memory module compartment cover page 152 ...

Page 22: ...ng or writing data Do not place the computer into Sleep mode or turn it off when this indicator is lit Num lock Press the Num Lk key to activate the numeric keypad Press it a second time to deactivate the numeric keypad The numeric keypad is not active when the indicator is unlit Caps lock Press the Caps Lock key to type letters in uppercase Letters appear in lowercase if you press the Shift key w...

Page 23: ...cord 1 into the AC adapter 3 2 Plug the other end of the power cord into an AC outlet 2 3 Plug the cable connected to the AC adapter 3 into the DC IN port 4 on the computer or on the optional docking station To disconnect your computer completely from AC power unplug the AC adapter Make sure that the AC outlet is easily accessible If you do not intend to use your computer for a long period of time...

Page 24: ...ack The battery pack supplied with your computer is not fully charged at the time of delivery Installing the Battery Pack To install the battery pack 1 Turn off the computer and close the LCD screen lid 2 Slide the battery LOCK switch 1 inward ...

Page 25: ...until the projections 2 on either side of the battery compartment fit into the U shaped cuts 3 on either side of the battery pack 4 Push the battery pack down into the compartment until it clicks into place 5 Slide the battery LOCK switch outward to secure the battery pack on the computer ...

Page 26: ... power from the AC outlet Certain rechargeable batteries do not meet Sony quality and safety standards For safety reasons this computer only functions with genuine Sony battery packs designed for this model If an unauthorized battery pack is installed the battery will not be charged and the computer will not function ...

Page 27: ...he battery charge functions the charge indicator turns off To select your desired maximum charge level see Using the Battery Charge Functions page 29 Charge the battery pack as described in this manual from your first battery charge Charge indicator status Meaning Lit in orange The battery pack is charging Blinks along with the green power indicator The battery pack is running out of power Normal ...

Page 28: ...ry pack does not affect the life of battery While some software applications or peripheral devices are in use your computer may not enter Hibernate mode even when the remaining battery life is short To avoid loss of data when using battery power you should save your data frequently and manually activate a power management mode such as Sleep or Hibernate If the battery pack wears out when the compu...

Page 29: ...Power Management and then Battery Charge Functions 3 Click to select the Enable Quick Charge Function check box in the right pane and click Apply 4 Click Advanced 5 Click to select the Enable Battery Care Function check box 6 Select the desired maximum charge level 7 Click OK Alternatively you can press the S1 button to launch the VAIO Power Management Viewer and enable the functions To check the ...

Page 30: ...fe just by setting the specific wallpaper as your desktop background To set the battery life conserving wallpaper 1 Click Start All Programs and VAIO Control Center 2 Click Display and then Long Battery Life Wallpaper Setting 3 Click Set Long Battery Life Wallpaper At the confirmation prompt click OK ...

Page 31: ...e battery pack while the computer is in Sleep mode To remove the battery pack 1 Turn off the computer and close the LCD screen lid 2 Slide the battery LOCK switch 1 inward 3 Slide and hold the battery RELEASE latch 2 inward put your fingertip underneath the tab 3 on the battery pack and lift the battery pack in the direction of the arrow and then slide it away from the computer ...

Page 32: ...s described below To shut down your computer 1 Turn off any peripherals connected to the computer 2 Click Start the arrow next to the Lock button and then Shut Down 3 Respond to any prompts warning you to save documents or to consider other users and wait for the computer to turn off automatically The power indicator light turns off ...

Page 33: ... Touch Pad page 35 Using Special function Buttons page 36 Using the Built in MOTION EYE Camera page 37 Using the Optical Disc Drive page 40 Using the ExpressCard Module page 50 Using the Memory Stick page 54 Using the SD Memory Card page 60 Using the Internet page 63 Using the Network LAN page 65 Using the Wireless LAN WLAN page 67 Using the Bluetooth Function page 74 ...

Page 34: ...ing the Fn F5 keys or press the Fn F5 keys and then the m or key Fn T F7 display output Toggles among your computer screen an external display and simultaneous output to both Fn F9 F10 zoom Changes the size of an image or a document displayed on some software To make the view look smaller and further away zoom out press the Fn F9 keys To make the view look bigger and closer zoom in press the Fn F1...

Page 35: ...l be able to use only the keyboard for pointer operations Action Description Point Slide your finger on the touch pad 1 to place the pointer 2 on an item or object Click Press the left button 3 once Double click Press the left button twice Right click Press the right button 4 once In many applications this action displays a shortcut menu Drag Slide your finger on the touch pad while pressing the l...

Page 36: ...By default the S1 button launches the VAIO Power Management Viewer The default button assignment may be different from the above To change the S1 button assignment press and hold the button or launch and navigate through the VAIO Control Center to display the setup window See the help file included with the VAIO Control Center for the S1 button assignment Z Drive eject button Ejects the optical di...

Page 37: ...e appropriate software Launching or exiting your instant messaging or video editing software does not activate or deactivate the built in MOTION EYE camera The built in MOTION EYE camera cannot be shared by more than one software application If another software application is using the camera exit the application before using the built in MOTION EYE camera with your desired application The viewer ...

Page 38: ...er 4 Click the Capture button below the displayed image The current image in the viewfinder is captured and its thumbnail image is added as a thumbnail in the left pane of the main window When capturing an image in a dark place click the WebCam Settings icon after step 2 and select the low light or low light compensation option in the properties window The WebCam Companion 2 provides many more fea...

Page 39: ... displayed image to start movie recording 5 When finished click the Record Video button once again to stop movie recording The first scene of the captured movie is added as a thumbnail in the left pane of the main window When capturing a movie in a dark place click the WebCam Settings icon after step 2 and select the low light or low light compensation option in the properties window The WebCam Co...

Page 40: ...c drive is disabled by the VAIO Power Management it will take a while to eject the drive tray The substitute drive eject button is disabled when the optical disc drive is not powered When recovering your system turn on your computer and press the substitute drive eject button on the optical disc drive Insert your recovery disc into the optical disc drive turn off the computer and then turn on the ...

Page 41: ... in gently Do not remove the optical disc when your computer is in a power saving mode Sleep or Hibernate Doing so may cause the computer to malfunction If you use an external optical disc drive connect the drive before you launch any preinstalled disc operation program ...

Page 42: ... Your computer plays and records CDs DVDs and Blu ray Disc media depending on the model you purchased Check your specifications for the type of optical disc drive installed on your model Use the table below to see which types of media your optical disc drive supports ...

Page 43: ... 4 Writing data to single sided DVD RAM discs 2 6 GB compliant with DVD RAM Version 1 0 is not supported DVD RAM Version 2 2 12X SPEED DVD RAM Revision 5 0 disc is not supported 5 Writing data to DVD R DL Double Layer discs is available only on discs supporting DVD R DL Double Layer recording 6 Writing data to DVD R DL Dual Layer discs is available only on discs supporting DVD R DL Dual Layer reco...

Page 44: ...sc or the manufacturer of the recordable disc 8 cm disc writing is not supported To play copyright protected Blu ray Disc media continuously update the AACS key The AACS key update requires Internet access As with other optical media devices circumstances may limit compatibility or prevent Blu ray Disc media playback VAIO computers may not support movie playback on packaged media recorded in AVC o...

Page 45: ... drives may not be able to play DVDs created with the DVD R DL DVD R DL DVD R DVD RW DVD R DVD RW or DVD RAM media You may not be able to play some of Blu ray Disc contents on your computer or the computer may become unstable during Blu ray Disc playback To play such contents normally download and install the latest updates for the WinDVD BD using the VAIO Update To download and install the update...

Page 46: ... Europe belongs to region 2 5 Russia belongs to region 5 or all this means that you can play this disc in most regions of the world you cannot play the disc on your computer If you change the region code while the WinDVD or WinDVD BD software is running restart the software or eject the disc and re insert it to make the new setting effective Do not try to change the region code settings of the dri...

Page 47: ...D If the Audio CD window appears click to select an option Copying Files to CDs To copy files to a disc 1 Insert a recordable disc into the optical disc drive If the AutoPlay window appears click Burn files to disc and follow the on screen instructions until the empty disc folder appears 2 Open the folder that contains the file s you want to copy and drag them to the empty disc folder 3 Close the ...

Page 48: ... use the software see the help file included with your DVD software Copying Files to DVDs To copy files to a disc 1 Connect the AC adapter to the computer 2 Close all running software applications 3 Insert a recordable disc into the optical disc drive 4 If nothing appears on the desktop click Start All Programs and the desired DVD burning software to copy files to the disc For instructions on how ...

Page 49: ...play the disc For instructions on how to use the software see the help file included with your software Copying Files to Blu ray Disc Media The Blu ray Disc writing function is available on selected models only See the online specifications to find out the type of your optical disc drive and then Reading and Writing Optical Discs page 42 to find out about the supported disc media To copy files to ...

Page 50: ...equipped with an ExpressCard 34 slot for transferring data among digital cameras camcorders music players and other audio video devices This slot can only accommodate an ExpressCard 34 34 mm wide module Referred to as the ExpressCard slot and the ExpressCard module in this manual ...

Page 51: ...do not need to shut down your computer before inserting or removing the ExpressCard module To insert an ExpressCard module 1 Locate the ExpressCard slot 2 Push the ExpressCard slot protector so that the protector pops out 3 Gently take hold of the ExpressCard slot protector and pull it out of the slot 4 Hold the ExpressCard module with the arrow facing upward and pointing toward the slot 5 Careful...

Page 52: ...omputer If the module does not go into the slot easily remove it gently and verify you are inserting it in the proper direction Make sure you use the most recent software driver provided by the ExpressCard module manufacturer ...

Page 53: ...ile your computer is on If it is not removed properly your system may not work properly To remove an ExpressCard module To remove an ExpressCard module when your computer is off skip steps 1 to 4 1 Double click the Safely Remove Hardware icon on the taskbar 2 Select the hardware you want to unplug 3 Click Stop 4 Follow the on screen instructions to remove the ExpressCard module 5 Push in the Expre...

Page 54: ... Stick is a compact portable and versatile IC recording media especially designed for exchanging and sharing digital data with compatible products such as digital cameras mobile phones and other devices Because it is removable it can be used for external data storage ...

Page 55: ...ted and found compatible with Sony branded Memory Stick with capacity of up to 16 GB that are available as of September 2008 However not all the Memory Stick that meet the same specifications as the compatible media are guaranteed of compatibility Inserting a Memory Stick with multiple conversion adaptors is not guaranteed of compatibility MagicGate is the general name of the copyright protection ...

Page 56: ...ur system and the contents on the Memory Stick are displayed If nothing appears on the desktop click Start Computer and double click the Memory Stick icon Be sure to hold the Memory Stick with the arrow pointing in the correct direction as you insert it into the slot To avoid damaging your computer or the media do not force the Memory Stick into the slot if you cannot insert it smoothly Do not ins...

Page 57: ...ting the media Formatting the Memory Stick erases the entire data on the media Before formatting the media make sure that it does not contain your valuable data Do not remove the Memory Stick from the slot while formatting This could cause a malfunction 1 Carefully slide the Memory Stick into the slot until it clicks into place 2 Click Start and Computer to open the Computer window 3 Right click t...

Page 58: ...58 n N Using Your VAIO Computer 5 Click Start 6 Follow the on screen instructions It may take time to format the Memory Stick depending on the media type ...

Page 59: ...es of data may take time to load so make sure the indicator is unlit before removing the Memory Stick To remove a Memory Stick 1 Check that the Media Access indicator light is unlit 2 Push in the Memory Stick toward the computer and release The Memory Stick ejects 3 Pull the Memory Stick out of the slot Always remove the Memory Stick gently or it may pop out unexpectedly ...

Page 60: ...emory cards that meet the same specifications as the compatible media are guaranteed of compatibility Always insert the correct memory card into the SD memory card slot SD memory cards with capacity of up to 2 GB and SDHC memory cards with capacity of up to 32 GB have been tested and found compatible with your computer The SD memory card slot on your computer does not support the high speed data t...

Page 61: ... Hold the SD memory card with the arrow facing upward and pointing toward the slot 3 Carefully slide the SD memory card into the slot until it clicks into place Do not force the card into the slot If the SD memory card does not go into the slot easily remove it gently and verify you are inserting it in the proper direction ...

Page 62: ...he Media Access indicator light is lit If you do the card or its data may become damaged To remove an SD memory card 1 Check that the Media Access indicator light is unlit 2 Push in the SD memory card toward the computer and release The SD memory card ejects 3 Pull the SD memory card out of the slot ...

Page 63: ...t your computer to the Internet using the wireless LAN function you need to set up the wireless LAN network See Using the Wireless LAN WLAN page 67 for more information When you connect your computer to the Internet be sure to take appropriate security measures to protect the computer against online threats If your computer is not equipped with a built in modem you may need to connect an external ...

Page 64: ...phone lines or a private branch exchange PBX Some of these connections may result in excess electrical current and could cause a malfunction in the built in modem If you connect a telephone cable coming through a splitter the modem or connected device may not work properly To set up a dial up connection to the Internet The following procedure applies to models with a built in modem only 1 Click St...

Page 65: ...ot supplied to the network Ethernet port on the computer or the optional docking station and the other end to your network For detailed settings and devices needed to connect to the network ask your network administrator The network Ethernet port on your computer is disabled when the computer is attached to the docking station Your computer can be connected to the network with the default settings...

Page 66: ...r If the network Ethernet port is connected to one of the telephone lines mentioned below high electric current to the port may cause damage overheating or fire Home intercom speakerphone or business use telephone lines multi line business telephone Public telephone subscriber line PBX private branch exchange ...

Page 67: ...protocol Wi Fi Protected Access 2 WPA2 and Wi Fi Protected Access WPA Proposed jointly by the IEEE and Wi Fi Alliance both WPA2 and WPA are specifications of standards based on interoperable security enhancements that increase the level of data protection and access control for existing Wi Fi networks WPA has been designed to be forward compatible with the IEEE 802 11i specification It utilizes th...

Page 68: ...ommunication speed varies depending on the distance between communication devices existence of obstacles between such devices the device configuration the radio conditions and the software in use In addition communications may be cut off depending on the radio conditions The communication range varies depending on the actual distance between communication devices existence of obstacles between suc...

Page 69: ...int Ad hoc An ad hoc network is a network in which a LAN is created only by wireless devices themselves with no other central controller or access point Each device communicates directly with other devices in the network You can set up an ad hoc network easily at home ...

Page 70: ...on the WIRELESS switch 2 Click the button next to or above your desired wireless option s in the VAIO Smart Network window Make sure the WIRELESS indicator light turns on 3 Click Start and Control Panel 4 Click View network status and tasks under Network and Internet 5 Click Set up a connection or network in the left pane The Set up a connection or network window appears 6 Select an option to spec...

Page 71: ...The access point bridges the wireless and wired LAN and acts as a central controller for the wireless LAN network The access point coordinates transmission and reception from multiple wireless devices within a specific range The access point will select which channel to use on an infrastructure network For details on how to select the channel that will be used by the access point see the manual th...

Page 72: ...tandard using only the 5 GHz band available on selected models only is disabled by default To enable 5 GHz band communication you need to select the option to use the 5 GHz band or both the 2 4 GHz and 5 GHz bands on the WLAN tab in the VAIO Smart Network settings window 4 Right click or on the taskbar and select Connect to a network 5 Select the desired access point and click Connect For WPA PSK ...

Page 73: ... LAN Communications To stop wireless LAN communications Click the button next to or above the WLAN icon in the VAIO Smart Network window Turning off the wireless LAN function while accessing remote documents files or resources may result in data loss ...

Page 74: ...ces such as another computer or a mobile phone You can transfer data between these devices without cables at a range of up to 10 meters in an open area To start Bluetooth communications 1 Turn on the WIRELESS switch 2 Click the button next to or above the Bluetooth icon in the VAIO Smart Network window Make sure the WIRELESS indicator light turns on ...

Page 75: ... on your computer Size of file being exchanged Large files may occasionally be corrupted during continuous transfer due to limitations of the Bluetooth standard and electromagnetic interference in the environment All Bluetooth devices must be certified to make sure that the applicable standard requirements are maintained Even if standards are met individual device performance specifications and op...

Page 76: ...s however may cause radio interference and result in reduced communication speeds and distances than the standard values Read the Bluetooth regulations guide before using the Bluetooth function The Bluetooth function may not work with other devices depending on the manufacturer or the software version employed by the manufacturer Connecting multiple Bluetooth devices to your computer may cause cha...

Page 77: ...ent any anonymous Bluetooth devices from accessing your computer The first time two Bluetooth devices communicate a common passkey a password required for authentication should be determined for both devices to be registered Once a device is registered there is no need to re enter the passkey The passkey can be different each time but must be the same at both ends For certain devices such as a mou...

Page 78: ...ut the use of any cables To communicate with another Bluetooth device To communicate with another Bluetooth device you first need to set up the Bluetooth function For setting up and using the Bluetooth function search for Bluetooth information using Windows Help and Support To open Windows Help and Support click Start and Help and Support Be sure to turn on the WIRELESS switch before starting the ...

Page 79: ...er Stopping Bluetooth Communications To stop Bluetooth communications 1 Turn off the Bluetooth device that is communicating with your computer 2 Click the button next to or above the Bluetooth icon in the VAIO Smart Network window ...

Page 80: ... Headphones page 81 Connecting a Docking Station page 87 Connecting External Speakers page 95 Connecting an External Display page 96 Selecting Display Modes page 104 Using the Multiple Monitors Function page 105 Connecting an External Microphone page 107 Connecting a Universal Serial Bus USB Device page 108 Connecting a Printer page 111 Connecting an i LINK Device page 112 ...

Page 81: ...ed with your computer depending on the model you purchased The noise canceling headphones are equipped with a built in microphone that catches ambient noise and outputs an antiphase sound to reduce the noise See the online specifications to find out whether the noise canceling headphones are supplied with your computer ...

Page 82: ...Sound output devices connected to your computer via a Bluetooth connection The noise canceling function cannot be fully in effect unless you properly wear the headphones Be sure to fit earpieces of the headphones tightly into your ears If you feel that the noise canceling function has little effect adjust the earbud position in the earpieces of the noise canceling headphones or replace the earbuds...

Page 83: ...ise seems even louder depending on the type of noise or the degree of quietness in your environment In such a case disable the noise canceling function Use of a mobile phone may cause radio interference with the noise canceling headphones When using the headphones keep mobile phones away from the headphones Plugging or unplugging the noise canceling headphones generates noise This is normal and do...

Page 84: ...ion is enabled and a balloon message pops up from the icon Before plugging the headphones cable to the headphones jack make sure that the embossed marking on the plug faces upward When the icon is on the taskbar the noise canceling function is disabled Right click the icon and select Enable Noise Canceling Function from the menu If no icon is on the taskbar see What to do if the icon and the ballo...

Page 85: ...oise canceling function 1 Right click the icon on the taskbar and select Settings The Noise Canceling Headphones window appears If no icon is on the taskbar see What to do if the icon and the balloon do not appear page 86 to change the settings 2 Drag the Noise Canceling Control slider toward Mic or Mic to select your desired noise canceling level The slider should be at the center of the range to...

Page 86: ... Panel 2 Click Hardware and Sound 3 Click Manage audio devices under Sound 4 On the Playback tab double click the speakers or headphones icon 5 Click the Enhancements tab 6 Click to select the Noise Canceling Function check box and click Modify Settings If the Disable all enhancements check box is selected click to cancel the check box 7 Click to select the Display an icon for the noise canceling ...

Page 87: ...tion can be powered only through the AC adapter supplied with your computer Do not unplug the AC adapter from the docking station and the AC outlet while using the docking station This may cause data damage or hardware malfunctions A DC IN indicator Illuminates when the docking station is powered B IN USE indicator page 91 C UNDOCK button page 91 D DC IN port page 88 E Network Ethernet port 1000BA...

Page 88: ... the docking station This may detach the docking station and cause damage to both units The monitor port on your computer is not accessible when the computer is attached to the docking station Use the DVI D or MONITOR port on the docking station for connecting an external display 1 Disconnect all peripherals from the computer 2 Plug one end of the power cord 1 into the AC adapter 2 and the other e...

Page 89: ...icult to remove the docking station connector cover as it is tight in place on your computer Do not exert extra pressure when removing the cover so as not to damage the computer or the docking station connector cover Once you have removed the docking station connector cover keep it in the designated space 1 on the docking station ...

Page 90: ...ipheral Devices 5 Align the rear bottom corners of the computer with the guides on the docking station 6 Gently push down the computer until it clicks into place 7 Lift open the LCD screen lid and turn on the computer ...

Page 91: ... in loss of unsaved data or a failure of the computer When the battery pack is running out of power disconnecting your computer from the docking station may result in loss of unsaved data Do not disconnect your computer from the docking station during video playback Be sure to close video playback software before disconnection Once you have completed the steps in To disconnect your computer from t...

Page 92: ...unlit you do not have to press the UNDOCK button Pressing the UNDOCK button while your computer is in a power saving mode brings the computer to Normal mode first and then initiates the disconnection process Once you have placed your computer back in Normal mode be sure to take your computer off the docking station Use of the computer while on the docking station may cause unstable operations ...

Page 93: ...93 n N Using Peripheral Devices 2 Lift the computer off the docking station 3 Replace the docking station connector cover on the bottom of the computer ...

Page 94: ...ator light turns off Then lift the computer off the docking station 3 Replace the docking station connector cover to the bottom of the computer It is extremely important that you replace the docking station connector cover after disconnecting your computer from the docking station If the cover is left unattached dust may get inside and damage the computer To disconnect the docking station complete...

Page 95: ... cable 1 not supplied into the headphones jack 2 i 2 Plug the other end of the speaker cable to the external speaker 3 3 Turn down the volume of the speakers before you turn them on Make sure your speakers are designed for computer use Do not place floppy disks on the speakers Their magnetic field may damage the data on the disks The noise canceling function does not work on sound output through e...

Page 96: ...of the video You may be able to solve this problem by lowering the screen resolution of the display Follow the steps in Why doesn t my screen display a video page 203 to change the screen resolution If disconnecting the external display from the optional docking station does not automatically change the LCD resolution of your computer change the current display settings To change the settings see ...

Page 97: ... your computer is not accessible when the computer is attached to the docking station Use the MONITOR port on the docking station for connecting a computer display 1 If necessary plug one end of the display s power cord 1 into your display and the other end into an AC outlet 2 If you want to connect an analog monitor plug the display cable 2 not supplied into the monitor port 3 a on the computer o...

Page 98: ... computer is compliant with the HDCP standard and capable of encrypting the transmission channel of digital video signals for the purpose of copyright protection which enables you to play and view a wide variety of copyright protected high quality contents To view the copyright protected contents connect an HDCP compliant monitor to the HDMI output port on your computer or the DVI D port on the do...

Page 99: ... not accessible when the computer is attached to the docking station Use the MONITOR port on the docking station for connecting a multimedia computer display 1 Plug the power cord of your multimedia computer display 1 into an AC outlet 2 Plug the display cable 2 not supplied into the monitor port 3 a on the computer or on the docking station 3 Plug the speaker cable 4 not supplied into the headpho...

Page 100: ...100 n N Using Peripheral Devices ...

Page 101: ...o I change the sound output device page 215 1 Plug the power cord of your TV 1 into an AC outlet 2 Plug one end of an HDMI cable 2 not supplied to the HDMI output port 3 on the computer and the other end to the TV 3 Switch the input channel of the TV to external input 4 Set up the TV configuration system If a device driver other than the one provided by Sony is used the image will not be displayed...

Page 102: ...ed to change the device for sound output For the detailed instructions see How do I change the sound output device page 215 1 Turn on the TV and set its input to the HDMI input 2 Turn on the home theater receiver or surround sound decoder device and set its input to the HDMI input 3 Plug one end of an HDMI cable not supplied to the HDMI input port on the home theater receiver or surround sound dec...

Page 103: ...e when the computer is attached to the docking station Use the MONITOR port on the docking station for connecting a projector 1 Connect the power cord 1 of your projector into an AC outlet 2 Plug a display cable 2 not supplied into the monitor port 3 a on the computer or on the docking station 3 Plug an audio cable 4 not supplied into the headphones jack 5 i on the computer 4 Plug the display cabl...

Page 104: ...e see Using the Multiple Monitors Function page 105 for more information To select a display 1 Right click on the desktop and select Personalize 2 Click Display Settings 3 Follow the on screen instructions to change the settings You may not be able to display the same contents on your computer screen and the external display or projector at the same time depending on the type of your external disp...

Page 105: ... objects such as an open application window or a toolbar from one display to the other Your external display may not support the Multiple Monitors function Certain software applications may not be compatible with Multiple Monitors settings Make sure that your computer does not enter Sleep or Hibernate mode while you are using the Multiple Monitors function Otherwise the computer may not return to ...

Page 106: ...ou can also change the S1 button assignment to activate the Multiple Monitors function with the S1 button To change the S1 button assignment press and hold the button to display the window for changing the assignment For details on the S1 button see Using Special function Buttons page 36 Additionally you can set the display colors and resolution for each display and customize the Multiple Monitors...

Page 107: ...u need to use a sound input device for example to chat over the Internet you need to plug in an external microphone not supplied To connect an external microphone Plug the microphone cable 1 into the microphone jack 2 m Make sure your microphone is designed for computer use ...

Page 108: ... moving the computer with USB devices connected avoid exposing the USB ports to shock or impact Do not put the computer into a bag or carrying case when it has USB devices connected Connecting a USB Mouse To connect a USB mouse 1 Choose the USB port 1 you prefer to use 2 Plug the USB mouse cable 2 into the USB port You can now use your USB mouse not supplied 3 ...

Page 109: ... connect it to your computer To connect a USB floppy disk drive 1 Choose the USB port 1 you prefer to use 2 Plug the USB floppy disk drive cable 2 into the USB port Your USB floppy disk drive 3 is now ready for use When using a USB floppy disk drive do not apply force to the USB port This may cause a malfunction ...

Page 110: ...he computer to malfunction To disconnect a USB floppy disk drive To disconnect a USB floppy disk drive when your computer is off skip steps 1 to 5 1 Close all programs accessing the floppy disk drive 2 Double click the Safely Remove Hardware icon on the taskbar 3 Select the floppy disk drive you want to unplug 4 Click Stop 5 Follow the on screen instructions to remove the floppy disk drive 6 Disco...

Page 111: ...ter Using the USB Port You can connect a USB printer compatible with your version of Windows to the computer To connect a printer using the USB port 1 Plug the power cord 1 of your printer into an AC outlet 2 Choose the USB port 3 you prefer to use 3 Plug one end of a USB printer cable 2 not supplied into the USB port and the other end to your printer ...

Page 112: ...up to 400 Mbps However the actual transfer rate depends on the transfer rate of the external device The optional i LINK cables may not be available in some countries or areas An i LINK connection with other compatible devices is not fully guaranteed The i LINK connection may not be available depending on the software applications operating system and i LINK compatible devices you use See the manua...

Page 113: ...omputer and the other end into the DV In Out port 3 on the digital video camcorder On Sony digital video cameras ports labeled DV Out DV In Out or i LINK are i LINK compatible The Sony digital video camcorder shown here is an example Your digital video camcorder may need to be connected differently You cannot access the pictures stored on a Memory Stick when using an i LINK connection ...

Page 114: ...learn how to use and customize the look of your Sony software and utilities Setting the Password page 115 Using Fingerprint Authentication page 127 Using the Trusted Platform Module TPM page 135 Setting Up Your Computer with the VAIO Control Center page 142 Using the Power Saving Modes page 143 Managing Power with the VAIO Power Management page 148 Protecting the Hard Disk page 150 ...

Page 115: ...allows you to protect your computer from unauthorized access The hard disk password provides additional security for the data stored on your built in storage device If you set the hard disk password other users will not be able to access the data without knowing the password even if the password protected built in storage device is removed from your computer and is installed in another computer Th...

Page 116: ...t the user password you must first set the machine password Once you have set the power on password you cannot start your computer without entering the password Be sure not to forget the password Write down your password and keep it safe and private from other people If you forget the power on password and need assistance to reset it a password reset fee will be charged and your computer may need ...

Page 117: ...elect Security to display the Security tab select Set Machine Password and then press the Enter key 4 On the password entry screen enter the password twice and press the Enter key The password can be up to 32 alphanumeric characters including spaces long 5 Select Password when Power On under Security and press the Enter key 6 Change the setting from Disabled to Enabled 7 Press the or key to select...

Page 118: ...key several times when the VAIO logo appears 3 Enter the machine password and press the Enter key 4 Press the or key to select Security to display the Security tab select Set User Password and then press the Enter key 5 On the password entry screen enter the password twice and press the Enter key The password can be up to 32 alphanumeric characters including spaces long 6 Press the or key to selec...

Page 119: ...nter the machine password and press the Enter key 4 Press the or key to select Security to display the Security tab select Set Machine Password and then press the Enter key 5 On the password entry screen enter the current password once and a new password twice and then press the Enter key To remove the password leave the Enter New Password and Confirm New Password fields blank and press the Enter ...

Page 120: ...word and press the Enter key 4 Press the or key to select Security to display the Security tab select Set User Password and then press the Enter key 5 On the password entry screen enter the current password once and a new password twice and then press the Enter key To remove the password leave the Enter New Password and Confirm New Password fields blank and press the Enter key 6 Press the or key t...

Page 121: ... in storage devices in RAID configuration See the online specifications to find out about your storage device configuration You cannot start your computer with the master password If you forget the master password or the keyboard fails which is critical to password entry no bypass is possible and the data stored on the built in storage device will not be accessible There is NO RESET of this passwo...

Page 122: ... the built in hard disk drive select Hard Disk 1 Password for the flash memory storage device or select Hard Disk 2 Password for the hard disk drive 4 Select Enter Master and User Passwords and press the Enter key 5 Select Continue on the warning screen and press the Enter key 6 Enter the master password twice and press the Enter key The password should be up to 32 alphanumeric characters includin...

Page 123: ...nter key The Hard Disk Password entry screen appears If your computer is equipped with both the built in flash memory storage device and the built in flash hard disk drive select Hard Disk 1 Password for the memory storage device or select Hard Disk 2 Password for the hard disk drive 4 Select Change Master Password or Change User Password and press the Enter key 5 Enter the current password once a...

Page 124: ...your computer is equipped with both the built in flash memory storage device and the built in flash hard disk drive select Hard Disk 1 Password for the memory storage device or select Hard Disk 2 Password for the hard disk drive 4 Select Enter Master and User Passwords and press the Enter key 5 Enter the current password for Enter Current Hard Disk Master Password and press the Enter key 6 Press t...

Page 125: ...ngerprint sensor and you have set the Windows password in conjunction with the fingerprint authentication function you can substitute fingerprint authentication for password entry when turning on your computer For more information see Using Fingerprint Authentication page 127 To add the Windows password 1 Click Start and Control Panel 2 Click User Accounts and Family Safety or User Accounts 3 Clic...

Page 126: ...ssword 5 In the Current password field enter your current password 6 In the New password and Confirm new password fields enter a new password 7 Click Change password To remove the Windows password 1 Click Start and Control Panel 2 Click User Accounts and Family Safety or User Accounts 3 Click User Accounts 4 Click Remove your password 5 In the Current password field enter the current password that...

Page 127: ...rd page 116 and or the hard disk password page 121 you can substitute fingerprint authentication for password entry when starting your computer Password Bank for quick web site access page 133 You can substitute fingerprint authentication for entering information user accounts passwords etc required to access the password protected web sites File Safe feature to encrypt decrypt data page 133 With ...

Page 128: ...after the repair work the fingerprint templates will be lost You will have to register them all over again The maintenance and management of data concerning fingerprint authentication must be carried out at your own risk Sony assumes no liability for any defects arising out of your data maintenance and management Before disposing of your computer or transferring it to a third person it is strongly...

Page 129: ...tailed instructions To register a fingerprint Up to 10 fingerprints can be registered for each user and up to 21 fingerprints can be registered for logging onto your system using the Power on Security feature You can also select the fingerprint you want to use for the Power on Security feature later 1 Click Start All Programs Protector Suite QL and Control Center 2 Click Fingerprints and Initializ...

Page 130: ...ur VAIO Computer If you have failed to register a fingerprint follow these steps to try again 1 Place the top joint of your finger on the fingerprint sensor 1 2 Swipe your finger perpendicularly across the fingerprint sensor ...

Page 131: ...you move your finger too fast or too slow Let the fingerprint sensor take about one second to scan your fingerprint You may not be able to register and or have your fingerprint s recognized if your finger is excessively dry or wet wrinkled injured dirty etc Register more than one fingerprint in case that the fingerprint sensor fails to recognize the fingerprint Be sure to clean your fingertip s an...

Page 132: ... RAID configuration See the online specifications to find out about your storage device configuration For detailed information see the help file included with the Protector Suite QL Logging onto Windows If you have registered your fingerprints for your user account you can substitute fingerprint authentication for Windows password entry To log onto Windows swipe the registered finger across the fi...

Page 133: ...r folder for protection against unauthorized access The encrypted archive can be decrypted or unlocked for included file folder access by swiping your finger across the fingerprint sensor or entering the backup password you specified for encryption For detailed information see the help file included with the Protector Suite QL Using the Application Launcher The application launcher feature is avai...

Page 134: ...ed Fingerprints Before disposing of your computer or transferring it to a third person it is strongly recommended you erase the fingerprint data registered on the fingerprint sensor after erasing the data stored on your built in storage device To erase the registered fingerprints 1 Turn on the computer 2 Press the F2 key when the VAIO logo appears The BIOS setup screen appears If not restart the c...

Page 135: ...nd provides your computer with basic security functions In combination with the TPM you can encrypt and decrypt your data to strengthen computer security against inappropriate access TPMs are defined by Trusted Computing Group TCG and also called security chips See the online specifications to find out whether your model is equipped with the TPM ...

Page 136: ...lso be replaced if the motherboard needs replacement In such a case use the backup copies of the emergency recovery archive file emergency recovery token file password reset token file and personal secret file to restore the TPM configuration Be sure to make a backup copy of the data stored on the built in storage device before sending your computer for repair The built in storage device may be in...

Page 137: ...The EFS function has been enabled in user initialization process With the default settings the files in the folders below cannot be encrypted because they have system attributes Do not change the system attributes of the files in the folders below The following folders are invisible by default Folders containing basic user keys and others C username All Users Infineon TPM Software 2 0 BackupData C...

Page 138: ... userfolder Documents Security Platform window Storage folder for automatic backup data Default folder name SPSystemBackup The folder is created as the subfolder for the SPSystemBackup xml file Token file for restoring the TPM configuration Default file name SPEmRecToken xml Default path Removable media FD USB memory etc Key and certificate backup file Default file name SpBackupArchive xml Default...

Page 139: ...ncrypt them Sony assumes no liability for any troubles and damages arising out of your careless encryption of the following files and folders including them Password reset token file Default file name SPPwdResetToken xml Default path Removable media FD USB memory etc Password reset secret file Default file name SPPwdResetSecret xml Default path Removable media FD USB memory etc ...

Page 140: ...t select Exit Setup and then press the Enter key 6 After your system restarts select Execute in the confirmation window and then press the Enter key You can also disable the TPM and clear the TPM configuration in the BIOS setup screen Before enabling the TPM be sure to set the power on and hard disk passwords to protect against unauthorized modification of the TPM configuration The hard disk passw...

Page 141: ...ional Package Without these passwords you will not be able to restore any TPM protected data or backup files Be sure to write down the passwords and keep them safe and private from other people To initialize and configure the TPM See the on screen documentation for detailed information To open the documentation click Start All Programs Infineon Security Platform Solution and Help The maintenance a...

Page 142: ...r To use the VAIO Control Center 1 Click Start All Programs and VAIO Control Center 2 Select the desired control item and change the settings 3 Once finished click OK The setting of the desired item has been changed For more information about each option see the help file included with the VAIO Control Center Some of the control items will not be visible if you open the VAIO Control Center as a st...

Page 143: ... you should be aware that the computer will automatically enter Hibernate mode if the remaining battery life becomes short regardless of the power management setting you select If the battery charge level falls below 10 you should either connect the AC adapter to recharge the battery pack or shut down your computer and install a fully charged battery pack Using Normal Mode This is the normal state...

Page 144: ... power place the computer into Hibernate mode or turn it off To activate Sleep mode Click Start the arrow next to the Lock button and Sleep When your computer is in Sleep mode you cannot insert a disc Your computer comes out of Sleep mode quicker than out of Hibernate mode Sleep mode uses more power than Hibernate mode If the battery runs out of power while your computer is in Sleep mode you will ...

Page 145: ... LCD screen lid This power resuming preference will be lost if you remove both the AC adapter and the battery pack See Setting Up Your Computer with the VAIO Control Center page 142 If the computer is not used for a certain period of time it will enter Sleep mode To modify this you can change the Sleep mode settings To change the Sleep mode settings 1 Right click the power status icon on the taskb...

Page 146: ...for a long period of time place the computer into Hibernate mode To activate Hibernate mode Press the Fn F12 keys The computer enters Hibernate mode Alternatively you can click Start the arrow next to the Lock button and Hibernate to place the computer into Hibernate mode When your computer is in Hibernate mode you cannot insert a disc Hibernate mode requires more time than Sleep mode to be activa...

Page 147: ...uter will turn off automatically It takes more time to return to Normal mode from Hibernate mode than from Sleep mode You can use the VAIO Control Center to configure your computer to return to Normal mode when you open the LCD screen lid This power resuming preference will be lost if you remove both the AC adapter and the battery pack See Setting Up Your Computer with the VAIO Control Center page...

Page 148: ... status icon appears on the taskbar This icon indicates what kind of power source you are using at that time for example AC power Click this icon to display the window that shows your power status The VAIO Power Management function is added to the Windows Power Options To select a power plan 1 Right click the power status icon on the taskbar and select Power Options 2 Select your desired power pla...

Page 149: ...he power plan that was modified with the VAIO Power Management To start the VAIO Power Management Viewer 1 Click Start All Programs and VAIO Control Center 2 Click Power Management and VAIO Power Management Viewer Alternatively you can launch the VAIO Power Management Viewer by pressing the S1 button ...

Page 150: ...lity Activating VAIO HDD Protection To protect your hard disk drive against shock hazards you must first activate the VAIO HDD Protection To activate VAIO HDD Protection 1 Click Start All Programs and VAIO Control Center 2 Click Security and Hard Disk Drive Protection Settings 3 Select the Activate hard disk drive protection check box 4 Select one of the desired sensitivity level 5 Click OK For mo...

Page 151: ...ur product warranty period we recommend that You should contact your dealer to install a new memory module You should not install it yourself if you are not familiar with upgrading memory on a computer You should not touch the connectors or open the memory module compartment cover For the type of module and amount of memory installed on your model see the online specifications Contact VAIO Link if...

Page 152: ...fore touching a memory module ensure the following The procedures described in this document assume user familiarity with the general terminology associated with personal computers and with the safety practice and regulatory compliance requirements for using and modifying electronic equipment Turn off your computer and disconnect it from its power sources battery pack and AC adapter and from any t...

Page 153: ...ter and any repair costs will not be covered by the warranty Do not place the memory module in a location subject to Heat sources such as radiators or air ducts Direct sunlight Excessive dust Mechanical vibration or shock Strong magnets or speakers that are not magnetically shielded Ambient temperature of more than 35 C or less than 5 C High humidity Handle the memory module with care To avoid inj...

Page 154: ...computer and disconnect all peripheral devices 2 Unplug the computer and remove the battery pack 3 Wait about an hour until the computer cools down 4 Unscrew the screw indicated by the arrow below on the bottom of the computer and remove the memory module compartment cover 5 Touch a metal object to discharge static electricity ...

Page 155: ... installed memory module as follows Pull the latches in the direction of the arrows 1 The memory module is released Make sure that the memory module tilts up and then pull it out in the direction of the arrow 2 7 Remove the new memory module from its packaging ...

Page 156: ... on the motherboard If you want to install only one memory module be sure to use the lower slot Be sure to insert the connector edge of the memory module into the slot while aligning the notch on the module with the small projection in the open slot Do not force the memory module into the slot in a wrong orientation as it may cause damage to the slot and the module ...

Page 157: ...157 n N Upgrading Your VAIO Computer 9 Replace the memory module compartment cover 10 Tighten the screw on the bottom of the computer 11 Reinstall the battery pack and turn on the computer ...

Page 158: ...memory 1 Turn on the computer 2 Click Start All Programs and VAIO Control Center 3 Click System Information and System Information You can view the amount of system memory in the right pane If the additional memory does not appear repeat the installation procedure and restart the computer ...

Page 159: ...dling the LCD Screen page 160 Using the Power Source page 161 Handling Your Computer page 162 Handling the Built in MOTION EYE Camera page 165 Handling Floppy Disks page 166 Handling Discs page 167 Using the Battery Pack page 168 Using Headphones page 169 Handling the Memory Stick page 170 Handling the Hard Disk page 171 Updating Your Computer page 172 ...

Page 160: ... images The LCD screen becomes warm during operation This is normal and does not indicate a malfunction The LCD screen is manufactured using high precision technology You may however see tiny black points and or bright points red blue or green that continuously appear on the LCD screen This is a normal result of the manufacturing process and does not indicate a malfunction Avoid rubbing the LCD sc...

Page 161: ...dden power surges in an electrical storm for example Do not place heavy objects on the power cord To disconnect the cord pull it out by holding the plug Never pull the cord itself Unplug your computer from the AC outlet if you are not planning to use the computer for a long period of time Make sure that the AC outlet is easily accessible When the AC adapter is not used unplug it from the AC outlet...

Page 162: ... place any objects on top of the computer Do not place your computer in a location subject to Heat sources such as radiators or air ducts Direct sunlight Excessive dust Moisture or rain Mechanical vibration or shock Strong magnets or speakers that are not magnetically shielded Ambient temperature of more than 35 C or less than 5 C High humidity Do not place electronic equipment near your computer ...

Page 163: ...the computer Your computer uses high frequency radio signals and may cause interference to radio or TV reception If this occurs relocate the computer a suitable distance away from the set Use only specified peripheral equipment and interface cables Otherwise problems may occur Do not use cut or damaged connection cables If your computer is brought directly from a cold location to a warm one moistu...

Page 164: ...164 n N Precautions Make sure you disconnect the AC adapter and remove the battery pack before cleaning your computer To avoid losing data when your computer is damaged back up your data regularly ...

Page 165: ...he built in MOTION EYE camera regardless of your computer s power state as it may cause the camera to malfunction The built in MOTION EYE camera is disabled while videos or still images are imported from an i LINK compatible device connected to the i LINK port Clean the lens protection cover of the built in MOTION EYE camera with a blower brush or a soft brush If the cover is extremely dirty wipe ...

Page 166: ...ources of heat Keep floppy disks away from any liquid Do not let them get wet When you are not using your floppy disk always remove it from the floppy disk drive and put it in a storage case If the floppy disk comes with a label make sure that the label is properly affixed If the edge of the label is curled up the label may stick to the inside of the floppy disk drive and cause a malfunction or da...

Page 167: ...ner alcohol commercially available cleaners or anti static spray which may cause damage to the disc For normal cleaning hold the disc by its edges and use a soft cloth to wipe the surface from the center out If the disc is badly soiled moisten a soft cloth with water wring it out well and use it to wipe the surface of the disc from the center out Wipe off any remaining moisture with a dry soft clo...

Page 168: ...ck This is normal and is not cause for concern Keep the battery pack away from all sources of heat Keep the battery pack dry Do not open or try to disassemble the battery pack Do not expose the battery pack to any mechanical shock such as dropping it on a hard surface If you are not using your computer for a long period of time remove the battery pack from the computer to prevent damage to the bat...

Page 169: ...ic hazard and is illegal in some areas It can also be potentially dangerous to play loud music while walking especially at pedestrian crossings Preventing hearing damage Avoid using headphones at high volume Hearing experts advise against continuous loud and extended play If you experience a ringing in your ears reduce the volume or discontinue use ...

Page 170: ...location subject to Static electricity Electrical noise Extremely high temperatures such as in a car parked in the sun Direct sunlight High humidity Corrosive substances Use the storage case supplied with the Memory Stick Be sure to make a backup copy of your valuable data Keep the Memory Stick and the Memory Stick adaptors out of reach of children There is a risk of swallowing them When using the...

Page 171: ...e to prevent losing data due to mechanical vibration shock or dust you should be careful when handling your computer To avoid damaging your hard disk drive Do not subject your computer to sudden movements Keep your computer away from magnets Do not place your computer in a location subject to mechanical vibration or in an unstable position Do not move your computer while the power is on Do not tur...

Page 172: ... so that the computer can run more efficiently Windows Update Click Start All Programs and Windows Update and then follow the on screen instructions VAIO Update 4 Click Start All Programs VAIO Update 4 and VAIO Update Options and then follow the on screen instructions Your computer must be connected to the Internet to download the updates ...

Page 173: ...estions before contacting VAIO Link Computer page 175 System Security page 183 Battery page 184 Built in MOTION EYE Camera page 186 Networking page 188 Bluetooth Technology page 193 Optical Discs page 197 Display page 202 Printing page 206 Microphone page 207 Mouse page 208 Speakers page 209 Touch Pad page 211 Keyboard page 212 Floppy Disks page 213 Audio Video page 214 Memory Stick page 218 ...

Page 174: ...174 n N Troubleshooting Peripherals page 219 Docking Station page 220 ...

Page 175: ...s plugged into a power source and turned on If you are using an external display make sure it is plugged into a power source and turned on Make sure the brightness and contrast controls are adjusted correctly See the manual that came with your display for more information Unplug the AC adapter and remove the battery pack Wait three to five minutes Reinstall the battery pack plug the AC adapter and...

Page 176: ... stops responding while a software application is running press the Alt F4 keys to close the application window If the Alt F4 keys do not work click Start the arrow next to the Lock button and Shut Down to turn off your computer If your computer does not turn off press the Ctrl Alt Delete keys and click the arrow next to the Shut down button and Shut Down If the Windows Security window appears cli...

Page 177: ...his procedure does not work press and hold the power button until the computer turns off Turning off your computer with the power button may cause loss of unsaved data What should I do if the charge indicator light is blinking fast and my computer does not start This problem could be due to the battery pack not being installed properly To resolve this problem turn off your computer and remove the ...

Page 178: ...imum This is normal Because your computer s CPU utilizes a type of CPU speed controlling technology for power conservation purposes System Properties may display the current CPU speed instead of the maximum speed What should I do if Windows does not accept my password and returns a message Enter Onetime Password If you enter a wrong power on password three times consecutively the Enter Onetime Pas...

Page 179: ...AIO Link to reset it A reset fee will be charged How can I change the boot device order You can use one of the BIOS functions to change the boot device order Follow these steps 1 Turn on your computer 2 Press the F2 key when the VAIO logo appears The BIOS setup screen appears If not restart the computer and press the F2 key several times when the VAIO logo appears 3 Press the or key to select Boot...

Page 180: ...r your screen to turn off Select a screen saver other than the VAIO original screen saver What should I do if I cannot boot my computer from the external device connected to the computer To boot your computer from the external device for example the USB floppy disk drive and the USB i LINK optical disc drive you need to change the boot device Turn on your computer and press the F11 key when the VA...

Page 181: ...urn it on once again Use the recovery disc you created upon delivery of your computer 2 Select your keyboard layout from the drop down list and click Next 3 Select your operating system and click Next 4 Click VAIO Recovery Center 5 Click Restore Complete System and Start 6 Select Skip and click Next You will be prompted to select whether or not to keep the VAIO Value added contents 7 Select No and...

Page 182: ...here data for the system recovery is stored To check the volume of the recovery partition follow these steps 1 Click Start right click Computer and select Manage 2 Click Disk Management under Storage in the left pane The volume of the recovery partition and the total volume of the C drive are displayed in the Disk 0 row in the center pane ...

Page 183: ...ect to the Internet 2 Double click the Windows Security Alerts icon on the taskbar 3 Follow the on screen instructions to set up automatic or scheduled updates How do I keep my antivirus software updated You can keep the McAfee Internet Security Suite software program current with the latest updates from McAfee Inc To download and install the latest security updates follow these steps 1 Click Star...

Page 184: ...C power even if the battery pack is installed When should I recharge the battery pack When the battery charge level falls below 10 When both the charge and power indicator lights blink When you have not used the battery pack for a long period of time When should I replace the battery pack If the battery pack quickly runs out of power after fully charged it may be reaching the end of its life and s...

Page 185: ...e using battery power Your computer can enter Hibernate mode while using battery power but some software programs and peripheral devices prevent the system from entering Hibernate mode If you are using a program that prevents the system from entering Hibernate mode save your data frequently to avoid losing data See Using Hibernate Mode page 146 for information on how you can manually activate Hibe...

Page 186: ... images poor in quality The images captured under the fluorescent light may show reflections of light A dark portion in captured images may appear as a noise If the lens protection cover is dirty you cannot take a clear shot Clean the cover See Handling the Built in MOTION EYE Camera page 165 Why do captured images contain dropped frames and audio interruptions The effect settings on your software...

Page 187: ...lue to one of the camera properties e g light source flicker etc to eliminate flicker noise Why is the video input from the built in MOTION EYE camera suspended for a few seconds The video input may be suspended for a few seconds if a shortcut key with the Fn key is used the CPU load increases This is normal and does not indicate a malfunction What should I do if my computer becomes unstable when ...

Page 188: ...ccess point is on If you want to connect your computer to a wireless LAN access point using the 5 GHz band make sure the option to use the 5 GHz band or both the 2 4 GHz and 5 GHz bands is selected on the WLAN tab in the VAIO Smart Network settings window Wireless LAN communication IEEE 802 11a standard using only the 5 GHz band available on selected models only is disabled by default Follow these...

Page 189: ...cation failure To change the settings follow these steps 1 Right click the power status icon on the taskbar and select Power Options 2 Click Change plan settings under the current power plan 3 Click Change advanced power settings 4 Select the Advanced settings tab 5 Double click Wireless Adapter Settings and Power Saving Mode 6 Select Maximum Performance from the drop down list both for On battery...

Page 190: ...he wireless LAN data transfer speed is affected by distance and obstructions between devices and access points Other factors include device configurations radio conditions and software compatibility To maximize the data transfer speed move your computer away from obstacles or closer to any access point you may be using If you are using a wireless LAN access point the device may be temporarily over...

Page 191: ...t in a communication failure Follow the steps in What should I do if my computer cannot connect to a wireless LAN access point page 188 to change the settings What are channels Wireless LAN communication uses divided frequency bands known as channels Third party wireless LAN access point channels may be preset to different channels from Sony devices If you are using a wireless LAN access point see...

Page 192: ...IO Smart Network window on the desktop follow these steps 1 Click Start All Programs and VAIO Control Center 2 Click Network Connections and VAIO Smart Network 3 Click Advanced in the right pane For information on the VAIO Smart Network software see the help file included with the software ...

Page 193: ...d device is also connected to other devices it may not appear in the Bluetooth Devices window or you may not be able to communicate with the device What should I do if I cannot find the Bluetooth device I want to communicate with Check that the Bluetooth function of the device you want to communicate with is on See the other device s manual for more information If the device you want to communicat...

Page 194: ... find this computer check box The data transfer distance can be shorter than 10 meters depending on existing obstacles between the two devices on radio wave quality and on the operating system or the software in use Move your computer and Bluetooth devices closer to each other If the device you want to communicate with is already communicating with another Bluetooth device it may not be found or i...

Page 195: ...o the device to which it is connected Identify and remove obstacles between your computer and the device to which it is connected Large files may occasionally be corrupted during continuous transfer due to limitations of the Bluetooth standard and electromagnetic interference in the environment Why can t I use the services supported by the connected Bluetooth device Connection is only possible for...

Page 196: ...onto the computer as a user with administrative rights Why can t I use the Bluetooth devices when I switch users If you switch users without logging off your system the Bluetooth devices will not work Be sure to log off before switching users To log off your system click Start the arrow next to the Lock button and Log Off Why can t I exchange business card data with a mobile phone The business car...

Page 197: ...he drive tray does not open Make sure your computer is on If the power supply to the optical disc drive is disabled by the VAIO Power Management the substitute drive eject button on the optical disc drive will not work Use the drive eject button located on the right front edge of the computer It will take a while to eject the drive tray if the optical disc drive is not powered If the drive eject b...

Page 198: ... Ctrl Alt Delete keys and click the arrow next to the Shut down button and Restart to restart the computer 2 Remove the disc from the optical disc drive 3 Check the disc for dirt or damage If you need to clean the disc see Handling Discs page 167 for instructions If you are playing a disc and cannot hear sound do any of the following The volume may have been turned off by the muting button Press t...

Page 199: ...uble click the desired drive You can confirm the driver software by selecting the Driver tab and clicking Driver Details 7 Click OK to close the window Make sure an adhesive label is not affixed to a disc Adhesive labels can come off while the disc is in the optical disc drive and damage the drive or cause it to malfunction If a region code warning appears the disc may be incompatible with the opt...

Page 200: ...AIO Update To download and install the updates on the computer it must be connected to the Internet For information on how to connect the computer to the Internet see Using the Internet page 63 What should I do if I cannot write data to CD media Make sure you neither launch any software application nor allow any to launch automatically not even a screen saver If you are using a CD R RW disc with a...

Page 201: ...ne specifications to find out the type of your optical disc drive and then Reading and Writing Optical Discs page 42 to find out about the supported disc media Check if your optical disc drive supports the Blu ray Disc writing function BD R Disc media are not rewritable You cannot add or erase data to or from the BD R Disc media ...

Page 202: ... and is charged See Using the Battery Pack page 24 for more information If the display output is directed to the external display press the Fn F7 keys See Combinations and Functions with the Fn Key page 34 for more information What should I do if no image is displayed on my TV screen or external display connected to the HDMI output port Make sure you are using an HDCP compliant display The copyrig...

Page 203: ... for displaying high resolution videos In this case lower the resolution of the LCD screen To change the screen resolution follow these steps 1 Right click on the desktop and select Personalize 2 Click Display Settings 3 Move the slider under Resolution to the left to reduce or to the right to increase the screen resolution You can check the total amount of the graphics and video memory available ...

Page 204: ...gs tab 5 Double click Display 6 Adjust the LCD brightness setting in the item for brightness adjustment The Automatic Brightness Settings function does not work during the setup or recovery process The LCD brightness of your screen may fluctuate regardless of ambient light intensity What should I do if the external display remains blank If you cannot change the display output with the Fn F7 keys y...

Page 205: ...ick Start and Control Panel 2 Click Customize colors under Appearance and Personalization 3 Click Open classic appearance properties for more color options 4 Select Windows Aero from the Color scheme options on the Appearance tab 5 Click OK For information about the Windows Aero features such as Windows Flip 3D see Windows Help and Support ...

Page 206: ...rom a power saving mode Sleep or Hibernate then restart the computer If the bidirectional communication functions are provided with your printer disabling the functions on your computer may enable printing Follow these steps 1 Click Start and Control Panel 2 Click Printer under Hardware and Sound 3 Right click the printer icon and select Properties 4 Click the Ports tab 5 Click to cancel the Enabl...

Page 207: ...device follow these steps 1 Close all open programs 2 Click Start and Control Panel 3 Click Hardware and Sound 4 Click Manage audio devices under Sound 5 On the Recording tab select the desired device for sound input and click Set Default How can I prevent microphone feedback Microphone feedback occurs when the microphone receives the sound from a sound output device such as a speaker To prevent t...

Page 208: ...to close the application window If the Alt F4 keys do not work press the Windows key once and then the key several times select Restart with the M or m key and press the Enter key to restart your computer If your computer does not restart press the Ctrl Alt Delete keys select the arrow next to the Shut down button with the m and keys and then Restart with the M or m key and press the Enter key to ...

Page 209: ...off The volume may have been turned off by the muting button Press the button once again The volume may have been minimized by the volume down button Press the volume up button several times or keep pressing the button to turn up the volume loud enough to hear sound If your speakers require external power make sure the speakers are connected to a power source See the manual that came with your spe...

Page 210: ...een turned off by the muting button Press the button once again The volume may have been minimized by the volume down button Press the volume up button several times or keep pressing the button to turn up the volume loud enough to hear sound Check the Windows volume controls by clicking the volume icon on the taskbar Your sound output device may have been incorrectly configured To change the sound...

Page 211: ...window If the Alt F4 keys do not work press the Windows key once and then the key several times select Restart with the M or m key and press the Enter key to restart your computer If your computer does not restart press the Ctrl Alt Delete keys select the arrow next to the Shut down button with the m and keys and then Restart with the M or m key and press the Enter key to restart your computer If ...

Page 212: ... change the keyboard configuration follow these steps 1 Click Start and Control Panel 2 Click Clock Language and Region and click Regional and Language Options 3 Change the settings as desired What should I do if I cannot enter certain characters with the keyboard If you cannot enter U I O P J K L M and so on the Num Lk key may be activated Check that the Num lock indicator light is unlit If the N...

Page 213: ... Wait until the indicator light on the floppy disk drive turns off 3 Push the eject button to remove the disk and disconnect the USB floppy disk drive from your computer 4 Reconnect the floppy disk drive by plugging the USB cable into the USB port 5 Restart the computer by clicking Start the arrow next to the Lock button and Restart What should I do if I cannot write data to a floppy disk Make sur...

Page 214: ... a software application an operating system and a compatible i LINK device Not all products with an i LINK connection can communicate with each other See the manual that came with your compatible i LINK device for more information on operating conditions and proper connection Before connecting compatible i LINK PC peripherals to your system such as a CD RW or hard disk drive confirm their operatin...

Page 215: ...ucts with an i LINK connection can communicate with each other See the manual that came with your compatible i LINK device for more information on operating conditions and proper connection Before connecting compatible i LINK PC peripherals to your system such as a CD RW or hard disk drive confirm their operating system compatibility and required operating conditions How do I change the sound outp...

Page 216: ... HDMI output port optical output port or headphones jack For the detailed procedure see How do I change the sound output device page 215 If you still hear no sound from the sound output device follow these steps 1 Follow steps 1 to 4 in How do I change the sound output device page 215 2 On the Playback tab select the HDMI or S PDIF icon and click Properties 3 Click the Advanced tab 4 Select the sa...

Page 217: ...check boxes 7 Click OK If the Dolby Digital or DTS output is connected to a device that does not support it the device will not play any sound In such a case cancel the DTS Audio and Dolby Digital check boxes Why do sound interruptions and or dropped frames occur when I play high definition videos such as those recorded with the AVCHD digital video camcorder Playing high definition videos requires...

Page 218: ...ps in To format a Memory Stick page 57 Why can t I save music files onto my Memory Stick Copyright protected music can only be checked out to the Memory Stick with the MagicGate logo Use of recorded music requires permission from the copyright holders Sony is not responsible for music files that cannot be recorded from a CD or downloaded from other sources Can I copy images from a digital camera u...

Page 219: ...et Try using another USB port on your computer The driver could be installed to the specific port you used the first time you connected the device See the manual that came with your USB device for more information You may need to install software before you connect the device Try connecting a simple low powered device such as a mouse to test if the port is working at all USB hubs may prevent a dev...

Page 220: ...ng such devices and then try again If the above does not work shut down your computer and disconnect it from the docking station When the battery pack is running out of power you cannot disconnect your computer from the docking station Charge the battery pack or shut down the computer and then try again Be sure to return to the originally logged on user before disconnecting your computer from the ...

Page 221: ...holding the Microsoft Windows key and pressing the F1 key VAIO Link web site If you have any problem with the computer you can access the VAIO Link web site for troubleshooting Go to http www vaio link com VAIO Link help lines Before contacting VAIO Link by telephone try to solve the problem by reading the printed and non printed documentation Visit the other Sony web sites http www club vaio com ...

Page 222: ...tered trademarks of Intel Corporation Microsoft Windows Vista the Windows logo and BitLocker are trademarks or registered trademarks of Microsoft Corporation in the U S and other countries i LINK is a trademark of Sony used only to designate that a product contains an IEEE 1394 connection Roxio Easy Media Creator is a trademark of Sonic Solutions WinDVD for VAIO and WinDVD BD for VAIO are trademar...

Page 223: ... Koozyt Inc PlaceEngine was developed by Sony Computer Science Laboratories Inc and is licensed by Koozyt Inc XMB and xross media bar are trademarks of Sony Corporation and Sony Computer Entertainment Inc ENERGY STAR and the ENERGY STAR mark are registered U S marks AVCHD is a trademark of Panasonic Corporation and Sony Corporation All other names of systems products and services are trademarks of...

Page 224: ... 2009 Sony Corporation n ...

Reviews: