


55
Using Your VAIO Computer >
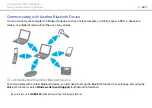
Using the Bluetooth Function
Notes on Using the Bluetooth Function
❑
The data transfer rate varies, depending on the following conditions:
❑
Obstacles, such as walls, located between devices
❑
Distance between devices
❑
Material used in walls
❑
Proximity to microwaves and cordless telephones
❑
Radio frequency interference and other environmental conditions
❑
Device configuration
❑
Type of software application
❑
Type of operating system
❑
Use of both wireless LAN and Bluetooth functions at the same time on your computer
❑
Size of file being exchanged
❑
Large files may occasionally be corrupted during continuous transfer due to limitations of the Bluetooth standard and
electromagnetic interference in the environment.
❑
All Bluetooth devices must be certified to make sure that the applicable standard requirements are maintained. Even if
standards are met, individual device performance, specifications, and operation procedures can vary. Data exchange may
not be possible in all situations.
❑
Video and audio may not be synchronized if you play videos on your computer with audio output from a connected
Bluetooth device. This is a frequent occurrence with Bluetooth technology and is not a malfunction.
❑
The 2.4 GHz band, with which Bluetooth devices or wireless LAN devices work, is used by various devices. Bluetooth
devices use the technology to minimize the interference from other devices that use the same wave length. Simultaneous
use of the Bluetooth function and wireless communication devices, however, may cause radio interference and result in
reduced communication speeds and distances than the standard values.


