background image

7

 GB

Notes on Installation 
and Usage

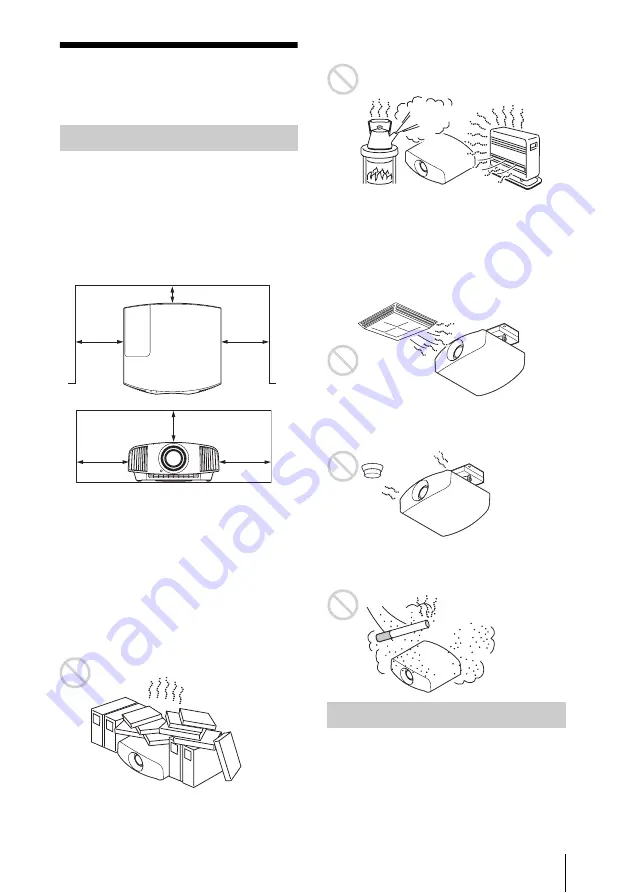
Do not place the unit in the following 
situations, which may cause malfunction or 
damage to the unit.

Near walls

To maintain the performance and reliability 
of the unit, leave space between walls and 
the unit as illustrated.

Air from air conditioners or the ventilation 
holes of this unit or other devices, may cause 
oscillation on the screen. Be sure not to 
install this unit in the area where the air from 
air conditioners or the ventilation holes of 
these devices reach to the front side of this 
unit.

Poorly ventilated location

Leave space of more than 30 cm (11 

7

/

8


inches) around the unit.

Hot and humid

Locations subject to direct cool or 
warm air from an air-conditioner

Installing the unit in such a location may 
cause a malfunction of the unit due to 
moisture condensation or rise in 
temperature.

Near a heat or smoke sensor

Malfunction of the sensor may occur.

Very dusty and extremely smoky 
locations

Do not do any of the following while using 
the unit.

Tilting front/rear and left/right

Avoid using the unit tilted at an angle of 
more than 15 degrees.

Unsuitable installation

1 cm (

13

/

32

 inch)

30 cm 
(11 

7

/

8


inches)

30 cm 
(11 

7

/

8


inches)

15 cm 
(6 inches)

30 cm 
(11 

7

/

8


inches)

30 cm 
(11 

7

/

8


inches)

Unsuitable Conditions

Summary of Contents for VPL-VW715ES

Page 1: ...VPL VW715ES 5 022 948 11 1 Video Projector Quick Reference Manual ____________ GB Guide de référence rapide __________ FR 2020 Sony Corporation Printed in China ...

Page 2: ...Warning Indicators and Replacing the Lamp as necessary For details on the operations refer to the Operating Instructions contained in the supplied CD ROM About the Quick Reference Manual Preparing Page 9 Installing the Unit Page 10 Connecting the Unit Page 12 Selecting the Menu Language Page 13 Projecting Page 14 Error Handling Warning Indicators Page 16 Maintenance Replacing the Lamp Page 17 Step...

Page 3: ...e above Power Cord Appliance Connector Plug please consult a qualified service personnel CAUTION Danger of explosion if battery is incorrectly replaced Replace only with the same or equivalent type recommended by the manufacturer When you dispose of the battery or the product you must obey the law in the corresponding area or country Do not dispose of the battery or the product in a fire or a hot ...

Page 4: ...ce pursuant to Subpart B of part 15 of FCC Rules If you have any questions about this product you may call Sony Customer Information Service Center 1 800 222 7669 or http www sony com This transmitter must not be co located or operating in conjunction with any other antenna or transmitter For the customers in Canada This device complies with Industry Canada s applicable licence exempt RSSs Operati...

Page 5: ... these holes or internal heat build up may occur causing picture degradation or damage to the unit On repacking Save the original shipping carton and packing material they will come in handy if you ever have to ship your unit For maximum protection repack your unit as it was originally packed at the factory For the customers in the U S A SONY LIMITED WARRANTY Please visit http www sony com psa war...

Page 6: ... FOR DAMAGES OF ANY KIND RESULTING FROM A FAILURE TO IMPLEMENT PROPER SECURITY MEASURES ON TRANSMISSION DEVICES UNAVOIDABLE DATA LEAKS RESULTING FROM TRANSMISSION SPECIFICATIONS OR SECURITY PROBLEMS OF ANY KIND Depending on the operating environment unauthorized third parties on the network may be able to access the unit When connecting the unit to the network be sure to confirm that the network i...

Page 7: ...of this unit Poorly ventilated location Leave space of more than 30 cm 11 7 8 inches around the unit Hot and humid Locations subject to direct cool or warm air from an air conditioner Installing the unit in such a location may cause a malfunction of the unit due to moisture condensation or rise in temperature Near a heat or smoke sensor Malfunction of the sensor may occur Very dusty and extremely ...

Page 8: ...mode when using the unit at high altitudes could have adverse effects such as reducing the reliability of certain components Never mount the projector on the ceiling or move it by yourself Be sure to consult with qualified Sony personnel charged When installing the unit on a ceiling be sure to use a safety wire etc to prevent the unit from falling Entrust the installation to an experienced contrac...

Page 9: ...f any kind onto it Do not place the remote control in a location near a heat source a place subject to direct sunlight or a damp room The manual can be read on a computer with Adobe Reader installed You can download Adobe Reader free from the Adobe website 1 Open the index html file in the CD ROM 2 Select and click on the manual that you want to read If you have lost or damaged the CD ROM you can ...

Page 10: ...n a Adjust the focus Press the LENS ADJUSTMENT FOCUS button to display the Lens Focus adjustment window test pattern Then adjust the focus of the picture by pressing the M m buttons b Adjust the picture size Press the LENS ADJUSTMENT ZOOM button to display the Lens Zoom adjustment window test pattern Then adjust the size of the picture by pressing the M m buttons c Adjust the picture position Pres...

Page 11: ... image may be trapezoidal Be careful not to catch your finger when turning the front feet adjustable Lens adjustment window test pattern Notes Front feet adjustable Turn to adjust 1 78 1 16 9 2 35 1 1 85 1 1 33 1 4 3 The dashed lines show the screen sizes of each aspect ratio For more information refer to Connections and Preparations in the Operating Instructions contained in the supplied CD ROM ...

Page 12: ...uipment Connecting the Unit When you monitor and control the projector via the network access the Setup page of the projector refer to Using Network Features in the Operating Instructions via a Web browser and enable the desired control protocol Step 3 Right side of the unit AV amplifier Speakers Equipment with HDMI output connectors Computer to HDMI output HDMI cable not supplied Video signal flo...

Page 13: ...et the desired language with the menu screen 1 Press MENU The menu appears 2 Press M m to select the Setup menu and press or The setting items of the selected menu appear 3 Press M m to select Language and press or 4 Press M m to select a language and press The menu changes to the selected language To clear the menu Press MENU Selecting the Menu Language Step 4 ...

Page 14: ...n continues to run to reduce the internal heat The fan stops and the ON STANDBY indicator changes from flashing green to remaining red The power is turned off completely and you can disconnect the AC power cord Never disconnect the AC power cord while the indicator is flashing Tip You can turn off the unit by holding the 1 ON STANDBY button for about 1 second instead of performing the above steps ...

Page 15: ...thout any adjustment TV Picture quality suited for watching TV programs sports concerts and other video images PHOTO Ideal for projecting still images taken with a digital camera GAME Picture quality suited to gaming with well modulated colors and fast response BRT CINE Picture quality suited for watching movies in a bright environment such as a living room BRT TV Picture quality suited for watchi...

Page 16: ...then tighten the screws securely Three times The temperature of lamp is unusually high Turn off the power and wait for the lamp to cool then turn on the power again If the symptom persists the lamp may be at the end of its service life In this case replace the lamp with a new one Twice The internal temperature is unusually high Check to ensure that if nothing is blocking the ventilation holes or w...

Page 17: ... ceiling When replacing the lamp of a unit which is on the ceiling do not stand directly under the lamp cover When removing the lamp door inner cover avoid twisting it If the lamp explodes fragments may cause injury When removing the lamp unit make sure it remains horizontal then pull straight up Do not tilt the lamp unit If you pull out the lamp unit while tilted and if the lamp breaks the pieces...

Page 18: ...ews except the 3 specified screws Hold the lamp by the handle to remove and attach it 6 Push in the new lamp by the handle securely until it reaches the end and then tighten the 3 screws Be careful not to touch the optical block inside the unit 7 Close the lamp door inner cover and then tighten the screw 8 Close the lamp cover Notes Handle Note ...

Page 19: ...on either on the remote control or the control panel of the unit once Note on replacing the lamp when broken in the case of a ceiling installation If the lamp breaks broken lamp pieces may scatter and cause injury When the unit is on the ceiling remove the lamp door inner cover by sliding it horizontally slowly after raising it with 30 degree opened Avoid twisting the lamp door inner cover Disposa...

Page 20: ...urs d avertissement et Remplacement de la lampe le cas échéant Pour plus d informations sur l utilisation reportez vous au Mode d emploi que vous trouverez sur le CD ROM fourni A propos du Guide de référence rapide Préparation Page 8 Installation de l appareil Page 9 Raccordement de l appareil Page 11 Sélection de la langue du menu Page 12 Projection Page 13 Gestion des erreurs Indicateurs d avert...

Page 21: ... Pour toute question sur l utilisation du cordon d alimentation fiche femelle fiche mâle ci dessus consultez un technicien du service après vente qualifié ATTENTION Il y a danger d explosion s il y a remplacement incorrect de la batterie Remplacer uniquement avec une batterie du même type ou d un type équivalent recommandé par le constructeur Lors de la mise au rebut de la batterie ou du produit v...

Page 22: ...ans le boîtier débrancher le projecteur et le faire vérifier par un technicien qualifié avant la remise en service Débrancher le projecteur de la prise murale en cas de non utilisation pendant plusieurs jours Pour débrancher le cordon le tirer par la fiche Ne jamais tirer sur le cordon lui même La prise murale doit se trouver à proximité du projecteur et être facile d accès Le projecteur n est pas...

Page 23: ...imatiseur avec précaution Si de la condensation se forme laissez le projecteur allumé pendant deux heures avant de l utiliser Remarques sur la sécurité Sony ne peut être tenue responsable de tout dommage de quelque nature que ce soit résultant d une incapacité à mettre en place des mesures de sécurité adaptées pour les dispositifs de transmission de fuites de données inévitables dues aux spécifica...

Page 24: ...e ventilation Laisser un dégagement de plus de 30 cm 11 7 8 pouces autour de l appareil Endroits chauds et humides Endroits directement exposés au souffle froid ou chaud d un climatiseur L installation de l appareil dans de tels endroits pourrait provoquer un dysfonctionnement sous l effet de la condensation d humidité ou de l élévation de température Proximité d un détecteur de chaleur ou de fumé...

Page 25: ...glez Mode haute altit dans le menu Réglage sur On Si vous n activez pas ce mode lors d une utilisation à haute altitude ceci pourra affecter le projecteur diminution de la fiabilité de certaines pièces par exemple N installez jamais le projecteur au plafond et ne le déplacez jamais par vos propres moyens Veillez à vous adresser à un technicien Sony agréé service payant Lorsque vous installez l app...

Page 26: ...télécommande à proximité d une source de chaleur dans un endroit exposé aux rayons directs du soleil ou dans une pièce humide Vous devez installer Adobe Reader sur votre ordinateur pour pouvoir lire ce manuel Vous pouvez télécharger Adobe Reader gratuitement depuis le site Web d Adobe 1 Ouvrez le fichier index htm situé sur le CD ROM 2 Sélectionnez le manuel que vous souhaitez lire puis cliquez su...

Page 27: ... STANDBY pour mettre l appareil sous tension 4 Projetez une image sur l écran puis réglez la mise au point la taille et la position a Réglez la mise au point Appuyez sur le bouton LENS ADJUSTMENT FOCUS pour afficher la fenêtre de réglage Focus d objectif mire d essai Réglez ensuite la mise au point de l image en appuyant sur les boutons M m b Réglez la taille de l image Appuyez sur le bouton LENS ...

Page 28: ...les pour maintenir l appareil à l horizontale Si l appareil est incliné vers le haut ou le bas l image projetée peut être trapézoïdale Veillez à ne pas vous coincer les doigts lorsque vous faites pivoter les pieds avant réglables Fenêtre de réglage de l objectif mire d essai Remarques Pieds avant réglables Tournez pour régler 1 78 1 16 9 2 35 1 1 85 1 1 33 1 4 3 Les lignes pointillées indiquent le...

Page 29: ...raccorder Raccordement de l appareil Pour surveiller et commander le projecteur via le réseau accédez à la page Setup du projecteur reportez vous à la section Utilisation des fonctionnalités réseau du Mode d emploi via un navigateur Web et activez le protocole de contrôle souhaité Etape 3 Côté droit de l appareil Amplificateur AV Haut parleurs Appareil avec des connecteurs de sortie HDMI Ordinateu...

Page 30: ... Appuyer sur MENU Le menu apparaît 2 Appuyer sur M m pour sélectionner le menu Setup puis appuyer sur ou Les options de réglage du menu sélectionné apparaissent 3 Appuyer sur M m pour sélectionner Language puis appuyer sur ou 4 Appuyer sur M m pour sélectionner une langue puis appuyer sur La langue du menu devient celle que vous avez sélectionnée Pour faire disparaître le menu Appuyer sur MENU Sél...

Page 31: ...ontinue à tourner pour abaisser la température interne Le ventilateur s arrête et l indicateur ON STANDBY cesse de clignoter en vert pour briller en rouge L alimentation s arrête complètement et vous pouvez débrancher le cordon d alimentation Ne jamais débrancher le cordon d alimentation lorsque l indicateur clignote Conseil Vous pouvez mettre l appareil hors tension en maintenant le bouton 1 ON S...

Page 32: ...lité d image adéquate pour regarder des programmes TV du sport des concerts et d autres images vidéo PHOTO Idéal pour la projection d images fixes provenant d un appareil photo numérique GAME Qualité d image adaptée aux jeux avec des couleurs bien modulées et une réponse rapide BRT CINE Qualité d image adéquate pour regarder les films dans un environnement lumineux comme un séjour BRT TV Qualité d...

Page 33: ...ampe puis vissez le solidement Trois fois La température de la lampe est anormalement élevée Mettez hors tension et attendez que la lampe se refroidisse puis remettez sous tension Si ce symptôme persiste la lampe a peut être atteint la fin de sa durée de service Dans ce cas remplacez la lampe par une neuve Deux fois La température à l intérieur du projecteur est anormalement élevée Assurez vous qu...

Page 34: ...mplacement de la lampe d un appareil installé au plafond ne vous tenez pas directement sous le couvercle de la lampe Lorsque vous retirez le couvercle de la lampe couvercle intérieur évitez de le tordre Si la lampe explose les fragments peuvent provoquer des blessures Lorsque vous retirez la lampe assurez vous qu elle reste en position horizontale puis soulevez la directement vers le haut N inclin...

Page 35: ...e vers le haut et retirez la lampe À l exception des 3 vis spécifiées ne desserrez aucune autre vis Tenez la lampe par la poignée pour la retirer et la fixer 6 Insérez fermement et à fond la nouvelle lampe à l aide de la poignée puis resserrez les 3 vis Veillez à ne pas toucher le bloc optique à l intérieur du projecteur 7 Fermez le couvercle de la lampe couvercle intérieur puis vissez le Poignée ...

Page 36: ...die L appareil ne se mettra sous tension que si la lampe est bien mise en place L appareil ne se mettra sous tension que si le couvercle de la lampe est bien fermé Pour effacer un message affiché à l écran appuyez une fois sur un bouton quelconque de la télécommande ou du panneau de commande de l appareil Remarque concernant le remplacement d une lampe brisée en cas d installation au plafond Si la...

Page 37: ...s tubes fluorescents dépend de votre lieu de résidence Respectez la politique d élimination des déchets de votre région Pour les clients aux États Unis et au Canada La lampe de cet appareil contient du mercure Disposez selon les lois locales provinciales et fédérales applicables Pour de plus amples informations voir www sony com mercury ...

Page 38: ......

Page 39: ......

Reviews: