1-6
VPL-PS10/PX10/PX15
10
(GB)
qf
Connector panel cover lock
Used to remove/install the connector panel cover
9
.
qg
Rear adjusters
qh
Adjusters
When a picture is projected on an exterior of the
screen, adjust the picture using these adjusters.
For details on how to use the adjusters, see “How to use
the adjusters” on page 11 (GB).
qj
Security lock
Connects to an optional security cable (made by
Kensington)
1)
.
The security lock corresponds to Kensington’s
MicroSaver
®1)
Security System.
If you require further information, contact
Kensington
2855 Campus Drive, San Mateo, CA 94403
In North America
Phone: 800-235-6708
Fax: 800-247-1317
Outside North America
Phone: 847-541-9500
Home page address:
http://www.kensington.com/
qk
Lamp cover
ql
Ventilation holes (intake)
w;
Right speaker
Location and Function of Controls
Bottom
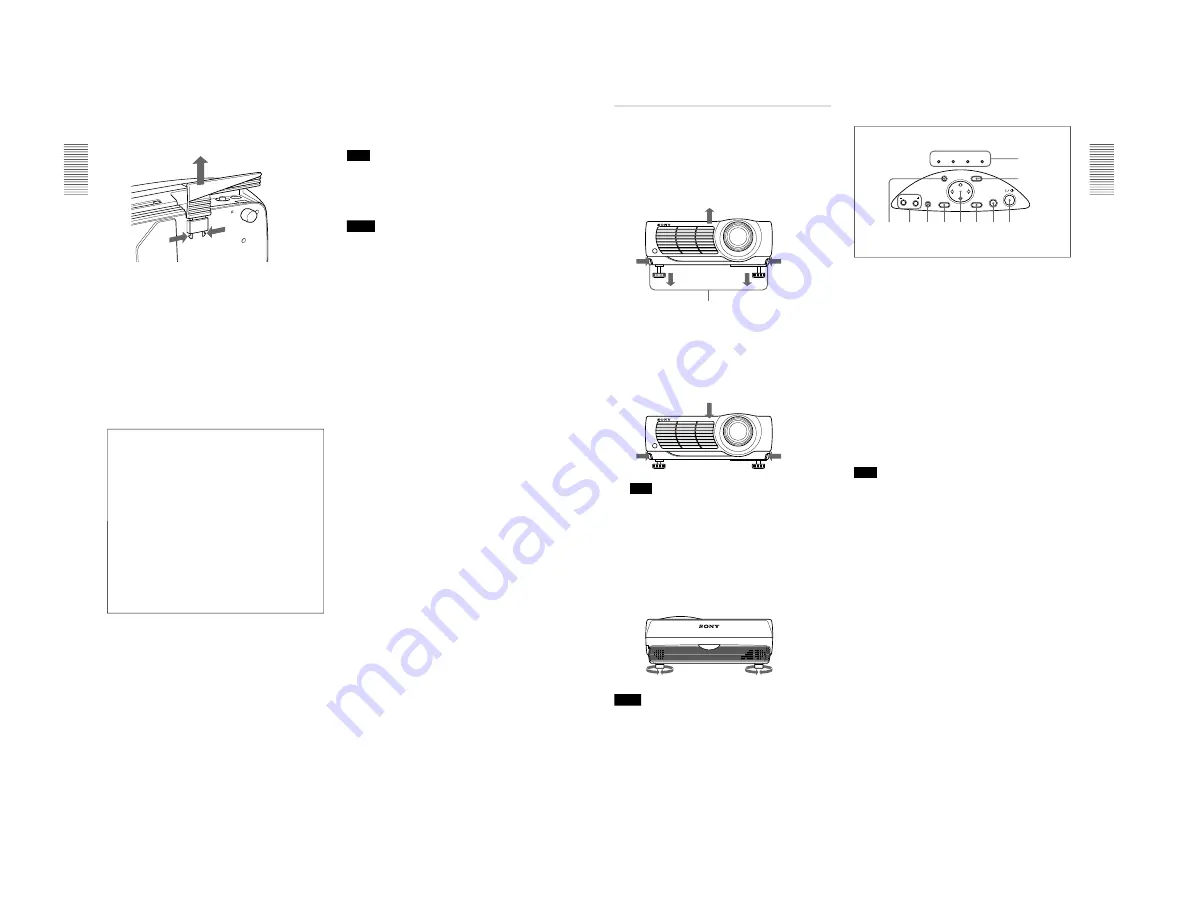
While pressing both sides of the lock, slide the
connector cover outward to release it.
1
1
2
wa
Air filter cover lock
Used to remove the air filter cover.
For details, see “Cleaning the Air Filter” on page 38 (GB).
Note
Clean the air filter every 300 hours to ensure
optimal performance.
ws
Ventilation holes (intake) / air filter cover
Notes
• Do not place anything near the ventilation holes as it
may cause internal heat build-up.
• Do not place your hand or objects near the
ventilation holes — the air coming out is hot.
.........................................................................................................................................................................................................
1) Kensington and MicroSaver are registered trademarks of Kensington Technology Group.
11
(GB)
How to use the adjusters
To adjust the height
Adjust the height of the projector as follows:
1
Lift the projector and press the adjuster buttons.
The adjusters will extend from the projector.
2
While pressing the buttons, adjust the height.
Then, release the buttons.
The adjusters will lock, then the height of the
projector will be fixed. For fine adjustment, turn
the adjusters to the right or left.
Note
If the adjusters have been extended to the limit
and you keep turning the adjusters
counterclockwise, the adjusters will stop turning
and the adjuster buttons cannot be pressed. In this
case, turn the adjusters clockwise, and then press
the adjuster buttons again.
3
If necessary, turn the rear adjusters to the right or
left to adjust the height of the projector.
Notes
• Be careful not to let the projector down on your
fingers.
• Do not push hard on the top of the projector with the
adjusters out.
Adjuster buttons
Control Panel
1
HELP key
If you need help information during an operation,
press this key to display help messages. The Help
menu lists error recovery techniques depending on
problem type.
2
/– keys
Adjust the volume of the built-in speakers.
+ : Increases the volume.
– : Decreases the volume.
3
APA (Auto Pixel Alignment) key
Adjusts the picture to be projected automatically to
give the clearest picture possible while a signal from
the computer is input. Adjusts the shift (up/down and
left/right) at the same time automatically.
Note
Press the APA key when the full image is displayed
on the screen. If there are black edges around the
image, the APA function will not function properly
and the image may extend beyond the screen.
4
RESET key
Resets the value of an item to its factory preset value.
This key functions when the menu or a setting item is
displayed on the screen.
5
Arrow (
M
/
m
/
<
/
,
) keys
Used to select a menu or to make various adjustments.
6
ENTER key
Enters the settings of items in the menu system.
HELP
LAMP/
COVER
TEMP/
FAN
POWER
SAVING
ON/
STANDBY
RESET
APA
VOLUME
ENTER
INPUT
MENU
1
2
3 4 5 6 7 8
q;
9
Location and Function of Controls
Summary of Contents for VPLL-CT10
Page 8: ......
Page 32: ...1 24 VPL PS10 PX10 PX15 88 JP ...
Page 52: ...1 44 VPL PS10 PX10 PX15 Sony Corporation Printed in Japan ...
Page 100: ......
Page 104: ......
Page 150: ......
Page 194: ......
Page 196: ...Sony Corporation B P Company 9 870 304 02 English 01GS16 1 Printed in Japan 2001 6 ...


