background image

Other features

Other features

15

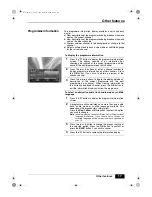
The EPG (Electronic Programme Guide) provides a quick and
easy way to:
a) View a complete list of all available channels
b) View a channel list related to a chosen category
c) Set a programme to be recorded 

1

Press the 


button to display the EPG.

This display consists of an information box and a seven
channel programme list covering a two hour period.

2

Press the 

V

v

and 

b

 buttons or enter a channel number

to move around the list. If you press the 

b

 button after

highlighting the last programme on the right, the schedule
for the next two hours is displayed (depending on
availability from the broadcaster).

3

As each programme is highlighted, a brief description of
the programme appears in the information box.
Press the 

Red

 button to display the previous seven

channels or the 

Green

 button to display the next seven

channels . 

4

When the programme you wish to view is highlighted,
press the 

OK

 button to obtain a preview in the

background. Press 

OK

  once  more  to  exit  the  EPG  and

view the programme.

Note

: If you press the 

 button on the remote control when the EPG

is on display, you have the option to view the programme
schedule 24 hours in advance (when available). Press the 

Blue

button to view the next 24 hour schedule. Press the 

Yellow

button when you wish to return to the previous days schedule.
Press the 

 button to return to normal EPG operation.

The Category pop-up list

This feature allows you to search for channels related to a
particular topic. For example, if you select ‘News’ from the pop-
up list, then only channels related to News will be shown in the
EPG. 

1

With the EPG on display, press the 

Yellow

 button. The

category pop-up list appears.

2

Press the 

V

 or 

v

 buttons to highlight the category you

want, then press the 

OK

 button. The chosen category is

displayed in a title bar at the top of the EPG display and
only programmes related to that category will be shown in
the list.
Some examples of category types are as follows:

All Programmes:

This gives a complete channel list.

Favourite List 1: 

Displays the favourite channels you
have stored in the Favourite list 1
folder.

Films:

Displays movies available for viewing.

News:

Displays all news channels.

Entertainment:

Displays all entertainment channels.

Sports:

Displays all sports channels.

Kids:

Displays all children’s channels.

Music:

Displays all music channels.

3

Press the 

V

v

and 

b

 buttons to highlight the

programme you wish to view, then press the 

OK

 button to

exit the category menu and view the selected programme.

Note:

The category of each programme is determined by the
broadcaster.

The EPG

Continued -------

Text.fm  Page 15  Tuesday, April 27, 2004  8:21 AM

Summary of Contents for VTX-D800U

Page 1: ...4 097 287 05 GB 409728705 Digital Terrestrial Receiver VTX D800U Operating Guide 2003 by Sony Corporation cover fm Page 1 Monday April 19 2004 2 31 PM ...

Page 2: ... the helpline Note You can check the signal strength and signal quality using the menu system of this receiver Page 9 explains how to display the main menu on screen and page 14 explains how to obtain the signal strength display The serial number and the model number are located on the rear of the receiver Date of purchase Serial number Model number Post code Detailed fault description Signal stre...

Page 3: ... with the following instructions The wires in this mains lead are coloured in accordance with the following code Blue Neutral Brown Live As the colours of the wires in the mains lead of this apparatus may not correspond with the coloured markings identifying the terminals in your plug proceed as follows The wire which is coloured blue must be connected to the terminal which is marked with the lett...

Page 4: ...moisture Do not cover the ventilation openings of the receiver with newspapers or curtains etc For ventilation leave a space of at least 10cm all around the receiver Never place the receiver in hot humid or excessively dusty places Do not install the receiver where it may be exposed to mechanical vibrations or electromagnetic radiation Clean the receiver with a soft lightly dampened cloth Do not u...

Page 5: ...10 Country 10 Subtitles 10 Picture 10 Parental Control 11 Tuning 12 Autotune 12 Manual Tune 12 Programme Sort 13 Programme Skip 13 Technical information 14 Feature pages 14 Other Features 15 The EPG 15 Programme information 17 Digital text 18 Notes on connecting SMARTLINK and other equipment 19 Additional information 20 Using the remote control to operate other manufacturers TVs 20 Specifications ...

Page 6: ...trol to operate your brand of TV refer to page 20 qs Standby button l 1 Press to switch off your receiver temporarily Press again to resume normal operation qd TV standby button l 1 Press to switch off your TV temporarily Press again to resume normal operation Note This button will only work once you have configured the remote control to operate your brand of TV refer to page 20 qf TV STB button P...

Page 7: ... supplied 5 Batteries Fully wired Scart lead RF Loopthrough cable Stand Remote control MENU BACK REC TV STB TV PROG 2 3 1 5 6 4 0 TV RADIO 8 9 7 PROG RM X800 DIGITAL TERRESTRIAL RECEIVER OK Text fm Page 5 Tuesday April 27 2004 8 21 AM ...

Page 8: ...ar of the receiver as shown then push down into the fixing holes to secure Note To remove the stand press clip A downwards then pull away from receiver VCR Scart socket RF OUT socket RF IN socket PROG Up Down buttons Indicating light Green receiver is operational Red receiver is in standby The light will flash red when receiving a command from the remote control Standby button A Text fm Page 6 Tue...

Page 9: ... Hi Fi equipment you can use either a conventional 3 5mm jack plug lead or an optical lead mini TOS when connecting your Hi Fi to the receiver Do not connect your headphones to this socket To TV aerial socket To TV scart socket Loop through cable To VCR scart socket When connecting SMARTLINK equipment please refer to page 19 If you do not have a VCR connect the loop through cable directly to your ...

Page 10: ... which describe some of the features available to you If you do not wish to view these pages press the BACK button 5 When autotune has ended a completion menu appears indicating the number of TV and Radio channels that have been captured and stored Notes If you are watching the information screens a display appears to inform you autotune has ended Press the BACK button to display the completion me...

Page 11: ...vourite then press the OK button If you do not wish to choose from one of the five channels in the display press the Red or Green button to view the previous or next five channels available Note A favourite channel is identified by a next to the programme number To view the list showing only your favourite channels press the Blue button To view a different favourite list 1 Press the Yellow button ...

Page 12: ...not appear automatically on your TV To view the picture you will have to set the TV to the AV input to which your receiver is connected In this setting the WSS will remain On WSS Off The picture from the receiver automatically appears on your TV but the screen format will depend on the TV setting Off The picture from the receiver will not appear automatically on your TV and WSS will be Off To view...

Page 13: ...tton to confirm If you do not wish to choose from one of the five channels in the display press the Red or Green button to view the previous or next five channels available if more than five are available Note A locked channel can be identified by the symbol next to the programme number To lock or unlock all channels 1 Highlight Lock Channels in the Parental Control menu and press the OK button to...

Page 14: ...the number of TV and Radio channels that have been captured and stored 4 Press the OK button to remove the display and view the first channel captured Manual Tune This tuning method allows you to capture and store individual services 1 With Tuning highlighted in the main menu press the OK button Enter your PIN if requested and the Tuning display appears with Auto Tune highlighted Press the V or v ...

Page 15: ...channel listing 1 With Tuning highlighted in the main menu press the OK button The Tuning display appears with Auto Tune highlighted 2 Press the V or v button to highlight Programme Skip then press the OK button The on screen programme list is displayed 3 Press the V or v button to highlight the programme number that contains the channel you wish to skip then press the OK button An X appears along...

Page 16: ...on to select The Signal Strength display appears 2 After viewing the information displayed press the BACK button repeatedly to return to the main menu Software Upgrade Periodically Sony will issue upgrades for the software that was initially installed in your receiver These upgrades will automatically be received and enabled If desired you can disable this option as follows 1 Enter the Technical I...

Page 17: ...view the next 24 hour schedule Press the Yellow button when you wish to return to the previous days schedule Press the button to return to normal EPG operation The Category pop up list This feature allows you to search for channels related to a particular topic For example if you select News from the pop up list then only channels related to News will be shown in the EPG 1 With the EPG on display ...

Page 18: ... return to normal operation To record a programme using the Manual Timer 1 With the EPG on display press the Blue button to display the Timer list menu then press the Red button to display the Manual Timer Setup menu If you do not have a SMARTLINK VCR a message will appear to remind you to set your VCR timer 2 Press the V or v button to select the correct date then press the b button to highlight ...

Page 19: ...en channel 3 Press the B or b buttons to toggle the display between a description of the current programme and the next programme on a channel When viewing information for the currently displayed channel press the OK button to exit the information display and view the programme To select an alternative audio track audio mode or subtitle language 1 Press the button to display the programme informat...

Page 20: ...ow to change the displayed programme 3 If you are instructed to press OK or Select when viewing the text pages press the OK button 4 When you have finished viewing the text service follow the on screen instructions or press the PROG button to exit Selecting digital text from other channels Digital text services may also be available on other digital channels This is sometimes indicated by a small ...

Page 21: ...through to the TV This will also be done when the receiver is in the standby mode Note To return to a programme from the receiver press the l 1 button on the remote control to switch off the receiver then press the l 1 button once more to resume normal operation This receiver can be connected to your Hi Fi using either a digital optical lead or a stereo analogue lead These can be connected to the ...

Page 22: ... enter the code Even if your TV is listed in the table below in some instances you may not be able to operate all of the available TV fuctions Brand Code Brand Code Aiwa 036 055 Mitsubishi 045 Akai 059 060 062 063 064 065 066 067 068 Mivar 029 106 Beijing 022 NEC 020 053 058 063 094 097 Blaupunkt 071 Noblex 022 CGE 046 106 Nokia 031 059 097 Daewoo 017 037 069 Onwa 023 024 025 Ferguson 027 061 073 ...

Page 23: ... the remote control to cancel standby mode Remote control not working Batteries low Replace both batteries You cannot find a channel you have previously watched The channel only broadcasts for part of the day Check the programme listings No picture Scart plug loose Your TV might be unable to switch automatically into the AV mode Check scart plugs are firmly connected Set the TV to AV mode e g AV1 ...

Page 24: ...60 57 wm Emley Moor 52 40 43 46 50 49 North West wk Winter Hill 56 66 68 67 60 63 North East wl Bilsdale 34 21 31 24 27 42 e Caldbeck 25 23 26 39 45 42 ez Chatton 40 50 43 46 47 51 es Pontop Pike 48 55 59 62 65 53 Scotland ed Angus 68 66 59 62 56 65 ef Black Hill 41 47 44 51 55 65 eg Sandale No Digital Transmission eh Caldbeck No Digital Transmission ej Craigkelly 33 29 23 26 42 39 ek Darvel 22 25...

Page 25: ...e 17 To display information 17 L Language setting 10 M Menu system using 9 N Notes on other equipment Hi Fi 19 SMARTLINK 19 VCRs 19 P Parental control Setting age limit 11 Setting your PIN 11 To lock channels 11 Picture setting 10 Programme Sort 13 R Receiver Front view 6 Rear view 6 Remote control Inserting batteries 7 Overview 4 Using with other makes of TV 20 S Safety information 1 2 Signal str...

Page 26: ...Text fm Page 24 Monday April 19 2004 2 32 PM ...

Page 27: ...cover fm Page 3 Monday April 19 2004 2 31 PM ...

Page 28: ...made to the product without the prior written consent of Sony in order to conform to the national or local technical or safety standards in force in any country other than the ones for which the product was originally designed and manufactured 3 This guarantee will not apply if the type or serial number on the product has been altered deleted removed or made illegible 4 This guarantee covers none ...

Reviews: