©2008 Sony Corporation Printed in China
B
C
English
How to attach the clip
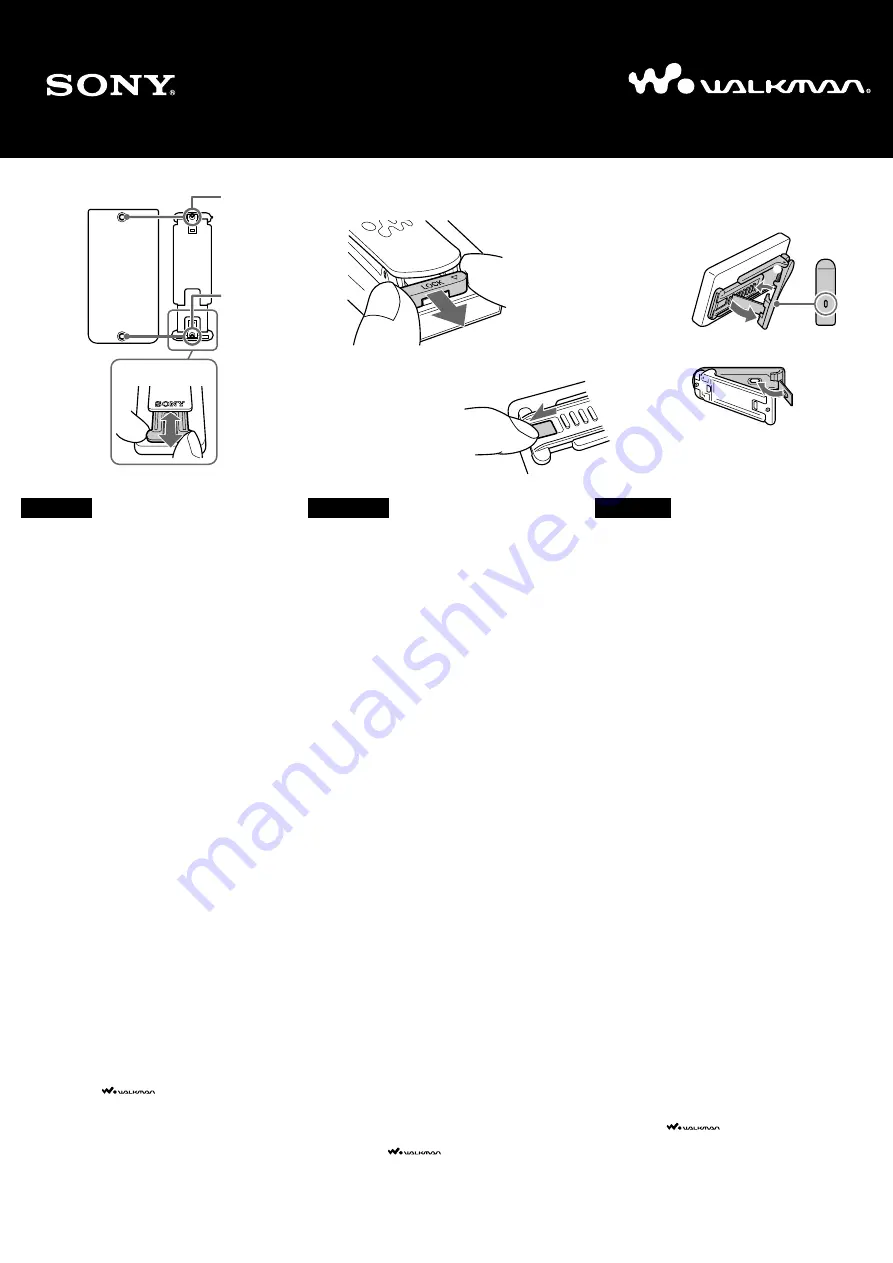
When attaching the clip to your WALKMAN, lock the top and bottom
knobs securely after matching knobs into the accessory holes.
1
Insert the top knob (Figure
A
-
1
) of the clip into the
top accessory hole (Figure
A
-
2
) of your
WALKMAN.
2
Adjust the slider (Figure
A
-
3
) to match the position
of the bottom knob (Figure
A
-
4
) with the bottom
accessory hole (Figure
A
-
5
) of the WALKMAN,
and insert the bottom knob.
3
After inserting, lock the top knob by pulling up the top
tab (Figure
B
-
1
) until it clicks.
4
Lock the bottom knob by moving the bottom tab
(Figure
B
-
2
) until it clicks.
z
Tip
With the WALKMAN inserted in the clip, basic operations are still
possible.
Notes
• Depending on your WALKMAN model, you may need to hold the
clip steady when locking it.
• Make sure to lock both tabs to prevent the WALKMAN from
dropping out of the clip.
• To prevent possible damage to the WALKMAN, make sure that
there is no dirt or dust inside the clip or on the WALKMAN before
using the clip. If necessary, wipe the clip with a soft cloth, such as a
glass cleaning cloth.
• Accessories, such as the cradle, cannot be used with the clip
attached. Detach the clip before using the cradle.
How to remove the clip
Holding the WALKMAN and clip steady, slide the top tab down and
the bottom tab up to unlock them.
How to use as the horizontal stand
Open the clip (Figure
C
-
1
), and press the button (Figure
C
-
2
)
and place the swing arm (Figure
C
-
3
) between the slots.
• You can change the angle of the WALKMAN by changing the
position of the swing arm.
How to stow the swing arm
Place the swing arm back into the clip until it snaps into position
(Figure
C
-
4
).
• If the swing arm jiggles, push it back into place.
“WALKMAN” and
are registered trademarks of Sony
Corporation.
Français
Fixation du clip
Lors de la fixation de l’attache à votre WALKMAN, verrouillez
solidement les griffes inférieures et supérieures après avoir inséré les
griffes dans les trous correspondants.
1
Insérez la griffe supérieure (Figure
A
-
1
) du clip
dans la fente pour accessoire supérieure (Figure
A
-
2
) du WALKMAN.
2
Réglez le curseur (Figure
A
-
3
) pour alignez la
griffe inférieure (Figure
A
-
4
) avec la fente pour
accessoire inférieure (Figure
A
-
5
) du WALKMAN,
puis insérez la griffe inférieure.
3
Après avoir inséré, verrouillez la griffe supérieure en
tirant sur la languette inférieure vers le haut (Figure
B
-
1
) jusqu’à ce qu’un déclic se fasse.
4
Verrouiller la griffe inférieure en déplaçant la
languette inférieure (Figure
B
-
2
) jusqu’à ce qu’un
déclic se fasse.
z
Conseil
Lorsque le WALKMAN est inséré dans le clip, il est toujours possible
d’utiliser les fonctions de base.
Remarques
• Selon le modèle de votre WALKMAN, vous pouvez avoir à
maintenir fermement le clip pour le verrouiller.
• Assurez-vous de verrouiller les deux languettes pour éviter que le
WALKMAN ne tombe du clip.
• Pour éviter d’abîmer le WALKMAN, veillez à ce qu’il n’y ait pas
de saleté ou de poussière à l’intérieur du clip ou sur le WALKMAN
avant d’utiliser le clip. Si nécessaire, nettoyez le clip à l’aide d’un
chiffon doux, tel qu’un chiffon à lunettes.
• Il est possible que vous ne puissiez pas utiliser certains accessoires,
tel qu’un support, lorsque le clip est fixé. Retirez le clip avant
d’utiliser le support.
Comment retirer le clip
Maintenez fermement le WALKMAN et le clip, puis glissez la
languette supérieure vers le bas et la languette inférieure vers le haut
pour les déverrouiller.
Comment utiliser le clip en support horizontal
Ouvrez le clip (Figure
C
-
1
), appuyez sur la touche (Figure
C
-
2
)
et placez le bras pivotant (Figure
C
-
3
) entre les fentes.
• Vous pouvez régler l’angle du WALKMAN en changeant la
position du bras pivotant.
Pour fermer le bras pivotant
Refermez le bras pivotant dans le clip jusqu’à ce qu’il soit en position
fixe (Figure
C
-
4
).
• Si le bras pivotant bouge dans tous les sens, refermez-le.
« WALKMAN » et
sont des marques déposées de Sony
Corporation.
Operating Instructions
CLP-NWU30
3-870-690-
01
(1)
Mode d’emploi
A
Español
Cómo colocar el soporte
Cuando instale el soporte en su WALKMAN, asegúrese de bloquear
los mandos superiores e inferiores después de encajarlos en los
orificios de los accesorios.
1
Inserte el mando superior (figura
A
-
1
) del soporte
en el orificio superior del accesorio (figura
A
-
2
) del
WALKMAN.
2
Ajuste el control deslizante (figura
A
-
3
) para hacer
coincidir la posición del mando inferior (figura
A
-
4
) con el orificio inferior del accesorio (figura
A
-
5
) del WALKMAN, e inserte el mando inferior.
3
Después de insertarlo, bloquee el mando superior
levantando la lengüeta (figura
B
-
1
) hasta que haga
clic.
4
Bloquee el mando inferior desplazando la lengüeta
inferior (figura
B
-
2
) hasta que haga clic.
z
Sugerencia
Con el WALKMAN insertado en el soporte, es posible realizar
algunas operaciones básicas.
Notas
• Dependiendo del modelo de WALKMAN, es posible que deba
sujetar firmemente el soporte al bloquearlo.
• Asegúrese de bloquear ambas lengüetas para evitar que el
WALKMAN se caiga del soporte.
• Para evitar posibles daños en el WALKMAN, asegúrese de que no
haya suciedad ni polvo en el interior del soporte ni en el
WALKMAN antes de utilizar el soporte. Si es necesario, limpie el
soporte con un paño suave, como un paño de limpieza de cristales.
• No es posible utilizar accesorios como, por ejemplo, la base con el
soporte instalado. Retire el soporte antes de utilizar la base.
Cómo extraer el soporte
Sujete el WALKMAN y el soporte firmemente y, a continuación,
deslice hacia abajo la lengüeta superior para desbloquearlos.
Cómo utilizar el soporte en horizontal
Abra el soporte (figura
C
-
1
), presione el botón (figura
C
-
2
) y
coloque el brazo oscilante (figura
C
-
3
) entre las ranuras.
• Para cambiar el ángulo del WALKMAN, cambie la posición del
brazo oscilante.
Cómo guardar el brazo oscilante
Vuelva a colocar el brazo oscilante en el soporte hasta que encaje en
su posición (figura
C
-
4
).
• Si el brazo oscilante se desencaja, presiónelo para volver a
encajarlo.
“WALKMAN” y
son marcas comerciales registradas
de Sony Corporation.
Manual de instrucciones
1
2
4
3
1
2
1
4
3
2
5


