background image

4

Getting started

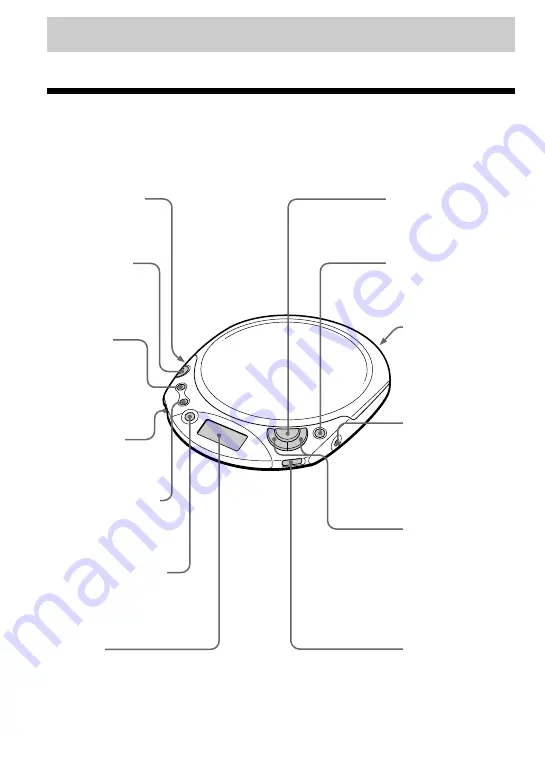
Locating the controls

For details, see pages in parentheses.

CD player (front)

1

i

 (headphones)

jack
(page 6)

7

Display
(pages 9 - 15)

4

VOLUME*
control
(page 6)

5

MENU/
button
(pages 9, 12, 13)

2

OPEN button
(page 6)

3

SOUND/
PRESET –
button
(pages 12 - 14)

qa

DC IN 4.5 V
(external power
input) jack
(page 6)

8

u

** (play/pause)

button
(pages 6, 7)

9

x

 (stop)•RADIO OFF

button
(pages 7, 10, 12, 16)

q;

Strap holes

6

RADIO ON•BAND/
MEMORY button
(pages 10 - 13)

qd

HOLD switch
(page 15)

qs

.

/

>

(AMS/search) •
TUNE –/+ buttons
(pages 7, 9, 10, 12)

*

There is a tactile dot beside VOLUME to show the direction to turn up the volume.

** The button has a tactile dot.

Summary of Contents for Walkman D-F201

Page 1: ...in which you purchased the CD player is shown on upper left of the bar code label on the package For accessories supplied with your CD player check the area code of your model and see Accessories supplied optional 3 241 442 23 1 D F201 2002 Sony Corporation WALKMAN is a trademark of Sony Corporation ...

Page 2: ...es on the apparatus To prevent fire or shock hazard do not place objects filled with liquids such as vases on the apparatus CAUTION The use of optical instruments with this product will increase eye hazard Certain countries may regulate disposal of the battery used to power this product Please consult with your local authority CAUTION INVISIBLE LASER RADIATION WHEN OPEN DO NOT STARE INTO BEAM OR V...

Page 3: ...ures To maximize the skip protection performance ESP MAX 14 Emphasizing the bass sound SOUND 14 Protecting your hearing AVLS 15 Locking the controls HOLD 15 Turning off the operation beep sound 16 Connecting your CD player Connecting a stereo system 17 Connecting to a power source Using the dry batteries 18 Notes on the power source 19 Additional information Precautions 20 Maintenance 20 Troublesh...

Page 4: ...EN button page 6 3 SOUND PRESET button pages 12 14 qa DC IN 4 5 V external power input jack page 6 8 u play pause button pages 6 7 9 x stop RADIO OFF button pages 7 10 12 16 q Strap holes 6 RADIO ON BAND MEMORY button pages 10 13 qd HOLD switch page 15 qs AMS search TUNE buttons pages 7 9 10 12 There is a tactile dot beside VOLUME to show the direction to turn up the volume The button has a tactil...

Page 5: ...5 CD player inside qg AVLS switch page 15 CD player rear qf ESP switch page 14 Getting started qh MONO ST stereo switch page 11 qj Battery compartment page 18 ...

Page 6: ... the tray and close the lid OPEN button Label side up Playing a CD You can also use dry batteries as a power source Headphones or Earphones to i headphones 1 Connect your CD player 1 Connect the AC power adaptor 2 Connect the headphones earphones u button to an AC outlet to DC IN 4 5V AC power adaptor ...

Page 7: ...ressing Similarly if you are at the first track you can locate the last track by pressing About the display When you press u after changing the CD or turning off and on the player the total number of tracks in the CD and total playing time appear for about two seconds During play the track number and the elapsed playing time of the current track appear During pause the elapsed playing time flashes...

Page 8: ...layback capability may vary depending on the quality of the disc and the condition of the recording device CD DA is the abbreviation for Compact Disc Digital Audio It is a recording standard used for the Audio CDs Removing the CD Remove the CD while pressing the pivot in the center of the tray ...

Page 9: ...ay Play mode indication MENU button Each time you press the button you can change the playback mode No indication Normal play Play all tracks repeatedly 1 Play a single track 1 Play a single track repeatedly SHUF Play tracks in random order repeatedly buttons Playback options ...

Page 10: ...ntil the band you want appears Each time you press the button the display changes as follows FM1 FM2 FM3 FM4 FM5 AM 3 Press TUNE or to tune in the station you want and adjust the volume To turn off the radio Press x RADIO OFF To tune in the station quickly Hold down TUNE or in step 3 until the frequency digits begin to change in the display The CD player automatically scans the radio frequencies a...

Page 11: ...he FM antenna If it is hard to hear the FM broadcast Set the MONO ST switch to MONO using a pointed material The noise will be reduced but the radio will play in monaural When listening to the radio on batteries If you connect the external power source plug to the DC IN 4 5 V jack of your CD player the CD player will turn off Turn it on by pressing RADIO ON BAND to continue listening to it Headpho...

Page 12: ... TUNE or to tune in the station you want while PRESET flashes 6 Press MEMORY When the station is preset successfully the beep sounds and PRESET stops flashing in the display The new station replaces the old one FM AM After 2 seconds PRESET starts flashing again and the CD player enters the PRESET MEMORY standby mode 7 Repeat steps 4 to 6 when you preset the stations in the same band When you prese...

Page 13: ... or connect the AC power adaptor again The indications in the display keep flashing until all preset stations are cleared then stop flashing and disappear from the display Playing preset radio stations You can tune in the station easily by pressing PRESET or button 1 Press RADIO ON BAND to select the band 2 Press PRESET or to tune in a stored station Using the radio ...

Page 14: ...sticated technology Due to the light weight and improved anti shock characteristics of the optical block this system recovers from the skipping much quicker than conventional technology such as ESP or ESP2 Although ESP MAX provides excellent protection skipping may occasionally occur Set ESP under the lid to ON To turn off the ESP MAX function Set ESP to OFF Notes Playing may stop when the CD play...

Page 15: ...he AVLS function Set AVLS to NORM Displayed when LIMIT is selected and AVLS function is activated Locking the controls HOLD You can lock the controls on your CD player to prevent accidental button presses Slide HOLD in the direction of the arrow To unlock the controls Slide HOLD in the opposite direction of the arrow Displayed when the HOLD function is activated Available features ...

Page 16: ... headphones earphones when you operate your CD player 1 Remove the power source AC power adaptor or dry batteries from the CD player 2 Connect the power source while pressing x on the CD player To turn on the beep sound Remove the power source and then connect the power source without pressing x ...

Page 17: ...ette recorder etc B Connecting your CD player Connecting cord Left white Right red to i Notes Before you play a CD turn down the volume of the connected device to avoid damaging the connected speakers Use the AC power adaptor for recording If you use the dry batteries as a power source they may become completely depleted during recording Adjust the volume properly on the CD player and connected de...

Page 18: ...rtment B Connecting to a power source To remove the batteries Remove the batteries as illustrated below When to replace the batteries You can check the remaining power of the batteries in the display Battery power is full r r Battery power is getting low r r Battery power is low Lo batt Batteries are depleted Beep sounds When the batteries are depleted replace both batteries with new ones Notes Th...

Page 19: ... not carry the batteries with coins or other metallic objects It can generate heat if the positive and negative terminals of the battery are accidentally contacted by a metallic object Do not mix rechargeable batteries with dry batteries Do not mix new batteries with old ones Do not use different types of batteries together When the batteries are not to be used for a long time remove them If batte...

Page 20: ...handling CDs To keep the CD clean handle it by its edge Do not touch the surface Do not stick paper or tape onto the CD Do not expose the CD to direct sunlight or heat sources such as hot air ducts Do not leave the CD in a car parked under direct sunlight On headphones earphones Road safety Do not use headphones earphones while driving cycling or operating any motorized vehicle It may create a tra...

Page 21: ...batteries with new LR6 size AA alkaline batteries page 18 c Replace the batteries with new LR6 size AA alkaline batteries page 18 c Use only the AC power adaptor or car battery cord in Accessories supplied optional back cover c Remove all power sources then insert the batteries or connect the AC power adaptor again pages 6 18 c The buttons are locked Slide the HOLD switch back page 15 c The CD is ...

Page 22: ...eries with new LR6 size AA alkaline batteries page 18 c Move the CD player away from the TV c Keep the AC power adaptor away from the CD player Cause and or corrective actions c The resume function is working To start from the first track press u for 2 seconds or more or open the lid of the CD player Or remove all power sources then insert the batteries or connect the AC power adaptor again pages ...

Page 23: ... the upper left side of the bar code on the package Two LR6 size AA batteries 3 V DC AC power adaptor DC IN 4 5 V jack U U2 CA2 E92 MX2 TW2 BR3 model 120 V 60 Hz CED CET CEW CEX CE7 EE EE1 E13 G5 G6 G7 G8 BR1 model 220 230 V 50 60 Hz CEK 3CE7 model 230 240 V 50 Hz AU2 model 240 V 50 Hz JE W E33 EA3 KR4 model 100 240 V 50 60 Hz HK2 model 220 V 50 60 Hz AR1 CNA model 220 V 50 Hz Battery life approx ...

Page 24: ... cord DCC E345 Car battery cord with car connecting pack DCC E34CP Car connecting pack CPA 9C Connecting cord RK G129 RK G136 Earphones MDR E848LP MDR EX70LP Headphones MDR A44L MDR A110LP When using optional headphones use only headphones with stereo miniplugs You cannot use headphones with micro plugs Your dealer may not handle some of the accessories listed above Please ask the dealer for detai...

Reviews: