background image

- 24 -

WA1

RM-Y1108

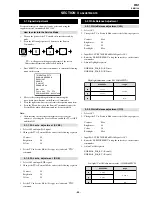
Service adjustments to this model can be performed using the
supplied remote Commander RM-Y1108.

‘TT—’ will appear in the upper right corner of the screen.
Other status information will also be displayed.

3.

Press ‘MENU’ on the remote commander to obtain the following
menu on the screen.

4.

Move to the corresponding adjustment item using the
up or down arrow buttons on the Remote Commander.

5.

Press the right arrow button to enter into the required menu item.

6.

Press the ‘Menu’ button on the Remote Commander to quit the
Service Mode when all adjustments have been completed.

Note :

After carrying out the service adjustments, to prevent the
customer accessing the ‘Service Menu’ switch the TV set OFF
and then ON.

i+

5

+

(ON SCREEN                            (DIGIT 5)                                ()                                  (TV)
   DISPLAY)

1.

Turn on the power to the TV set and enter into the stand-by
mode.

2.

Press the following sequence of buttons on the Remote
Commander.

SECTION 3 

 ADJUSTMENTS

3-1. Signal Adjustment

How to enter into the Service Mode

3-2. White Balance Adjustment

V

T

L

E

N

A

P

T

N

E

D

I

R

T

R

E

D

O

C

E

D

A

M

O

R

H

C

T

H

G

I

L

K

C

A

B

D

N

U

O

S

T

S

U

J

D

A

F

I

U

N

E

M

R

O

R

R

E

1

2

.

0

v

1

A

W

h

F

F

h

F

F

a

t

a

d

y

r

o

t

c

a

F

0

9

8

7

6

5

4

3

2

1

:

R

E

B

M

U

N

L

A

I

R

E

S

3

R

S

0

2

-

V

L

K

e

g

n

a

r

x

x

x

x

x

8

9

7

2

.

0

D

N

J

8

.

0

y

y

y

y

y

3

2

8

2

.

0

Y

Y

Y

Y

Y

-

A

/

N

3

R

S

0

2

-

V

L

K

e

g

n

a

r

x

x

x

x

x

8

9

7

2

.

0

D

N

J

8

.

0

y

y

y

y

y

3

2

8

2

.

0

Y

Y

Y

Y

Y

-

A

/

N

3-1-1. PAL auto adjustment (CVBS)

1. Select AV1 and input PAL signal.

2. Change the TV to Personal Mode and set the following registers.

Contrast

-

90

Brightness -

50

Colour

-

50

3. Set the TV in Service Mode (See opposite) and send “TT51”

command.

3-1-2. PAL auto adjustment (RGB)

1. Select AV1 and input RGB signal.

2. Change the TV to Personal Mode and set the following registers.

Contrast

-

90

Brightness -

50

Colour

-

50

3. Set the TV in Service Mode (See opposite) and send “TT52”

command.

3-2-1. White Balance adjustment (H/L)

1. Select AV1.

2. Change the TV to Personal Mode and set the following registers.

Contrast

-

Max

Brightness -

50

Colour

-

50

Backlight -

Max

3. Input PAL CVBS 70 IRE Full Field Signal to AV1.

4. Enter the ‘SERVICE MENU’ using the cursor keys on the remote

commander.

5. Adjust Highlight registers:

NORMAL_PAL_RD (R Drive)

NORMAL_PAL_BD (B Drive)

High light adjustment value (10500K-6MPCD)

3-2-2. White Balance adjustment (C/O)

1. Select AV1.

2. Change the TV to Personal Mode and set the following registers.

Contrast

-

Max

Brightness -

50

Colour

-

50

Backlight -

Max

3. Input PAL CVBS 20 IRE Full Field Signal to AV1.

4. Enter the ‘SERVICE MENU’ using the cursor keys on the remote

commander.

5. Adjust CutOff registers:

NORMAL_PAL_RC (R cutoff)

NORMAL_PAL_BC (B cutoff)

Low light (Cut Off) adjustment value (10500K-6MPCD)

Summary of Contents for WEGA KLV-20SR3

Page 1: ... 1 WA1 RM Y1108 SERVICEMANUAL WA1 CHASSIS MODEL COMMANDER DEST KLV 20SR3 RM Y1108 AEP MODEL COMMANDER DEST RM Y1108 FLAT PANEL COLORTV KLV 20SR3 ...

Page 2: ...d Printed Wiring Boards 26 A Board Schematic Diagram 27 A Printed Wiring Board 30 G Board Schematic Diagram 32 G Printed Wiring Board 33 H1 Board Schematic Diagram 34 H1 Printed Wiring Board 35 H2 Board Schematic Diagram 34 H2 Printed Wiring Board 35 H3 Schematic Diagram 36 H3 Printed Wiring Board 37 H5 Schematic Diagram 36 H5 Printed Wiring Board 37 4 4 Semiconductors 38 5 EXPLODED VIEWS 5 1 Fron...

Page 3: ...temperature needs to be set to 370 degrees centigrade This requires soldering equipment capable of accurate temperature control coupled with a good heat recovery characteristics For more information on the use of Lead Free Solder please refer to http www sony training com r e b m u n t r a P r e t e m a i D s k r a m e R 9 1 5 0 0 0 4 6 7 m m 3 0 g K 5 2 0 0 2 5 0 0 0 4 6 7 m m 4 0 g K 0 5 0 1 2 5...

Page 4: ...f s t u p n I B G R r o f s t u p n I o i d u A d n a o e d i V V T f o s t u p t u O s l a n g i s n o i t p m u s n o C r e w o P W 5 0 W 5 6 r o t c e n n o c o r u E n i p 1 2 2 s l a n g i s o e d i V d n a o i d u A r o f s t u p n I o e d i V S r o f s t u p n I s l a n g i s o i d u A d n a o e d i V V T f o s t u p t u O e l b a t c e l e s e c a f r e t n i k n i l t r a m S s n o i s n ...

Page 5: ...e 12 Open 13 Ground red 14 Ground blanking 15 _ _ Red input 0 7 3dB 75 ohms positive _ S signal Chroma input 0 3 3dB 75 ohms positive 16 Blanking input Ys signal High state 1 3V Low state 0 0 4V Input impedence 75 ohms 17 Ground video output 18 Ground video input 19 Video output 1V 3dB 75ohms positive sync 0 3V 3 10dB 20 _ _ Video input 1V 3dB 75ohms positive sync 0 3V 3 10dB _ Video input Y S sig...

Page 6: ... faulty If a device is found to be faulty the relevant device number will be displayed through the LED Series of flashes which must be counted Flash Timing Example e g error number 3 StBy LED ON ON OFF OFF LED Error Code D E L R O R R E E D O C N O I T P I R C S E D R O R R E 2 0 r o r r E d r a o B A 3 0 r o r r E d r a o B B 4 0 r o r r E l e n a P 5 0 r o r r E M O R P E E 6 0 r o r r E s u B C...

Page 7: ... or by pressing and holding the Auto Start Up button on the top of TV set for more than three seconds see page 17 1 Connect the TV plug to the mains socket 220 240V AC 50Hz 2 The first time that the TV set is connected it is usually turned on If the TV is off press the on off button to turn on the TV The first time you switch on the TV a Language menu appears automatically on the TV screen 3 Press...

Page 8: ...d the other channels move accordingly 3 Repeat steps b 1 and b 2 if you wish to change the order of the other channels 8 Press the MENU button to remove the menu from the screen Auto tuning Programmes found No channel found Please connect aerial Confirm Programme Sorting Exit MENU 01 02 03 04 05 06 07 08 09 10 11 TVE TVE2 TV3 C33 C27 C58 S02 S06 C44 C47 C48 Programme Sorting Exit MENU 01 02 03 04 ...

Page 9: ...Press B or b to decrease or to increase the green tones Next press OK to store This option only appears for NTSC signal e g USA video tapes Sharpness Press B or b to soften or to sharpen the picture Next press OK to store This option only appears and can only be adjusted if Picture Mode is set to Personal Backlight Press B or b to darken or brighten the backlight This option only appears and can o...

Page 10: ...ness Backlight Reset Noise Reduction Colour Tone Select Set OK End MENU Personal 80 50 50 50 70 Auto Normal Sound Effect Treble Bass Balance Reset Dual Sound Auto Volume Natural 0 0 0 Stereo Off Sound Adjustment Select Set OK End MENU Sound Adjustment Sound Effect Treble Bass Balance Reset Dual Sound Auto Volume Natural 0 0 0 Stereo Off Select Set OK End MENU Back The Features Menu The Features me...

Page 11: ...t press v or V to select the desired option and press OK Finally read below how to operate into each option LANGUAGE This option allows you to select the language that menus are displayed in To do this After selecting the option press OK and then proceed in the same way as in step 3 of the section Switching On the TV and Automatically Tuning on page 22 COUNTRY This option allows you to select the ...

Page 12: ...en press OK to enter the Set Up menu Next press v or V to select Manual Programme Preset and press OK Finally read below how to operate into each option The Manual Programme Preset option allows you to a Preset channels or the VCR channel one by one to the programme order of your choice To do this 1 Once you have entered the Set Up menu as it is explained on page 30 and after selecting the Manual ...

Page 13: ...On in the step above f View and record scrambled channels e g from a pay TV decoder when using a decoder connected to Scart 2 directly or through a VCR This option is only available depending on the country you have selected in the Country menu To do this Once you have entered the Set Up menu as it is explained on page 30 and after selecting the Manual Programme Preset option press OK Next press v...

Page 14: ...reveal concealed information e g answers to a quiz Press Press it again to conceal the information To change brightness of Teletext Whilst you are viewing Teletext press repeatedly to choose between four different options of brightness To switch off Teletext Press If wrong Teletext characters appear for Cyrillic languages we recommend you set the Language option in the Set Up menu to Russia if you...

Page 15: ...of the external speakers can be altered by pressing the volume buttons on the TV remote control The treble and bass setting can also be altered through the Sound Adjustment menu see page 27 S S Viewing pictures from equipment connected to the TV 1 Connect your equipment to the designated TV socket as indicated on page 36 2 Switch on the connected equipment 3 To watch the picture from the connected...

Page 16: ...V is compatible with the VESA universal wall stand system S S Troubleshooting Here are some simple solutions to problems which may affect the picture and sound Problem Possible solution No picture No picture screen is dark and no sound Check the aerial connection Connect the TV to the mains and press the power switch on the top side of the TV set If the standby indicator is on press TV on the remo...

Page 17: ...mote control Check that TV Speakers option is set to On in the Features menu page 29 Audio noise Unable to receive a stereo or dual sound broadcast Make sure that the aerial is connected Keep the aerial cable away from other connecting cables Do not use 300 ohm twin lead cables as interference may occur Communication problems may occur if the infrared communication equipment e g infrared cordless ...

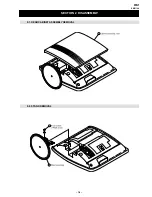
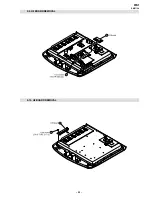
Page 18: ... 18 WA1 RM Y1108 SECTION 2 DISASSEMBLY 2 2 STAND REMOVAL 2 1 REAR CABINET ASSEMBLY REMOVAL ...

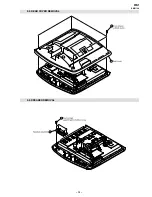
Page 19: ... 19 WA1 RM Y1108 2 3 REAR COVER REMOVAL 2 4 SPEAKER REMOVAL ...

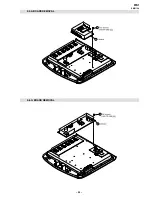
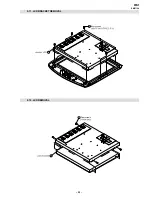
Page 20: ... 20 WA1 RM Y1108 2 5 A BOARD REMOVAL 2 6 G BOARD REMOVAL ...

Page 21: ... 21 WA1 RM Y1108 2 7 H1 BOARD REMOVAL 2 8 H2 BOARD REMOVAL 4 3 ...

Page 22: ... 22 WA1 RM Y1108 2 9 H3 BOARD REMOVAL 2 10 H5 BOARD REMOVAL ...

Page 23: ... 23 WA1 RM Y1108 2 11 LCD BRACKET REMOVAL 2 12 LCD REMOVAL Four screws ...

Page 24: ...g n a r x x x x x 8 9 7 2 0 D N J 8 0 y y y y y 3 2 8 2 0 Y Y Y Y Y A N 3 R S 0 2 V L K e g n a r x x x x x 8 9 7 2 0 D N J 8 0 y y y y y 3 2 8 2 0 Y Y Y Y Y A N 3 1 1 PAL auto adjustment CVBS 1 Select AV1 and input PAL signal 2 Change the TV to Personal Mode and set the following registers Contrast 90 Brightness 50 Colour 50 3 Set the TV in Service Mode See opposite and send TT51 command 3 1 2 PA...

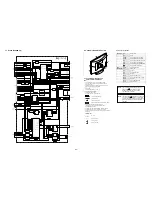
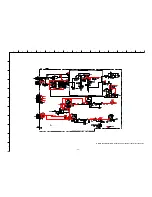
Page 25: ...VIDEO IN RIGHT OUT RIGHT IN LEFT OUT LEFT IN MODE AV LINK CN3702 CN3700 TO H2 BOARD CN9300 IC3701 ANALOG MULTIPLEXER DE MULTIPLEXER 1 3 6 1 STBY 5V TO A BOARD CN0041 CN9050 LED 2 OUT IC9050 IR RECEIVER SIRCS H5 IR RECEIVER LED S VCC 2 SIRCS 5 LED 1 5V STANDBY POWER STANDBY CN6003 AC IN AC IN G POWER SUPPLY 1 3 1 4 L6000 2 3 IC6000 MAIN BRIDGE RECTIFIER 1 2 VC1 23 16 T6000 D6010 TO B BOARD CN6301 C...

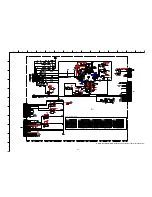
Page 26: ...T OUT LEFT IN BLUE IN MODE GREEN IN RED IN BLANKING VIDEO IN C FRONT LUMINANCE CHROMINANCE 43 44 CVBS2 Y2 IN C2 IN CVBS OUT 41 CVBS3 Y2 IN 15 25 26 27 IC3801 SUB VIDEO PROCESSOR YS3 B1 IN G1 IN R1 IN 1 21 9 22 23 13 14 AMPLIFIER Q3808 AMPLIFIER Q3809 2 4 R SCART 1 AMPLIFIER Q3806 G SCART 1 B SCART 1 FB SCART 1 CVBS AV1 CVBS RF Y OUT H5 CB OUT CR OUT SCL SDA AMPLIFIER Q3807 IC3811 SYNC ADDER CS CS ...
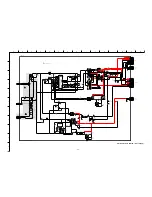
Page 27: ...MSD601 RST1 HEADPHONE AMPLIFIER 470 4 7K 4 7K 0 0022 50V 100 100 0 47 0 47 RB053L C2036 0 0022 C2037 0 0022 R2031 100K 5VSTBY 5VSTBY 5VSTBY Q2205 MSD601 RST1 R2209 10K R2210 100 R2430 0 R2431 0 3 3k COMPONENTS MARKED AS XX ARE NOT FITTED ON THIS MODEL A 1 3 TUNER AUDIO CHROMA DECODER SCART 1 TP1 100ns div A 1 3 Board Waveform 3 0Vp p H TP1 TO SPEAKERS ...

Page 28: ... 3 4 5 6 7 8 9 10 11 O 28 A Board Schematic Diagram Tuner Audio Chroma Decoder Scart 1 Page 2 3 CN6005 CN6001 CN6300 REGULATOR REGULATOR 220K RD5 6SB T1 R6206 10k R0040 0 XX COMPONENTS MARKED AS XX ARE NOT FITTED ON THIS MODEL A 2 3 ...
Page 29: ... ADDER XX CONTROL AMP C2604 470PF C2605 470PF R3626 150 SW_MONITOR L3811 10UH R3822 1K C3801 0 01 C3802 47 16V Q3801 MSB709 RT1 220 220 150 1 5k 47 COMPONENTS MARKED AS XX ARE NOT FITTED ON THIS MODEL A 3 3 5ms div 20us div 20us div 10us div 10us div A 3 3 Board Waveforms 1Vp p H 700mVp p H TP1 TP2 TP3 650mVp p H 650mVp p H 200mVp p H TP4 TP5 TP5 TP1 TP4 TP3 TP2 ...

Page 30: ...l o V o N f e R o N n i P V s t l o V o N f e R o N n i P V s t l o V o N f e R o N n i P V s t l o V o N f e R o N n i P V s t l o V o N f e R o N n i P V s t l o V o N f e R o N n i P V s t l o V o N f e R o N n i P V s t l o V o N f e R o N n i P V s t l o V o N f e R o N n i P V s t l o V 2 0 0 0 C I 1 1 2 0 0 0 2 C I 5 1 0 0 0 0 2 C I 1 2 6 4 0 0 0 2 C I 8 3 2 7 0 0 0 2 C I 5 5 0 0 0 0 2 C I ...

Page 31: ... 4 E 1 0 2 2 D 4 G 5 0 2 6 C I 4 I 1 0 2 2 Q 4 G 2 0 2 2 D 4 G R O T S I S N A R T 2 0 2 2 Q 4 G 3 0 2 2 D 4 G 1 0 0 0 Q 5 B 3 0 2 2 Q 5 E 4 0 2 2 D 4 G 2 0 0 0 Q 2 F 4 0 2 2 Q 5 G 5 0 2 2 D 5 G 6 4 0 0 Q 3 J 5 0 2 2 Q 5 G 0 0 6 2 D 6 D 7 4 0 0 Q 3 J 0 0 3 2 Q 4 E 1 0 6 3 D 6 D 0 0 2 1 Q 4 F 1 0 3 2 Q 4 E 7 2 6 3 D 6 E 1 0 2 1 Q 4 G 0 0 6 2 Q 5 D 2 0 2 6 D 3 G 0 0 3 1 Q 5 B 1 0 6 2 Q 6 D 9 0 2 6 D...

Page 32: ...R6109 UDZSTE 4 7B D6100 10ERB20 TB3 D6102 M1FL20U 4063 D6104 ERA22 08 D6103 16V 0 1 C6107 8 7 6 5 4 3 2 1 STR A6169 IC6100 MMDL914T1 D6101 50V 47 C6105 50V 4 7 C6102 1kV 100p SL C6021 1kV 100p SL C6022 3 3uH L6002 3 3uH L6003 S SI2301DS T1 Q6006 M1FM3 D6014 22k R6045 100k R6047 MSD601 RT1 Q6008 1 10W 47k R6052 FCH10A10 D6010 FCH10A10 D6012 0 1 C6033 C6035 XX CHIP 10k R6034 MSD601 RT1 Q6009 Q6010 M...

Page 33: ...0 0 1 6 D 9 G 3 0 1 6 D 8 F 0 0 1 6 C I 8 G 3 0 0 6 Q 8 G 7 0 0 6 Q 8 M 0 0 0 6 D 8 D 5 0 0 6 D 7 G 0 1 0 6 D 8 K 3 1 0 6 D 8 J 0 0 1 6 D 9 G C I R O T S I S N A R T 4 0 0 6 Q 7 G 8 0 0 6 Q 9 M 1 0 0 6 D 8 F 6 0 0 6 D 7 G 1 1 0 6 D 7 J 4 1 0 6 D 3 B 2 0 1 6 C I 8 H 1 0 0 6 C I 6 K 0 0 0 6 Q 8 F 6 0 0 6 Q 8 L f e R s e g b d c f e R s e g b d c f e R s e g b d c 1 0 0 6 Q 5 5 7 1 6 7 5 5 7 3 0 0 6 ...

Page 34: ... R9004 1 10W 4 7k R9005 1 10W 10k R9006 CHIP 0 R9007 25V 0 1 C9000 XX FB9000 S9000 S9001 S9002 S9003 S9004 S9005 S9006 UDZS 5 6B D9000 UDZS 5 6B D9001 H1 KLV 20SR3 KEY 1 GND GND KEY 2 TO B BOARD CN0101 COMPONENTS MARKED AS XX ARE NOT FITTED ON THIS MODEL H1 CONTROL BUTTONS TO A BOARD CN2211 TO H3 BOARD CN3702 UDZS 9 1B UDZS 9 1B DTZ TT11 6 8B DTZ TT11 6 8B L9204 0 L9205 0 L9206 0 COMPONENTS MARKED...

Page 35: ... F G H I J K L M N 1 2 3 4 5 6 7 8 9 10 11 O 35 H1 Printed Wiring Board Conductor Side A H1 Printed Wiring Board Conductor Side B H2 Printed Wiring Board Conductor Side A H2 Printed Wiring Board Conductor Side B ...

Page 36: ...707 0 R3708 0 R3710 0 R3711 0 R3713 0 R3714 0 R3715 0 R3716 0 R3717 150 COMPONENTS MARKED AS XX ARE NOT FITTED ON THIS MODEL H3 SCART 2 1 2 3 4 5 6 6P CN9050 5VSTBY SIRCS GND GND LED1 LED2 UDZS 5 6B D9053 1 10W 47 R9051 CHIP 0 R9050 VCC OUT GND RS 20 IC9050 UDZS 5 6B D9050 SLR 325MCT31 D9051 SLR 325VCT31 D9052 50V 2200p C9052 10V 22 C9051 25V 0 1 C9053 5VSTBY 5VSTBY 6 3V 47 C9050 ST BY POWER H5 KL...

Page 37: ... F G H I J K L M N 1 2 3 4 5 6 7 8 9 10 11 O 37 H5 Printed Wiring Board Conductor Side A H5 Printed Wiring Board Conductor Side B H3 Printed Wiring Board Conductor Side A H3 Printed Wiring Board Conductor Side B ...

Page 38: ...4EKA DTC144EKA T146 MSB709 RT1 MSD601 RST1 C B E 10ERB20 TB3 ERA22 08 RD5 6ESB2 MSP3411G QA B11 68 61 60 1 52 44 43 35 27 26 18 10 9 TOP VIEW NJM2904M CATHODE ANODE MC74LVX8053DTR2 1 2 3 123 D10SC6M 4012 M1FM3 M1FL20U 4063 RB160M 30TR BA7046 5 6 7 1 2 3 4 RPM7140 H8 IN GND OUT FCH10A10 CXA2163AQ NJM4558V TE2 5 6 7 1 2 3 4 1 TOP VIEW PCF8574TS T PQ1CZ41H2ZPH PQ20WZ1UJ00H S2K2842 LBS2SONY SI2301DS T...

Page 39: ... 39 WA1 RM Y1108 UF4005PKG23 CATHODE ANODE 8 7 6 5 1 3 4 2 TDA2822D013TR TC7SET02F TE85L TL1431CZ AP TA8216H ...

Page 40: ...ld be anticipated when ordering these items 5 1 FRONT CABINET ASSY AND SPEAKERS REF NO PART NO DESCRIPTION REMARK REF NO PART NO DESCRIPTION REMARK 40 1 X 2022 061 1 CABINET ASSY FRONT 20 SILVER 2 X 2022 280 1 CABINET ASSY FRONT 20 BLACK 2 2 2 022 910 01 GUIDE LIGHT 3 2 022 921 01 HOLDER SIDE JACK 20 4 A 1068 281 A H2 COMPLETE BOARD 5 1 825 959 11 LOUDSPEAKER 4X7CM 6 A 1057 434 A H5 MOUNT 7 A 1057...

Page 41: ...ASE STAND 56 2 022 916 01 PLATE SWIVEL 57 2 022 917 01 BRACKET TERMINAL 58 A 1057 432 A H3 BOARD COMPLETE 59 2 022 918 01 BRACKET VESA 60 A 1057 429 A G BOARD COMPLETE 61 2 022 920 01 BRACKET 20 LCD 62 A 1068 279 A A BOARD COMPLETE 63 1 805 627 11 LCD PANEL 20 1 INCH VGA TFT 64 8 597 936 00 TUNER FSS BTF EF411Z 65 A 1068 280 A B BOARD COMLETE 53 61 r 7 685 647 79 SCREW BVTP 3X10 TYPE2 IT 3 n 7 685...

Page 42: ... therefore do not appear in the Parts List 42 Page G BOARD COMPLETE Parts List 43 H1 BOARD COMPLETE Parts List 44 H3 BOARD COMPLETE Parts List 45 H5 BOARD COMPLETE Parts List 46 A BOARD COMPLETE Parts List 46 H2 BOARD COMPLETE Parts List 52 MISCELLANEOUS 53 ACCESSORIES AND PACKAGING MATERIALS 53 REMOTE COMMANDER 53 Note The B Board Schematic Diagram Printed Wiring Board and Parts List are not indi...

Page 43: ...01UF 10 00 50V C6105 1 107 909 11 ELECT 47UF 20 00 50V C6106 1 104 331 11 CERAMIC 0 0022UF 10 00 1KV C6107 1 107 826 11 CERAMIC CHIP 0 1UF 10 00 16V C6109 1 131 872 91 CERAMIC CHIP 1000PF 10 630V C6110 1 128 945 31 ELECT 1000UF 20 10V C6111 1 107 826 11 CERAMIC CHIP 0 1UF 10 00 16V CONNECTOR CN6001 1 794 032 21 PIN CONNECTOR PC BOARD 11P CN6002 1 766 382 21 PIN CONNECTOR 1 5MM SMD 10P CN6003 1 691...

Page 44: ...TAL CHIP 470 5 1 10W R6031 1 216 864 11 SHORT CHIP 0 R6032 1 216 837 11 METAL CHIP 22K 5 1 10W R6033 1 216 837 11 METAL CHIP 22K 5 1 10W R6034 1 216 833 11 METAL CHIP 10K 5 1 10W R6035 1 216 822 11 METAL CHIP 1 2K 5 1 10W R6037 1 216 821 11 METAL CHIP 1K 5 1 10W R6038 1 216 821 11 METAL CHIP 1K 5 1 10W R6039 1 216 864 11 SHORT CHIP 0 R6040 1 216 825 11 METAL CHIP 2 2K 5 1 10W R6041 1 216 864 11 SH...

Page 45: ...5 1 107 826 11 CERAMIC CHIP 0 1UF 10 00 16V C3746 1 126 394 11 ELECT CHIP 10UF 20 00 16V C3747 1 107 826 11 CERAMIC CHIP 0 1UF 10 00 16V C3748 1 126 396 11 ELECT CHIP 47UF 20 00 16V C3749 1 107 826 11 CERAMIC CHIP 0 1UF 10 00 16V C3750 1 126 396 11 ELECT CHIP 47UF 20 00 16V C3751 1 107 826 11 CERAMIC CHIP 0 1UF 10 00 16V H1 H3 CONNECTOR CN3700 1 770 130 11 CONNECTOR SQUARE TYPE 21P CN3702 1 580 05...

Page 46: ...R2708 1 216 853 11 METAL CHIP 470K 5 1 10W R2709 1 216 853 11 METAL CHIP 470K 5 1 10W R2710 1 216 853 11 METAL CHIP 470K 5 1 10W R2711 1 216 853 11 METAL CHIP 470K 5 1 10W R2712 1 216 839 11 METAL CHIP 33K 5 1 10W R2713 1 216 836 11 METAL CHIP 18K 5 1 10W R2714 1 216 839 11 METAL CHIP 33K 5 1 10W R2715 1 216 836 11 METAL CHIP 18K 5 1 10W R2718 1 218 841 11 METAL CHIP 560 0 5 1 10W R2719 1 218 841 ...

Page 47: ... 126 396 11 ELECT CHIP 47UF 20 00 16V C2304 1 126 396 11 ELECT CHIP 47UF 20 00 16V C2309 1 126 396 11 ELECT CHIP 47UF 20 00 16V C2310 1 126 396 11 ELECT CHIP 47UF 20 00 16V C2311 1 107 826 11 CERAMIC CHIP 0 1UF 10 00 16V C2312 1 107 826 11 CERAMIC CHIP 0 1UF 10 00 16V C2313 1 127 573 11 CERAMIC CHIP 1UF 10 16V C2400 1 162 923 11 CERAMIC CHIP 47PF 5 00 50V C2401 1 162 923 11 CERAMIC CHIP 47PF 5 00 ...

Page 48: ...CERAMIC CHIP 0 01UF 10 00 25V C3814 1 162 970 11 CERAMIC CHIP 0 01UF 10 00 25V C3816 1 165 176 11 CERAMIC CHIP 0 047UF 10 00 16V C3820 1 107 826 11 CERAMIC CHIP 0 1UF 10 00 16V C3821 1 162 914 11 CERAMIC CHIP 9PF 0 50PF 50V C3822 1 126 394 11 ELECT CHIP 10UF 20 00 16V C3823 1 126 396 11 ELECT CHIP 47UF 20 00 16V C3824 1 162 970 11 CERAMIC CHIP 0 01UF 10 00 25V C3825 1 162 970 11 CERAMIC CHIP 0 01U...

Page 49: ...07 8 729 010 05 TRANSISTOR MSB709 RT1 Q3808 8 729 010 29 TRANSISTOR MSD601 RST1 Q3809 8 729 010 05 TRANSISTOR MSB709 RT1 Q6200 8 729 045 62 TRANSISTOR 2SK2158 T2B Q6203 8 729 010 29 TRANSISTOR MSD601 RST1 RESISTOR JR2200 1 216 864 11 SHORT CHIP 0 JR2300 1 216 864 11 SHORT CHIP 0 IC IC0001 8 759 561 69 IC PCF8574TS T IC0002 8 759 701 01 IC NJM2904M IC0030 8 759 561 69 IC PCF8574TS T IC1200 8 759 51...

Page 50: ...220 5 1 10W R0047 1 216 825 11 METAL CHIP 2 2K 5 1 10W R0048 1 216 833 11 METAL CHIP 10K 5 1 10W R0049 1 216 833 11 METAL CHIP 10K 5 1 10W R0050 1 216 833 11 METAL CHIP 10K 5 1 10W R0051 1 216 833 11 METAL CHIP 10K 5 1 10W R0052 1 216 809 11 METAL CHIP 100 5 1 10W R0053 1 216 833 11 METAL CHIP 10K 5 1 10W R0054 1 216 811 11 METAL CHIP 150 5 1 10W R0055 1 216 864 11 SHORT CHIP 0 R0056 1 216 809 11 ...

Page 51: ...6 845 11 METAL CHIP 100K 5 1 10W R2420 1 216 837 11 METAL CHIP 22K 5 1 10W R2421 1 216 837 11 METAL CHIP 22K 5 1 10W R2423 1 216 821 11 METAL CHIP 1K 5 1 10W R2424 1 216 841 11 METAL CHIP 47K 5 1 10W R2425 1 216 841 11 METAL CHIP 47K 5 1 10W R2426 1 216 833 11 METAL CHIP 10K 5 1 10W R2427 1 216 833 11 METAL CHIP 10K 5 1 10W R2428 1 216 864 11 SHORT CHIP 0 R2429 1 216 864 11 SHORT CHIP 0 R2430 1 21...

Page 52: ... 75 5 1 10W R3625 1 216 025 11 RES CHIP 100 5 1 10W R3626 1 216 029 00 RES CHIP 150 5 1 10W R3811 1 216 809 11 METAL CHIP 100 5 1 10W R3812 1 216 809 11 METAL CHIP 100 5 1 10W R3813 1 216 864 11 SHORT CHIP 0 R3814 1 218 851 11 METAL CHIP 1 5K 0 5 1 10W R3818 1 216 864 11 SHORT CHIP 0 R3822 1 216 821 11 METAL CHIP 1K 5 1 10W R3833 1 216 821 11 METAL CHIP 1K 5 1 10W R3835 1 216 828 11 METAL CHIP 3 9...

Page 53: ... 274 01 CUSHION LOWER 2 109 154 01 BOTTOM PAT 20 2 109 155 01 BOX ACCESSORY 4 101 087 02 BAG PROTECTION CROSS 2 067 275 11 INSTRUCTION MANUAL ENGLISH RUSSIAN POLISH PORTUGUESE 2 067 275 21 INSTRUCTION MANUAL GERMAN FRENCH DUTCH ITALIAN 2 067 275 31 INSTRUCTION MANUAL DANISH FINNISH SWEDISH SPANISH REMOTE COMMANDER 1 478 815 11 REMOTE COMMANDER RM Y1108 R9209 1 216 810 11 METAL CHIP 120 5 1 10W R92...

Page 54: ...re modules Please contact your local Sony Service organisation for the latest information Read restore and compare NVM contents via the I2C bus Acknowledge check of all I2C devices in the TV set Read Error Codes emulation of the Error Reader tool Remote Commander emulation User programmable Functional Check through Infrared Fast and documented Test Mode setting of all Sony TV chassis Partnumbers T...

Reviews: