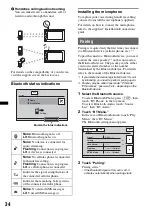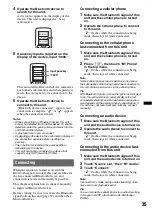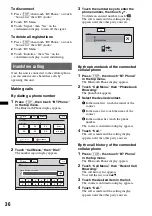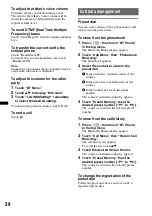
background image

42

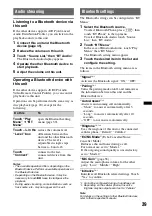
Speaker configuration and 
volume setup

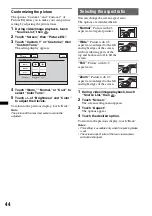
Creating a virtual center speaker 
— CSO

To fully enjoy surround sound, it is preferable to 
have 5 speakers (front left/right, rear left/right, 
center) and 1 subwoofer. CSO (Center Speaker 
Organizer) allows you to create a virtual center 
speaker even though a real center speaker is not 
connected.

1

During disc/USB playback, touch 
“Source List,” then 

.

2

Touch “Sound.”

The sound setting menu appears.

3

Touch “CSO.”

The options appear.

4

Touch “CSO1,” “CSO2,” or “CSO3.”

The setting is complete.

To return to the previous display, touch “Back.”

Note

“CSO” is effective only when “Multi Ch Output” is set to 
“Multi” (page 51)
, as it is effective only for playback of 
multi-channel sources.

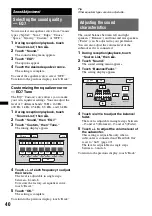
Using rear speakers like 
subwoofers 
— Rear Bass Enhancer

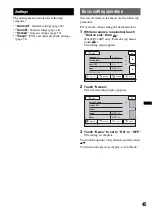
Rear Bass Enhancer enhances the bass sound by 
applying the low pass filter setting (page 49) to 
the rear speakers. This function allows the rear 
speakers to work like a pair of subwoofers if one 
is not connected.

1

During reception/playback, touch 
“Source List,” then 

.

2

Touch “Sound.”

The sound setting menu appears.

3

Touch 

v

/

V

 to scroll, then touch “RBE.”

The options appear.

4

Touch “RBE1,” “RBE2,” or “RBE3.”

The setting is complete.

To return to the previous display, touch “Back.”

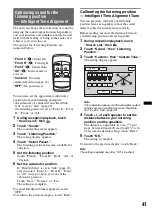
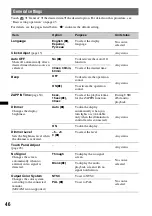
Adjusting the speaker volume

You can adjust the volume level of each 
connected speaker.
The adjustable speakers are “Front R” (Front 
Right), “Front L” (Front Left), “Surround L” 
(Rear Left), “Surround R” (Rear Right) and 
“Subwoofer*.”

*

Adjustable only when a subwoofer is connected and 
“Rear/Sub Out” is set to “Sub” (page 49).

1

While no source is selected, touch 
“Source List,” then 

.

2

Touch “Sound.”

The sound setting menu appears.

3

Touch 

v

/

V

 to scroll, then touch “4.1ch 

Speaker Level.”

The setting display appears.

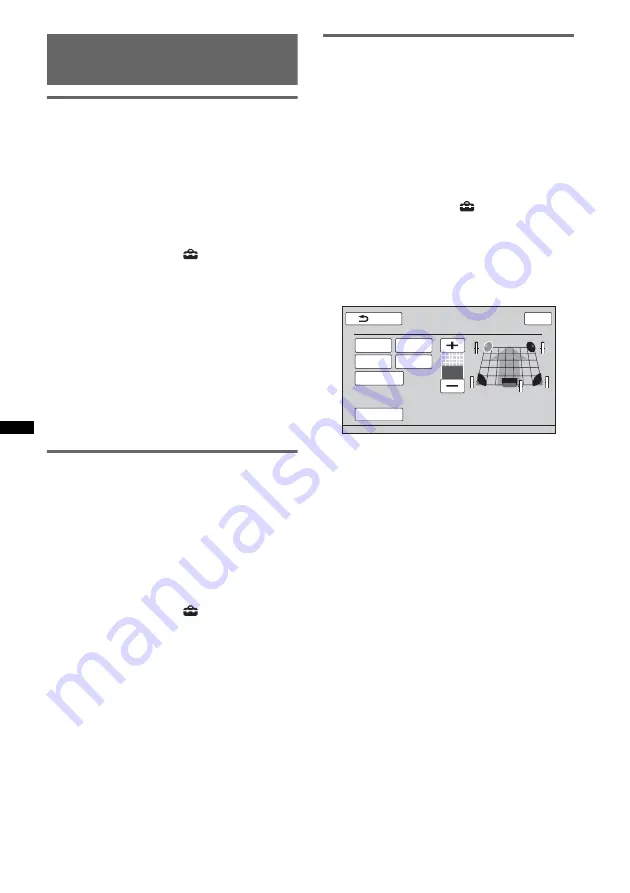
4

Touch the speaker, then +/– to adjust 
the level.

Repeat this step to adjust each speaker’s 
volume.
To restore the default setting, touch “Reset.”

To return to the previous display, touch “Back.”

Front L

Surround L

Subwoofer

Front R

Surround R

Reset

Back

4.1ch Speaker Level

Top

0

Summary of Contents for XAV-63

Page 1: ...Operating Instructions Manual de instrucciones Istruzioni per l uso 4 410 680 22 1 XAV 64BT XAV 63 AV Center 2012 Sony Corporation GB ES IT AV Center ...

Page 2: ...Disposal of waste batteries applicable in the European Union and other European countries with separate collection systems This symbol on the battery or on the packaging indicates that the battery provided with this product shall not be treated as household waste On certain batteries this symbol might be used in combination with a chemical symbol The chemical symbols for mercury Hg or lead Pb are ...

Page 3: ...he public of the RLAN access to telecom networks and services by the Ministerial Decree 28 5 2003 as amended and Art 25 general authorization for electronic communications networks and services of the Code of electronic communications Norway Use of this radio equipment is not allowed in the geographical area within a radius of 20 km from the centre of Ny Alesund Svalbard Warning if your car s igni...

Page 4: ...rols 20 Playback indications 21 Using PBC playback control functions 22 Configuring audio settings 22 Changing the audio language format 22 Changing the audio channel 23 Adjusting the audio output level Dolby D level 23 Repeat and shuffle play 23 Direct search play 24 USB Device Operations Playing from a USB device 25 Repeat and shuffle play 25 Enjoying music according to your mood SensMe 26 Befor...

Page 5: ...stening to a Bluetooth device via this unit 39 Operating a Bluetooth device with this unit 39 Bluetooth settings 39 Sound Adjustment Selecting the sound quality EQ7 40 Customizing the equalizer curve EQ7 Tune 40 Adjusting the sound characteristics 40 Optimizing sound for the listening position Intelligent Time Alignment 41 Calibrating the listening position Intelligent Time Alignment Tune 41 Speak...

Page 6: ...mera settings 54 Additional Information Precautions 54 Notes on LCD panel 54 Notes on discs 55 Playback order of MP3 WMA AAC JPEG Xvid MPEG 4 files 55 About MP3 files 56 About WMA files 56 About AAC files 56 About JPEG files 56 About MPEG 4 files 56 About iPod 56 About Bluetooth function 57 Maintenance 58 Removing the unit 58 Specifications 59 Troubleshooting 60 Error displays messages 63 Language...

Page 7: ...rt circuit If the unit does not work properly check the connections first referring to the supplied Installation Connections guide If everything is in order check the fuse Protect the unit surface from damage Do not expose the unit surface to chemicals such as insecticide hair spray insect repellent etc Do not leave rubber or plastic materials in contact with the unit for a long time Otherwise the...

Page 8: ...sit www gracenote com CD DVD Blu ray Disc and music and video related data from Gracenote Inc copyright 2000 to present Gracenote Gracenote Software copyright 2000 to present Gracenote One or more patents owned by Gracenote apply to this product and service See the Gracenote website for a non exhaustive list of applicable Gracenote patents Gracenote CDDB MusicID MediaVOCS the Gracenote logo and lo...

Page 9: ...ely shielded electronic systems in cars such as electronic fuel injection systems electronic antiskid antilock braking systems electronic speed control systems or air bag systems For installation or service of this device please consult with the manufacturer or its representative of your car Faulty installation or service may be dangerous and may invalidate any warranty that may apply to this devi...

Page 10: ...symbols Available functions differ depending on the format regardless of disc type The format symbols below appear in these Operating Instructions next to the description of functions available for their corresponding file types Tip For details on compression formats see page 56 Note Even compatible discs may not be playable on this unit depending on their recording condition Disc symbol in manual...

Page 11: ...e top menu For XAV 63 Press to open the source list F Front AUX terminal page 53 G USB terminal Remove the cap to connect a USB device H Volume control dial I SOURCE OFF button Press to turn on the power change the source Tuner Radio Disc iPod USB AUX Auxiliary equipment BT Audio Bluetooth Audio Press and hold for 1 second to exit the source Press and hold for more than 2 seconds to turn off J Dis...

Page 12: ...touch anywhere on the display H AV Source key 2 Touch to open the source list I BT Phone key 2 Touch to enter Bluetooth Phone mode J Source select keys Touch to change the source Tuner Radio Disc AUX Auxiliary equipment iPod USB SensMe BT Audio Bluetooth Audio 2 K Top key M OFF key This key varies based on the model XAV 64BT Top key XAV 63 M OFF key See above for the function of each key 1 Appears...

Page 13: ...ton Press to switch the listening position Front L Front R Front All Custom OFF D O Return button Press to return to the previous display return to the menu on a VCD 1 E EQ Equalizer button Press to select an equalizer curve from 7 music types Xplod Vocal Edge Cruise Space Gravity Custom OFF F Number buttons page 24 Radio Press to receive stored stations Press and hold to store stations Disc USB P...

Page 14: ...e menu on a disc L ZAP button Press to enter ZAPPIN mode M M m Cursor ENTER buttons page 19 Press to control the menu on a DVD N SRC Source button Press to turn on change the source Tuner Radio Disc iPod USB AUX Auxiliary equipment BT Audio Bluetooth Audio 5 O MODE button Press to select the radio band FM MW LW select an auxiliary device Front AUX Rear AUX 6 P VOL Volume buttons 1 When playing wit...

Page 15: ...the display language Touch repeatedly until the desired language English Spanish Russian appears 4 Touch OK The setting is complete This setting can then be further configured in the setting menu For details on setting the subwoofer connection status see page 49 For details on setting the listening position see Optimizing sound for the listening position Intelligent Time Alignment on page 41 For d...

Page 16: ...ist Band Receive Menu Preset List PTY List TA AF Top P1 P2 P3 BTM Memory P4 P5 P6 ATT Band FM1 Receive Menu Preset List FM2 FM3 LW PTY List TA AF Top MW Source List 1 Source List Touch to open the source list page 12 2 ATT Touch to attenuate the sound To cancel touch again 3 TA Touch to set TA in RDS page 18 4 AF Touch to set AF in RDS page 18 5 Top XAV 64BT Touch to open the top menu page 12 XAV ...

Page 17: ... select the desired band FM1 FM2 FM3 MW or LW 2 Touch Preset List then BTM The unit stores the first six available stations in the preset list P1 to P6 A beep sounds when the setting is stored Storing manually 1 While receiving the station that you want to store touch Preset List 2 Touch Memory then touch a number in the list P1 to P6 The number and the confirmation display appear 3 Touch Yes The ...

Page 18: ...ce Tip If you adjust the volume level during a traffic announcement that level will be stored into memory for subsequent traffic announcements independently from the regular volume level Staying with one regional program Regional When the AF function is on this unit s factory setting restricts reception to a specific region so you will not be switched to another regional station with a stronger fr...

Page 19: ...he DVD menu Touch b v V B to move the cursor then touch ENTER to confirm If the menu control panel does not appear by touching the display use the remote commander About the DVD menu A DVD is divided into several sections which make up a picture or music feature These sections are called titles When you play a DVD that contains several titles you can select a desired title using the DVD s top menu...

Page 20: ...t page 12 4 Touch to skip a chapter track scene image file Touch and hold momentarily to reverse fast forward the video and then repeatedly to switch the speed 2 t 12 t 120 t 2 1 To cancel touch u Touch and hold to reverse fast forward the audio track During pause touch and hold down to play the video in slow motion To cancel release the key 5 u Touch to pause resume play after pause 6 Play Menu T...

Page 21: ...album name F Album artwork display 6 G Format track number album number 7 EQ7 setting status play mode status repeat shuffle 1 When ATT is activated appears 2 During JPEG playback or VCD playback with PBC functions no indication appears 3 Indications differ depending on the disc format 4 When playing a VCD with PBC functions page 22 no indication appears 5 DVD only 6 The recommended size is from 2...

Page 22: ... during playback without PBC Configuring audio settings Note Discs in DTS format are not supported The sound is not output if the DTS format is selected Changing the audio language format The audio language can be changed if the disc is recorded with multilingual tracks You can also change the audio format when playing a disc recorded in multiple audio formats e g Dolby Digital 1 During playback t...

Page 23: ...the Adjust box to set to ON 3 Touch repeatedly to adjust the output level The output level is adjustable in single steps between 10 and 10 To close the play menu touch Play Menu Repeat and shuffle play 1 During playback touch Play Menu then the Repeat or Shuffle box repeatedly until the desired option appears Repeat or shuffle play starts To close the play menu touch Play Menu The repeat options a...

Page 24: ...CD MP3 WMA AAC Track JPEG Image Xvid MPEG 4 Movie 1 The search item depends on the setting 2 Available only when playing a VCD without PBC functions Setting the search item DVD only You can set the search item title or chapter for DVD playback 1 Touch Source List then touch 2 Touch Visual The visual setting menu appears 3 Touch v V to scroll then touch DVD Direct Search to set to Chapter or Title ...

Page 25: ...connection Do not leave a USB device in a parked car as malfunction may result This unit cannot recognize USB devices via a USB hub Be sure to use the USB cable supplied with the device if a cable is needed when making a USB connection Notes on playback If a USB device contains multiple file types only the selected file type audio video image can be played For details on how to select the file typ...

Page 26: ...computer drag and drop tracks from Windows Explorer or iTunes etc to Content Transfer Both analysis and transfer of tracks will be performed by Content Transfer 4Connecting the USB device and enjoying the SensMe function on the unit Connect the set up USB device You can then enjoy SensMe channels or SensMe mood on this unit Installing SensMe Setup and Content Transfer on your computer The software...

Page 27: ...rred using Content Transfer For details refer to the Help of Content Transfer Playing tracks in channels SensMe channels SensMe channels automatically group tracks into channels by their tunes You can select and play a channel that fits your mood activity etc 1 Connect a USB device set up for the SensMe function 2 Touch Source List then SensMe 3 Touch channels The channel list appears 4 Touch v V ...

Page 28: ...e is from 240 240 to 960 960 pixels 2 May not be detected correctly Morning 5 00 9 59 Daytime 10 00 15 59 Evening 16 00 18 59 Night 19 00 23 59 Midnight 24 00 4 59 Plays tracks recommended for each time of day Set the clock page 15 for the channel to be displayed accurately Shuffle All Plays all analyzed tracks in random order Energetic High spirit tracks Relax Calm tracks Mellow Mellow melancholy...

Page 29: ...yed track is indicated as a green dot Tracks are played from the circle s center outward SensMe mood playback controls and indications A To display the control keys Source List ATT TA AF Top page 20 B To move the circle and regroup tracks C To change the size of the circle small medium or large D Indicates the album artwork display 1 E Indicates the playback status elapsed playback time zappin sta...

Page 30: ...ion is also available during iPod playback iPod Operations For details on the compatibility of your iPod see About iPod on page 56 or visit the support site on the back cover In these Operating Instructions iPod is used as a general reference for the iPod functions on the iPod and iPhone unless otherwise specified by the text or illustrations Playing an iPod 1 Reduce the volume on this unit 2 Remo...

Page 31: ...wing play modes For audio playback ALBUM TRACK GENRE PLAYLIST ARTIST MUSIC PODCAST For video playback MOVIE RENTAL TV SHOW MUSIC VIDEO VIDEO PLAYLIST VIDEO PODCAST May not appear depending on iPod setting 1 During playback touch 2 Touch MUSIC or VIDEO 3 Touch the desired play mode To start playback touch the desired item s in the list To scroll the list touch v V To skip items of the selected play...

Page 32: ...ile You can list up albums folders tracks images video files and select a desired one to play This function is convenient especially for the disc in MP3 WMA AAC JPEG Xvid MPEG 4 format or USB device containing many albums tracks etc 1 During playback touch The list of categories or files from the currently played item appears To move to the upper level touch To scroll the list line by line touch v...

Page 33: ...izing you need to perform pairing again 2Connecting After pairing is made connect this unit and the Bluetooth device Depending on the device connection is automatically made along with the pairing Do this To Draw a horizontal line left to right Radio reception seek forward stations The same as DVD VCD playback skip forward a chapter track The same as JPEG Xvid MPEG 4 audio playback skip forward a ...

Page 34: ... be called passcode PIN code PIN number password etc depending on the Bluetooth device 1 Select the Bluetooth source To select Bluetooth Phone press TOP then touch BT Phone in the top menu To select Bluetooth Audio touch Source List then BT Audio 2 Touch BT Menu In the case of Bluetooth Audio touch Play Menu then BT Menu The Bluetooth setting menu appears 3 Touch Pairing Pairing starts If the Blue...

Page 35: ...ignal of this unit and the cellular phone is turned on 2 Operate the cellular phone to connect to this unit flashes while the connection is being made then stays lit while connected Connecting to the cellular phone last connected from this unit 1 Make sure the Bluetooth signal of this unit and the cellular phone is turned on 2 Press TOP then touch BT Phone in the top menu flashes while the connect...

Page 36: ...nected cellular phone 1 Press TOP then touch BT Phone in the top menu The Bluetooth Phone display appears 2 Touch Call Menu then Phonebook Browsing The phonebook appears 3 Select the desired contact 1In the initial list touch the initial of the contact 2In the name list touch the name of the contact 3In the number list touch the phone number The contact confirmation display appears 4 Touch Call Th...

Page 37: ...unction on the cellular phone while it is connected to this unit Noises such as the engine running may interfere with sound recognition In order to improve recognition operate under conditions where noise is minimized Voice dial may not work depending on the recognition specification of the cellular phone For details visit the support site on the back cover To adjust the talker s voice volume Turn...

Page 38: ...o store from the phonebook 1 Press TOP then touch BT Phone in the top menu The Bluetooth Phone display appears 2 Touch Call Menu then Phonebook Browsing The phonebook appears 3 Select the contact to store in the preset dial 1In the initial list touch the initial of the contact 2In the name list touch the name of the contact 3In the number list touch the phone number The contact confirmation displa...

Page 39: ...Play Menu then BT Menu The Bluetooth setting menu appears 3 Touch the desired item in the list and configure the setting The items in the Bluetooth setting menu are as follows 1 Cannot be configured during a handsfree call 2 Depending on the cellular phone this unit s ringtone may be output even if set to Cellular Note For details on the setting of other Bluetooth devices refer to their respective...

Page 40: ... equalizer curve touch Reset 5 Touch OK The setting is complete To return to the previous display touch Back Tip Other equalizer types are also adjustable Adjusting the sound characteristics The sound balance between left and right speakers Balance and front and rear speakers Fader can be adjusted to your preference You can also adjust the volume level of the subwoofer if it is connected 1 During ...

Page 41: ...e setting is complete To cancel Intelligent Time Alignment select OFF To return to the previous display touch Back Calibrating the listening position Intelligent Time Alignment Tune You can precisely calibrate your listening position from each speaker so that the sound delay reaches the listener more correctly Before starting measure the distance between your listening position and each speaker 1 ...

Page 42: ...ows the rear speakers to work like a pair of subwoofers if one is not connected 1 During reception playback touch Source List then 2 Touch Sound The sound setting menu appears 3 Touch v V to scroll then touch RBE The options appear 4 Touch RBE1 RBE2 or RBE3 The setting is complete To return to the previous display touch Back Adjusting the speaker volume You can adjust the volume level of each conn...

Page 43: ...me selection display appears 4 Select the screen theme Touch Screen Theme then the desired type To return to the previous display touch Back Adjusting the picture Picture EQ You can adjust the picture to suit the interior brightness of the car The options are indicated below Dynamic Vivid picture with bright clear colors Standard Standard picture Theater Brightens the monitor suitable for darkly l...

Page 44: ...e options are indicated below 1 During video image playback touch Source List then 2 Touch Screen The screen setting menu appears 3 Touch Aspect The options appear 4 Touch the desired option To return to the previous display touch Back Notes This setting is available only when the parking brake is set The screen aspect ratio of the rear view camera cannot be changed ATT Back Picture EQ Custom Tune...

Page 45: ...n 1 While no source is selected touch Source List then For XAV 64BT only From the top menu touch The setting menu appears 2 Touch Screen The screen setting display appears 3 Touch Demo to set to ON or OFF The setting is complete To scroll the options only when required touch v V To return to the previous display touch Back General Sound Screen Visual 1 4 Language Clock Adjust Auto OFF Beep ZAPPIN ...

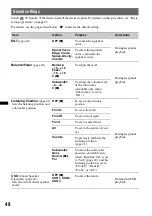
Page 46: ...IN Time page 30 6sec 15sec z 30sec To select the playback time for the ZAPPIN function During USB iPod audio playback Dimmer Changes the display brightness Auto z To dim the display automatically when you turn lights on Available only when the illumination control lead is connected Any status ON To dim the display Dimmer Level Sets the brightness level when the dimmer is activated 5 5 0 z To selec...

Page 47: ...d screen Video z To display the picture from the connected device Rotary Commander Changes the operative direction of rotary commander controls Default z To use in the factory set position Any status Reverse To use on the right side of the steering column Camera Input Activates the video input from the connected rear view camera OFF To deactivate the input Any status ON z To display the picture fr...

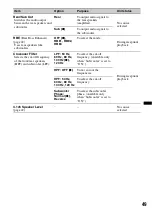
Page 48: ... To adjust the volume level of the subwoofer Available only when Subwoofer is set to ON Listening Position page 41 Sets the listening position and subwoofer position OFF z To not set the listening position Duringreception playback Front L To set to front left Front R To set to front right Front To set to center front All To set to the center of your car Custom To precisely calibrate the listening ...

Page 49: ...lect the mode Duringreception playback Crossover Filter Selects the cut off frequency of the front rear speakers HPF and subwoofer LPF LPF 50 Hz 60 Hz 80 Hz 100 Hz z 120 Hz To select the cut off frequency Available only when Subwoofer is set to ON Duringreception playback HPF OFF z To not cut out the frequencies HPF 50 Hz 60 Hz 80 Hz 100 Hz 120 Hz To select the cut off frequency Subwoofer Phase No...

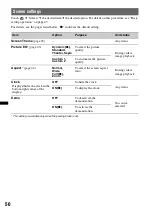
Page 50: ... Theme page 43 Any status Picture EQ page 43 Dynamic z Standard Theater Sepia To select the picture quality During video image playback Custom 1 Custom 2 To customize the picture quality Aspect page 44 Normal Wide Full z Zoom To select the screen aspect ratio During video image playback Clock Displays hides the clock in the bottom right corner of the display OFF To hide the clock Any status ON z T...

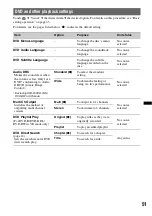
Page 51: ...lear when the volume is low Only for a DVD conforming to Audio DRC Dynamic Range Control Excluding DVD R DVD R DL DVD RW in VR mode Standard z To select the standard setting No source selected Wide To obtain the feeling of being at a live performance Multi Ch Output Switches the method of outputting multi channel sources Multi z To output in 4 1 channels No source selected Stereo To downmix to 2 c...

Page 52: ...n monitor 4 3 Pan Scan To display a wide picture on the entire screen and automatically cut off the portions that do not fit Multi Disc Resume OFF To not store the resume settings in memory Resume playback is available only for the current disc in the unit No source selected ON z To store the resume settings in memory for up to 5 video discs DVD VIDEO VCD Xvid MPEG 4 only USB Resume OFF To not sto...

Page 53: ...ype video or audio of each connected device the background screen can be switched accordingly 1 While no source is selected touch Source List then The general setting menu appears If not touch General 2 Touch v V to scroll then touch Front AUX Input or Rear AUX Input 3 Touch Audio or Video Audio is available for Front AUX Input or Rear AUX Input while Video is available only for Rear AUX Input The...

Page 54: ...ot operate properly To maintain high sound quality Do not splash liquid onto the unit or discs Notes on LCD panel Do not wet the LCD panel or expose it to liquids This may cause a malfunction Do not press on the LCD panel as doing so can distort the picture or cause a malfunction i e the picture may become unclear or the LCD panel may be damaged Do not touch other than with the finger as it may da...

Page 55: ...t Multi Session For DATA DVDs UDF Bridge format combined UDF and ISO 9660 Multi Border The maximum number of folders albums 256 including root and empty folders files tracks images videos and folders contained in a disc 2 000 if a folder file names contain many characters this number may become less than 2 000 displayable characters for a folder file name 64 Joliet Romeo Notes on finalizing discs ...

Page 56: ...rts Group is an image file compression format standard It compresses still images approximately 1 10 to 1 100 of original size When naming a JPEG file be sure to add the file extension jpg to the file name Note on JPEG Playback of progressive JPEG files is not supported About MPEG 4 files MPEG 4 files meeting the following requirements can be played Playback is not be guaranteed for all MPEG 4 fil...

Page 57: ...If this unit is used within 10 m of a wireless LAN device turn off the wireless LAN device Install this unit and Bluetooth device as near to each other as possible Microwaves emitting from a Bluetooth device may affect the operation of electronic medical devices Turn off this unit and other Bluetooth devices in the following locations as it may cause an accident where inflammable gas is present in...

Page 58: ...good contact Be sure to observe the correct polarity when installing the battery Do not hold the battery with metallic tweezers otherwise a short circuit may occur Fuse replacement When replacing the fuse be sure to use one matching the amperage rating stated on the original fuse If the fuse blows check the power connection and replace the fuse If the fuse blows again after replacement there may b...

Page 59: ...epending on factors such as obstacles between devices magnetic fields around a microwave oven static electricity reception sensitivity antenna s performance operating system software application etc 3 Bluetooth standard profiles indicate the purpose of Bluetooth communication between devices Power amplifier section Outputs Speaker outputs Speaker impedance 4 8 ohms Maximum power output 52 W 4 at 4...

Page 60: ...General No power is being supplied to the unit Check the connection or fuse If the unit is turned off and the display disappears it cannot be operated with the remote commander tTurn on the unit The power antenna aerial does not extend The power antenna aerial does not have a relay box There is no beep sound The beep sound is canceled page 46 An optional power amplifier is connected and you are no...

Page 61: ... the connection to the connected equipment and set the input selector of the equipment to the source corresponding to this unit The disc is defective or dirty Installation is not correct tInstall the unit at an angle of less than 45 in a sturdy part of the car The parking cord light green is not connected to the parking brake switch cord or the parking brake is not applied The picture does not fit...

Page 62: ...not recognize USB devices via a USB hub Items cannot be played Reconnect the USB device The USB device takes longer to play The USB device contains large sized files or files with a complicated tree structure A beep sounds During playback the USB device has been disconnected tBefore disconnecting a USB device make sure to stop playback first for data protection The sound is intermittent The sound ...

Page 63: ...ey 0000 The Bluetooth function cannot be operated Exit the source by pressing and holding SOURCE OFF for 1 second then turn on the unit No sound is output from the car speakers during a handsfree call If the sound is output from the cellular phone set the cellular phone to output the sound from the car speakers Cannot read The unit cannot read the data due to some problem The data is damaged or co...

Page 64: ...t be operated due to a problem tPress the reset button page 15 SensMe data Reading The unit is reading all data for the SensMe function in the connected USB device tWait until reading is complete Depending on the amount of data etc it may take time The connected USB device is not supported For details on the compatibility of your USB device visit the support site on the back cover The SensMe data ...

Page 65: ...avanese 1287 Georgian 1297 Kazakh 1298 Greenlandic 1299 Cambodian 1300 Kannada 1301 Korean 1305 Kashmiri 1307 Kurdish 1311 Kirghiz 1313 Latin 1326 Lingala 1327 Laothian 1332 Lithuanian 1334 Latvian Lettish 1345 Malagasy 1347 Maori 1349 Macedonian 1350 Malayalam 1352 Mongolian 1353 Moldavian 1356 Marathi 1357 Malay 1358 Maltese 1363 Burmese 1365 Nauru 1369 Nepali 1376 Dutch 1379 Norwegian 1393 Occi...

Page 66: ...til aplicable en la Unión Europea y en países europeos con sistemas de tratamiento selectivo de residuos Este símbolo en el equipo o en su embalaje indica que el presente producto no puede ser tratado como residuos doméstico normal Debe entregarse en el correspondiente punto de recogida de equipos eléctricos y electrónicos Al asegurarse de que este producto se desecha correctamente usted ayuda a p...

Page 67: ...ucto El apartado siguiente hace referencia únicamente al modelo XAV 64BT La placa de características que indica el voltaje de funcionamiento etc está situada en la parte inferior del chasis Por medio de la presente Sony Corp declara que el XAV 64BT cumple con los requisitos esenciales y cualesquiera otras disposiciones aplicables o exigibles de la Directiva 1999 5 CE Para mayor información por fav...

Page 68: ...iones de reproducción 22 Uso de las funciones PBC control de reproducción 22 Configuración de los ajustes de audio 23 Cambio del idioma formato de audio 23 Cambio del canal de audio 23 Ajuste del nivel de salida de audio Nivel de Dolby D 23 Reproducción aleatoria y repetición 24 Reproducción de búsqueda directa 25 Operaciones con el dispositivo USB Reproducción desde un dispositivo USB 25 Reproduc...

Page 69: ...har un dispositivo Bluetooth a través de esta unidad 40 Funcionamiento del dispositivo Bluetooth con esta unidad 40 Ajustes de Bluetooth 41 Ajuste del sonido Selección de la calidad de sonido EQ7 42 Personalización de la curva de ecualizador Sintonía EQ7 42 Ajuste de las características del sonido 42 Optimización del sonido para la posición de escucha Alineamiento inteligente de tiempo 43 Calibrac...

Page 70: ...cional Precauciones 57 Notas sobre el panel LCD 57 Notas sobre los discos 57 Orden de reproducción de los archivos MP3 WMA AAC JPEG Xvid MPEG 4 58 Acerca de los archivos MP3 58 Acerca de los archivos WMA 58 Acerca de los archivos AAC 59 Acerca de los archivos JPEG 59 Acerca de los archivos MPEG 4 59 Acerca de iPod 59 Acerca de la función Bluetooth 59 Mantenimiento 61 Extracción de la unidad 61 Esp...

Page 71: ...tamente compruebe las conexiones en primer lugar para ello consulte la guía Instalación Conexiones suministrada Si todo está en orden compruebe el fusible Proteja la superficie de la unidad de posibles daños No exponga la superficie de la unidad a productos químicos como insecticidas lacas repelentes de insectos etc No deje materiales de goma o plástico en contacto con la unidad durante mucho tiem...

Page 72: ...úsica y los vídeos de Gracenote Inc copyright 2000 son propiedad ahora de Gracenote Los derechos de autor de Gracenote Software copyright 2000 son propiedad ahora de Gracenote Una o varias patentes propiedad de Gracenote son aplicables a este producto y servicio Consulte el sitio web de Gracenote para acceder a una lista no exhaustiva de las patentes de Gracenote aplicables Gracenote CDDB MusicID ...

Page 73: ... los automóviles como sistemas de inyección electrónica de combustible sistemas de freno electrónico antideslizante antibloqueo sistemas de control electrónico de la velocidad o sistemas de bolsas de aire Para obtener información sobre la instalación o servicio de este dispositivo consulte con el fabricante o con el representante de su automóvil Una instalación o servicio defectuosos podría ser pe...

Page 74: ...s disponibles varían en función del formato independientemente del tipo de disco Los siguientes símbolos de formato aparecen en este Manual de instrucciones junto a la descripción de las funciones disponibles con los tipos de archivo correspondientes Sugerencia Para obtener más información sobre los formatos de compresión consulte la página 58 Nota Es posible que incluso los discos compatibles no ...

Page 75: ...nú superior Para el modelo XAV 63 Presione este botón para abrir la lista de fuentes F Terminal AUX frontal página 55 G Terminal USB Extraiga la tapa para conectar un dispositivo USB H Rueda de control del volumen I Botón SOURCE OFF Presione para encender cambiar la fuente Sintonizador radio Disco iPod USB AUX equipo auxiliar Audio BT audio Bluetooth Mantenga el botón pulsado durante 1 segundo par...

Page 76: ...volver a encenderlos toque cualquier parte de la pantalla H Tecla Fuente AV 2 Toque para abrir la lista de fuentes I Tecla Teléfono BT 2 Toque para entrar en el modo Teléfono Bluetooth J Teclas de selección de fuentes Toque para cambiar la fuente Sintonizador radio Disco AUX equipo auxiliar iPod USB SensMe Audio BT audio Bluetooth 2 K Tecla Arriba tecla M OFF Esta tecla cambia según el modelo XAV ...

Page 77: ... encenderlos vuelva a pulsar el botón C Botón POSITION Pulse este botón para cambiar la posición de escucha Delant I Delant D Delant Todo Personaliz DESACT D Botón O Volver Pulse este botón para volver a la pantalla anterior o volver al menú de un VCD 1 E Botón EQ Ecualizador Puede seleccionar una curva de ecualizador entre 7 tipos de música Xplod Vocal Vanguar Vuelo Espacial Gravedad Personal DES...

Page 78: ...isión TOP MENU Pulse este botón para abrir el menú superior de un DVD MENU Pulse este botón para abrir el menú de un disco L Botón ZAP Pulse este botón para acceder al modo ZAPPIN M Botones M m Cursor ENTER página 20 Pulse estos botones para controlar el menú de un DVD N Botón SRC Fuente Presione para encender cambiar la fuente Sintonizador radio Disco iPod USB AUX equipo auxiliar Audio BT audio B...

Page 79: ...talla Tóquelo varias veces hasta que aparezca el idioma deseado Inglés Español Ruso 4 Toque OK El ajuste se ha guardado Este ajuste se puede configurar más adelante y con más precisión en el menú de ajustes Para obtener información detallada sobre el ajuste del estado de la conexión del altavoz de subgraves consulte la página 51 Para obtener información detallada sobre el ajuste de la posición de ...

Page 80: ...parecen toque la pantalla ATT Lista fuentes Banda Menú re cepción Lista presint Lista PTY TA AF Arriba P1 P2 P3 BTM Memoria P4 P5 P6 ATT Banda FM1 Menú re cepción Lista presint FM2 FM3 LW Lista PTY TA AF Arriba MW Lista fuentes 1 Lista fuentes Toque esta tecla para abrir la lista de fuentes página 12 2 ATT Toque esta tecla para atenuar el sonido Para cancelar esta función vuelva a tocar la tecla 3...

Page 81: ...meras emisoras disponibles en la lista de emisoras presintonizadas P1 P6 La unidad emite un pitido al almacenar el ajuste Almacenamiento manual 1 Mientras recibe la emisora que desea almacenar toque Lista presint 2 Toque Memoria y a continuación toque un número de la lista P1 P6 Aparecerá el número y la pantalla de confirmación 3 Toque Sí La emisora quedará almacenada Nota Si intenta almacenar otr...

Page 82: ...l mismo ajuste AF TA Es posible almacenar ambos tipos de emisoras manualmente tanto si son RDS como si no con el ajuste AF TA que corresponda 1 Ajuste AF TA y a continuación almacene la emisora con BTM o manualmente Recepción de anuncios de emergencia Con las funciones AF o TA activadas los anuncios de emergencia interrumpirán automáticamente la fuente seleccionada en ese momento Sugerencia Si aju...

Page 83: ...e v V 2 Toque el tipo de programa deseado La unidad busca emisoras que ofrezcan el tipo de programa seleccionado Para cerrar la lista PTY toque Lista PTY Tipos de programas Notas No es posible utilizar esta función en países y regiones en los que no estén disponibles los datos PTY Es posible que reciba un programa de radio diferente del seleccionado Ajuste de CT 1 Ajuste CT en ACTIV al configurar ...

Page 84: ...ítulos Si reproduce un DVD que contiene varios títulos puede seleccionar el título que desee mediante el menú superior del DVD En los DVD que permiten seleccionar opciones como por ejemplo el idioma de los subtítulos o del sonido seleccione estos elementos mediante el menú DVD Si el disco contiene archivos JPEG La presentación de diapositivas se inicia automáticamente Para detener la reproducción ...

Page 85: ...en una pista de audio Durante una pausa manténgala pulsada para reproducir el vídeo a cámara lenta Para cancelar esta función suelte la tecla 5 u Toque esta tecla para poner en pausa o reanudar la reproducción tras la pausa ATT Álbum Arriba Lista fuentes 9 Menú reprod q TA AF MPEG 4 6 Menú reprod Toque esta tecla para abrir el menú de reproducción que incluye las siguientes opciones Repetir Aleato...

Page 86: ...guna indicación 5 Solo DVD 6 El tamaño recomendado es de 240 240 a 960 960 píxeles 7 Solamente MP3 WMA AAC Uso de las funciones PBC control de reproducción El menú PBC ayuda interactivamente a realizar las operaciones mientras se reproduce un VCD compatible con PBC 1 Active la reproducción de un VCD compatible con PBC Aparece el menú PBC 2 Toque Panel PBC Aparece el panel de control del menú 3 Toq...

Page 87: ...zquierdo a través de los altavoces derecho e izquierdo Las opciones se indican a continuación Estéreo sonido estéreo estándar predeterminado 1 Izquierda sonido del canal izquierdo monoaural 2 Derecha sonido del canal derecho monoaural 1 Durante la reproducción toque Menú reprod y a continuación Audio varias veces hasta que aparezca el canal de audio deseado Para cerrar el menú de reproducción toqu...

Page 88: ...tulo actual 1 DESACT vuelve al modo de reproducción normal Pista repite la pista actual DESACT vuelve al modo de reproducción normal Pista repite la pista actual Álbum repite el álbum actual carpeta DESACT vuelve al modo de reproducción normal Imagen repite la imagen actual Álbum repite el álbum actual MPEG 4 ATT Arriba Menú reprod Control DVD Lista fuentes Capítulo DESACT ACTIVAR Repetir Aleatori...

Page 89: ... estándar USB Los códecs compatibles son MP3 mp3 WMA wma AAC m4a JPEG jpg Xvid avi y MPEG 4 mp4 Es recomendable realizar una copia de seguridad de los datos en un dispositivo USB Para obtener información detallada sobre la compatibilidad de su dispositivo USB visite el sitio web de soporte técnico Notas Conecte el dispositivo USB después de poner en marcha el motor En función del dispositivo USB e...

Page 90: ... bits variable es posible que el tiempo de reproducción transcurrido no coincida con la realidad No se garantiza la reproducción de archivos de compresión sin pérdidas Reproducción aleatoria y repetición 1 Durante la reproducción toque Menú reprod y a continuación la casilla Repetir o Aleatoria varias veces hasta que aparezca la opción deseada Se inicia la reproducción aleatoria o la repetición La...

Page 91: ...ctivar la función SensMe en la unidad Si no se lleva a cabo el registro junto con el procedimiento de instalación siga los siguientes pasos 1 Ejecute SensMe Setup en el ordenador 2 Conecte un dispositivo USB al ordenador 3 Siga las instrucciones en pantalla para completar el registro Sugerencia Si conecta un dispositivo USB registrado que contenga pistas analizadas el dispositivo USB puede volver ...

Page 92: ...en orden aleatorio El orden variará con cada selección de canal Lista de canales x Recomendado Mezclar todo x Canales básicos Reproduce las pistas según el tipo de música x Canales para conducir Reproduce las pistas más adecuadas durante la conducción Mezclar todo Relajante Enérgica ZAP Mañana 5 00 9 59 Día 10 00 15 59 Tarde 16 00 18 59 Noche 19 00 23 59 Medianoche 24 00 4 59 Reproduce las pistas ...

Page 93: ...parece un círculo alrededor del punto que ha tocado y se reproducen las pistas que hay en el interior del círculo 1 Conecte un dispositivo USB configurado para la función SensMe 2 Toque Lista fuentes y a continuación SensMe 3 Toque ánimo Aparecen los dos ejes del mapa de ánimo 4 Toque el punto del mapa que desee Aparece un círculo alrededor del punto que ha tocado y se inicia la reproducción de la...

Page 94: ...USB en secuencia puede buscar la pista que desee escuchar Esta función es muy práctica por ejemplo cuando se busca una pista en modo aleatorio o repetir aleatorio 1 Durante la reproducción de audio toque ZAP La reproducción se inicia desde un pasaje de la pista siguiente Puede seleccionar el tiempo de reproducción página 48 pero no puede seleccionar el pasaje de la pista que va a reproducirse 2 To...

Page 95: ...rolar la reproducción del iPod del mismo modo que la reproducción de discos Para obtener información detallada consulte Controles de reproducción en la página 20 Para obtener información detallada sobre las indicaciones de reproducción consulte Indicaciones de reproducción en la página 22 Para detener la reproducción Mantenga pulsado SOURCE OFF durante 1 segundo Para desconectar el iPod Detenga la...

Page 96: ...ACTIVAR Desactivación de aplicación de control de pasajero Toque la casilla Control de APP para Pasajeros para ajustarla en DESACT El modo de reproducción cambia a modo de reanudación Para cerrar el menú de reproducción toque Menú reprod Notas La imagen y el vídeo de la app solo aparecen en esta unidad con el freno de estacionamiento accionado La app y el vídeo solo pueden controlarse desde el iPh...

Page 97: ...chivo seleccionado audio vídeo imagen El orden de prioridad de reproducción de tipos de archivo inicialmente se ajusta en audio vídeo y a continuación en imagen por ejemplo si el disco contiene archivos de vídeo y archivos de imagen solamente se reproducen archivos de vídeo Puede seleccionar el tipo de archivo para realizar una lista y a continuación seleccionar el archivo que desee para reproduci...

Page 98: ...sitivo Bluetooth Dependiendo del dispositivo la conexión se realiza en forma automática junto con el emparejamiento Haga esto Para Trazar una línea horizontal de derecha a izquierda Recepción de radio búsqueda de emisoras hacia atrás Funciona igual que Reproducción de DVD VCD salta un capítulo pista hacia atrás Funciona igual que Reproducción de JPEG Xvid MPEG 4 audio salta un archivo pista hacia ...

Page 99: ...manual del dispositivo Bluetooth 1 Si elimina el registro del dispositivo de esta unidad al inicializar debe realizar el emparejamiento nuevamente 2 La clave se puede llamar código de acceso Código PIN Número PIN contraseña etc dependiendo del dispositivo Bluetooth 1 Seleccione la fuente de Bluetooth Para seleccionar el Teléfono Bluetooth presione TOP y a continuación toque Teléfono BT en el menú ...

Page 100: ...ta unidad no puede conectarse a un dispositivo que sólo admite HSP Head Set Profile Conexión Cuando el encendido está activado con la señal de Bluetooth activada esta unidad busca el último dispositivo Bluetooth conectado y la conexión se realiza de forma automática dentro de lo posible En este capítulo se explica cómo conectarse manualmente a los dispositivos Bluetooth registrados Antes de comenz...

Page 101: ...sted puede conectar un teléfono móvil para emisión de audio si el dispositivo es compatible con A2DP Advanced Audio Distribution Profile Para desconectarlo 1 Presione TOP después toque Teléfono BT o toque Lista fuentes luego Audio BT 2 Toque Menú BT 3 Toque Señal luego Sí en la pantalla de confirmación para apagar la señal Para eliminar todos los registros 1 Presione TOP después toque Teléfono BT ...

Page 102: ...nsulte Marcación predefinida en la página 40 1 Presione TOP y a continuación toque Teléfono BT en el menú superior Aparece la pantalla de Teléfono Bluetooth 2 Toque el número deseado en la lista de P1 a P6 Aparece la pantalla de confirmación de contacto 3 Toque Llamar La llamada se realiza y la pantalla de llamada aparece hasta que la otra persona contesta Mediante la función de marcación por voz ...

Page 103: ...encias Puede ajustar para contestar automáticamente una llamada página 41 Puede ajustar para usar el tono de llamada del teléfono móvil o de esta unidad página 41 Operaciones durante una llamada La siguiente pantalla aparece durante una llamada Para ajustar el volumen de la voz de la persona que habla Gire el selector de control del volumen durante una llamada El nivel de volumen de la voz de la p...

Page 104: ...e P1 a P6 El contacto se almacena en el número predefinido seleccionado Para cambiar el registro de la marcación predefinida Siga el procedimiento anterior y sobrescriba una marcación predefinida registrada Transmisión de audio Escuchar un dispositivo Bluetooth a través de esta unidad Si el otro dispositivo admite A2DP Advanced Audio Distribution Profile puede escuchar el sonido de la reproducción...

Page 105: ...mada de esta unidad podría entregarse incluso si se ajusta en Celular Nota Para obtener más información sobre el ajuste de los otros dispositivos Bluetooth consulte sus manuales respectivos Señal 1 Activa la señal de Bluetooth ACTIV DESAC Conectar 1 Enciende o apaga el modo de emparejamiento y memoriza la información entre esta unidad y el dispositivo Bluetooth Resp automática 1 Contesta automátic...

Page 106: ...ábrica toque Restablecer 5 Toque OK El ajuste se ha guardado Para volver a la pantalla anterior toque Atrás Sugerencia También es posible ajustar otros tipos de ecualizador Ajuste de las características del sonido El balance de sonido entre los altavoces izquierdo y derecho Balance y entre los altavoces frontal y posterior Equilibrio se puede ajustar de acuerdo con sus preferencias Asimismo puede ...

Page 107: ...á configurar la posición del altavoz de subgraves Toque Cerca Normal o Lejos El ajuste se ha guardado Para cancelar Alineamiento inteligente de tiempo seleccione DESACT Para volver a la pantalla anterior toque Atrás Calibración de la posición de escucha Ajuste de Alineamiento inteligente de tiempo Puede calibrar con precisión la posición de escucha desde cada altavoz para que el retraso del sonido...

Page 108: ...res Con esta función los altavoces posteriores actuarán como si fueran altavoces de subgraves en caso de que no haya ninguno conectado 1 Durante la recepción reproducción toque Lista fuentes y a continuación 2 Toque Sonido Aparece el menú de ajustes de sonido 3 Toque v V para desplazarse por el menú y a continuación toque RBE Aparecen las opciones 4 Toque RBE1 RBE2 o RBE3 El ajuste se ha guardado ...

Page 109: ...n de temas de pantalla 4 Seleccione el tema de pantalla Toque Tema pantalla y a continuación el tipo que desee Para volver a la pantalla anterior toque Atrás Ajuste de la imagen Picture EQ Puede ajustar la imagen para que se adapte lo mejor posible al brillo del interior de su vehículo Las opciones se indican a continuación Dinámica imagen viva con colores nítidos y brillantes Estándar imagen está...

Page 110: ...indican a continuación 1 Durante la reproducción de vídeo imagen toque Lista fuentes y a continuación 2 Toque Pantalla Aparece el menú de ajustes de pantalla 3 Toque Aspecto Aparecen las opciones 4 Toque la opción que desee Para volver a la pantalla anterior toque Atrás Notas Este ajuste sólo está disponible si el freno de mano está echado La relación de aspecto de la pantalla de la cámara de visu...

Page 111: ...uentes y a continuación Sólo para el modelo XAV 64BT En el menú superior toque Aparece el menú de ajustes 2 Toque Pantalla Aparece la pantalla de ajustes de pantalla 3 Toque Demostración para ajustarla en ACTIV o DESAC El ajuste se ha guardado Para desplazarse por las opciones solamente cuando sea necesario toque v V Para volver a la pantalla anterior toque Atrás General Sonido Pantalla Visual 1 4...

Page 112: ...do DESAC Desactivar el sonido de funcionamiento Cualquier estado ACTIV z Activar el sonido de funcionamiento Tiempo para ZAPPIN página 30 6 segundos 15 segundos z 30 segundos Seleccionar el tiempo de reproducción para la función ZAPPIN Durante la reproducción de audio USB iPod Atenuador Cambia el brillo de la pantalla Auto z Atenuar la pantalla automáticamente cuando las luces se encienden Solamen...

Page 113: ...fuente seleccionada Audio Mostrar la pantalla de fondo de esta unidad Video z Mostrar la imagen del dispositivo conectado Control giratorio Cambia la dirección de funcionamiento de los controles del control giratorio Predet z Utilizarlo en la posición configurada de fábrica Cualquier estado Reversa Utilizarlo en la parte derecha de la columna de dirección Entrada de la cámara Activa la entrada de ...

Page 114: ...vel Durante la recepción reproducción Altav grav 6 6 0 z Ajustar el nivel de volumen del altavoz de subgraves Solamente está disponible cuando Altavoz subgraves está ajustado en ACTIV Posición escuchar página 43 Ajusta la posición de escucha y la posición del altavoz de subgraves DESACT z No ajustar la posición de escucha Durante la recepción reproducción Delant I Ajustarla en frontal izquierda De...

Page 115: ...os altavoces posteriores como un altavoz de subgraves DESACT z RBE1 RBE2 RBE3 Seleccionar el modo Durante la recepción reproducción Filtro de cruce Selecciona la frecuencia de corte de los altavoces frontales posteriores HPF y del altavoz de subgraves LPF LPF 50 Hz 60 Hz 80 Hz 100 Hz z 120 Hz Seleccionar la frecuencia de corte Solamente está disponible cuando Altavoz subgraves está ajustado en ACT...

Page 116: ...pantalla página 45 Cualquier estado Picture EQ página 45 Dinámica z Estándar Teatro Sepia Seleccionar la calidad de imagen Durante la reproducción de vídeo imagen Personalizada1 Personalizada 2 Personalizar la calidad de imagen Aspecto página 46 Normal Ancho Completa z Zoom Seleccionar la relación de aspecto de la pantalla Durante la reproducción de vídeo imagen Reloj Muestra oculta el reloj en la...

Page 117: ...nsigue un sonido claro cuando el volumen es bajo Solamente para los DVD con DRC de audio Control de rango dinámico Excepto DVD R DVD R DL DVD RW en modo VR Estándar z Seleccionar el ajuste estándar Ninguna fuente seleccionada Ancha Tener la sensación de estar en una representación en directo Salida múltip canales Cambia el método de emitir las fuentes de canales múltiples Multi z Emitir en 4 1 can...

Page 118: ...ámica en toda la pantalla y automáticamente cortar las porciones que no encajen Reanud disco múltiple DESAC No almacenar los ajustes de reanudación en la memoria La función de reanudar la reproducción solamente está disponible para el disco de la unidad actual Ninguna fuente seleccionada ACTIV z Almacenar los ajustes de reanudación en la memoria con capacidad de hasta 5 discos de vídeo Solamente D...

Page 119: ...ede cambiar adecuadamente 1 Sin ninguna fuente seleccionada toque Lista fuentes y a continuación Aparece el menú de ajustes general De lo contrario toque General 2 Toque v V para desplazarse y después toque Entrada AUX Frontal o Entrada AUX Posterior 3 Toque Audio o Video La opción Audio está disponible con Entrada AUX Frontal y Entrada AUX Posterior mientras que Video solo está disponible con Ent...

Page 120: ...alización de las líneas del marcador Toque Marcador Vuelva a tocar Marcador para ocultar las líneas del marcador Inversión de la imagen Toque Espejo Aparece una imagen reversa de espejo Edición de líneas 1 Toque Ed línea 2 Seleccione la línea que desee editar Toque Edición 1 Edición 2 o Edición 3 en función de la línea que desee editar 3 Edite la línea Para aumentar la longitud toque B b Para redu...

Page 121: ...D se fabrica con precisión con más del 99 99 de sus segmentos operativos No obstante es posible que un pequeño porcentaje habitualmente el 0 01 de segmentos no se pueda iluminar correctamente Sin embargo esto no interferirá en la visualización Notas sobre los discos No exponga los discos a la luz directa del sol ni a fuentes de calor como por ejemplo conductos de aire caliente ni los deje en un ve...

Page 122: ...amente se reproduce el CD DA de la primera sesión aunque otras sesiones se haya grabado otro tipo de formato por ejemplo MP3 Cuando el CD DA se ha grabado en una sesión diferente a la primera La unidad reconoce el disco como DATA CD o DATA DVD y se omiten todas las sesiones CD DA Cuando se graba un MP3 WMA AAC JPEG Xvid MPEG 4 Solamente se reproducen las sesiones que contienen el tipo de archivo s...

Page 123: ...s de utilizarlos Made for iPod touch 4ª generación iPod touch 3ª generación iPod touch 2ª generación iPod classic iPod nano 6ª generación iPod nano 5ª generación iPod nano 4ª generación iPod nano 3ª generación iPod nano 2ª generación iPod nano 1ª generación iPhone 4S iPhone 4 iPhone 3GS iPhone 3G Control de APP para Pasajeros no está disponible en el iPod nano 1a generación Made for iPod y Made fo...

Page 124: ...es inflamables presentes en hospitales trenes aviones o gasolineras cerca de puertas automáticas o de una alarma de incendio Esta unidad admite capacidades de seguridad que cumplen con el estándar Bluetooth para proporcionar una conexión segura cuando se utiliza la tecnología inalámbrica Bluetooth pero la seguridad podría no ser suficiente según el ajuste Esté atento cuando se comunique utilizando...

Page 125: ...No coja la pila con pinzas metálicas ya que podría producirse un cortocircuito Cambio del fusible Al cambiar el fusible asegúrese de utilizar uno con el mismo amperaje indicado en el fusible original Si se funde el fusible compruebe la conexión de la alimentación y cambie el fusible Si el fusible se vuelve a fundir después de cambiarlo es posible que haya un problema interno En este caso póngase e...

Page 126: ...spositivos campos magnéticos alrededor de un horno microondas electricidad estática sensibilidad de recepción rendimiento de la antena sistema operativo aplicación de software etc 3 Los perfiles del estándar Bluetooth indican el objetivo de la comunicación Bluetooth entre dispositivos Sección del amplificador de potencia Salidas salidas de altavoz Impedancia de altavoz 4 8 ohmios Salida máxima de ...

Page 127: ... surjan con la unidad Antes de consultar la siguiente lista de comprobación verifique los procedimientos de conexión y de funcionamiento Si el problema no se resuelve visite el sitio web de soporte técnico que aparece en la contraportada ALL General La unidad no recibe alimentación Compruebe la conexión o el fusible Si la unidad está apagada y la pantalla desaparece no se puede utilizar con el man...

Page 128: ... TA página 18 No se reciben anuncios de tráfico Active TA página 18 La emisora no emite información de tráfico a pesar de ser TP tSintonice otra emisora PTY muestra None La emisora actual no es RDS No se reciben datos RDS La emisora no especifica el tipo de programa Parpadea el nombre del servicio del programa No hay frecuencia alternativa para la emisora actual tToque mientras el nombre del servi...

Page 129: ...Xvid MPEG 4 no se reproducen La grabación no se ha realizado de acuerdo con las normas ISO 9660 de nivel 1 o nivel 2 en el formato de expansión Joliet o Romeo DATA CD o el formato de Puente UDF DATA DVD página 58 La extensión del archivo no es correcta página 58 Los archivos no están almacenados en formato MP3 WMA AAC JPEG Xvid MPEG 4 Si el disco contiene varios tipos de archivo solamente se puede...

Page 130: ...a ventana si el camino es ruidoso tBaje el aire acondicionado si está alto La calidad de sonido del teléfono es mala La calidad del sonido del teléfono depende de las condiciones de recepción del teléfono móvil tSi la recepción no es buena mueva el automóvil a un lugar donde pueda mejorar la señal del teléfono móvil El volumen del dispositivo Bluetooth conectado es bajo o alto El nivel de volumen ...

Page 131: ...no móvil página 36 Los concentradores no son compatibles Los concentradores USB no son compatibles con esta unidad Local Seek Local Seek El modo de búsqueda local está activado durante la sintonización automática No AF No hay frecuencia alternativa para la emisora actual No hay datos reproducibles El disco no contiene datos reproducibles No hay datos de SensMe en el dispositivo El dispositivo USB ...

Page 132: ... Durante la reproducción se ha desconectado un dispositivo USB o un cable USB tAsegúrese de conectar el dispositivo USB y el cable USB Lectura USB La unidad está leyendo toda la información de archivos y álbumes carpetas del dispositivo USB que está conectado tEspere hasta que finalice la lectura y se inicie la reproducción automáticamente En función de la estructura esta operación puede tardar al...

Page 133: ...9 Yiddish 1283 Javanese 1287 Georgian 1297 Kazakh 1298 Greenlandic 1299 Cambodian 1300 Kannada 1301 Korean 1305 Kashmiri 1307 Kurdish 1311 Kirghiz 1313 Latin 1326 Lingala 1327 Laothian 1332 Lithuanian 1334 Latvian Lettish 1345 Malagasy 1347 Maori 1349 Macedonian 1350 Malayalam 1352 Mongolian 1353 Moldavian 1356 Marathi 1357 Malay 1358 Maltese 1363 Burmese 1365 Nauru 1369 Nepali 1376 Dutch 1379 Nor...

Page 134: ... paesi europei con sistema di raccolta differenziata Questo simbolo sul prodotto o sulla confezione indica che il prodotto non deve essere considerato come un normale rifiuto domestico ma deve invece essere consegnato ad un punto di raccolta appropriato per il riciclo di apparecchi elettrici ed elettronici Assicurandovi che questo prodotto sia smaltito correttamente voi contribuirete a prevenire p...

Page 135: ... tensione di esercizio e informazioni simili è situata sulla parte inferiore del telaio Con la presente Sony Corp dichiara che questo XAV 64BT è conforme ai requisiti essenziali ed alle altre disposizioni pertinenti stabilite dalla direttiva 1999 5 CE Per ulteriori dettagli si prega di consultare il seguente URL http www compliance sony de Italia L uso della rete RLAN è regolato relativamente all ...

Page 136: ... dischi 20 Comandi di riproduzione 20 Indicazioni di riproduzione 22 Uso delle funzioni PBC controllo della riproduzione 22 Configurazione delle impostazioni audio 23 Modifica della lingua del formato audio 23 Modifica del canale audio 23 Regolazione del livello di uscita audio Livello Dolby D 23 Riproduzione ripetuta e in ordine casuale 24 Riproduzione con ricerca diretta 25 Funzionamento dei dis...

Page 137: ...ne dei dati delle chiamate 40 Numeri preselezionati 40 Streaming audio 41 Ascolto di un dispositivo Bluetooth tramite l apparecchio 41 Uso di un dispositivo Bluetooth tramite l apparecchio 41 Impostazioni Bluetooth 41 Regolazione dell audio Selezione della qualità audio EQ7 42 Personalizzazione della curva dell equalizzatore EQ7 Tune 42 Regolazione delle caratteristiche dell audio 43 Ottimizzazion...

Page 138: ...azioni aggiuntive Precauzioni 60 Note sul pannello LCD 60 Note sui dischi 60 Ordine di riproduzione dei file MP3 WMA AAC JPEG Xvid MPEG 4 61 Informazioni sui file MP3 61 Informazioni sui file WMA 62 Informazioni sui file AAC 62 Informazioni sui file JPEG 62 Informazioni sui file MPEG 4 62 Informazioni su iPod 62 Informazioni sulla funzione Bluetooth 63 Manutenzione 64 Rimozione dell apparecchio 64...

Page 139: ...o Se l apparecchio non funziona correttamente controllare innanzitutto i collegamenti facendo riferimento alla guida Installazione Collegamenti in dotazione Se questi sono corretti controllare il fusibile Proteggere la superficie dell apparecchio da eventuali danni Non esporre la superficie dell apparecchio a sostanze chimiche quali insetticidi spray per capelli repellenti per insetti e così via N...

Page 140: ...lteriori informazioni visitare il sito www gracenote com CD DVD Blu ray Disc e dati relativi a musica e video di Gracenote Inc copyright 2000 ad oggi Gracenote Gracenote Software copyright 2000 ad oggi Gracenote Uno o più brevetti di proprietà di Gracenote si applicano al presente prodotto e relativo servizio Per un elenco indicativo dei brevetti Gracenote applicabili fare riferimento al sito Web ...

Page 141: ...o non adeguato quali ad esempio sistemi a iniezione diretta elettronici sistemi ABS antisbandamento antiblocco elettronici sistemi di controllo della velocità elettronici o sistemi con airbag Per informazioni sull installazione o l assistenza del presente dispositivo consultare il produttore o la concessionaria dell automobile in questione L installazione o interventi di manutenzione errati potreb...

Page 142: ...disponibili variano in base al formato indipendentemente dal tipo di disco Nelle presenti Istruzioni per l uso i simboli del formato indicati di seguito sono riportati accanto alla descrizione delle funzioni disponibili per i corrispondenti tipi di file Suggerimento Per ulteriori informazioni sui formati di compressione vedere a pagina 61 Nota Anche se compatibili a seconda delle condizioni di reg...

Page 143: ...ale Per XAV 63 Premere per accedere all elenco delle sorgenti F Terminale AUX anteriore pagina 58 G Terminale USB Rimuovere il cappuccio per collegare un dispositivo USB H Manopola di controllo del volume I Tasto SOURCE OFF Premere per attivare l alimentazione cambiare la sorgente Tuner radio Disc iPod USB AUX apparecchio ausiliario BT Audio audio Bluetooth Tenere premuto per 1 secondo per uscire ...

Page 144: ...alsiasi del display H Pulsante AV Source 2 Toccare per accedere all elenco delle sorgenti I Pulsante BT Phone 2 Toccare per attivare il modo telefono Bluetooth J Pulsanti di selezione della sorgente Toccare per cambiare la sorgente Tuner radio Disc AUX apparecchio ausiliario iPod USB SensMe BT Audio audio Bluetooth 2 K Pulsante Top pulsante M OFF Questo pulsante varia a seconda del modello XAV 64B...

Page 145: ...azione dei tasti Per attivare di nuovo premere nuovamente C Tasto POSITION Premere per modificare la posizione di ascolto Front L Front R Front All Custom OFF D Tasto O indietro Premere per tornare alla schermata precedente al menu di un VCD 1 E Tasto EQ equalizzatore Premere per selezionare una curva dell equalizzatore tra 7 tipi di musica Xplod Vocal Edge Cruise Space Gravity Custom OFF F Tasti ...

Page 146: ...i ANGLE Premere per modificare l angolo di visualizzazione TOP MENU Premere per accedere al menu principale di un DVD MENU Premere per accedere al menu di un disco L Tasto ZAP Premere per attivare il modo ZAPPIN M Tasti M m cursore ENTER pagina 20 Premere per controllare il menu di un DVD N Tasto SRC sorgente Premere per accendere cambiare la sorgente Tuner radio Disc iPod USB AUX apparecchio ausi...

Page 147: ...occare più volte finché non viene visualizzata la lingua desiderata inglese spagnolo russo 4 Toccare OK L impostazione è completata Queste impostazioni possono essere regolate ulteriormente nel menu di impostazione Per ulteriori informazioni sull impostazione dello stato del collegamento del subwoofer vedere a pagina 53 Per ulteriori informazioni sull impostazione della posizione di ascolto fare r...

Page 148: ...tinuo tenere premuto m M Comandi di ricezione Se i comandi della ricezione non sono visualizzati toccare il display ATT Source List Band Receive Menu Preset List PTY List TA AF Top P1 P2 P3 BTM Memory P4 P5 P6 ATT Band FM1 Receive Menu Preset List FM2 FM3 LW PTY List TA AF Top MW Source List 1 Source List Toccare per accedere all elenco delle sorgenti pagina 12 2 ATT Toccare per attenuare l audio ...

Page 149: ...prime sei stazioni disponibili nell elenco di preselezione da P1 a P6 Quando l impostazione è stata memorizzata viene emesso un segnale acustico Memorizzazione manuale 1 Durante la ricezione della stazione che si desidera memorizzare toccare Preset List 2 Toccare Memory quindi un numero nell elenco da P1 a P6 Vengono visualizzati il numero e il messaggio di conferma 3 Toccare Yes La stazione viene...

Page 150: ...sibile preselezionare le stazioni RDS insieme all impostazione AF TA Se viene utilizzata la funzione BTM vengono memorizzate solo le stazioni RDS con la stessa impostazione AF TA Se si utilizza la preselezione manuale è possibile preselezionare le stazioni RDS e non RDS con impostazioni AF TA distinte 1 Impostare AF TA quindi memorizzare la stazione mediante la funzione BTM o manualmente ATT Band ...

Page 151: ...azione locale Selezione di PTY 1 Durante la ricezione FM toccare PTY List Se la stazione sta trasmettendo dati PTY viene visualizzato l elenco PTY Per scorrere l elenco toccare v V 2 Toccare il tipo di programma desiderato L apparecchio avvia la ricerca di una stazione che trasmette il tipo di programma selezionato Per chiudere l elenco PTY toccare PTY List Tipi di programmi Note Non è possibile u...

Page 152: ...rzione musicale Queste sezioni vengono denominate titoli Se viene riprodotto un DVD contenente diversi titoli è possibile selezionare il titolo desiderato utilizzando il menu principale del DVD stesso Per i DVD che consentono di selezionare voci quali lingue dei sottotitoli dell audio procedere alla selezione utilizzando il menu DVD Se nel disco sono contenuti file JPEG Viene avviata automaticamen...

Page 153: ...ndietro in avanti in un brano audio Durante una pausa toccare e tenere premuto per riprodurre il video al rallentatore Per annullare rilasciare il tasto 5 u Toccare per mettere in pausa riprendere la riproduzione dopo una pausa ATT Album Top Source List 9 Play Menu 0 TA AF MPEG 4 6 Play Menu Toccare per accedere al menu di riproduzione in cui sono disponibili le seguenti voci Repeat Shuffle pagina...

Page 154: ...onsigliate sono comprese tra 240 240 e 960 960 pixel 7 Solo MP3 WMA AAC Uso delle funzioni PBC controllo della riproduzione Il menu PBC consente di effettuare operazioni in modo interattivo durante la riproduzione di un VCD compatibile con le funzioni PBC 1 Avviare la riproduzione di un VCD compatibile con le funzioni PBC Viene visualizzato il menu PBC 2 Toccare PBC Panel Viene visualizzato il pan...

Page 155: ... o solo il canale sinistro per l ascolto tramite entrambi i diffusori destro e sinistro Di seguito sono indicate le opzioni disponibili Stereo audio stereo standard impostazione predefinita 1 Left audio del canale sinistro monofonico 2 Right audio del canale destro monofonico 1 Durante la riproduzione toccare Play Menu quindi più volte Audio finché non viene visualizzato il canale audio desiderato...

Page 156: ...di riproduzione normale Track per ripetere il brano corrente OFF per tornare al modo di riproduzione normale Track per ripetere il brano corrente Album per ripetere l album cartella corrente OFF per tornare al modo di riproduzione normale Image per ripetere l immagine corrente Album per ripetere l album corrente MPEG 4 ATT TA AF Top Play Menu DVD Control Source List Chapter OFF ON Repeat Shuffle A...

Page 157: ... JPEG jpg Xvid avi e MPEG 4 mp4 Si consiglia di eseguire il backup dei dati contenuti in un dispositivo USB Per ulteriori informazioni sulla compatibilità del dispositivo USB in uso visitare il sito Web relativo all assistenza riportato sulla retrocopertina Note Collegare il dispositivo USB dopo avere acceso il motore A seconda del dispositivo USB è possibile che si verifichino problemi di funzion...

Page 158: ...ero massimo di dati visualizzabili cartelle album 256 file brani 2 000 A seconda della quantità di dati registrati è possibile che l avvio della riproduzione richieda del tempo Non è possibile riprodurre file DRM Digital Rights Management Durante la riproduzione o la ricerca rapida all indietro in avanti di un file MP3 WMA AAC VBR velocità di trasmissione variabile è possibile che il tempo di ripr...

Page 159: ...scinare i brani da Esplora risorse di Windows o da iTunes e simili e rilasciarli in Content Transfer Sia l analisi che il trasferimento dei brani vengono eseguiti da Content Transfer 4Collegamento del dispositivo USB e uso della funzione SensMe sull apparecchio Collegare il dispositivo USB È quindi possibile utilizzare SensMe channels o SensMe mood sul presente apparecchio Installazione di SensMe ...

Page 160: ...ni o video Per ulteriori informazioni consultare la Guida in linea di Content Transfer Riproduzione di brani in canali SensMe channels Tramite SensMe channels i brani vengono raggruppati automaticamente in canali a seconda della tipologia È possibile selezionare e riprodurre un canale in base al proprio stato d animo all attività da svolgere e così via 1 Collegare un dispositivo USB impostato per ...

Page 161: ...nnels vengono riprodotte le sezioni più melodiche o ritmate 2 dei brani 1 Le dimensioni consigliate sono comprese tra 240 240 e 960 960 pixel 2 Potrebbero non venire rilevate correttamente Morning 5 00 9 59 Daytime 10 00 15 59 Evening 16 00 18 59 Night 19 00 23 59 Midnight 24 00 4 59 Brani consigliati per ciascun momento della giornata Impostare l orologio pagina 15 affinché il canale venga visual...

Page 162: ...no correntemente riprodotto viene indicato da un punto verde I brani vengono riprodotti dal centro del cerchio verso l esterno Controlli e indicazioni di riproduzione di SensMe mood A Per visualizzare i tasti di controllo Source List ATT TA AF Top pagina 20 B Per spostare il cerchio e raggruppare i brani C Per modificare le dimensioni del cerchio piccolo medio o grande D Indica la copertina dell a...

Page 163: ...è disponibile anche durante la riproduzione iPod Funzionamento con iPod Per ulteriori informazioni sulla compatibilità dell iPod in uso vedere Informazioni su iPod a pagina 62 oppure visitare il sito di assistenza riportato sulla retrocopertina Nelle presenti Istruzioni per l uso il termine iPod è utilizzato per riferirsi in generale alle funzioni iPod presenti su iPod e iPhone salvo dove diversam...

Page 164: ...o durante la riproduzione sul display dell apparecchio viene visualizzato il messaggio USB device is not connected Dispositivo USB non collegato Impostazione del modo di riproduzione È possibile impostare uno dei seguenti modi di riproduzione Per la riproduzione audio ALBUM TRACK GENRE PLAYLIST ARTIST MUSIC PODCAST Per la riproduzione video MOVIE RENTAL TV SHOW MUSIC VIDEO VIDEO PLAYLIST VIDEO POD...

Page 165: ...te se viene annullato il modo Controllo app passeggero Funzioni utili Visualizzazione di un elenco di brani immagini file video List Selezione di un brano un immagine un file video È possibile visualizzare un elenco di album cartelle brani immagini file video quindi selezionare quello che si desidera riprodurre Questa funzione è particolarmente utile qualora vengano utilizzati dischi registrati ne...

Page 166: ...zione radio ricercare le stazioni in avanti Stessa funzione di Riproduzione di DVD VCD saltare in avanti di un capitolo brano Stessa funzione di Riproduzione JPEG Xvid MPEG 4 audio saltare in avanti di un file brano Stessa funzione di MPEG 4 Azione richiesta Per Tracciare una linea orizzontale da destra verso sinistra Ricezione radio ricercare all indietro le stazioni Stessa funzione di Riproduzio...

Page 167: ...no in modo automatico Nota Se la registrazione del dispositivo viene eliminata dal presente apparecchio tramite inizializzazione occorre effettuare di nuovo l associazione 2Connessione Al termine dell associazione stabilire la connessione tra l apparecchio e il dispositivo Bluetooth A seconda del dispositivo la connessione viene effettuata automaticamente con la procedura di associazione 3Funzione...

Page 168: ...e BT Menu Per l audio Bluetooth toccare Play Menu e quindi BT Menu Viene visualizzato il menu di impostazione Bluetooth 3 Toccare Pairing Viene avviata l associazione Se il segnale Bluetooth dell apparecchio è disattivato si attiva automaticamente all avvio dell associazione 4 Utilizzare il dispositivo Bluetooth per cercare il presente apparecchio Sul display del dispositivo viene visualizzato un ...

Page 169: ...lefono cellulare connesso 1 Accertarsi che il segnale Bluetooth del presente apparecchio e del telefono cellulare sia attivato 2 Premere TOP quindi toccare BT Phone nel menu principale lampeggia mentre viene eseguita la connessione quindi rimane acceso mentre la connessione è attiva Nota Alcuni telefoni cellulari richiedono un autorizzazione per consentire l accesso alla propria rubrica durante la...

Page 170: ...viene inviata e viene visualizzata la schermata di chiamata finché l interlocutore non risponde Tramite la rubrica del telefono cellulare connesso 1 Premere TOP quindi toccare BT Phone nel menu principale Viene visualizzata la schermata del telefono Bluetooth 2 Toccare Call Menu quindi Phonebook Browsing Viene visualizzata la rubrica 3 Selezionare il contatto desiderato 1Nell elenco delle iniziali...

Page 171: ...lizzata la schermata del telefono Bluetooth 2 Toccare Redial La chiamata viene inviata e viene visualizzata la schermata di chiamata finché l interlocutore non risponde Note Pronunciare il tag vocale nello stesso modo in cui è stato memorizzato nel telefono cellulare Se sul telefono cellulare connesso è attiva la funzione di chiamata vocale è possibile che con il presente apparecchio non funzioni ...

Page 172: ...Toccare BT Menu 2 Toccare v V per visualizzare MIC Gain 3 Toccare più volte Low Middle High per selezionare l impostazione desiderata Per tornare alla schermata precedente toccare Back Per terminare una chiamata Toccare Gestione dei dati delle chiamate Numeri preselezionati È possibile memorizzare i contatti della rubrica o l elenco cronologico delle chiamate in corrispondenza dei numeri preselezi...

Page 173: ...eguire le stesse operazioni utilizzate per la riproduzione dei dischi pagina 20 con le seguenti eccezioni Note Le operazioni disponibili variano in base al dispositivo Bluetooth Per effettuare le operazioni non disponibili utilizzare il dispositivo Bluetooth A seconda del dispositivo Bluetooth potrebbe essere necessario toccare u due volte per avviare mettere in pausa la riproduzione Durante l uso...

Page 174: ...e diverse 63 Hz 160 Hz 400 Hz 1 kHz 2 5 kHz 6 3 kHz e 16 kHz 1 Durante la ricezione riproduzione toccare Source List quindi 2 Toccare Sound e quindi toccare EQ7 3 Toccare Custom quindi Tune Viene visualizzata la schermata di sintonizzazione Pairing 1 Consente di attivare disattivare il modo di associazione e di memorizzare le informazioni tra questo apparecchio e il dispositivo Bluetooth Auto Answ...

Page 175: ...ornare alla schermata precedente toccare Back Ottimizzazione dell audio per la posizione di ascolto Intelligent Time Alignment L apparecchio è in grado di modificare la localizzazione dell audio ritardando l uscita audio da ogni diffusore in modo da adattarsi alla posizione di ascolto nonché di simulare un campo sonoro naturale che offre la sensazione di essere sempre al centro indipendentemente d...

Page 176: ...usore per impostare la distanza tra la posizione di ascolto e i diffusori La distanza è regolabile in incrementi di 2 cm da 0 a 400 cm Per ripristinare l impostazione predefinita toccare Reset 5 Toccare OK L impostazione è completata Per tornare alla schermata precedente toccare Back Nota L impostazione viene applicata solo dopo avere toccato OK Configurazione dei diffusori e impostazione del volu...

Page 177: ... regolare il livello di volume di ciascun diffusore collegato I diffusori che è possibile regolare sono Front R anteriore destro Front L anteriore sinistro Surround L posteriore sinistro Surround R posteriore destro e Subwoofer Regolabile soltanto se è collegato un subwoofer e Rear Sub Out è impostato su Sub pagina 53 1 Quando non è selezionata una sorgente toccare Source List e quindi 2 Toccare S...

Page 178: ...selezione del tema dello schermo 4 Selezionare il tema Toccare Screen Theme quindi il tipo di tema desiderato Per tornare alla schermata precedente toccare Back Regolazione dell immagine Picture EQ È possibile selezionare la qualità dell immagine più adatta per la luminosità all interno dell auto Di seguito sono indicate le opzioni disponibili Dynamic immagine intensa con colori vivaci e nitidi St...

Page 179: ... seguito sono indicate le opzioni disponibili 1 Durante la riproduzione video di immagini toccare Source List quindi 2 Toccare Screen Viene visualizzato il menu di impostazione dello schermo 3 Toccare Aspect Vengono visualizzate le opzioni disponibili 4 Toccare l opzione desiderata Per tornare alla schermata precedente toccare Back Note Questa impostazione è disponibile soltanto se il freno a mano...

Page 180: ... 1 Quando non è selezionata una sorgente toccare Source List e quindi Solo per XAV 64BT dal menu principale toccare Viene visualizzato il menu di impostazione 2 Toccare Screen Viene visualizzata la schermata di impostazione dello schermo 3 Toccare Demo per impostare su ON o OFF L impostazione è completata Per scorrere l elenco delle opzioni solo se necessario toccare v V Per tornare alla schermata...

Page 181: ...zione di spegnimento automatico Qualsiasi stato 30sec 30min 60min Per selezionare l intervallo di tempo desiderato Beep OFF Per disattivare il segnale acustico relativo alle operazioni Qualsiasi stato ON z Per attivare il segnale acustico relativo alle operazioni ZAPPIN Time pagina 31 6sec 15sec z 30sec Per selezionare la durata di riproduzione della funzione ZAPPIN Durante la riproduzione audio U...

Page 182: ... AUX Rear AUX Input pagina 58 Consente di impostare il tipo di dispositivo collegato ai terminali AUX posteriori per impostare lo sfondo in modo appropriato OFF Per disattivare l ingresso AUX Nessuna sorgente selezionata Audio Per visualizzare lo sfondo del presente apparecchio Video z Per visualizzare l immagine proveniente dal dispositivo collegato Rotary Commander Consente di modificare la dire...

Page 183: ...51 Voce Opzione Descrizione Stato dell apparecchio CT ora pagina 18 19 OFF z Per disattivare la funzione CT Qualsiasi stato ON Per attivare la funzione CT ...

Page 184: ...15 0 z Per regolare il livello Durante la ricezione riproduzione Subwoofer 6 6 0 z Per regolare il livello di volume del subwoofer Disponibile solo se Subwoofer è impostato su ON Listening Position pagina 43 Consente di impostare la posizione di ascolto e la posizione del subwoofer OFF z Per non impostare la posizione di ascolto Durante la ricezione riproduzione Front L Per impostarla su anteriore...

Page 185: ...ente di utilizzare i diffusori posteriori come subwoofer OFF z RBE1 RBE2 RBE3 Per selezionare il modo Durante la ricezione riproduzione Crossover Filter Consente di selezionare la frequenza di taglio dei diffusori anteriori posteriori HPF e del subwoofer LPF LPF 50 Hz 60 Hz 80 Hz 100 Hz z 120 Hz Per selezionare la frequenza di taglio Disponibile solo se Subwoofer è impostato su ON Durante la ricez...

Page 186: ...eme pagina 46 Qualsiasi stato Picture EQ pagina 46 Dynamic z Standard Theater Sepia Per selezionare la qualità delle immagini Durante la riproduzione di video immagini Custom 1 Custom 2 Per personalizzare la qualità delle immagini Aspect pagina 47 Normal Wide Full z Zoom Per selezionare il rapporto di formato dello schermo Durante la riproduzione di video immagini Clock Consente di visualizzare o ...

Page 187: ...DRC Consente di rendere chiaro l audio quando il volume è basso Solo per i DVD conformi ad Audio DRC controllo della gamma dinamica Esclusi i DVD R DVD R DL DVD RW nel modo VR Standard z Per selezionare l impostazione standard Nessuna sorgente selezionata Wide Per ricreare l atmosfera di un esibizione dal vivo Multi Ch Output Consente di impostare il metodo di uscita delle sorgenti multicanale Mul...

Page 188: ...o dello schermo 4 3 4 3 Pan Scan Per visualizzare un immagine ampia su tutto lo schermo eliminando automaticamente le parti che non rientrano nelle dimensioni dello schermo Multi Disc Resume OFF Per non memorizzare le impostazioni di ripresa della riproduzione La funzione di ripresa della riproduzione è disponibile solo per il disco correntemente inserito nell apparecchio Nessuna sorgente selezion...

Page 189: ...57 Voce Opzione Descrizione Stato dell apparecchio Video CD PBC pagina 22 OFF Per riprodurre un VCD senza funzioni PBC Nessuna sorgente selezionata ON z Per riprodurre un VCD con funzioni PBC ...

Page 190: ...ivo Impostando il tipo video o audio di ciascun dispositivo collegato è possibile impostare lo sfondo in modo appropriato 1 Quando non è selezionata una sorgente toccare Source List e quindi Viene visualizzato il menu delle impostazioni generali Diversamente toccare General 2 Toccare v V per far scorrere il menu quindi toccare Front AUX Input o Rear AUX Input 3 Toccare Audio o Video Audio è dispon...

Page 191: ... di contrassegno Toccare Marker Toccare di nuovo Marker per nascondere le linee di contrassegno Inversione dell immagine Toccare Mirror Viene visualizzata un immagine speculare Modifica delle linee 1 Toccare Line Edit 2 Selezionare la linea da modificare Toccare 1 Edit 2 Edit o 3 Edit a seconda della linea da modificare 3 Modificare la linea Per aumentare la lunghezza toccare B b Per ridurre la lu...

Page 192: ...chermo LCD Il pannello LCD è un prodotto di elevata precisione con oltre il 99 99 di segmenti operativi Tuttavia è possibile che una piccola percentuale solitamente lo 0 01 dei segmenti non si illumini correttamente Ad ogni modo tale fenomeno non influenza la visualizzazione Note sui dischi Non esporre i dischi a luce solare diretta o a fonti di calore per esempio condotti dell aria Evitare di las...

Page 193: ...deve essere finalizzato Se un CD DA CD audio digitale viene registrato nella prima sessione L apparecchio riconosce il disco come un CD DA e solo il CD DA della prima sessione viene riprodotto anche se in altre sessioni viene registrato un altro formato per esempio MP3 Se il CD DA viene registrato in una sessione diversa dalla prima L apparecchio riconosce il disco come un DATA CD o un DATA DVD e ...

Page 194: ... Informazioni sui file MPEG 4 È possibile riprodurre i file MPEG 4 che rispondono ai seguenti requisiti La riproduzione non può essere garantita per tutti i file MPEG 4 compatibili Profilo MPEG 4 Simple Profile Velocità di trasmissione max 7 Mbps su USB FS 10 Mbps su DVD 7 Mbps su CD Frequenza fotogrammi max 30 fps Dimensioni immagine max 720 480 pixel Audio max 320 kbps AAC LC Estensione file mp4...

Page 195: ...iene utilizzato entro un raggio di 10 m da un dispositivo LAN senza fili spegnere quest ultimo Installare il presente apparecchio e il dispositivo Bluetooth il più vicino possibile l uno all altro Le microonde trasmesse da un dispositivo Bluetooth possono influire sul funzionamento di apparecchiature mediche elettroniche Spegnere il presente apparecchio e altri dispositivi Bluetooth nei seguenti l...

Page 196: ...rrare la batteria con pinze di metallo in quanto potrebbe verificarsi un corto circuito Sostituzione del fusibile Per la sostituzione del fusibile assicurarsi di utilizzare un fusibile dello stesso amperaggio di quello indicato sull originale Se il fusibile si brucia controllare i collegamenti dell alimentazione e sostituire il fusibile Se dopo la sostituzione il fusibile si brucia di nuovo è poss...

Page 197: ...elettricità statica sensibilità della ricezione prestazioni dell antenna sistema operativo applicazione software e così via 3 I profili standard Bluetooth indicano lo scopo della comunicazione Bluetooth tra dispositivi Amplificatore di potenza Uscite uscite diffusori Impedenza diffusori 4 8 ohm Potenza in uscita massima 52 W 4 a 4 ohm Caratteristiche generali Uscite Terminale di uscita video poste...

Page 198: ...a maggior parte dei problemi che si potrebbero verificare durante l uso di questo apparecchio Prima di esaminare l elenco che segue verificare le procedure di collegamento e d uso dell apparecchio Se il problema persiste visitare il sito di assistenza riportato sulla retrocopertina ALL Caratteristiche generali L apparecchio non riceve alimentazione Verificare il collegamento o il fusibile Se l app...

Page 199: ... viene trasmesso alcun notiziario sul traffico Attivare il modo TA pagina 18 La stazione non trasmette notiziari sul traffico pur essendo una stazione TP tSintonizzarsi su un altra stazione Per PTY è visualizzata l indicazione None La stazione corrente non è una stazione RDS I dati RDS non vengono ricevuti La stazione non specifica il tipo di programma Il nome del servizio programmi lampeggia Non ...

Page 200: ...ona Il disco non è finalizzato pagina 61 Il formato del disco e la versione del file non sono compatibili con il presente apparecchio pagina 10 61 Premere Z per rimuovere il disco I file MP3 WMA AAC JPEG Xvid MPEG 4 non vengono riprodotti La registrazione non è stata eseguita in base al formato ISO 9660 livello 1 o livello 2 al formato di espansione Joliet o Romeo DATA CD oppure al formato UDF Bri...

Page 201: ...mata A seconda del dispositivo di connessione è possibile che la suoneria non venga emessa correttamente tImpostare Ringtone su Default pagina 42 Il volume della voce dell interlocutore è basso Aumentare il volume nel corso di una chiamata Il volume dell interlocutore è troppo basso o alto Regolare il livello di MIC Gain pagina 40 Durante le conversazioni telefoniche si verifica un fenomeno di eco...

Page 202: ...apparecchio tInserire un disco compatibile Premere Z per rimuovere il disco Disc Reading È in corso la lettura di tutte le informazioni relative ai file album cartella del disco tUna volta terminata l operazione la riproduzione viene avviata automaticamente Potrebbe essere necessario attendere alcuni minuti a seconda della struttura del disco Error Per i modelli XAV 64BT e XAV 63 Il dispositivo US...

Page 203: ...a A seconda della quantità di dati e così via la lettura potrebbe richiedere alcuni minuti The connected USB device is not supported Per ulteriori informazioni sulla compatibilità del dispositivo USB in uso visitare il sito di assistenza riportato sulla retrocopertina The SensMe data is corrupted Si è verificato un problema ai dati per la funzione SensMe per esempio informazioni o nomi di file alt...

Page 204: ...ddish 1283 Javanese 1287 Georgian 1297 Kazakh 1298 Greenlandic 1299 Cambodian 1300 Kannada 1301 Korean 1305 Kashmiri 1307 Kurdish 1311 Kirghiz 1313 Latin 1326 Lingala 1327 Laothian 1332 Lithuanian 1334 Latvian Lettish 1345 Malagasy 1347 Maori 1349 Macedonian 1350 Malayalam 1352 Mongolian 1353 Moldavian 1356 Marathi 1357 Malay 1358 Maltese 1363 Burmese 1365 Nauru 1369 Nepali 1376 Dutch 1379 Norwegi...

Page 205: ......

Page 206: ...For XAV 64BT only ...

Page 207: ......

Page 208: ...st support information on this product please visit the web site below Sito di assistenza clienti In caso di domande o per le informazioni più aggiornate sul presente prodotto visitare il seguente sito Web sitio Web http support sony europe com Register your product online now at Registre su producto online en Registra online il tuo prodotto su www sony europe com myproducts Sony Corporation Print...

Reviews: