51
Playback
Chapt
er
3
Re
c
o
rdin
g and Pl
a
y
bac
k
2
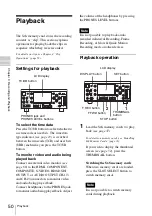
Press the PLAY/PAUSE button to start
playback.
The PLAY/PAUSE indicator lights.
To check the status during playback
Press the DISPLAY button.
For details on each indication displayed, see
“
3
LCD display” (page 18).
To enter playback pause mode
Press the PLAY/PAUSE button.
The PLAY/PAUSE indicator blinks in
pause mode.
The playback is restarted by pressing the
button again.
To switch to high-speed playback
This unit allows you to play clips at 4 times
or 15 times normal speed in the forward or
reverse direction. Audio is muffled in high-
speed playback.
To play at a high speed in the forward
direction:
Press the F FWD button or
,
button.
Each time you press the button, the
playback speed switches between 4
times and 15 times normal speed.
To play at a high speed in the reverse
direction:
Press the F REV button or
<
button.
Each time you press the button, the
playback speed switches between 4
times and 15 times normal speed.
To return to normal playback:
Press the
PLAY/PAUSE button.
To stop playback
When you press the STOP button, playback
stops and this unit enters E-E mode.
When you press the THUMBNAIL button,
playback stops and the thumbnail screen
appears on the monitor screen.
For details on the thumbnail screen, see “Thumbnail
screen” (page 52).
To insert a shot mark during
playback
Use the IR remote commander.
1
Set “IR Remote”
of the
OTHERS menu to “On” to activate the
IR remote commander.
2
Start playback and press the
SHOTMARK 1 or 2 button where you
wish to insert a mark (during playback
or in pause mode).
A shot mark of the type corresponding
to the button you press is recorded.
• No shot mark can be added if the memory
card is write-protected.
• No shot mark can be added to the first or
last frame of a clip (at which the playback
is in pause mode and the clip number is
incremented).
To display the Clip Operation
menu
Pressing the SET button with a still picture
displayed in pause mode calls the Clip
Operation menu. You can use the Clip
Operation menu to check the detailed clip
information or add shot marks.
For details on Clip Operation menus, see “Clip
Operations” (page 56).
Notes
Summary of Contents for XDCAM EX PMW-EX30
Page 111: ......


