

For inquiries, call:
Customer Service Center
For general information and charges
(toll free)
For loss or theft and operation information
(toll free)
In case above numbers are not available, (toll free)
0120-977-033
(except Okinawa)
0120-977-699
(Okinawa)
From au cell phones:
113
without area code
From fixed-line phones:
0077-7-113
From fixed-line phones:
0077-7-111
From au cell phones:
157
without area code
Sold by: KDDI CORPORATION,
OKINAWA CELLULAR TELEPHONE COMPANY
Manufactured by: Sony Mobile Communications Inc.
April 2013, 1st Edition
1273-7593.1
Cell phone and PHS operators collect and recycle unused telephones,
batteries and battery chargers at stores bearing the logo regardless
of brand and manufacturer to protect the environment and reuse
valuable resources.
Secure cell phone support center
For loss, theft, damage.
From a land-line phone/an au cell phone,
0120-925-919
(toll-free)
Business hours 9:00−21:00 (7 days a week)
Basic Operation
Key icons
The followings are the main functions of
x
,
y
,
r
keys located at the bottom of the screen.
Using the touch panel
The display on the product is a touch panel operated by
touching it with your finger.
■
Tap/Double-tap
Tap: Gently touch a screen and then immediately release your
finger. Double tap: Tap the same position twice.
■
Long-touch
Keep touching an item with your finger.
■
Slide
While your finger is gently touching the screen, trace it to the
desired direction to move over.
■
Flick (swipe)
Operate the screen by quickly moving (flicking) your finger
up, down, right, or left.
■
Pinch
Touch the screen with two fingers and widen (pinch-out) or
narrow (pinch-in) the fingers' distance.
■
Drag
Keep touching an item or icon, trace it to the desired direction
to move.
Home screen
Home screen consists of multiple screens. Slide/flick left or
right to switch them. The center screen is the default screen to
operate. Tap
y
to return to the Home screen any time.
a
Home screen position
Indicates which screen of the
five Home screens you are in.
b
Widgets
c
Wallpapers
d
Shortcuts (Applications)
e
Media folders
(WALKMAN, Movies, Album,
Sony Select, Camera, FM
radio, 1Seg)
f
基本機能フォルダ
(Basic
functions folder)
(LISMO Player, YouTube,
Maps, Alarm & Clock, Calendar, Infrared, Settings)
g
Application key
Adding to Home screen/Editing Home screen
You can change wallpaper or theme of the Home screen and
add/delete/move shortcuts of applications, widgets, folders,
etc. on the Home screen.
・
You can add wallpapers by downloading from websites.
1
Long-touch an area of the Home screen where no icons
are displayed
Alternatively, pinch-in on the Home screen.
■
Adding a folder
1
From the Home screen, long-touch an icon
2
Drag the icon onto another icon
3
Enter a folder name
u
[Done]
■
Deleting shortcuts/widgets/folders
1
From the Home screen, long-touch an icon or a folder
you want to delete
appears at the bottom of the screen.
2
Drag the icon or the folder to "
"
To delete the folder, tap "Delete" after Step 2. Shortcuts etc.
in the folder are also deleted.
❖
Information
・
Long-touch a shortcut, widget, or folder icon to move.
Using the Applications screen
You can call up functions from the Applications screen.
Application icons installed to the product are also displayed.
・
When you tap application icons to use respective functions,
you may incur communication charges depending on the
function.
■
Starting an application
1
From the Home screen, [
]
The Applications screen appears. Slide or flick left or right
to switch the Applications screen.
2
Tap an application to use
■
Main applications
■
Downloading applications
You can download applications such as convenient tools and
games from the Google Play and install them to use on the product.
・
To use Google Play, you need to set a Google account. For
details, refer to "Setting Guide".
■
Deleting (uninstalling) applications
Before deleting installed applications, back up contents
related to the application that you want to save including data
saved in the application.
❖
Information
・
Some applications may not be deleted.
Knowing the status of the product
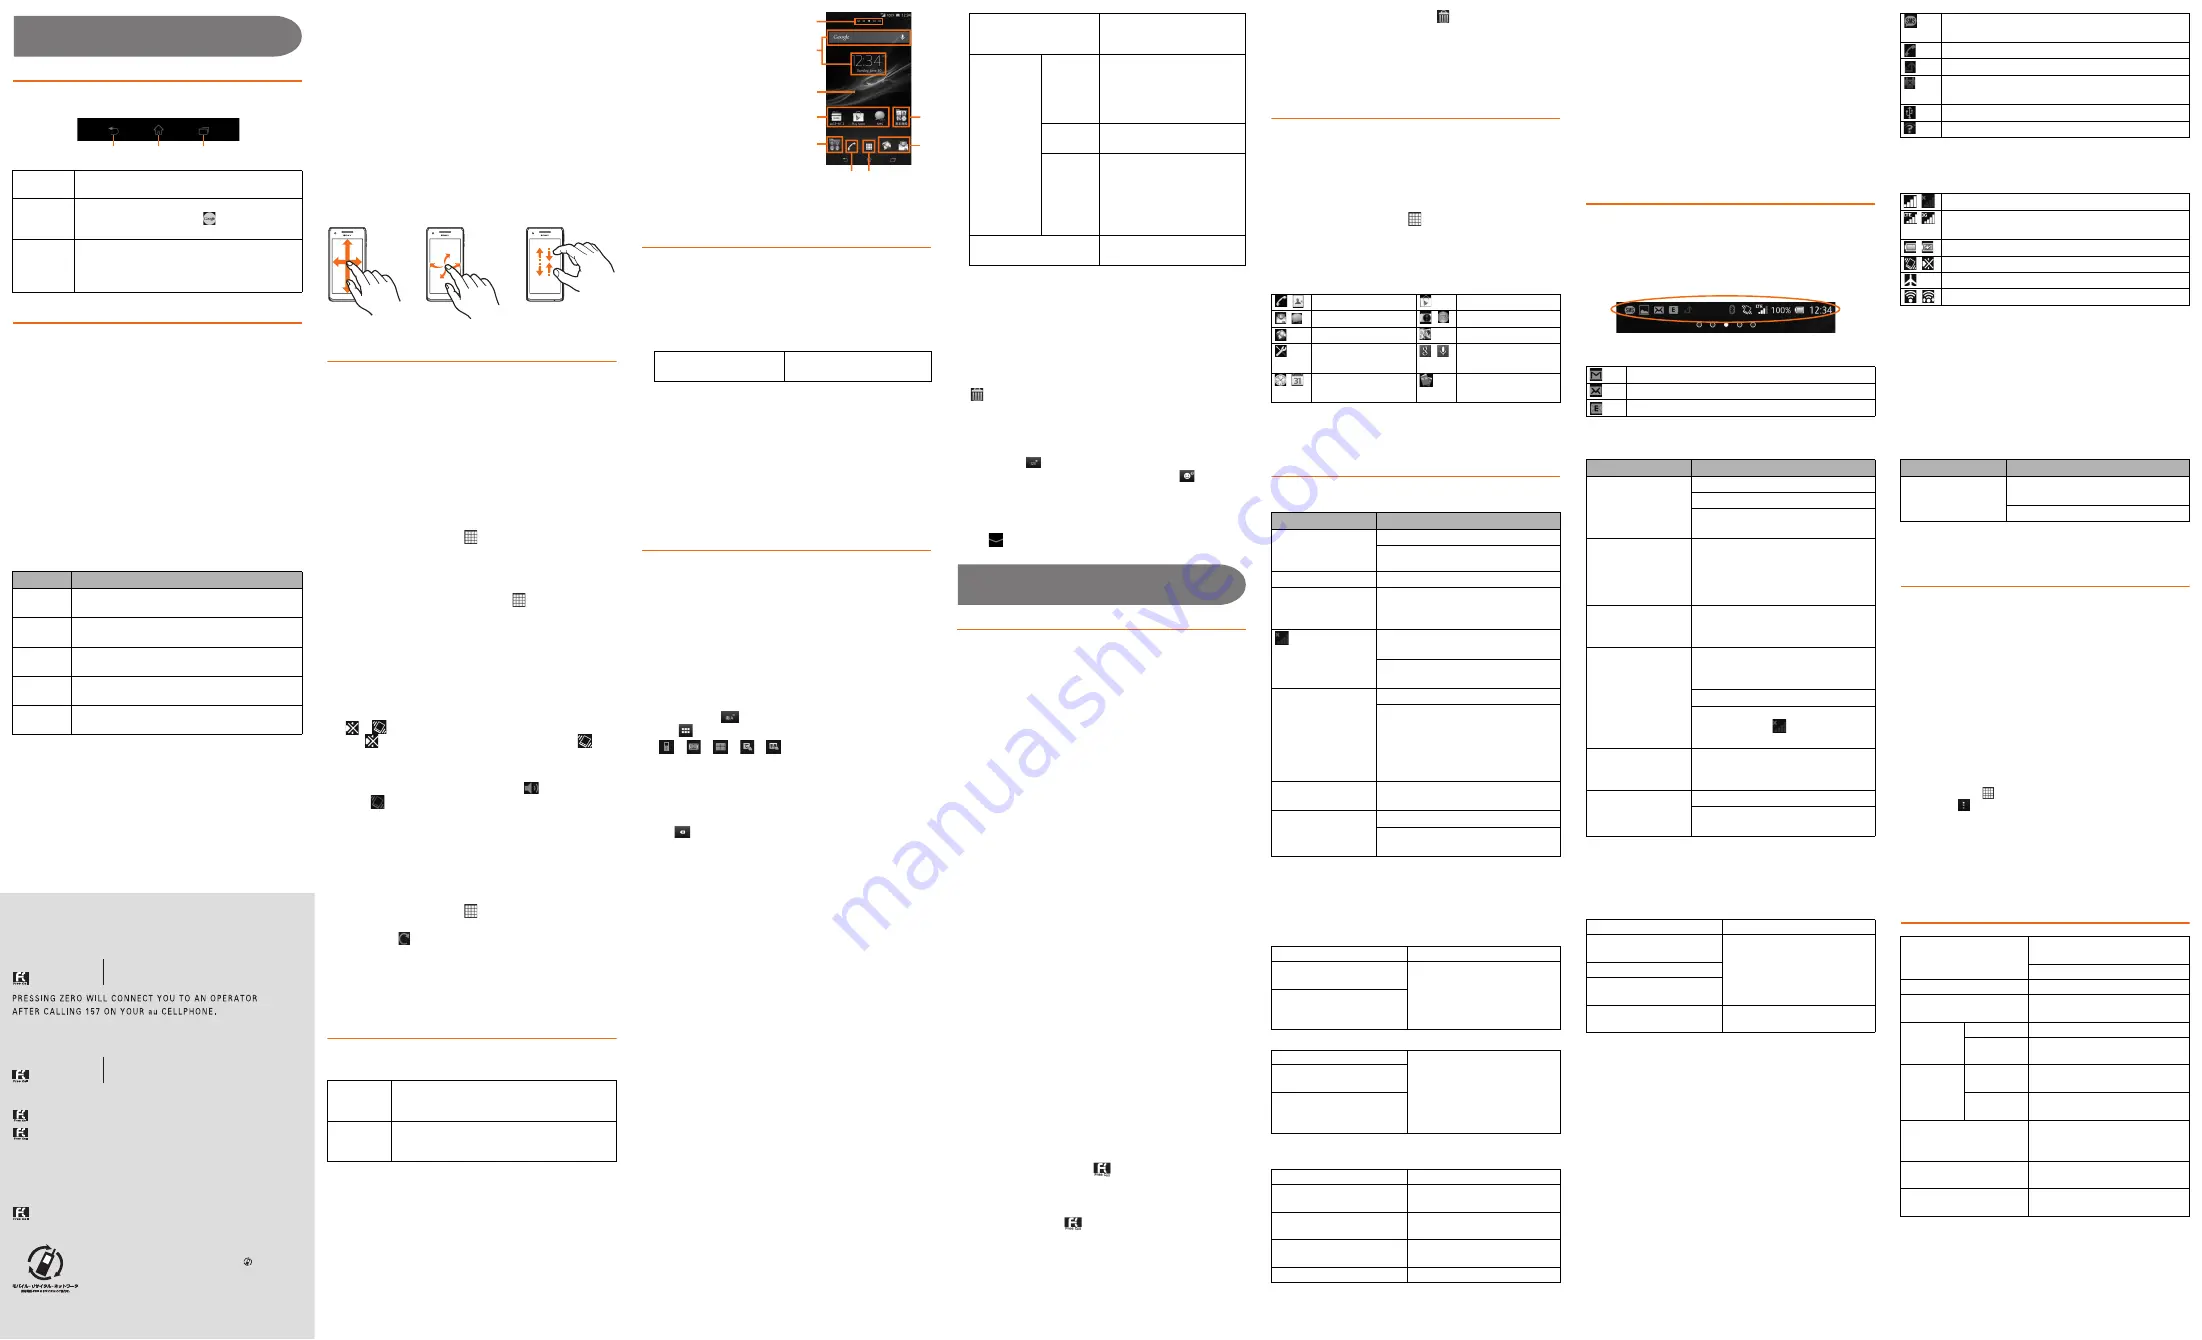
■
Status bar
The status bar is located at the top of the product screen. On
the left of the status bar, notification icons appear to inform
missed calls, new mails, operations in progress, etc., and on
the right, status icons appear to indicate the status of the
product.
■
Examples of notification icon
*1 Appears when switched to another screen such as the Home
screen.
■
Main status icons
■
Notification panel
If any notification icons are displayed, slide down the status
bar to open the Notification panel. You can check details of
notification icons or start corresponding applications.
❖
Information
・
To delete a notification, tap "Clear" or flick the notification left
or right to delete from the list.
x
Back
Return to the previous screen. Close a dialog
box, menu, or the Notifications panel.
y
Home
Display the Home screen.
Long-touch and drag it to "
" to activate
"Google" application.
r
Recently
used
applications
You can display recently used applications on a
list and activate or delete them from the list.
Also, you can use and set small apps.
x
x y r
Slide
Pinch
Flick (swipe)
2
WIDGETS
Add a widget on the Home
screen.
a
b
c
d
e
f
g
d
d
APPS
Add a shortcut of an
application, a setting screen,
etc. on the Home screen.
WALLPAPERS Album
Select an image from albums
to set as a wallpaper.
・
To set image range, drag or
pinch to adjust cropping
area and tap "Crop".
Live
Wallpapers
Select a content from albums
to set as a wallpaper.
(Xperia
TM
's
Wallpaper)
Select an image to set as a
wallpaper.
・
Images displayed to the
right of "Albums"/"Live
Wallpapers" are "Xperia
TM
's
Wallpaper".
THEMES
Set the Home screen image or
the unlock screen image.
/
Phone, Contacts
Play Store
/
E-mail, SMS
/
Camera, Album
Browser
Maps
Settings
/
Google, Voice
Search
/
Alarm & clock,
Calendar
Instruction Manual
New Gmail message
New PC mail message
New E mail (@ezweb.ne.jp) message
New SMS/Receiving notification service message,
New Receiving notification
Talking
*1
, Calling
*1
, Receiving
Missed call
Green Heat energy saving icon (Remove the AC
adapter from the power outlet)
USB connecting
Wi-Fi
®
open network available
/
Signal level (Level 4, Out of service area)
/
Data communication status (LTE available, 3G
available)
/
Battery level (100%, Charging)
/
Silent mode (Vibration, Mute)
Airplane mode is activated.
/
Wi-Fi
®
connected, Wi-Fi
®
communicated
・
Some notifications may not be deleted depending on the content.
・
When you set screen lock to "Swipe", slide the status bar
downward to check the Notification panel without unlocking
the screen.
■
Notification LED
Notification LED informs charging prompt, battery level while
charging, missed calls, new mails, etc. by turning on or
flashing.
*1 Notification LED flashes when unlock screen is displayed,
backlight turned off and screen lock is disabled.
❖
Information
・
When the remaining battery is not sufficient for turning the
product ON, pressing
P
makes LED flash red three times.
・
When you start charging with the product powered off, the
notification LED turns in red. When the status of battery
appears on the display, however, the notification LED lights
in color for indicating the battery level.
・
While using the "Album" application or "WALKMAN"
application, the notification LED turns on according to the
contents. Also, when receiving a call, it flashes according to
the themes color of screen settings.
■
Checking own phone number
1
From the Home screen, [
]
X
[Settings]
2
[About phone]
X
[Status]
The phone number of the product is shown under "My phone number".
❖
Information
・
Alternatively, from the Home screen, [
]
X
[Contacts]
X
[Myself] to check your phone number.
■
Setting the Silent Mode
Set the ringtone volume to 0. Note that setting the product to
Silent mode does not mute sounds for shutter, playback of
video or music, alarm, etc. And adjusting the volume of
"Ringtone & notifications" in Sound settings or pressing upper
part of
m
cancels Silent mode.
1
P
(over 1 sec)
2
[
]/[
]
Tap "
" to set mute (ringtone volume 0) and tap "
" to
set vibrator.
❖
Information
・
Slide the status bar downward and tap "
" to set vibrator
or tap "
" to set mute (ringtone volume 0).
■
Setting Airplane mode
When airplane mode is set, all wireless functions (phone,
packet communication, Wi-Fi
®
function, Bluetooth
®
function,
NFC R/W P2P function) are turned off.
1
P
(over 1 sec)
u
[Airplane mode]
❖
Information
・
Slide the status bar downward and tap "Airplane" to switch
the airplane mode on or off.
Entering characters
Use software keyboard to enter characters.
The software keyboard appears when you tap the entry field
for registering a contact, composing a mail, etc.
■
Switching keyboards
To input Japanese, use "Xperia
TM
Japanese keyboard"
switching five input types of "Phonepad", "QWERTY
keyboard", "Japanese syllabary", "Kana handwriting", "Kanji
handwriting".
1
Tap a character input box
Phonepad is set for portrait screen and QWERTY keyboard
is for landscape screen by default.
2
Long-touch "
"
Tap "
" for Kanji handwriting.
3
[
]/[
]/[
]/[
]/[
]
The keyboard switches to Phonepad/QWERTY keyboard/
Japanese syllabary/Kana handwriting/Kanji handwriting.
❖
Information
・
Word suggestions or direct conversion candidates for the
entered characters appear. Tap a word to enter.
・
Tap "
" to delete the character before the cursor.
・
Long-touch "
" to enter symbols (single byte/double
byte), facemarks from the displayed list. Tap "
" for Kanji
handwriting.
・
On the Phonepad, you can enter characters by flicking a
key up/down/left/right besides repeatedly tapping the key
(toggle input).
・
Tap "
" at the bottom left of the screen to hide the software
keyboard.
Support
Introduction of related accessories
For details, refer to the instruction manual for each device.
・
Battery Pack (SOL22UAA)
・
Desktop Holder (SOL22PUA)
・
au Carrying Case F Black (0105FCA) (sold separately)
・
Sony Mobile AC adapter 05 (EP880) (sold separately)
・
Common AC Adapter 04 (0401PWA) (sold separately)
❖
Information
・
For the latest information on accessories, visit the au
homepage
(
http://www.au.kddi.com/
) or contact the Customer Service
Center.
・
Accessories described on this page can be purchased from
the au Online Shop.
http://auonlineshop.kddi.com/
Troubleshooting
Before you assume that the product is malfunctioning, check
the following:
For more details, visit au Customer Support site of au homepage.
http://www.au.kddi.com/support/mobile/trouble/repair
Updating Software
You can update the product to the most recent software for
optimal performance and to get the latest enhancements.
・
You are charged for data communication when connecting to
the Internet from the product by using packet communication.
・
You are recommended to back up your data before
updating software.
・
For details, visit
http://www.sonymobile.co.jp/support/
or
refer to the "Instruction Manual" (Japanese) application or
"
取扱説明書詳細版
(Full instruction manual)" (Japanese)
available on au homepage.
■
Downloading and updating software
Update files can be downloaded from the Internet web site via
wireless communication into the product directly.
・
To download software updates only via Wi-Fi
®
, from the
Home screen, [
]
X
[
ツール
(Tool)]
X
[Update
Center]
X
[
]
X
[Settings]
X
[Preferred data traffic] and
select "Via Wi-Fi only". If you set to "Via mobile network/Wi-Fi"
for updating, note that when Wi-Fi
®
communication
becomes unstable, packet communication takes the place
automatically, which may apply communication fees.
Status
Description
Red
The battery is charging when the remaining
battery level is 14% or lower.
Orange
The battery is charging when the remaining
battery level is 15% - 89%.
Green
The battery is charging when the remaining
battery level is 90% or higher.
Flashing
red
The remaining battery level is 14% or lower.
Flashing
white
Indicates missed call, New Gmail message, new
PC mail message, new SMS message.
*1
Symptom
What you should check
Power is not turned
on even though
P
is pressed.
Is the battery pack charged?
Is
P
pressed for over 1 second?
The power goes off.
Is the battery running out?
The power turns off
while activation
screen is displayed.
Is the battery running out?
(Out of service
area) appears.
Is the product out of the service area
or in an area where the signal is weak?
Is the built-in antenna covered with
finger etc.?
Cannot charge the
battery pack
(Notification LED
does not light, the
battery icon does
not change into
charging).
Is the battery pack attached properly?
Is the specified charging equipment
(sold separately) attached properly?
Charging is not
complete.
Is the temperature of the product
raised or very low?
Cannot operate
touch panel as
intended.
Are you operating with gloved hands?
Are you operating with a fingernail or
foreign object on the screen?
Cannot operate key/
touch panel.
Is the power turned on?
Is "Screen lock" set?
Turn off the power and then turn it on
again.
Screen response is
slow when you tap
on the screen/press
the keys.
When a large amount of data is saved
in the product or transferring large-
size data between the product and
microSD memory card, the screen
response may be delayed.
A message such as
charge the battery
appears.
The battery is almost dead.
Battery usage time
is short.
Is the battery pack fully charged?
Charge until the notification LED turns
green.
Is the battery pack end-of-life?
Is the product used for a long period
at places where
(out of range)
appears?
The display
backlight turns off
in a short while.
Is set "Sleep" period too short?
Display is dark.
Is "Brightness" set to dark?
Is the proximity sensor covered by
sticker?
Symptom
What you should check
Cannot recognize a
microSD memory
card.
Is the microSD memory card inserted
properly?
Is the microSD memory card unmounted?
Symptom
What you should check
1
From the Home screen, [
]
X
[
ツール
(Tool)]
X
[Update
Center]
2
[System]
X
[
]
■
Connecting to a PC for updating software
You can update software using PC Companion to be installed
from the product.
・
Install PC Companion to your PC beforehand.
After-sales service
■
When asking for repair
For repair, contact Secure cell phone support center.
❖
Information
・
Before handing in the product for repair, make a backup of
the contents of memory since they may disappear during
repair. Note that the Company shall not be liable for any
damages and loss of income should the contents of
memory be altered or lost.
・
Recycled parts that meet the Company's quality standards
are sometimes used for repair.
・
Collected au cell phones by Replacement cell phone
delivery service which you used before are recycled to cell
phones for replacement after repairs. Also replaced parts
by au after-sales service are collected and recycled by
KDDI. They are not returned to customers.
■
Performance parts for repair
The Company retains performance parts for repair of the
Xperia
TM
UL main unit and its peripherals for six years after
discontinuation of production. "Performance parts for repair"
refers to parts required for maintaining the functions of the
product.
■
Warranty card
At the store of purchase, thoroughly check and read the name
of the retailer, date of purchase and other necessary details
filled in on the warranty card, and be sure to keep it in a safe
place.
■
Secure cell phone support plus LTE
An after-sales service membership program on a monthly
basis called "Secure cell phone support plus LTE" (monthly
fee: 399 yen including tax) is available for using your au cell
phone for a long time without worries. This service expands
coverage for many troubles including malfunction, theft and
loss. For details of this service, refer to au homepage or
contact Secure cell phone support center.
❖
Information
・
You can apply for membership only at the time of
purchasing your au cell phone.
・
Once you cancel the membership, you cannot reapply for it
until you purchase an au cell phone next time.
・
Note that when changing the model or purchasing an extra
cell phone, this service only covers the most recently
purchased au cell phone.
・
When an au cell phone is handed over to you or someone
else, the Secure cell phone support plus LTE membership is
also handed over to the successor of the cell phone.
・
When you get a new au cell phone by changing the model
or purchasing an extra cell phone, the "Secure cell phone
support plus"/"Secure cell phone support plus LTE"
membership for the old au cell phone is automatically
canceled.
・
Service contents are subject to change without notice.
■
au Micro IC Card (LTE)
The au Micro IC Card (LTE) is lent to you by au. In case of loss
or damage, the card will be replaced at your expense. When
malfunction is suspected, or in case of theft or loss, contact
an au shop or PiPit.
■
After-sales service
If you are unsure about anything regarding after-sales service,
contact the following service contact.
Customer Service Center (for service canceling procedure
or operation in case of loss or theft)
From a land-line phone,
0077-7-113
(toll-free)
From an au cell phone,
113
without area code (toll free)
Secure cell phone support center (for loss, theft, damage)
From a land-line phone/From an au cell phone,
0120-925-919
(toll free)
Business hours 9:00 – 21:00 (7 days a week)
■
au after-sales service information
Replacement cell phone delivery service
Secure cell phone support plus LTE members
Non-Secure cell phone support plus LTE members
Holding over and repair
Secure cell phone support plus LTE members
Non-Secure cell phone support plus LTE members
* Charge amounts are all tax-included.
❖
Information
Replacement cell phone delivery service
・
When you have trouble with your au cell phone, replacement
cell phone (same model, same color, including new battery)
is delivered by calling to. Return your damaged cell phone
within 14 days after replacement cell phone is delivered.
・
Available up to twice in a year from the day you use this
service as a start day. If you do not use this service in the
past year at the subscription to this service, it will be 1st and
if you use, it will be 2nd.
* For details, refer to au homepage.
Holding over and repair
・
Damages and malfunctions intentionally caused by the
customer as well as those due to modification (e.g.
disassembly, change of parts, painting, etc.) by the
customer are not covered by this service.
・
You cannot receive a refund for replacement of the outer
casing due to stains, scratches, paint removal, etc. on the
outer casing.
Main specifications
❖
Information
・
The continuous call time, continuous stand-by time,
continuous 1Seg viewing time and continuous tethering time
may drop to less than half depending on the battery
charging status, usage environment such as temperature,
reception condition at the location where the product is
used, and the function settings.
During the
warranty
period
Repairs will be done based on the terms of
services of the free-of-charge repair warranty
described on the warranty card.
Outside the
warranty
period
We shall repair the product for a charge as
requested by the customer if repair renders it
usable.
Spontaneous failure 1st year Free of charge
Spontaneous failure 2nd
year or later
Customer charge
1st: 5,250 yen
2nd: 8,400 yen
Partially damage, water
soak, irreparable damage,
theft or loss
Spontaneous failure 1st year No recompense
Spontaneous failure 2nd
year or later
Partially damage, water
soak, irreparable damage,
theft or loss
Spontaneous failure 1st year Free of charge
Spontaneous failure 2nd
year or later
Free of charge (three-year
warranty)
Partially damage
Customer charge
Upper limit: 5,250 yen
Water soak, irreparable
damage
Customer charge
10,500 yen
Theft, loss
No recompense
Spontaneous failure 1st year Free of charge
Spontaneous failure 2nd
year or later
Actual cost
Partially damage
Water soak, irreparable
damage
Theft, loss
No recompense
(model change)
Display
Approx. 5.0 inches
TFT 16,777,216 colors
1,080 x 1,920 dots
Weight
Approx. 145 g (with battery pack)
Dimension (W x H x T)
Approx. 71 mm x 135 mm x
10.5 mm
Continuous
call time
In Japan
Approx. 910 min.
Overseas
(GSM)
Approx. 570 min.
Continuous
stand-by
time
In Japan
Approx. 440 hours (LTE)
Approx. 480 hours (3G)
Overseas
(GSM)
Approx. 520 hours
Charging time
Using Common AC Adapter 04
(sold separately): Approx.
140 min.
Continuous 1Seg
viewing time
Approx. 280 min.
Continuous tethering
time
Approx. 300 min. (LTE on WAN)
Approx. 460 min. (3G on WAN)
w
x
y
z
A
D
E
F
G
H
B
C
J
K
L
M
N
u
v
I


