background image

SIM card protection

You can lock and unlock each SIM card that you use in your device with a PIN
(Personal Identity Number). When a SIM card is locked, the subscription linked to the
card is protected against misuse, meaning that you have to enter a PIN every time
you start your device.

If you enter the PIN incorrectly more times than the maximum number of attempts
allowed, your SIM card will become blocked. You then need to enter your PUK
(Personal Unblocking Key) and a new PIN. Your PIN and PUK are supplied by your
network operator.

To set up a SIM card lock

1

From the Home screen, tap  .

2

Find and tap 

Settings

 > 

Lock screen & security 

Set up SIM card lock

.

3

Select a SIM card.

4

Drag the slider beside 

Lock SIM card

 to the right.

5

Enter the SIM card PIN and tap 

OK

. The SIM card lock is now active and you

will be prompted to enter this lock every time you restart the device.

To remove a SIM card lock

1

From the Home screen, tap  .

2

Find and tap 

Settings

 > 

Lock screen & security 

Set up SIM card lock

.

3

Select a SIM card.

4

Drag the slider beside 

Lock SIM card

 to the left.

5

Enter the SIM card PIN and tap 

OK

.

To change the SIM card PIN

1

From the Home screen, tap  .

2

Find and tap 

Settings

 > 

Lock screen & security 

Set up SIM card lock

.

3

Select a SIM card.

4

Tap 

Change SIM PIN

.

5

Enter the old SIM card PIN and tap 

OK

.

6

Enter the new SIM card PIN and tap 

OK

.

7

Re-type the new SIM card PIN and tap 

OK

.

To unlock a blocked SIM card using the PUK code

1

Enter the PUK code and tap 

.

2

Enter a new PIN code and tap 

.

3

Re-enter the new PIN code and tap 

.

If you enter an incorrect PUK code too many times, you need to contact your network operator
to get a new SIM card.

Using multiple SIM cards

Your device works with one or two SIM cards inserted. You get incoming
communication to both SIM cards and you can select from which number you want
to place outgoing communication. Before you can use both SIM cards, you need to
enable them and select the SIM card that will handle data traffic.

You can forward calls that come in on SIM card 1 to SIM card 2 when SIM card 1 is
unreachable, and vice versa. This function is called Dual SIM reachability. You must
enable it manually. See 

Forwarding calls on page 68.

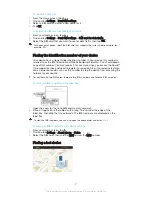
To enable or disable the use of two SIM cards

1

From the Home screen, tap  .

2

Find and tap 

Settings

 > 

Dual SIM settings

.

3

Drag the sliders beside 

SIM1

 and 

SIM2

 to the right or left.

20

This is an Internet version of this publication. © Print only for private use.

Summary of Contents for Xperia X F5122

Page 1: ...User guide Xperia X F5122 ...

Page 2: ... 21 Learning the basics 23 Using the touchscreen 23 Locking and unlocking the screen 24 Home screen 25 Application screen 26 Navigating applications 27 Widgets 28 Shortcuts and folders 28 Background and themes 29 Battery and power management 30 Taking a screenshot 31 Notifications 31 Icons in the status bar 33 Applications overview 36 Downloading applications 38 Downloading applications from Googl...

Page 3: ...settings 54 Date and time 54 X Reality for mobile 55 Super vivid mode 55 Enhancing the sound output 55 Multiple user accounts 56 Typing text 59 On screen keyboard 59 Phonepad 60 Entering text using voice input 61 Editing text 61 Personalising the on screen keyboard 62 Calling 64 Making calls 64 Receiving calls 65 Ongoing calls 67 Using the call log 67 Forwarding calls 68 Restricting calls 68 Multi...

Page 4: ...stening to music 86 Music home screen menu 87 Playlists 88 Sharing music 89 Enhancing the sound 89 Recognising music with TrackID 89 FM radio 91 Listening to the radio 91 Favourite radio channels 92 Sound settings 92 Camera 93 Taking photos and recording videos 93 Face detection 94 Using Smile Shutter to capture smiling faces 94 Adding geographical positions to your photos 94 General camera settin...

Page 5: ...ooth wireless technology 120 Smart apps and features that save you time 123 Using your device as a wallet 123 Travel and maps 124 Using location services 124 Google Maps and navigation 124 Using data traffic when travelling 124 Using your device with a car infotainment system 125 Airplane mode 125 Calendar and alarm clock 127 Calendar 127 Alarm and clock 127 Accessibility 130 Magnification gesture...

Page 6: ...ng and resetting your device 138 Warranty SAR and usage guidelines 140 Limitations to services and features 140 Legal information 140 6 This is an Internet version of this publication Print only for private use ...

Page 7: ...device is running you can check it via the Settings menu For more information about software updates see Updating your device on page 133 To check the current software version of your device 1 From your Home screen tap 2 Find and tap Settings About phone Android version Overview 7 This is an Internet version of this publication Print only for private use ...

Page 8: ...out the holder to remove the nano SIM card or cards or memory card from the device To insert one or two nano SIM cards If you drag out the SIM Memory card holder while the device is powered on the device restarts automatically 1 With the screen facing down drag out the SIM Memory card holder using your finger nail 2 Firmly place a single SIM card in the correct orientation in position one as shown...

Page 9: ... the memory card under Settings Storage memory Advanced settings Storage next to SD card then follow the rest of the instructions above Screen protection Before using your device remove the transparent protection film by pulling up on the protruding tab It is recommended to protect your device with a Sony branded screen cover or protector intended for your Xperia model The use of third party scree...

Page 10: ...sing history and bookmarks using the Google Chrome web browser Identify yourself as the authorised user after a software repair using Xperia Companion Remotely find lock or clear a lost or stolen device using the my Xperia or Android Device Manager services For more information about Android and Google go to http support google com It is crucial that you remember your Google account username and p...

Page 11: ... how long your device was in the box before you purchased it the battery level may be quite low It is therefore recommended that you charge the battery for at least 30 minutes before starting up your device for the first time You can still use your device while it is charging To read more about how to improve the battery performance see Battery and power management on page 30 To charge your device...

Page 12: ...the battery charge level is greater than 90 Red The battery is charging and the battery charge level is less than 15 Orange The battery is charging and the battery charge level is less than 90 12 This is an Internet version of this publication Print only for private use ...

Page 13: ...to perform a Factory Data Reset Protection by my Xperia If you remotely reset your device using this service you must enter the username and password for a Google account associated with the service The device must be connected to the Internet before the setup process can be completed Otherwise you will not be able to use your device after the reset Android Device Manager If you remotely reset you...

Page 14: ...creen security Screen lock 3 Draw your screen unlock pattern 4 Tap Pattern and follow the instructions on your device To create a screen lock PIN 1 From your Home screen tap 2 Find and tap Settings Lock screen security Screen lock PIN 3 Enter a numeric PIN then tap Continue 4 Re enter and confirm your PIN then tap OK To create a screen lock password 1 From your Home screen tap 2 Find and tap Setti...

Page 15: ...our device 4 Click the picture of your device under Your devices 5 Select Lock or Change PIN2 to replace the current screen lock with a new PIN code 6 Follow the on screen instructions provided by Protection by my Xperia Depending on your security settings your device may lock after a screen lock reset You then need to enter your Google account username and password in order to use the device Fing...

Page 16: ... Fi connection to limit data traffic charges Make sure that all your apps are updated using the Play Store application in order to ensure that the Google Play services app is updated Having an up to date Google Play services app ensures that you can use the latest Smart Lock features Enable Smart Lock Set when you want your device to unlock automatically The Smart Lock feature is developed by Goog...

Page 17: ...before the trusted device can keep it unlocked To remove a trusted Bluetooth device 1 From your Home screen tap 2 Find and tap Settings Lock screen security Smart Lock Trusted devices 3 Tap the device that you want to remove 4 Tap Remove trusted device Making sure you re secure when using trusted devices Different Bluetooth devices support different Bluetooth standards and security capabilities Th...

Page 18: ...r the location that you want to use as your home location If other residences share your street address you can add the actual location of your home within the building complex as a custom place To remove your home location 1 Make sure location mode is turned on and that you are using either the High accuracy or Battery saving setting 2 From your Home screen tap 3 Find and tap Settings Lock screen...

Page 19: ...hose body is connected If you give your device to someone else while it s unlocked using On body detection your device may stay unlocked for the other user Keep in mind that On body detection as a security feature is less secure than a pattern PIN or password To enable On body detection 1 From your Home screen tap 2 Find and tap Settings Lock screen security Smart Lock On body detection 3 Drag the...

Page 20: ...M card PIN 1 From the Home screen tap 2 Find and tap Settings Lock screen security Set up SIM card lock 3 Select a SIM card 4 Tap Change SIM PIN 5 Enter the old SIM card PIN and tap OK 6 Enter the new SIM card PIN and tap OK 7 Re type the new SIM card PIN and tap OK To unlock a blocked SIM card using the PUK code 1 Enter the PUK code and tap 2 Enter a new PIN code and tap 3 Re enter the new PIN co...

Page 21: ...when you access the Xperia Care support service and need to register your device Also if your device is stolen some network providers can use this number to stop the device from accessing the network in your country For devices with two SIM cards there are two IMEI numbers one for each SIM card slot To view your IMEI numbers on the label tray 1 Open the cover for the nano SIM and memory card slot ...

Page 22: ... sharing a device with multiple users note that the Protection by my Xperia service is only available to the user who is logged in as the owner Finding a lost device using Android Device Manager Google offers a location and security web service called Android Device Manager You can use it in parallel with or as an alternative to the my Xperia service If you lose your device you can use Android Dev...

Page 23: ... keyboard Touching and holding Move an item Activate an item specific menu Activate selection mode for example to select several items from a list Pinching and spreading Zoom in or out on web pages photos and maps and when you re taking photos or shooting videos 23 This is an Internet version of this publication Print only for private use ...

Page 24: ... the screen darkens to save battery power and locks automatically This lock prevents unwanted actions on the touchscreen when you are not using it When you buy your device a basic screen swipe lock is already set This means that you have to swipe upwards on the screen to unlock it You can change the security settings later and add other kinds of locks See Screen lock on page 13 To activate the scr...

Page 25: ...me screen The highlighted dot shows the pane that you are currently in 1 Introduction to Xperia widget Tap to open the widget and select a task such as copying content from your old device or setting up Xperia services 2 Dots Represents the number of Home screen panes To go to the Home screen Press To browse the Home screen Home screen panes You can add new panes to your Home screen up to a maximu...

Page 26: ...ll uninstallable applications are indicated by 3 Tap the application that you want to uninstall then tap Delete To adjust the size of icons on your Home screen 1 Touch and hold any area on your Home screen until the device vibrates then tap 2 Tap Icon size then select an option Application screen The Application screen which you open from the Home screen contains the applications that come pre ins...

Page 27: ...t you want to uninstall then tap Delete Navigating applications You can navigate between applications using the navigation keys the favourites bar and the recently used applications window which lets you switch easily between all recently used applications The navigation keys are the Home key the Recent apps key and the Back key Some applications get closed when you press the Home key to exit whil...

Page 28: ...dget that you want to add To resize a widget 1 Touch and hold a widget until it magnifies and the device vibrates then release the widget If the widget can be resized for example the Calendar widget then a highlighted frame and resizing dots appear 2 Drag the dots inward or outward to shrink or expand the widget 3 To confirm the new size of the widget tap anywhere on the Home screen To move a widg...

Page 29: ...emove an item from the Home screen Touch and hold the item until it becomes selected then drag the item to Remove from Home screen on the top of the screen To create a folder on the Home screen Touch and hold an application icon or a shortcut until it becomes selected then drag and drop it on top of another application icon or shortcut To add items to a folder on the Home screen Touch and hold an ...

Page 30: ... tap 2 Find and tap Settings Apps 3 Select an application and review its battery consumption via App info Battery usage Battery optimisation Battery optimisation is a powerful and convenient built in mode which improves your battery life significantly by reducing battery consumption when you are not using the device or certain apps This is achieved by suspending battery draining network activities...

Page 31: ... mode and then tap Activate 4 Confirm to activate Your Home screen is replaced by STAMINA Home and appears in the status bar when Ultra STAMINA mode is active Taking a screenshot You can capture still images of any screen on your device as a screenshot Screenshots you take are automatically saved in Album To take a screenshot 1 Press and hold down the power key until a prompt window appears 2 Tap ...

Page 32: ...ap the notification To dismiss a notification from the lock screen Place your finger on the notification and flick left or right To expand a notification on the lock screen Drag the notification downwards Not all notifications are expandable Managing notifications on the lock screen You can set up your device so that only selected notifications get displayed on your lock screen You can make all no...

Page 33: ... the notification level for an app 1 From your Home screen tap 2 Find and tap Settings Sound notification App notifications 3 Select the app for which you want to change the notification settings 4 Drag the relevant slider to the right Notification levels and options for specific applications Block all Never show notifications for the selected app Treat as priority Receive the selected app s notif...

Page 34: ... The battery is charging STAMINA mode is activated Airplane mode is activated The Bluetooth function is activated SIM card 1 is inserted SIM card 2 is inserted The microphone is muted The speakerphone is on Do not disturb mode is activated Allow exceptions in Do not disturb mode Vibrate mode An alarm is set GPS is activated Synchronisation is ongoing Problem with sign in or synchronisation The Hea...

Page 35: ...th friends using the Hangouts application Upcoming calendar event A song is playing The radio is on The device is connected to a computer via a USB cable Internal storage is 75 full Tap to transfer data to a memory card Warning More undisplayed notifications Not all icons that may appear on your device are listed here These icons are for reference purposes only and changes may be made without noti...

Page 36: ...t location find other locations and plan routes using Google Maps Use the Play Store application to download free and paid applications for your device Use the Messaging application to send and receive text and multimedia messages Use the Video application to play videos on your device and share content with your friends Use the Music application to organise and play music and audio books View new...

Page 37: ... For example you can access a User guide troubleshooting information plus tips and tricks Some applications are not supported or listed by all networks and or service providers in all areas 37 This is an Internet version of this publication Print only for private use ...

Page 38: ...gs 3 Mark the Send usage info checkbox if it is not already marked 4 Tap Agree Computer tools There are a number of tools available to help you connect your device to a computer and manage content such as contacts movies music and photos This device has a capless USB port If your device gets exposed to water ensure the USB port is completely dry before inserting a USB cable Xperia Companion Xperia...

Page 39: ...ent remaining storage capacity may prevent updates Ensure you have sufficient storage capacity before attempting to update To check for new software 1 If you are using a device with multiple users make sure you are logged in as the owner 2 From your Home screen tap 3 Find and tap Settings About phone Software update If no new software is available it s possible that you may not have enough free me...

Page 40: ...dynamic memory RAM is about 3 GB and cannot be used for storage RAM is used to handle running applications and the operating system You may have to purchase a memory card separately Read more about the use of memory in Android devices by downloading the White paper for your device at www sonymobile com support Improving memory performance The memory in your device tends to fill up as a result of n...

Page 41: ...between a Windows computer and your device to transfer and manage your files Once the two devices are connected you can drag and drop content between your device and the computer or between your device s internal storage and SD card using the computer s file explorer If you have a PC or an Apple Mac computer you can use Xperia Companion to access the file system of your device Backing up and resto...

Page 42: ...with the Xperia Backup restore application Using the Xperia Backup restore application you can make an online backup or a local backup of data For example you can back up data manually or turn on the automatic backup function to save data periodically The Xperia Backup restore application is recommended for backing up data before you do a factory data reset With this application you can back up th...

Page 43: ...inish To edit a backup file 1 From your Home screen tap 2 Find and tap Settings Backup reset 3 Under Xperia Backup Restore tap More 4 Tap Edit backup file then select a backup source and the data types that you want to delete 5 Tap Delete data 6 Tap OK to confirm 7 After the data is deleted tap Finish To restore backed up content 1 If you are restoring content from a USB storage device make sure t...

Page 44: ...e under Settings About phone you can download a light version using the Play Store application To run a specific diagnostic test 1 From your Home screen tap 2 Find and tap Settings About phone Diagnostics Test 3 Select a test from the list 4 Follow the instructions and tap Yes or No to confirm if a feature works To run all diagnostic tests 1 From your Home screen tap 2 Find and tap Settings About ...

Page 45: ...rase all data from your device s internal storage and you will not be able to access the files on any of your encrypted SD cards again To avoid permanent damage to your device do not restart your device while a reset procedure is underway 1 From your Home screen tap 2 Find and tap Settings Backup reset Factory data reset 3 Tap Reset phone 4 If required draw your screen unlock pattern or enter your...

Page 46: ...y responsible for additional content that you download to or forward from your mobile device Prior to your use of any additional content please verify that your intended use is properly licensed or is otherwise authorized Sony does not guarantee the accuracy integrity or quality of any additional content or any other third party content Under no circumstances will Sony be liable in any way for you...

Reviews: