


4
Signal level. The number of flags indicates
the signal level.
5
The Bluetooth function. The fountain will
flow with water when the Bluetooth
function is on. When the Bluetooth
function is off, the fountain is still.
6
Battery level. The number of filled car park
levels indicates battery level status.
7
Sony Ericsson website.
8
Google Maps.
9
Google website.
10
Calls. A red airplane will fly in and stop on
the runway after you miss a phone call.
11
Wi-Fi on/off. The air control tower will emit
signal waves when Wi-Fi is on.
12
Time and date.
Downloading new panels
To download new panels
•
From the Panel settings view, tap
Get more panels
.
Calling
Making and receiving calls
You can use your phone to make, receive and keep track
of calls and messages. You can also dial directly from
22
Contacts or from the Call History. To make or receive a
phone call, your phone must be within range of a network.
Making calls
To make a call using the keypad
1
Press
.
2
If the keypad is not visible, tap .
3
Enter the phone number, starting with the area code, by
tapping the number keys.
4
Tap .
To end a call
•
To end an ongoing call, press
.
To make international calls
1
Press
.
2
Tap and hold down
until the international call prefix
+
appears.
3
Enter the country/region code, area code (without the
initial zero) and phone number.
4
Tap .
To make a call from Contacts
1
Press
.
2
Tap
.
3
Hide the keypad if necessary.
4
Scroll to the contact you want to call.
5
Tap the contact to see all of the contact's phone
numbers.
6
Tap the number you want to call.
Receiving calls
To answer a call
•
Press
.
23
Emergency calls
Your phone supports international emergency numbers, for
example, 112 or 911. You can normally use these numbers
to make emergency calls in any country, with or without the
SIM card inserted, if you are within range of a network.
In some countries, other emergency numbers may also
be promoted. Your network operator may therefore
have saved additional local emergency numbers on the
SIM card.
To make an emergency call
1
Press
.
2
To display the Phone keypad, if not already displayed, tap
.
3
Dial the local emergency number, or look it up on the SIM
card, if available.
4
Tap .
Network settings
You can set how your phone should choose an available
network when you are outside your operator coverage area.
To enter network settings
1
Press
and tap
Menu
>
Options
.
2
Tap the
Network
tab and enter the settings.
You can get e-mail in your phone and use all standard e-
mail functions.
You can synchronise your e-mail using the
Microsoft® Exchange ActiveSync® application.
24
Before using e-mail
Before you can send and receive e-mail, you need to set up
at least one e-mail account in your phone. You can set up
the following types of e-mail accounts:
•
Outlook e-mail that you can synchronize with a PC or
your company Microsoft® Exchange Server
•
E-mail account provided by an ISP (Internet Service
provider)
•
Web-based e-mail accounts
•
Work account that you access using a VPN (Virtual
Private Network) connection
Before using e-mail, you need to have the correct
Internet settings in the phone. See
Connecting to the
Internet
on page 35.
To set up Microsoft® Outlook® e-mail through a
Microsoft® Exchange Server
1
Tap >
>
Setup E-mail
.
2
Enter your email address and password, select the
Save
password
option, then tap
Next
.
3
Select
Try to get the e-mail settings automatically
from the Internet
, then tap
Next
.
4
If automatic settings can not be found, select
Exchange
server
in the
Your e-mail provider
list, then tap
Next
.
5
Tap
Next
again.
6
Mark the
Attempt to detect Exchange Server Settings
automatically
check box, then tap
Next
.
7
If server settings are not detected, enter them manually,
then tap
Next
.
8
Enter your user name, password and domain, then tap
Next
.
25
9
If prompted, enter the server address, then tap
Next
.
10
Select the data you want to synchronize, then tap
Finish
.
Some e-mail features depend on the Microsoft®
Exchange Server version used in your company.
Check with your network administrator for the
availability of these features.
To manually set up an e-mail account of a common type
1
Tap >
>
Setup E-mail
.
2
Enter your e-mail address and password. Select the
Save
password
option, then tap
Next
.
3
Check the
Try to get the e-mail settings automatically
from the Internet
box, then tap
Next
.
4
If automatic settings can not be found, select an option
in the
Your e-mail provider:
list, then tap
Next
.
5
Enter your name and account display name, then tap
Next
.
6
If prompted, enter the incoming mail server address and
the account type, then tap
Next
.
7
Enter your user name and password for the e-mail
account, check the
Save password
box, then tap
Next
.
8
Tap
Advanced Server Settings
, select a
Network
connection
, and tap
Done
to confirm.
9
Enter the outgoing mail server address, then tap
Next
.
10
Select a time interval for
Automatic Send/Receive:
.
11
Tap
Finish
.
Handling e-mail messages
To check for new e-mail
1
Tap >
.
2
Tap your e-mail account.
26
3
Tap
Menu
>
Send/Receive
.
Direct push
Direct push technology lets you receive new e-mail
messages in your phone as soon as they arrive in your Inbox
on the Microsoft® Exchange Server. This feature also works
for items such as contacts, calendar appointments and
tasks.
To turn on and off MS Direct push
1
Tap >
Settings
>
Communication Manager
.
2
Select an option for
MS Direct Push
.
Frequent updates can be costly and are operator-
dependent.
SMS
You can send short text messages up to 160 characters
long to other mobile phones using SMS (Short Message
Service).
Before you use SMS, you must have a service center
number. The number is supplied by your service provider
and is usually saved on the SIM card the first time you start
your device with the SIM inserted. If not, you should contact
your service provider.
To create and send a text message
1
Tap >
Text
.
2
Tap
Menu
>
New
>
Text message
.
3
Enter the phone number manually or tap
To:
to add a
phone number from
Contacts
.
4
Tap the text area and enter the text.
5
Tap
Send
.
27
To view a message
1
When you receive a new text or multimedia message,
appears on the screen.
2
Tap >
Text
.
3
Tap a conversation list.
4
In the conversation list, tap the message.
MMS
In a message sent using MMS (Multimedia Messaging
Service), you can include pictures, video, and audio clips.
Please note that MMS is a charged service and has to
be provisioned on your mobile account. Contact your
service provider for details. Please make sure the size
of multimedia messages that you send is within the
limits allowed by your service provider.
To install MMS settings automatically
1
Tap >
Settings
>
Connections
>
Connection
Setup
.
2
Tap
OK
.
To view a message
1
When you receive a new text or multimedia message,
appears on the screen.
2
Tap >
Text
.
3
Tap a conversation list.
4
In the conversation list, tap the message.
To create and send a multimedia message
1
Tap >
Text
.
2
Tap
Menu
>
New
>
Multimedia Message
.
3
Tap a template or tap to open a blank picture message.
28
Browsing the Web
Connecting to the Internet
You can connect to the Internet by using GPRS/HSPA or
Wi-Fi. Before connecting to the Internet by GPRS/HSPA
you need the correct Internet settings in the phone. The
settings are usually saved on the SIM card the first time you
start up the phone after inserting the SIM card. If not, you
can download settings automatically, or contact your
service provider to get the required information for entering
the settings manually.
Automatical download of settings may not be available
in all markets.
To start browsing
1
Tap >
Internet Explorer
.
2
Enter the Web address in the address field, and then tap
.
Wi-Fi (Wireless LAN)
You can connect your phone to a wireless network to
access the Internet. You can connect at home (personal
networks) or in public access zones (hot spots).
•
Personal networks – usually protected. A pass phrase or
a key is required from the owner.
•
Hot spots – usually unprotected, but often require you to
log on to the operator's service before you get Internet
access.
35
phone to factory settings and delete all phone content, for
example if you want to let someone else use your phone.
Before performing a
Clear Storage
, you need to back
up all data, for example photos and music stored in the
phone, in order not to lose this data.
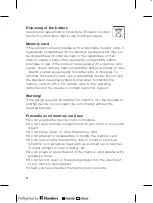
To reset the phone to factory settings
1
Remove the battery cover and the stylus. Locate the small
hole (see picture).
2
Insert a thin object into the hole and press down.
To reset the phone to factory settings and delete all phone
content
•
Select >
Settings
>
System
>
Clear Storage
.
34
function on. There is thus no need to enter the
passcode again.
To accept a Bluetooth™ partnership
1
Check that Bluetooth™ functionality is turned on and
your phone is in visible mode.
2
Tap
Yes
when prompted to establish a partnership with
the other device.
3
Enter the same passcode that was entered on the device
requesting the partnership, then tap
Next
.
4
When you are notified that the partnership has been
established, tap
Done
. You can now exchange
information with the paired device in a secure manner.
Update Service
You can update the software of your phone in order to
improve performance. This is done using the Sony Ericsson
Update Service.
To use Update Service
A USB cable is required for this operation.
1
From a PC with an Internet connection, go to
www.sonyericsson.com/update
.
2
Follow the instructions to install the latest available
software in your phone.
Resetting the phone
You can reset your phone to factory default settings. You
can also use
Clear Storage
to simultaneously reset your
33
2 Computer:
Click
Start
>
All Programs
>
Windows Mobile
Device Center
.
3
Click at the lower left part of the Windows® Mobile
Device Center window.
Bluetooth™ partnership
A Bluetooth™ partnership is a relationship you create
between your phone and another Bluetooth-enabled device
in order to exchange information in a secure manner.
To create a Bluetooth™ partnership
1
Tap >
Settings
>
Bluetooth
™.
2
On the
Devices
tab, tap
Add new device
. Your phone
searches for other Bluetooth-enabled devices and
displays them in the box.
3
Tap the desired device in the list, then tap
Next
.
4
Specify a passcode (1 to 16 characters) to establish a
secure connection, then tap
Next
.
5
Wait for the paired device to accept the partnership.
When the receiving party has entered the same passcode
that you specified, the name of the paired device is
displayed in your phone.
6
Tap the name of the paired device and mark the check
boxes for the services you want to use on the paired
device.
7
Tap
Finish
.
Creating a Bluetooth partnership between two devices
is a one-time process. Once a partnership is created,
the devices will recognize each other automatically
when they are close enough and have the Bluetooth
32
before you can start the synchronization. For more
information, see
Bluetooth™ partnership
on page 32.
•
Wireless connection – Synchronize with an Exchange
Server using Exchange ActiveSync® or Windows Mobile
Device Center.
You are recommended to synchronize frequently in
order to keep the information in your phone and
computer up-to-date.
Setting up synchronization
•
If your computer uses Windows XP® or other compatible
Windows operating system, you should use Microsoft®
Exchange ActiveSync® 4.5 or later.
•
If your computer uses Windows Vista®, you should use
Windows® Mobile Device Center, which is part of the
operating system.
To install Exchange ActiveSync®
1
Go to
www.sonyericsson.com/X2support
to download the
latest version of the Exchange ActiveSync® application
to your computer.
2
Follow the on-screen instructions to install the software.
To set up synchronization in Windows XP
1
Install Microsoft Exchange ActiveSync® on the
computer. For more information, see
To install Exchange
ActiveSync®
on page 30.
2
Connect the phone to the computer using the USB cable
that comes with the phone. The
Synchronization Setup
Wizard
automatically starts and guides you through the
creation of a synchronization partnership.
3 Computer:
Click
Next
.
30
4
Enter the phone number manually after
To:
or tap
To:
to
add a number from
Contacts
.
5
Enter a subject.
6
Tap the image area to insert a photo or a video clip.
7
Tap
Insert Text
to enter text.
8
Tap
Insert Audio
to insert audio.
9
Tap
Send
.
Synchronizing
By regularly synchronizing your data you can always keep
the information in your phone up-to-date, wherever you are.
You can synchronize several types of information between
your phone and a computer:
•
Microsoft® Outlook® information – e-mail messages,
contacts, calendar items, tasks and notes
• Media
– photos, videos and music
• Favorites
– Web page bookmarks under
Mobile
Favorites
•
Files – Microsoft® Office documents, pdf files, and more
Synchronization methods
After you have installed the synchronization software, you
can synchronize your phone with your computer using one
of these methods:
•
USB connection – When you connect a USB cable
between your phone and a computer, the
synchronization starts automatically.
•
Bluetooth connection – You must first set up a Bluetooth
partnership between your phone and the computer
29
4
To synchronize your phone with the computer, mark the
Synchronize directly with a server running Microsoft
Exchange
check box and click
Next
.
5
Select the information types that you want to synchronize,
then click
Next
.
6
Click
Finish
.
To set up synchronization in Windows Vista
1
Connect your phone to the computer using the USB
cable.
2 Computer:
The Windows® Mobile Device Center
automatically starts. Click
Set up your device
.
3
Select the information types that you want to synchronize.
4
Type a name for your phone, and click
Set Up
.
Starting synchronization
To start synchronization from Exchange ActiveSync® on a
computer
•
Connect your phone to the computer using the USB
cable. Exchange ActiveSync® opens automatically and
the synchronization starts.
To start synchronization from Exchange ActiveSync® in the
phone
1
Connect your phone to the computer using the USB
cable.
2 Phone:
Tap >
ActiveSync
.
3
Tap
Sync
.
To start synchronization from Windows® Mobile Device
Center on a computer
1
Connect your phone to the computer using the USB
cable.
31
To connect to a wireless network
1
Tap >
Settings
>
Connections
>
Wi-Fi
.
2
Tap the network you want to connect to.
3
A number of screens will follow. On each screen, check
the information displayed and change if necessary, then
tap
Next
.
4
On the last screen, tap
Finish
.
To turn on or off Wi-Fi
1
Tap >
Settings
>
Communication Manager
.
2
Mark or unmark the
Wi-Fi
check box to turn the function
on or off, respectively.
Using Wi-Fi consumes battery power. Turn off Wi-Fi
when not in use.
TV out
You can view pictures, videos and Office Mobile
applications stored in your phone on a TV, LCD monitor or
a video projector. Your phone connects to the TV, LCD
monitor or video projector through a dedicated TV out
cable.
DRM protected movies stored on your phone can not
be viewed on a TV or LCD monitor.
To view photos and videos on a TV
1
Connect the TV out cable to the phone and the TV.
2
Tap >
Settings
>
Connections
>
Communication
manager
.
3
Tap the DLNA Media Server check box.
4
Tap the file you want to show on the TV.
36
Camera
You can take photos and record videos using the camera
in the phone. You will find saved photos and videos by
pressing under
Media
>
Pictures
and
Videos
.
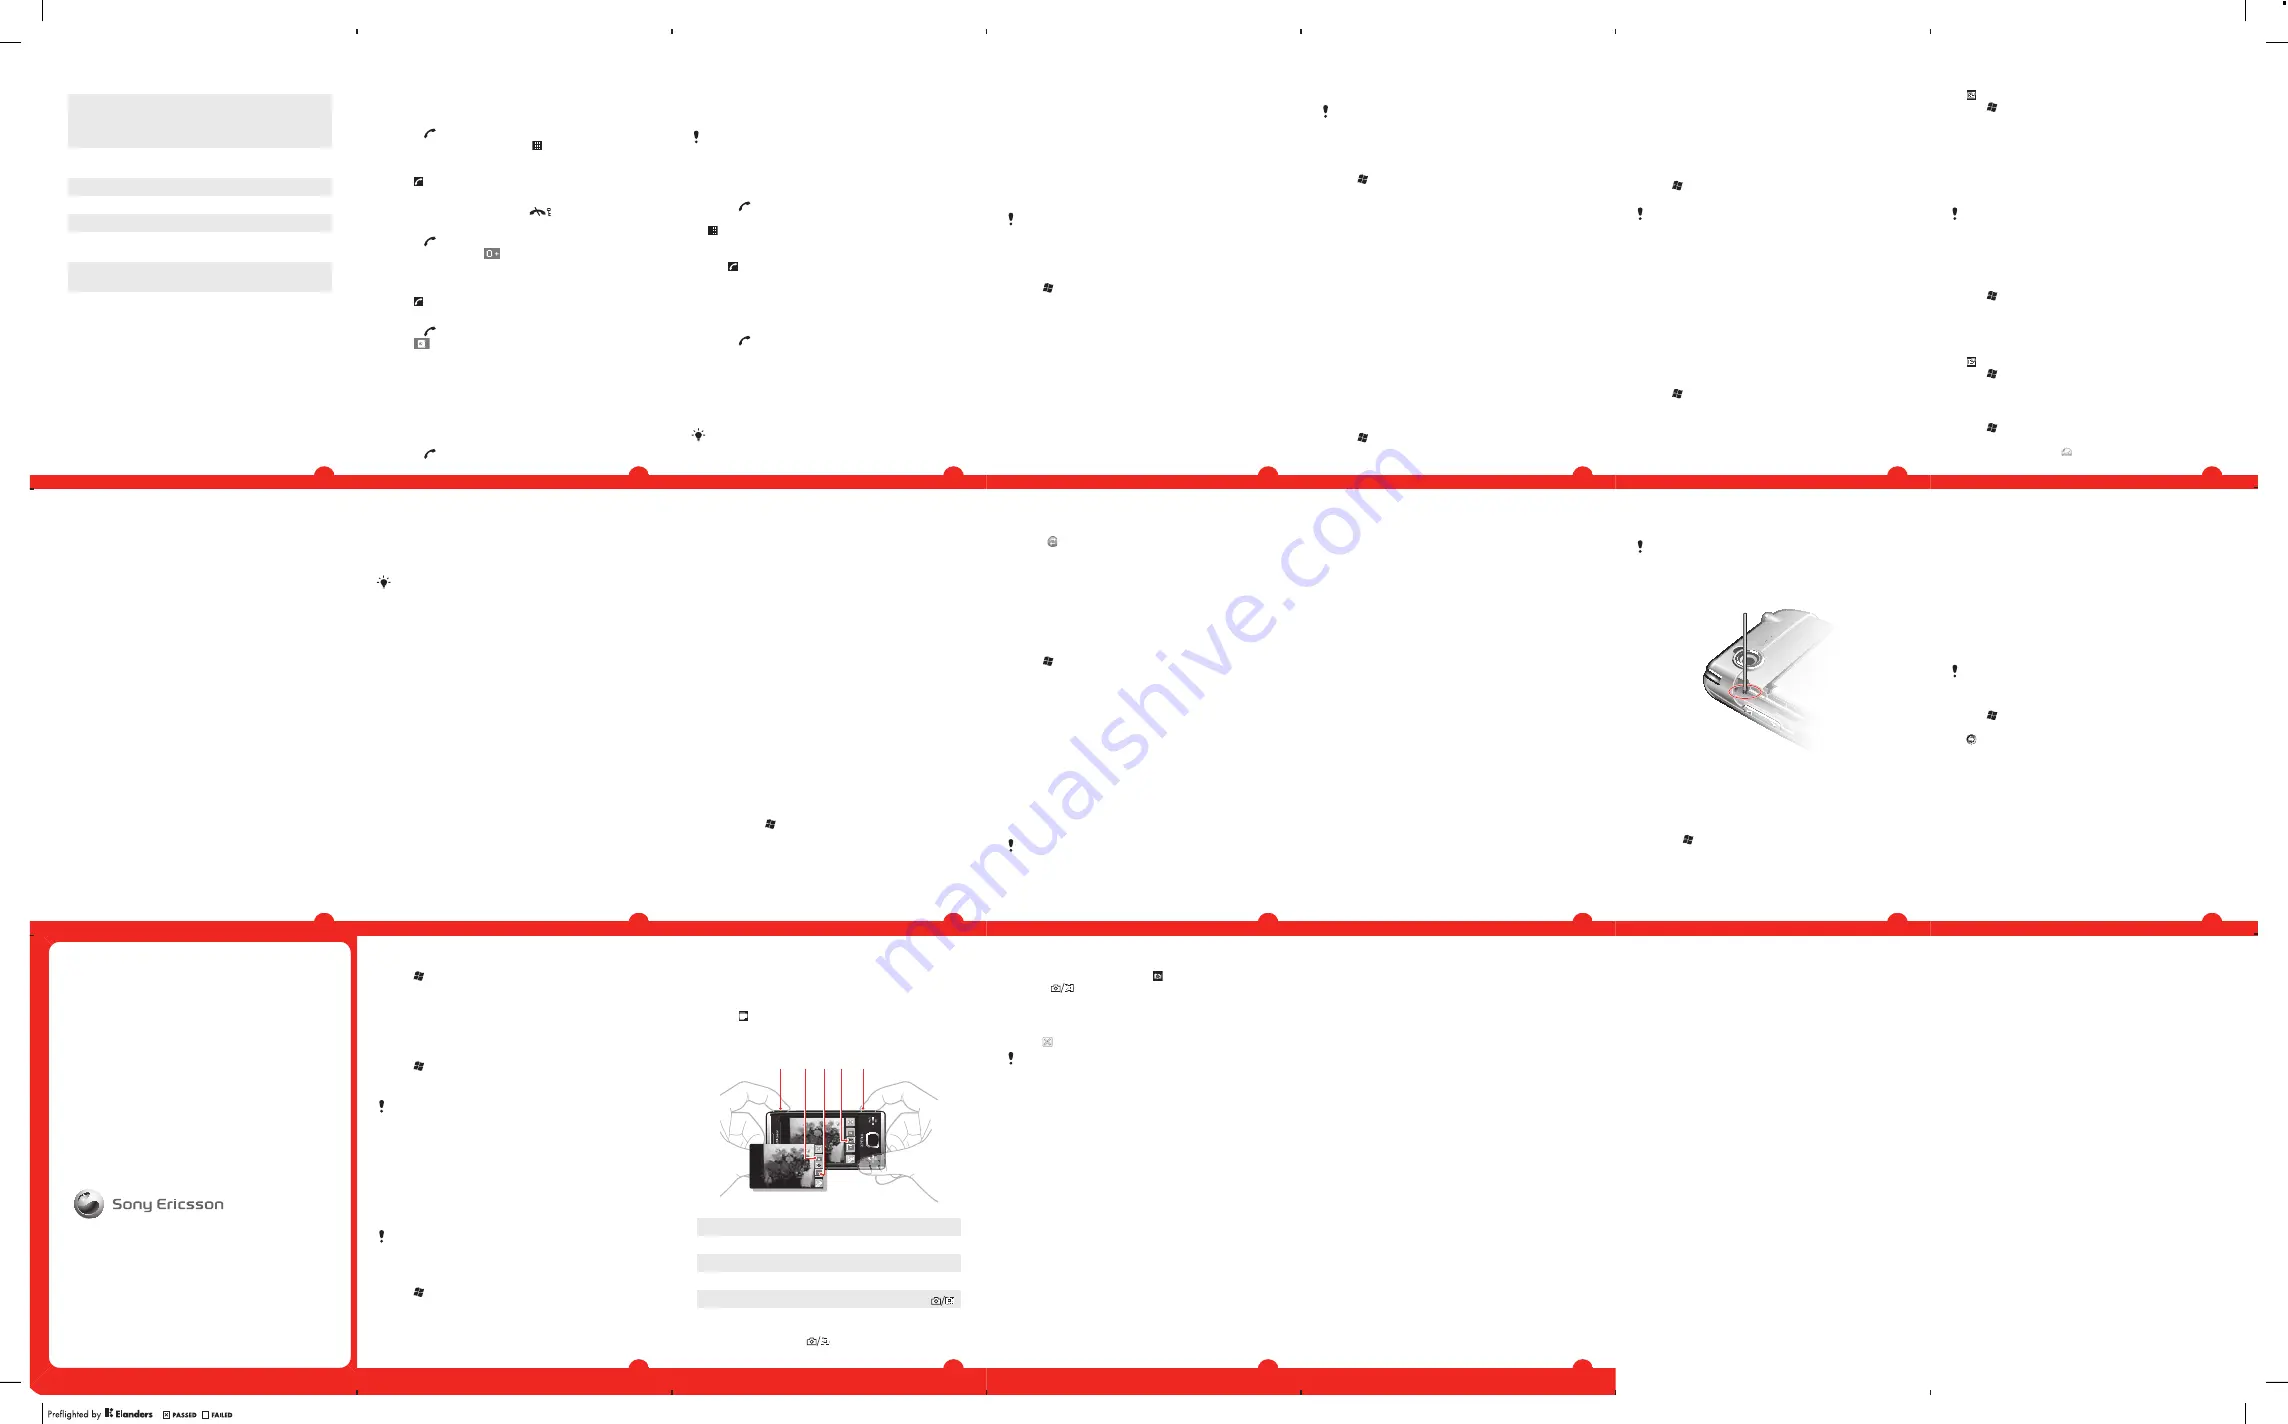
Using the camera
1
2
3
4
5
1 Zoom in or out
2 View photos and videos
3 Select video camera
4 Select still camera
5 Activate the camera/Take photos/Record videos
To activate the camera
•
Press and hold down
.
37
To take a photo
1
Activate the camera and tap .
2
Press
halfway down to use auto focus.
3
When the focus frame is green, press fully down to take
the photo.
To exit the camera
•
Tap .
The camera closes automatically if you do not use it for
two minutes.
Legal information
Sony Ericsson X2
This User guide is published by Sony Ericsson Mobile Communications
AB or its local affiliated company, without any warranty. Improvements
and changes to this User guide necessitated by typographical errors,
inaccuracies of current information, or improvements to programs and/
or equipment, may be made by Sony Ericsson Mobile Communications
AB at any time and without notice. Such changes will, however, be
incorporated into new editions of this User guide.
All rights reserved.
©Sony Ericsson Mobile Communications AB, 2009
Publication number: 1230-3175.1
Your mobile phone has the capability to download, store and forward
additional content, e.g. ringtones. The use of such content may be
restricted or prohibited by rights of third parties, including but not limited
to restriction under applicable copyright laws. You, and not
Sony Ericsson, are entirely responsible for additional content that you
download to or forward from your mobile phone. Prior to your use of any
additional content, please verify that your intended use is properly
licensed or is otherwise authorized. Sony Ericsson does not guarantee
the accuracy, integrity or quality of any additional content or any other
third party content. Under no circumstances will Sony Ericsson be liable
in any way for your improper use of additional content or other third party
content.
38
Please note:
Some of the services in this User guide are not supported by all networks.
This also applies to the GSM International Emergency Number 112
.
Please contact your network operator or service provider if you are in
doubt whether you can use a particular service or not.
Bluetooth and the Bluetooth logo are trademarks or registered
trademarks of Bluetooth SIG Inc. and any use of such mark by
Sony Ericsson is under license.
Wi-Fi is a trademark or a registered trademark of the Wi-Fi Alliance.
The Liquid Identity logo and X2 are trademarks or registered trademarks
of Sony Ericsson Mobile Communications AB.
Sony and "make.believe" is a trademark or registered trademark of Sony
Corporation.
Media Go is a trademark or a registered trademark of Sony Media
Software and Services
Ericsson is a trademark or registered trademark of Telefonaktiebolaget
LM Ericsson.
Microsoft, Windows, the Windows logo, Outlook, Windows Vista and
ActiveSync are registered trademarks or trademarks of Microsoft
Corporation in the United States and/or other countries.
This product is protected by certain intellectual property rights of
Microsoft. Use or distribution of such technology outside of this product
is prohibited without a license from Microsoft.
DLNA is a trademark or registered trademark of the Digital Living Network
Alliance.
PLAYSTATION is a trademark or registered trademark of Sony Computer
Entertainment, Inc.
Other product and company names mentioned herein may be the
trademarks of their respective owners.
Any rights not expressly granted herein are reserved.
All illustrations are for illustration only and may not accurately depict the
actual phone.
This User guide contains simulated screen images.
39
www.sonyericsson.com
Sony Ericsson Mobile Communications AB
SE-221 88 Lund, Sweden
1230-3175.1


