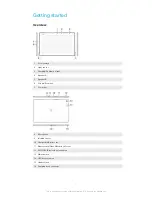
background image

User guide

TM

 Z2 Tablet

SGP561

Summary of Contents for Xperia Z2 SGP561

Page 1: ...User guide TM Z2 Tablet SGP561 ...

Page 2: ...ifications 20 Icons in the status bar 21 Downloading applications 23 Downloading applications from Google Play 23 Downloading applications from other sources 23 Internet and networks 24 Browsing the web 24 Internet and messaging settings 24 Wi Fi 25 Sharing your mobile data connection 26 Controlling data usage 27 Selecting mobile networks 28 Virtual private networks VPNs 29 Synchronising data on y...

Page 3: ...ng contacts 44 Favourites and groups 45 Sending contact information 45 Avoiding duplicate entries in the Contacts application 45 Backing up contacts 46 Email 47 Setting up email 47 Sending and receiving email messages 47 3 This is an Internet version of this publication Print only for private use Email preview pane 48 Organising your email messages 49 Email account settings 50 Gmail 50 Music 51 Tr...

Page 4: ...6 Transferring video content to your device 77 Managing video content 77 Video Unlimited service 78 Connectivity 79 Mirroring the screen of your device on a TV using a cable 79 Mirroring the screen of the phone on your device wirelessly 79 Mirroring the screen of your device on a TV wirelessly 79 Sharing content with DLNA Certified devices 80 4 This is an Internet version of this publication Print...

Page 5: ... lost device 97 IMEI number 98 Battery and power management 98 Memory and storage 100 Managing files using a computer 101 Restarting and resetting 102 Using your device in wet and dusty conditions 103 Recycling your device 104 Limitations to services and features 104 Legal information 104 5 This is an Internet version of this publication Print only for private use ...

Page 6: ...Xperia Z2 Tablet User guide 6 This is an Internet version of this publication Print only for private use ...

Page 7: ...lume Zoom key 7 Power key 8 Microphone 9 Infrared sensor 10 Charger USB port cover 11 Memory card Nano SIM card slot cover 12 Wi Fi GPS Bluetooth antenna area 13 Main camera 14 NFC detection area 15 Headset jack 16 Charging dock connector 7 This is an Internet version of this publication Print only for private use ...

Page 8: ...he nano SIM card holder 3 Place the nano SIM card on the holder with the gold coloured contacts on the nano SIM card facing up 4 Insert the nano SIM card holder back into the device 5 Re attach the nano SIM card slot cover Inserting the nano SIM card into the device without the SIM card holder could damage your nano SIM card or your device and Sony Mobile does not guarantee and will not be held li...

Page 9: ...hen press against the edge of the memory card and release it 3 Draw the card outwards to remove it fully Starting your device for the first time The first time you start your device a setup guide opens to help you configure basic settings sign in to some accounts and personalise your device For example if you have a Sony Entertainment Network account you can sign in to it here and get set up strai...

Page 10: ... services you need a Google account For example a Google account is mandatory if you want to Download and install applications from Google Play Synchronise email contacts and the calendar Chat with friends using the Hangouts application Synchronise your browsing history and bookmarks For more information about Android and Google read the article To set up a Google account on your device 1 From you...

Page 11: ...hat different users can log in separately to the device and use it For example different users can have different home screen setups wallpaper and general settings as well as separate memory storage So they can install their own applications and store files such as music and photos that only they can access Multiple user accounts work well in situations where different family or group members shar...

Page 12: ... the device 2 If you have set a password for the new account enter the password to log in If you have not set a password just unlock the screen To delete a user from your device 1 Make sure you are logged in as the owner 2 From your Home screen tap 3 Find and tap Settings Users 4 Tap beside the name of the user that you want to delete then tap Delete Each secondary user can also delete himself her...

Page 13: ...r text using the on screen keyboard Touching and holding Move an item Enable an item specific menu Enable selection mode for example to select several items from a list Pinching and spreading Zoom in or out on a web page a photo or a map 13 This is an Internet version of this publication Print only for private use ...

Page 14: ...ions on the touchscreen when you are not using it When you buy your device a basic screen swipe lock is already set This means that you have to swipe in any direction from the middle of the screen to unlock it You can change the security settings later and add other kinds of locks See Screen lock on page 36 To activate the screen Briefly press the power key To unlock the screen Place a finger on t...

Page 15: ...ne as the main Home screen pane 1 Touch and hold an empty area on your Home screen until the device vibrates 2 Flick left or right to browse to the pane that you want to set as your main Home screen pane then tap To add a pane to your Home screen 1 Touch and hold an empty area on your Home screen until the device vibrates 2 Flick left or right to browse the panes then tap To delete a pane from you...

Page 16: ...ication screen 1 To open the Application screen menu drag the left edge of the Application screen to the right 2 Select the desired option under SHOW APPS To search for an application from the Application screen 1 To open the Application screen menu drag the left edge of the Application screen to the right 2 Tap Search apps 3 Enter the name of the application that you want to search for To uninsta...

Page 17: ...same screen For example you can have a webpage open and then open the Calculator small app on top of it and perform calculations You can download more small apps from Google Play To open a small app 1 To make the small apps bar appear press 2 Tap the small app that you want to open You can open several small apps at the same time To close a small app Tap on the small app window To download a small...

Page 18: ...widget the full Weather application opens You can download additional widgets from Google Play To add a widget to the Home screen 1 Touch and hold an empty area on your Home screen until the device vibrates then tap Widgets 2 Find and tap the widget that you want to add To resize a widget 1 Touch and hold a widget until it magnifies and the device vibrates then release the widget If the widget can...

Page 19: ...ation The selected application is added to the Home screen In step 3 alternatively you can tap Shortcuts and then select an application from the list available If you use this method to add shortcuts some of the applications available allow you to add a specific function to the shortcut To move an item on the Home screen Touch and hold the item until it magnifies and the device vibrates then drag ...

Page 20: ... can capture still images of any screen on your device as a screenshot Screenshots you take are automatically saved in Album To take a screenshot 1 Press and hold down the power key and the volume down key simultaneously until you hear a clicking sound 2 To view the screenshot drag the status bar right to the bottom Status and notifications The icons in the status bar inform you of events such as ...

Page 21: ...er on a notification and flick left or right To clear all notifications from the Notification panel Tap Clear Notification light The notification light informs you about battery status and other events Icons in the status bar Status icons Signal strength No signal Roaming 3G is available Battery status Sending and downloading 3G data The battery is charging STAMINA mode is enabled Airplane mode is...

Page 22: ...en New email message Upcoming calendar event A song is playing The device is connected to a computer via a USB cable Warning message Emergency alert A Wi Fi connection is enabled and wireless networks are available Software updates are available Downloading data Uploading data More undisplayed notifications GPS is enabled 22 This is an Internet version of this publication Print only for private us...

Page 23: ...issions to applications that you trust You can view the permissions granted to a downloaded application by tapping the application under Settings Apps Downloading applications from other sources When your device is set to allow downloads from sources other than Google Play you can download applications directly from other websites by following the relevant download instructions Installing applicat...

Page 24: ...on your device at any time Contact your network operator for detailed information Sometimes you need to wait a while to have a working mobile data connection especially when the signal strength in your vicinity is weak and unstable To increase the signal strength of your mobile network move to an open location free from obstructions or get close to a window If you are using a device with multiple ...

Page 25: ... not show up in the list of available networks because they do not broadcast their network name SSID If you know the network name you can add it manually to your list of available Wi Fi networks To turn on Wi Fi 1 From your Home screen tap 2 Find and tap Settings 3 Drag the slider beside Wi Fi to the right to turn on the Wi Fi function It may take a few seconds before Wi Fi is enabled To connect t...

Page 26: ...led a mobile data connection on your device By adding a Wi Fi sleep policy you can specify when to switch from Wi Fi to mobile data To enable Wi Fi network notifications 1 Turn on Wi Fi if it is not already on 2 From your Home screen tap 3 Find and tap Settings Wi Fi 4 Press 5 Tap Advanced 6 Mark the Network notification checkbox To view detailed information about a connected Wi Fi network 1 From ...

Page 27: ...rm appears in the status bar once the portable Wi Fi hotspot is active 9 To stop sharing your data connection via Wi Fi unmark the Portable Wi Fi hotspot checkbox To rename or secure your portable hotspot 1 From the Home screen tap 2 Find and tap Settings More Tethering portable hotspot 3 Tap Portable Wi Fi hotspot settings Configure Wi Fi hotspot 4 Enter the Network SSID for the network 5 To sele...

Page 28: ...ired changes The performance of individual applications may be affected if you change the related data usage settings To view data transferred via Wi Fi 1 From your Home screen tap 2 Find and tap Settings Data usage 3 Tap then tick the Show Wi Fi usage checkbox if it is not ticked 4 Tap the Wi Fi tab Selecting mobile networks Your device automatically switches between mobile networks depending on ...

Page 29: ...device For detailed information on how to set up a connection to your virtual private network please contact the network administrator of your company or organisation To add a virtual private network 1 From your Home screen tap 2 Find and tap Settings More VPN 3 Tap 4 Select the type of VPN to add 5 Enter your VPN settings 6 Tap Save To connect to a virtual private network 1 From your Home screen ...

Page 30: ...sync to the right To synchronise manually with an online account 1 From your Home screen tap Settings 2 Under Accounts select the account type then tap the name of the account that you want to synchronise with A list of items that can be synchronised with the account appears 3 Tick the items that you want to synchronise 4 Tap then tap Sync now To remove an online account 1 From your Home screen ta...

Page 31: ...ngs of the EAS account as desired To set a synchronisation interval for an EAS account 1 From your Home screen tap 2 Tap Email then tap 3 Tap Settings and select an EAS account 4 Tap Check frequency and select an interval option To remove an EAS account 1 From your Home screen tap Settings 2 Under Accounts tap Exchange ActiveSync then select the EAS account that you want to remove 3 Tap then tap R...

Page 32: ...tion is installed on the Apple Mac computer 2 Computer Open the PC Companion application or the Sony Bridge for Mac application 3 Click Start to start the Calendar and Calendar Sync applications and follow the on screen instructions to synchronise your device with your Outlook calendar 32 This is an Internet version of this publication Print only for private use ...

Page 33: ...et your device to silent mode so that it doesn t ring when you re in a meeting To adjust the ringtone volume with the volume key Press the volume key up or down To adjust the media playing volume with the volume key When playing music or watching video press the volume key up or down To set your device to vibrate mode Press the volume key down until appears in the status bar To set your device to ...

Page 34: ...3 Tap Change SIM PIN 4 Enter the old SIM card PIN and tap OK 5 Enter the new SIM card PIN and tap OK 6 Re type the new SIM card PIN and tap OK To unlock a blocked SIM card using the PUK code 1 Enter the PUK code and tap 2 Enter a new PIN code and tap 3 Re enter the new PIN code and tap If you enter an incorrect PUK code too many times you need to contact your network operator to get a new SIM card...

Page 35: ...et up the Face Unlock feature 1 From your Home screen tap Settings Security Screen lock 2 Tap Face Unlock then follow the instructions on your device to capture a photo of your face 3 After your face has been successfully captured tap Continue 4 Select a backup unlock method and follow the instructions on the device to complete the setup For best results capture your face in an indoor area that is...

Page 36: ...riting language for text input See Personalising the Xperia keyboard on page 42 To change the language 1 From the Home screen tap 2 Find and tap Settings Language input Language 3 Select an option 4 Tap OK If you select the wrong language and cannot read the menu texts find and tap Then select the text beside and select the first entry in the menu that opens You can then select the language you wa...

Page 37: ...in volume between different media files are minimised To enhance the sound output automatically 1 From your Home screen tap 2 Find and tap Settings Sound Sound effects 3 Mark the ClearAudio checkbox To adjust the sound settings manually 1 From the Home screen tap 2 Find and tap Settings Sound Sound effects 3 Untick the ClearAudio checkbox if it is ticked 4 Tap Sound enhancements 5 Tick or untick t...

Page 38: ... Noise cancelling headset may not be included with the device at purchase When a noise cancelling headset is connected to your device you can also select the noise cancelling headset type by dragging down the status bar to open the Notification panel and then tapping Audio accessories To adjust the settings to the noise environment 1 Make sure a noise cancelling headset is connected to your device...

Page 39: ...le split keyboard or mini keyboard 5 Enter a space 6 Personalise your keyboard This key disappears after the keyboard has been personalised 7 Display numbers and symbols For even more symbols tap To display the on screen keyboard to enter text Tap a text entry field To enter text character by character 1 To enter a character visible on the keyboard tap the character 2 To enter a character variant ...

Page 40: ...st speak the words that you want to enter Voice input is an experimental technology from Google and is available for a number of languages and regions To enable voice input 1 When you enter text using the on screen keyboard tap 2 Tap then tap Keyboard settings 3 Tick the Google voice typing key checkbox 4 Tap to save your settings A microphone icon appears on your on screen keyboard To enter text ...

Page 41: ... then tap Keyboard settings and change the settings as desired 3 To add a writing language for text input tap Writing languages and tick the relevant checkboxes 4 Tap OK to confirm To change the text input settings 1 When you enter text using the on screen keyboard tap 2 Tap then tap Keyboard settings Text input settings and select the relevant settings To display the Smiley key 1 When you enter t...

Page 42: ...ructions to transfer your contacts Transferring contacts using an online account If you sync the contacts in your old device or your computer with an online account for example Google Sync Facebook or Microsoft Exchange ActiveSync you can transfer your contacts to your new device using that account To synchronise contacts to your new device using a synchronisation account 1 From your Home screen t...

Page 43: ...t To import all contacts tap Import all Searching and viewing contacts 1 Contacts Call and Groups tabs 2 Search for contacts 3 Add a contact 4 Edit a contact s details 5 View more options 6 Contact details display area 7 View contact details 8 Jump to contacts starting with the selected letter To search for a contact 1 From your Home screen tap then tap 2 Tap and enter a phone number name or other...

Page 44: ...ation services do not allow you to edit contact details To associate a picture with a contact 1 From your Home screen tap then tap 2 Tap the contact you want to edit then tap 3 Tap and select the desired method for adding the contact picture 4 When you have added the picture tap Done You can also add a picture to a contact directly from the Album application To delete contacts 1 From your Home scr...

Page 45: ...p 2 Touch and hold the contact whose details you want to send 3 Tap then select a transfer method and follow the on screen instructions To send several contacts at once 1 From your Home screen tap then tap 2 Press then tap Mark several 3 Mark the contacts you want to send or select all if you want to send all contacts 4 Tap then select an available transfer method and follow the on screen instruct...

Page 46: ...SIM card When you export contacts to a SIM card not all information may get exported This is due to memory limitations on SIM cards 1 From your Home screen tap then tap 2 Press then tap Export contacts SIM card 3 Mark the contacts you want to export or tap Mark all if you want to export all your contacts 4 Tap Export 5 Select Add contacts if you want to add the contacts to existing contacts on you...

Page 47: ... settings for the email account cannot be downloaded automatically complete the setup manually 5 When prompted enter a name for your email account so it is easily identifiable 6 When you have finished tap Next To set an email account as your default account 1 From your Home screen tap 2 Find and tap Email 3 Press then tap Settings 4 Select the account you want to use as the default account for wri...

Page 48: ...er the email subject and message text then tap To reply to an email message 1 In your email inbox find and tap the message that you want to reply to then tap Reply or Reply all 2 Enter your reply then tap To forward an email message 1 In your email inbox find and tap the message you want to forward then tap Forward 2 Enter the recipient s email address manually or tap and select a recipient from y...

Page 49: ... then tap Combined inbox 4 Tap then tap Sort 5 Select a sorting option To search for emails 1 From your Home screen tap then find and tap Email 2 If you are using several email accounts tap and select the name of the account you want to check then tap Inbox in the drop down menu If you want to search all your email accounts at once tap then tap Combined view 3 Tap 4 Enter your search text then tap...

Page 50: ...ap Settings 3 Select the EAS Exchange Active Sync account for which you want to set an Out of Office auto reply 4 Tap Out of office 5 Tap beside Out of office so that changes to 6 If needed tick the Set time range checkbox and set the time range for the auto reply 7 Enter your Out of Office message in the body text field 8 Tap OK to confirm Gmail If you have a Google account you can use the Gmail ...

Page 51: ... Learn more and download Sony Bridge for Mac Listening to music Use the WALKMAN application to listen to your favourite music and audio books 1 Browse your music 2 Album art if available 3 Tap to go to the previous song in the play queue Touch and hold to rewind within the current song 4 Play or pause a song 5 Tap to go to the next song in the play queue Touch and hold to fast forward within the c...

Page 52: ...The WALKMAN application stays playing in the background To open the WALKMAN application when it is playing in the background 1 While a song is playing in the background tap the to open the recently used applications window 2 Tap the WALKMAN application WALKMAN home screen The WALKMAN home screen gives you an overview of all the songs on your device as well as of the songs available on Music Unlimi...

Reviews: