182 mm
53 mm
TOP
TO
P
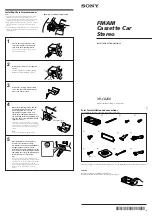
Installation
Precautions
•Do not tamper with the four holes on the upper surface of the unit. They are used for tuner adjustments
to be made only by service technicians.
•If you mount other Sony equipment with this unit, it is better to mount this unit in the lower position.
•There must be a distance of at least 15 cm between the cassettes slot of the unit and shift lever to insert
cassette easily. Choose the installation location carefully so the unit does not interfere with gear shifting
and other driving operations.
•Choose the mounting location carefully so the unit does not interfere with normal driving operations.
•Avoid installing the unit where it would be subject to high temperatures, such as from direct sunlight or
hot air from the heater, or where it would be subject to dust, dirt or excessive vibration.
•Use only the supplied mounting hardware for safe and secure installation.
Mounting angle adjustment
Adjust the mounting angle to less than 20°.
Mounting the unit in a Japanese car
You may not be able to install this unit in some makes of Japanese cars. In such a case, consult your Sony
dealer.
1
2
TOYOTA
to dashboard
Bracket
Bracket
5
max. size 5
×
8 mm
5
max. size 5
×
8 mm
Existing parts supplied to your car
NISSAN
5
max. size 5
×
8 mm
Claws
Cut all the claws from the unit with pincers
or other suitable tool.
Cassette
more than 15 cm
Shift lever
How to detach and attach the front panel
Before installing the unit, detach the front panel.
To detach
Before detaching the front panel, be sure to press
(OFF)
first.
Press
(OPEN)
to open up the front panel, then pull it off towards you.
To attach
Align the front panel to the unit , and push in.
To detach
To attach
Mounting example
Installation in the dashboard
1
2
To support the unit
Fire wall
With the TOP marking up
3
max. size 4
×
6 mm
2
Dashboard
4
Bend these claws, if necessary.
With the TOP marking up
1
3
to dashboard
5
max. size 5
×
8 mm
Bracket
Bracket
Notes
• To prevent malfunction, install only with the supplied
screws
5
.
• If you cannot mount the unit in the lower tier after cutting
off all claws, install it in the upper tier.
6
First attach
6
to the unit, then insert
the unit into
1
.
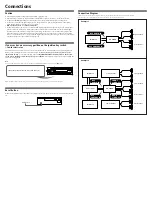
Note for Connecting
If there is alternator noise (a whining sound when the engine increases speed), ground the master unit
by connecting it to a metal point of the car with the supplied chassis ground cord
!™
. Connect the
ground cord to the master unit with a screw
3
. (See illustration.)
It is not necessary to install the
bracket
2
with Japanese cars.
3
2
!™
To a metal point of the car
1
Existing parts supplied to your car


