6
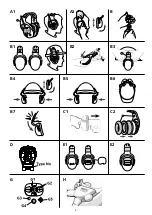
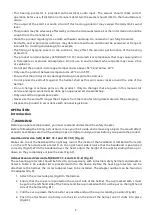
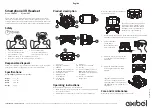
5. Detach the head harness at two places at the rear of the helmet and place the cord from the cups
above the harness attachment. Reattach the harness. Ensure the cord is not tangled.
6. For the working position, press the cups toward the ears until they click into place. Adjust the
height of the cups by sliding them up or down so they completely enclose the ears (Fig.B4).
7. Stand-by position: Pull the cups away from the ears until they lock into the stand-by position (Fig.
B5).
8. Parking position: From the stand-by position, rotate the cups to the rear of the helmet until they
click into place. In this position, the cushions do not get damaged or dirty and the cups can dry
(Fig.B6). NOTICE! Do not press the cups onto the helmet shell as this will lock the spring in the cup
arm, and damage the attachment slots on the side of the helmet.
9. Storage position: When the helmet is not in use, lower the cups and push them inwards until they
click into place (Fig.B7).
FUNCTIONS
Switch ON / OFF
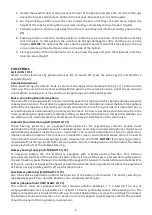
Switch on the electronics by pressing the key [O]. To switch off, press the same key [O] and hold for 2
seconds (Fig.G1).
Volume Adjustment
When powered up, the default mode is volume mode. Adjust the volume with the [+] or [-] button on the
right cup. The volume has six fixed settings. When pressing the volume buttons, a short beep sound is
heard. When reaching min or max volume, a longer beep sound is heard (Fig.G2).
Noise-Cancelling Boom Microphone
The earmuffs are equipped with a noise-cancelling speech microphone that is specially designed to work
in noisy environments. The product is supplied with an electret microphone. Adjust the boom microphone
so that the microphone is level with your mouth and about 3–5 mm from your lips. It is important not to
exceed this distance when working in a noisy environment, in order to get the best performance from the
noise-cancelling microphone. We recommend that you keep the microphone in this position whether you
are talking or not. A wind protector should be used to prevent interference from wind noise.
Ambient Sound Listening (left/RIGHT CO CC)
These hearing protectors are equipped with electronics for reproducing ambient sounds (level
dependent function). Ambient sound is captured by two externally mounted microphones (Fig.G3) and
reproduced by speakers inside the cup at a safe level. The sound is reproduced in stereo to preserve or
improve direction location. This function is intended for use in environments where there is a need to
hear ambient sound, such as warning signals, conversation and traffic. NOTICE! If the hearing protector
is swiched off, incoming signals from communication radio or mobile phone cannot be heard. The lowest
volume level shuts of the ambient listening.
Battery Saving Function (left/RIGHT CO CC)
To maximize battery life, the product is equipped with a battery-saving function. This function
automatically switches off the electronics after 4 hours if none of the keys is pressed during this period.
To switch back on, press the key in the middle of the keypad (O). About 2 minutes before automatic switch-
off occurs, a series of beeps will be heard as a warning that the hearing protector is about to be switched
off. Press any key to delay switch-off by a further 4 hours.
Low Battery Warning (left/RIGHT CO CC)
Two tones will be heard when about 10-20 percent of the battery life remains. The battery warning is
repeated every half hour until the batteries are completely discharged.
Battery Replacement (left/RIGHT CO CC)
The product must be equipped with two standard alkaline batteries, 1.5 V AA/LR6. The use of
rechargeable batteries such as NiMH 1.2 V or NiCd 1.2 V will significantly reduce the operating time. The
battery compartment is located in the left cup. To install new batteries, remove the lid (Fig.E1) and insert
the batteries. Make sure that the + and – poles are correctly aligned (Fig.E2). Replace the lid. The product
should be turned off during battery replacement.

