2-1
2 INSTALLATION
2.1 Introduction
This chapter discusses installation of the Load to the Mainframe, Load connections,
and unit self-tests, as well as application considerations.
2.2 Inspection
As soon as the instrument is unpacked, inspect any damage that might have occurred
in shipping. Keep all packing materials in case the Load or the Mainframe has to be
returned. If any damage is found, please file a claim with the carrier immediately. Do
not return the instrument to Sorensen without prior approval.
In additon to this manual, be sure that the following items have also been received with
your Mainframe and Load:
•
Mainframe: Power Cord
•
Load Module: Measurement and Load Cables
2.3 Installing the Modules
CAUTION!
Load module can be damaged by electronic discharge (static electricity).
Use standard anti-static work practices when you handle and install modules.
Avoid touching the connector and the circuit board.
The Sorensen MML-4 Mainframe can accommodate four single-width Loads
(MML-80-20-102, MML-80-60-301), or two double-width Loads (MML-80-120-601).
Loads can be combined in the Mainframe in any order. The Sorensen MML-2
mainframe can accommodate two single-width Loads or one double-width Load.
Module installation procedures in both Mainframes are the same. Installing Loads to
the Mainframe requires only a screwdriver.
Procedures
1. Disconnect the power cord with the Mainframe power off.
2. Remove any packing materials from the Mainframe.
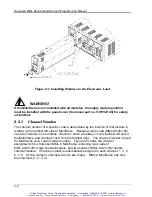
3. Start installing the modules in the slot (see Figure 2-1).
4. Plug the load module into the slot of the Mainframe along the rail.
5. Lock the module in place by use of the screwdriver (see Figure 2-1).
6. Install each additional module in the slot next to the previous one.
Artisan Scientific - Quality Instrumentation ... Guaranteed | (888) 88-SOURCE | www.artisan-scientific.com
Artisan Technology Group - Quality Instrumentation ... Guaranteed | (888) 88-SOURCE | www.artisantg.com

