background image

User  Manual  

9

(5)

(5)

(3)

(3)

(1)

(2)

(4)

(4)

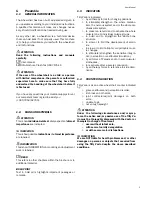
2.2.2  Starting and slowing down

 ATTENTION 

Avoid jerky starts. The wheelchair could tip back-

wards. With children we recommend, whenever pos-

sible, to use a headrest.

 ATTENTION

When driving downhill more strength is required.

This is why you should drive slow enough downhill 

that you are able to bring the wheelchair to a full 

stop at any time. 

 ATTENTION

Hand rims heat up from friction. If necessary, use 

gloves with a leather inner surface as used by 

cycling but NEVER wool gloves.

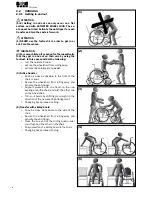
2.2.3  Danger of tipping and flipping over 

Special caution is necessary when driving (active and 

passive) with a tiltied seat and/or a back angle greater 

than 90°, because the centre of gravity is massively 

changed by this and it can become wobbily on a level 

surface.


 ATTENTION

WE RECOMMEND, IF POSSIBLE, NOT TO DRIVE OR 

OVERCOME OBSTACLES WITH A TILTED SEAT AND/

OR BACK ANGLE >90°. FOR THIS ALWAYS PLACE 

THE SEAT AND THE BACK IN A VERTICAL POSITION! 

 ATTENTION 

DO NOT HANG OBJECTS (BAGS ETC.) ON THE BACK 

OR THE BACK TUBES/ PUSH HANDLES/BAIL. WITH 

THIS YOU INFLUENCE THE TILT BEHAVIOUR OF THE 

WHEELCHAIR MASSIVELY.

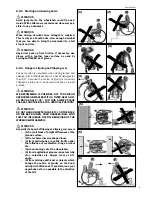
 ATTENTION 

Generally the hazard of flipping and tipping over occurs

•  (1) from all kinds of height differences of the 

ground surface,

•  (2) from chairs (never manage alone), 

•  (3) from participation in public traffic under 

the influence of medication, drugs, alcohol 

etc.,

•  (4) when leaning out of the wheelchair,

•  (5) from longitudinal grooves (streetcar rails 

etc.), curbsides etc. Always cross at 90° 

angle,

•  (6) from driving uphill and/or objects which 

change the centre of gravity on the back, 

driving with tilted seat. If possible, lean your 

upperbody as far as possible in the direction 

of the hill.

(4)

(4)

(6)

Summary of Contents for Tilty vario

Page 1: ...User Manual 1 Tilty Vario User Manual ...

Page 2: ...nt differ from the actual equipment components How ever a corresponding conduction is possible REHAKIND We are a member of rehaKIND e V International association child and adolescent rehabilitation COPYRIGHT by SORG Rollstuhltechnik GmbH Co KG Benzstraße 3 5 68794 Oberhausen Rheinhausen All texts and pictures in this user manual underlie the international copyright protection and are not allowed t...

Page 3: ...ANGLE 18 3 3 3 FOLDING THE BACK DOWN 18 3 3 4 SUBMERSIBLE BACK EXTENSION 18 3 3 5 ADJUSTING THE BACK ANGLE WITH A GAS PRESSURE SPRING 19 3 3 6 FOLDING THE BACK ANGLE DOWN WITH A GAS PRESSURE SPRING 19 3 4 PUSH AIDS 20 3 4 1 PUSH HANDLES PUSH BAIL 21 3 4 2 CLAMPING FORCE OF THE ECCENTRIC CLAMP 22 3 4 3 ANGLE ADJUSTMENT PUSH BAIL 22 3 4 4 PUSH AID FOR OUTSIDE OUTDOOR FRONT END 23 3 5 LEG SUPPORTS 24...

Page 4: ...6 handrim 17 clamp lever height adjustment push bail 18 clamp lever angle adjustment push bail 19 release lever gas pressure spring for back angle adjustment 20 control lever drum brake 1 axle plate with camber adapter 2 gas pressure spring for tilting 3 frame crossbar screwed on for growing feature 4 plug bolt to lock the back gas pressure spring 5 gas pressure spring for back angle adjustment 6 ...

Page 5: ...erial BOLD PRINT Text in bold print highlights important passages or remarks 1 3 INDICATION Tilty Vario is indicated by all therapy forms for changing positions to stimulate strengthen the whole metabo lism the nervous system and or the whole car diovascular system to preserve rebuild and to activate the whole muscle tone or individual muscle groups to build and to strengthen the whole bone struct...

Page 6: ...FICATION TILTY VARIO Tilty Vario is a growable active wheelchair with tilt func tion for children adolescents and adults Seat height and seat position can be set tilt function with gas pressure spring by 25 back angle adjustement with raster from 78 to 126 in addition can be folded forward frame abducted by 10 cm back height growable by 5 cm seat width growable by 4 cm and seat depth growable by 4...

Page 7: ...rotatable and turnab le parts This also goes for adjustment and repair work READ Before use read this user manual thoroughly ATTENTION The wheelchair can only be used according to its specifications Any other use or misuse can contain serious risks for you and your surroundings Also the guarantee or product liability can be terminated in case of misuse Slowly familiarize yourself with the wheelcha...

Page 8: ...lling away activate the anti tipper and assist 4 Active transfer Drive as close as possible to the front of the chair or seat Secure the wheelchair from rolling away and activate the anti tipper Support yourself with one hand on the new seating area the chair and with the other one on the wheelchair Turn your pelvis by shifting your weight in the direction of the new seating arrangement Changing b...

Page 9: ...come wobbily on a level surface ATTENTION WE RECOMMEND IF POSSIBLE NOT TO DRIVE OR OVERCOME OBSTACLES WITH A TILTED SEAT AND OR BACK ANGLE 90 FOR THIS ALWAYS PLACE THE SEAT AND THE BACK IN A VERTICAL POSITION ATTENTION DO NOT HANG OBJECTS BAGS ETC ON THE BACK OR THE BACK TUBES PUSH HANDLES BAIL WITH THIS YOU INFLUENCE THE TILT BEHAVIOUR OF THE WHEELCHAIR MASSIVELY ATTENTION Generally the hazard of...

Page 10: ...ri ence Slowly familiarise yourself with the action with the help of an experienced and strong assisting per son 3 In order to grab objects from the side in front of the wheelchair secure the wheelchair from rolling away do not lean too far out the wheelchair hold on with your free hand if possible try to shift as little weight as possible in the grabbing direction 4 If you have to lean forward ou...

Page 11: ...owards for example curbsides without braking ATTENTION 4 In order to overcome height differences or when using an elevator and lifting platforms you generally have to deactivate the anti tipper You could become restricted in maneuverability 5 In order to overcome curbsides your carer should slightly tilt you backwards lift both casters over the threshold and then with the driving wheels carefully ...

Page 12: ...p back and forth INDICATION Clean the axles and the axle holders regularly re moving lint and dirt INFORMATION After every change on the driving wheels the casters must be newly adjusted Have this done by an experienced re hab technician INDICATION When transfering in and out of the wheelchair turn the casters forward by driving backwards a little in order to ensure more stability 2 8 COMBINATION ...

Page 13: ...rection so that the backrest and a side guard rest securely on the edge of the provided area The wheelchair should not shift in case of an accident Close the wheel lock During the drive leave the wheelchair and seat yourself in the provided seat next to the spot for your wheelchair If available use the seat belt Let someone help you get in and out of public trans portation so that you do not get s...

Page 14: ...face but NEVER wool gloves ATTENTION RISK OF HAND INJURY from turning parts Do not grab in between the spokes of the rear wheel or between the rear wheel and the knee lever brake INDICATION Do not use the wheelchair in damp rooms or drive in salt water with it Important parts may corrode and not work properly anymore whereby the driving qualities or the lifespan of the wheelchair are negatively in...

Page 15: ... A tension spring regularly to make sure it functions properly 3 1 2 Drum brake wheels To apply remove please proceed as described above ATTENTION The drum brake wheels brake pads are extremely sensitive and can lose their functionality from dirt or scratches on the brake pads Remove lint and dirt from the brake pads regularly with a soft brush Check the functionality of the Bowden cables regularl...

Page 16: ...miliar surroundings with the technolo gy of this particular way of driving ATTENTION AFTER PUTTING ON THE WHEELS THE LOCK 1B 2C MUST BE ACTIVATED THE WHEELS SHOULD NOT BE ABLE TO COME OFF ATTENTION To brake you must apply the same pressure to the hand rims inside and outside otherwise you will swerve unwillingly and become a hazard to yourself and your surroundings ATTENTION Especially when drivin...

Page 17: ...p hand rims are made of several black synthetic materials and can heat to over 42 in the sun ATTENTION Under unfavorable circumstances the black coa tings can stretch from heat and can detach from the hand rim Avoid direct sunrays 1 A B 3 3 SEAT BACK UNIT ATTENTION WITH THE ANGLE ADJUSTMENT OF THE SEAT BACK UNIT TILTING AND OR THE BACK 90 THE CEN TRE OF GRAVITY AND THE TILTING BEHAVIOR OF THE WHEE...

Page 18: ... order to make the wheelchair more compact for transport fold the push bail forward after and remo ve the wheels To restraighten the back Fold the back back and at the same time pull with the cord A the bolts B inward so that they can glide past the row of holes C Release the cord A so that the bolts B can click into the row of holes C on both sides in the desired angle 3 3 4 Submersible back exte...

Page 19: ...ir from rolling away Press the small red button A on the locking bolt B at the same time pull the bolt B completely out of the carrier C Fold the back forward 2 To restraighten the back Pull the back back into a vertical position Place the locking bolt B in the bore of the car rier C until the springs D stop Guide the release button E of the gas pres sure spring into the carrier C Press the red bu...

Page 20: ...en under adver se conditions Before overcoming each obstacle be sure to check them to make sure they are tightly closed ATTENTION DANGER OF TIPPING OVER Do not hang any objects bags etc on the push aids ATTENTION 2 The curves at the end of the eccentric clamp A must always be concise with the half shell B The proper functioning is not guaranteed if the eccen tric clamp A is not concise with the ha...

Page 21: ...ube on the bottom side of the holder D Close the eccentric clamps A ATTENTION The curves at the end of the eccentric clamp A must always be concise with the half shell E The proper functioning is not guaranteed if the eccen tric clamp A is not concise with thte half shell E 1 4 Removing Open the eccentric clamps A slide the tube B as far up until the spring C hits on the bottom side of the holder ...

Page 22: ...closed ATTENTION Check for proper function of the eccentric clamps and the spring C in short intervals 3 4 3 Angle adjustment push bail Picture 2 shows the opened eccentric clamp picture 3 the closed one 2 3 To adjust the angle Loosen the eccentric clamp A on both sides so that the tooth profile B of the joint can move freely Place the push bail in the desired position and close the eccentric clam...

Page 23: ...m h A higher speed is not allowed ATTENTION Have all work to extend widen the push aid done by your rehab technician Mounting the push aid 2 Place the wheelchair with the casters on a jack up aid A secure the wheelchair from tipping backward and close the wheel lock Put the latches B on both sides in an opened position as shown in picture 3b pull out and turn 90 and insert both bars C from the fro...

Page 24: ...angle of the foot plate INDICATION Have these settings done by a qualified rehab technician To get in and out easier Secure the wheelchair from rolling away and fold the foot plate s back 3 5 1 Locking and unlocking the foot plate s 2 3 To unlock Pull the latch A out of the slot B turn it 90 and release the latch so that it stays unlocked To lock Place the foot plate in the locking position turn t...

Page 25: ...crews A and place the adapter tube s B in the desired position Retighten the clamp lever the screws A 1 To change the vertical distance from seat foot plate with model 1 Loosen the clamp levers C and place the adapter tube D in the desired position Retighten the clamp leversl C 2 To change the vertical distance from seat foot plate with model 2 Remove the screws C and move the foot plate to the de...

Page 26: ...bottom holes G of the leg support holder B replace the clamp lever s D back in the holder F and tighten it INDICATION Please regard that the casters must be able to turn 360 freely under the foot plate or on the side when the wheelchair is not tilted 3 To change the angle of the foot plate s Please proceed as described in the previous chapter INDICATION Please note that with an angle 90 the user s...

Page 27: ...us pressure is ap plied with both hands on the hand rims When driving downhill a higher strain for braking occurs Do not shy away from getting help Before each ride be sure to check the functionality of the brakes The wheelchair with passangers max load capaci ty must stand safely on a ramp with a slope of 7 12 3 when the wheel lock is in use 3 6 1 Standard wheel lock 1 To block the wheel lock Pre...

Page 28: ...ng DANGER OF FLIP PING OVER 3 6 4 Drum brake as wheel lock 3 To lock the drum brake pull both control levers A up until the tip of the blocking lever B has snapped into the grooves C The control lever A should not be able to move down To unlock Pull the control levers A up a little further un til the blocking levers B automatically unlock and release the control levers A ATTENTION The wheelchair w...

Page 29: ...sure that you do not lean your bo dy too far out of the wheelchair so that you do not fall out of the wheelchair If physically possible hold on to the opposite side of the wheelchair with your free hand If necessary use a suitable object to push down the anti tipper rod cane ATTENTION Make sure that the extension is always firmly snapped into its final position because a loose an ti tipper cannot ...

Page 30: ...pad holder Close the truss pad and turn from the outside the set screw A open or closed as need so that the arm B is in the holder C without play but the truss pad can still be opened and closed without a problem 3 9 ABDUCTION WEDGE The abduction wedge is mounted under the seat plate The height can be adjusted in 1 5 cm intervals the distance is infinitely variable ATTENTION Before getting in and ...

Page 31: ...E THE VEHICLE ATTENTION THE RESTRICTIONS AND REQUIREMENTS LISTED IN OUR CRASH TEST BROCHURE REGARDING THE USE AS A HEAD REST IN A VEHICLE IS ABSOLUTELY BINDING 3 11 THERAPY TABLE Please proceed accordingly with both connections 1 pluggable under both arm cushions 2 pluggable and able to fold down to the side under one arm cushion 2 In order to get in or out you must remove the therapy table or fol...

Page 32: ...n edge threshold 3 Deactivate the anti tipper A and grab the wheelchair tightly on the push handles push bail handles or rod With the tip of a foot push on the tipping lever B and tip the wheelchair slowly towards you Drive the tilted wheelchair with the driving wheels to the edge C and push it on the driving wheels over the obstacle Place the wheelchair in a horizontal position after the driving ...

Page 33: ... it up 4 choose the desired position along the notch C press the steering lever B back down and se cure it with the safety clamp A as in 1 A C 4 A 2 1 To activate the one hand steering OHS turn the casters so they are facing forward the OHS can only be activated or deactivated this way 5 unlock the snapping mechanism A pull latch B out and turn it 90 6 push the whole mechanism A down until it snap...

Page 34: ...sposed of after con sultation and approval from your benefactor As a general rule the disposal of the wheelchair must conform to the respective national legal regulations You may seek information about local disposal organizations from your city or municipal administration Our packaging materials are 100 recyclable Metal parts may be put to scrap metal recycling or sent to our factory Plastic and ...

Page 35: ...y be removed with the zippers We recommend washing them regularly with a mild detergent and low temperature in the washing machine PLEASE NOTE Please clean other cushions and covers e g from seat shells with warm water and hand soap Many stains can be removed with a sponge or a soft brush In case of doubt please consult the medical supply store which built your seat shell for advice on cleaning th...

Page 36: ...axle stand spring on push handle etc for proper functioning and replace if necessary CARRIAGE Check fixation of caster and driving wheels Check functionality of the quick release axles Check tires air pressure and valve replace if needed Check caster bearing caster fork and caster mounting bracket for condition proper functioning and running characteristics Check the firm fitting of the anti tippe...

Page 37: ...fixation of seat plate and back as well as seat shell fixation camber fixation anti tipper proper function clamping force of all eccentric clamps Velcro fleece connection seat and back belts for proper function ATTENTION If the welded seams are deformed and or have fissures contact a medical supply store immediately for qualified maintenance Every 4 weeks Retighten all screw joints check tire prof...

Page 38: ... 39 max 48 cm min 41 5 max 50 cm WITHOUT cushion absolute width of wheelchair min SW 320 mm dependent on camber max SW 370 mm absolute length of wheelchair with 22 mm dependent on wheel position with 24 mm absolute height of wheelchair min 620 mm without push handles max 990 mm incline max permitted 12 3 7 descent max permitted 12 3 7 stability max permitted 12 3 7 load capacity max max 90 kg empt...

Page 39: ...User Manual 39 4 8 DOCUMENTATION YEARLY INSPECTION Work done according to check list Additional work carried out Date signature stamp medical supply store ...

Page 40: ...FICATION company stamp SORG Rollstuhltechnik GmbH Co KG Benzstraße 3 5 D 68794 Oberhausen Rheinhn Tel 49 7254 9279 0 Fax 49 7254 9279 10 info sorgrollstuhltechnik de www sorgrollstuhltechnik de Technical changes and misprints reserved ...

Reviews: