Patent Pending
SOTO USA Inc.
110 Rustic Place, Eugene, Oregon 97401 USA
Phone: 503-314-5119
info@sotooutdoors.com www.sotooutdoors.com
Shinfuji Burner CO.,LTD.
1-1-3 Miyukihama, Mito-cho, Toyokawa-city,
Aichi-pref, 441-0314 Japan
Phone:+81 533 75 5000 FAX:+81 533 75 5033
EN
O D - 1 N P
M U K A
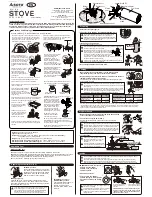
STOVE
STOVE
Instruction Manual
Be sure to read this manual carefully before using the Muka. Keep this manual for future reference and
review its contents regularly to keep aware of procedures and warnings. Failure to follow the warnings
described in this manual may result in fire, property damage, injury, or death. Please contact your
retailer or SOTO if you have any maintenance or repair related questions.
Cautions and Warnings
Applicable Fuel
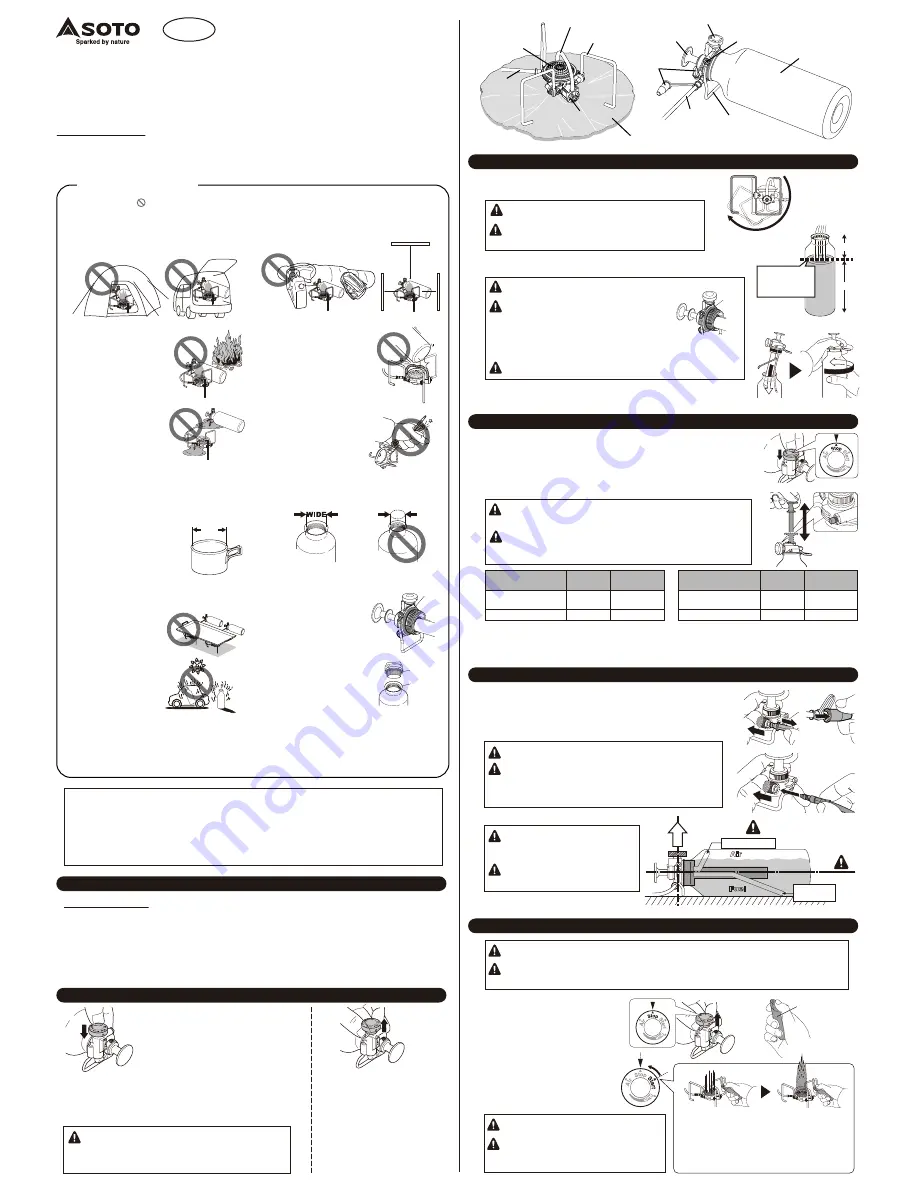
●Never use the stove near any flammable materials.
Keep all such materials at least 1m (3 ft.) away from
sides of the stove and at least 1.5m (5 ft.)
away from top while stove is in use.
●Use only SOTO approved
windscreens with the the Muka.
The windscreen is intended only
to be used with the stove. Never
cover the fuel with a windscreen
while the stove is in use. Avoid
exposing the fuel to heat. The
bottle may explode if exposed to
heat.
●This stove can produce carbon monoxide, which has
no odor. Using it in an enclosed space can be deadly.
Never use this stove in an enclosed space, including a
camper, tent, car, or home. Failure to follow this
instruction may cause injury or death.
White gasoline only
.
●NEVER use any fuel or liquid other than those specifically indicated in this manual.
●NEVER cross-contaminate the stove/bottle unit with fuel/liquid that is not recommended. Be sure to use a
clean vessel to carry the designated fuel. Failure to follow this instruction may clog the generator unit.
●The fuel used is highly volatile fuel. Be careful when handling such fuel.
●Do not use old fuel. Old fuel may clog the generator unit.
Regarding the Control Dial (CD)
◆
"UNLOCK" position or
“OPERATING” position:
The "OPERATING" position will
enable the dial to turn and
engage the CD with the 4
positions: STOP, START, RUN,
and AIR.
◆
“LOCK” position:
The Control Dial will lock when it is pressed.
The “LOCK” position will prevent accidental
engagement of the operating mode. Always
press the CD to the “LOCK” position when
stowing the stove or when traveling.
◆
Emergency Stop:
Place the CD in the “LOCK” position to extinguish the flame
when an emergency arises. The “LOCK” position will cut off the
fuel supply immediately but the residual fuel remaining inside the
hose may take time to burn off.
1m
(3 ft.)
1m
(3 ft.)
1.5m
(5 ft.)
①
Unfold the three pot supports.
②
Fill the fuel to the "DO NOT FILL ABOVE THIS LINE" mark.
③
Insert pump and screw down.
Do not connect the hose at this point.
④
Wipe off any spilled fuel with a clean cloth.
①
Make sure that the Control Dial (CD) is in the locked position
(depressed position), and it is set at the “STOP” position.
②
Begin pumping using full strokes. When a red mark on the Pressure
Indicator becomes visible, stop pumping.
The red line on the Pressure Indicator means that optimal pressure has
built up inside the bottle.
CAUTION: Excess pressure may cause a leaping red flame at start up. Do
not over-pressurize the bottle. Less pressure may cause a failure to ignite the
flame properly.
21cm
(8 inch)
4.5kg
(10 lbs.)
●Make sure no fuel is leaking
out before lighting the stove.
Stop operating the stove
immediately if a fuel leak is
found. Never light a stove that
is leaking fuel.
●Never move a hot stove or a stove that is in use. Wait
until the stove is completely cooled before touching.
●Never leave a burning or hot stove unattended.
●Keep children and/or pets away from stove and never
leave it unsupervised.
●Use the stove only as intended for
cooking food and boiling water. Do
not use pans with a diameter
exceeding 21cm (8 in.). The weight of
the pan plus food should not exceed
4.5kg (10 lbs.).
●Stop operating the stove if the ambient temperature falls
below -20°C (-4°F) because the O-ring will temporarily
harden and lose elasticity, causing the fuel to leak.
●Never use 2 stoves
side-by-side (i.e., a griddle),
as this may cause the stove
to deform or expode.
●ALWAYS store the fuel in a
cool area. Never expose fuel
to direct sunlight and never
leave inside tent or car.
Heated fuel may explode.
●Always keep the connection between hose and pump
clean. Failure to keep the connection clean may cause a
fuel leak.
●The generator unit on the Muka
Stove has been engineered
precisely to accomplish
instantaneous ignition, i.e.,
non-priming. Be sure to treat it
carefully. Dropping or throwing
may cause damage to the
generator unit which may require
a replacement. (Part#: OD-GRN).
●The Muka Stove’s flexible hose
provides smooth and easy
operation when setting up and
stowing. NEVER bend the hose
more than 90°. Failure to follow
this instruction may cause a fuel
leak. Stop using the stove when
any fuel leak is found.
●Use only the SOTO Wide Mouth Bottle. Be sure to
read instructions printed on the bottle before use.
●IMPORTANT!!! Always check the lip on top of the
bottle and the O-ring P-34
on
the Smart Pump for wear-and
-
tear, including dust, deforma
-
tion, and cuts. This could cause
the fuel to leak, resulting in fire,
bodily injury, and even death. If
dirty, clean the flat lip and the
O-ring. Replace the O-ring if
wear-and-tear has occurred.
Replace the bottle if the flat lip
is deformed and cuts are found.
●Always place the cap on
SOTO's Wide Mouth Bottle
when stowing or traveling.
●When separating the Smart Pump from a pressurized
Wide Mouth Bottle, one side of the O-Ring may be
pushed out by the compressed air. If this occurs, adjust
the O-Ring before re-setting.
●Always store the Muka and pump separately when
stowing for a long period of time.
①
Remove plastic guards located at the end of the hose unit and
at the connection on the Smart Pump.
②
Connect the hose to the Smart Pump.
Confirm that the Smart Pump and hose sections are securely
connected.
③
Lay bottle down.
The low profile Muka stove produces a robust flame. The stove is intended for outdoor use ONLY. Never
use the stove on a desk, counter-top, furniture, etc.
Keep the Smart Pump and hose units clean and free from dust, sand,
and other debris. Failure to heed this warning may cause a fuel leak.
Fuel flow will be blocked when snow or ice is formed at the brass
hose connections. Be sure to keep the connection areas clean and
free of any water, snow , and ice to avoid the formation of ice which
blocks the fuel flow. Should this occur, warm up the connection
section, keeping it clean and free of ice.
ALWAYS lay the bottle down with the
stabilizer downward. Be sure to lay the
bottle at a 180° angle. (Refer to the
illustration.)
The Control Dial (CD) must ALWAYS be
in the upright, vertical position when unit
is in use. (Refer to the illustration.)
Never place face or other body parts directly over
the stove when lighting.
This initial ignition will significantly reduce pressure
built up inside the bottle. Always make sure to
optimize the pressure inside the fuel bottle before
igniting the stove.
Use of the reflective sheet in the snow: When used with the stove in the snow, the reflective heat may
cause the snow to melt under the sheet, making the base unstable. Be sure to check snow conditions
under the reflective sheet regularly to avoid potential sliding of pots which may be full of hot liquid or food.
Actions marked " " in the illustrations are strictly prohibited.
Preparing
Pumping
Prepare the unit
"DO NOT FILL
ABOVE THIS
LINE"
Fuel
Air
When filling the bottle with fuel, keep the fuel and bottle far
away from a lit stove, naked flame, or any heat source.
When inserting the pump, carefully place it into the bottle to avoid damage
of all pipes installed in the pump system.
IMPORTANT!!! Always check the lip on top of the bottle
and the O-ring P-34 on the Smart Pump for wear-and
-
tear, including dust, deformation, and cuts. This could
cause the fuel to leak, resulting in fire, bodily injury, and
even death. If dirty, clean the flat lip and the O-ring.
Replace the O-ring if wear-and-tear has occurred. Replace the bottle if the
flat lip is deformed and cuts are found.
NEVER fill fuel above the "DO NOT FILL ABOVE THIS LINE"
mark as the system requires adequate air to ignite. A lack of air
supply may result in failure to ignite.
①
②
③
①
②
Ignition
①
IMPORTANT: Confirm that the CD
position is at the "STOP"
position. Then, pull the CD
upward to unlock.
②
Prepare a heat source.
③
Turn the CD to the “START”
position and ignite. Initial ignition
may produce a strong red leaping
flame.
Output:
4,000 kcal/h 4,650 W 15,800 BTU
Types of fuel:
White gasoline only.
Duration:
Burns approx. 1 hour at maximum output (1.5 hour at 2,500 kcal/h [
10,000
BTU])
using 480ml (16.3 oz.) white gasoline.
Weight:
163g (5.7 oz.) without pump, 333g (11.8 oz.) with the pump.
Dimensions when in use (stove body only):
13.5 x 13.5 x 8.0cm (5.3 x 5.3 x 3.1 inches)
Dimensions when stowed (stove body only):
8.0 x 6.5 x 8.0cm (3.1 x 2.6 x 3.1 inches)
The proper procedure for extinguishing a flame is to turn the CD
to the “AIR” position. The “AIR” position will cut off the fuel
supply, allowing only air to release from the Wide Mouth Bottle.
Simultaneously, the air cleans the fuel passageway. This
procedure will also ensure a longer life for the generator unit.
①
②
①
②
③
Ignite the gas mixture
made up of fuel and air.
Only air will be released
during the initial 2 to 3
seconds.
SOTO Wide
Mouth Bottle
Conventional
fuel bottle
Hose
Hose
Pump
Plastic
guard
Control Dial(CD)
Burner
head
Pot support
Generator unit
Stabilizer
stand
Fuel bottle
Pressure indicator
Vent
Heat reflective sheet
Lock
Red mark on
the Pressure
Indicator
Unlock
O-ring
P-34
O-ring
P-34
O-ring
P-34
Lip
ATTENTION: Only air will be released during the
initial 2 to 3 seconds after the CD is turned to the
“START” position. Then fuel mixed with air will
appear at the burner head.
Check whether the Backflow Prevention Nozzle (Assembly Drawing 25) is
loose. If loose, tighten with the Multi-tool.
Bottle:
Lay at a 180° angle
CD: in the upright,
vertical position
③
Opening for air
Opening for
intake of fuel
Heat
source
At low temperature, the Pump Shaft Gasket may undergo shrinkage, causing
difficulties in pressurizing the bottle. If this is observed, unscrew the cylinder
cap, remove the pump shaft and bring the Pump Shaft Gasket to body
temperature. Return the units and continue pressurizing the bottle.
Pressure Indicator facilitates the operator by ensuring a successful ignition at each initial operation. The Pressure
Indicator also prevents operator from over-pressurizing the fuel bottle. The Pressure Indicator may not accurately
reflect the exact pressure inside the fuel bottle. The Pressure Indicator will not move in and out according to the
pressure built up or released inside the fuel bottle.
Fuel bottle 1000ml
Filled to the “Do not
fill above this line”
Half filled
Level of
the fuel
700 ml
350 ml
Pumping
strokes
90 times
210 times
Fuel bottle 1000ml
Filled to the “Do not
fill above this line”
Half filled
Level of
the fuel
480 ml
240 ml
Pumping
strokes
70 times
140 times
ART#: OD-1NP EN̲USA1403


