background image

13 


APPENDIX 

POWERING THE VOLCANO 
 

The Volcano nominally operates from a 9V DC supply (not included) and requires 100ma or greater.  You can use either 
regulated or non regulated supplies.  The connection is 2.1mm (some supplies have 2.5mm which is too loose a 
connection so be careful to use the correct size) with the center pin positive.  You will not damage the unit if you use a 
reverse polarity connector but the power LED will not come on and the unit will not operate.  Although you can use a 
9VDC switching regulator it is NOT recommended as these types of regulators can introduce a low level of unwanted 
noise into the sound.  You may not find this objectionable so if you prefer to use a switching regulator then you can 
certainly try it to see how it works out for you.  You can also use a 12 VDC supply if it is regulated (or switching) as 
unregulated supplies tend to put out more voltage than the nominal voltage.   

 
SELECTING AN EXPRESSION PEDAL 

There are two types of pedals that can be used with the Volcano, a traditional volume pedal (which likely has a log 
curve) and an expression pedal (which has a linear curve and is usually found for use with keyboards).  The 

best

 pedal to 

use with the Volcano is a linear expression pedal as this has the smoothest curve.  Some users however already have a 
favorite volume pedal and you can certainly use this type of pedal as well.  If you have a reasonable choice though, go 
for the expression pedal for use with the Volcano.   

Expression pedals come in two flavors, those with the ring of the tip-ring-sleeve jack connected to the wiper and those 
with the tip connected to the wiper.  The Volcano uses the ring for the wiper.  Some pedals such as the Boss FV500 
series uses the tip.  To adapt these pedals to the Volcano, use a stereo cord with the tip and the ring on one side of the 
cable reversed.  This is not a stock type cable and therefore would need to be wired up by a technician or anyone handy 
with a solder iron.  The Mission Engineering pedal model EP1-R is an expression pedal that can plug directly into the 
Volcano.  Set the polarity switch to the forward position on the pedal. 

When calibrating pedals that have a range pot, such as the Boss FV500 pedal, be sure to set the pot to the MIN position 
before calibration and during use.  

CALIBRATING THE EXPRESSION PEDAL (DETAIL) 

1.


Remove the 2 front panel screws and place the board on a non-conductive surface (cardboard box or wood table) to 
avoid shorting the circuit board.  Connect the expression pedal and power up the unit.  Take care to avoid touching 
any of the components except for the switch.  

2.


Move the expression pedal to its full back position. 

3.


Move Switch 5 to the CAL position (toward the front of the unit).  The status LED will shine red. 

4.


Smoothly move the expression pedal to its forward most position over about a half to a full second.  Shortly after 
the travel ends the status LED will shine green. 

5.


The pedal is now calibrated, and the calibration should be checked at this point.  To check calibration, move the 
pedal back and forth.  The LED will go from red (back) to green (mid position) to green (forward position) if you used 
an expression pedal.  If you used a volume pedal, the center light will be yellow instead of green.  If you do not get 3 
LED colors in this order or if the red and green LEDS do not light at the end most positions of the pedal then move 
the calibration switch back to the NORM position and repeat 2-4.  Also repeat calibration if the center led seems off 
toward one side when rather than in the center position of the pedal.  If you are sure you did the cal correctly, but 
the yellow/green center position led is still off center, you may be using a reversed tip-ring as described in the 
section above.  

6.


If step 5 indicates the pedal is calibrated, then move Switch 5 to the NORM position (back of unit) for normal use.  
Make additional switch settings if desired at this point referring to the SWITCH SETTINGS section 

7.


 Remove power, and secure the unit back in its box.   It should not be necessary to calibrate again unless you change 
pedals. 

Summary of Contents for Volcan

Page 1: ...Volcano MIDI and Expression Pedal Controlled Volume ...

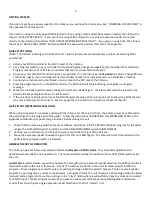
Page 2: ...ortion high transparency input and output buffer are included in the Volcano to keep your instrument signal as clean as possible In a nutshell your signal goes through nothing more than an input buffer a resistor selector circuit and an output buffer for absolutely the cleanest possible signal available For an added measure of quality and to insure the lowest possible noise levels a balanced diffe...

Page 3: ...it is factory set to channel 1 See the appendix to instructions on how to set the MIDI channel QUICK START EXPRESSION PEDAL ONLY When using an expression or volume pedal with the Volcano for the very first time the Volcano must be calibrated to the pedal to get the full range out of the pedal Follow the instructions CALIBRATING THE EXPRESSION PEDAL in the appendix to calibrate your pedal and go to...

Page 4: ...set to instrument the input can accept all instrument level signals and can even accept lower line level signals before overload and has the advantage of allowing up to 18dB of boost If you are planning on using the Volcano between the guitar and amp or even in most amp effect loops the INSTRUMENT setting is the best because of the extra boost offered If you are using the unit with a very hot effe...

Page 5: ...er different starting back pedal gains These limited ranges are useful if you do not want to go entirely to mute but would rather have more control over a more limited range Program 14 is used only when 2 Volcano units are used together in a master slave configuration slave unit program set to program 1 to allow panning of a signal to two amplifiers Connect an instrument to the inputs of both unit...

Page 6: ... 1 LINE 42dB to 0dB limited 42dB sweep range 9 1 0 0 0 LINE 36dB to 6dB limited 42dB sweep range 8 0 1 1 1 INSTR 30dB to 12dB limited 42dB sweep range 9 1 0 0 0 INSTR 24dB to 18dB limited 42dB sweep range 10 1 0 0 1 LINE 30dB to 0dB limited 30dB sweep range 11 1 0 1 0 LINE 24dB to 6dB limited 30dB sweep range 10 1 0 0 1 INSTR 18dB to 12dB limited 30dB sweep range 11 1 0 1 0 INSTR 12dB to 18dB limi...

Page 7: ...nts When these programs are selected the MIDI CC and expression pedal have no effect Use these programs to jump directly to a specific amount of gain and to ignore the current pedal position REFER TO THE FIXED GAIN PROGRAMS CHART FOR SPECIFIC PROGRAM NUMBERS Sweep gain programs Use these programs to allow the Volcano to respond to the MIDI CC pedal movement or expression pedal movement Choose a pr...

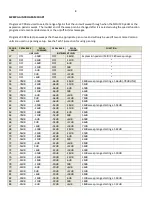
Page 8: ...RAM GAIN LINE SETTING GAIN INSTRUMENT SETTING 0 mute mute 24 38 dB 26 dB 1 84dB 72 dB 25 36 dB 24 dB 2 82dB 70 dB 26 34 dB 22 dB 3 80dB 68 dB 27 32 dB 20 dB 4 78dB 66 dB 28 30 dB 18 dB 5 76dB 64 dB 29 28 dB 16 dB 6 74dB 62 dB 30 26 dB 14 dB 7 72dB 60 dB 31 24 dB 12 dB 8 70dB 58 dB 32 22 dB 10 dB 9 68 dB 56 dB 33 20 dB 8 dB 10 66 dB 54 dB 34 18 dB 6 dB 11 64 dB 52 dB 35 16 dB 4 dB 12 62 dB 50dB 36 ...

Page 9: ...6dB 18dB 48dB sweep range starting at 66dB 78dB LINE 55 78dB 24dB 66dB 12dB 54dB 56 78dB 18dB 66dB 6dB 60dB 57 78dB 12dB 66dB 0dB 66dB 58 78dB 6dB 66dB 6dB 72dB 59 78dB 0dB 66dB 12dB 78dB 60 78dB 6dB 66dB 18dB 84dB 61 78dB 30dB 54dB 18dB 36dB sweep range starting at 54dB 62 78dB 24dB 54dB 12dB 42dB 63 78dB 18dB 54dB 6dB 48dB 64 78dB 12dB 54dB 0dB 54dB 65 78dB 6dB 54dB 6dB 60dB 66 78dB 0dB 54dB 12d...

Page 10: ...he center of the sweep and so on Any shape curve can be saved here using sys ex messages and custom curve editors We are hoping to offer an editor in the future although plans are non specific at this point Currently all 7 curves are loaded with various shapes you can experiment with To use the custom curves first select any of the sweep gain curves with the exception of the pan curves then select...

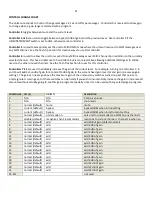
Page 11: ... pedal as CC 2 over channel 1 110 transmit pedal as CC 3 over channel 1 111 transmit pedal as CC 0 over channel 2 wraps for 15 or 16 112 transmit pedal as CC 1 over channel 2 113 transmit pedal as CC 2 over channel 2 114 transmit pedal as CC 3 over channel 2 115 transmit pedal as CC 0 over channel 3 wraps for 14 15 or 16 116 transmit pedal as CC 1 over channel 3 117 transmit pedal as CC 2 over cha...

Page 12: ...ain on a sweep gain setting The gain can never go above the maximum gain of the unit and any switches turned on past that point are simply ignored Having a set of these switches can be handy if you wish to momentarily increase the gain in incremental amounts without actually going to another gain program especially since it can be used with any selected gain program CONTROLLER OFF 0 ON 127 DESCRIP...

Page 13: ...each Volcano is set to its own MIDI channel then programs on each unit can be set individually by having switches on your controller set with the channel numbers of the units you want to control individually If you want a single switch to then control all units at once such as an increment decrement program then you can use the omni mode or channel 16 mode to temporarily allow all units to hear th...

Page 14: ...ne handy with a solder iron The Mission Engineering pedal model EP1 R is an expression pedal that can plug directly into the Volcano Set the polarity switch to the forward position on the pedal When calibrating pedals that have a range pot such as the Boss FV500 pedal be sure to set the pot to the MIN position before calibration and during use CALIBRATING THE EXPRESSION PEDAL DETAIL 1 Remove the 2...

Page 15: ... half way between 0 and 127 If set to log the MIDI data will bunch up on one side of the sweep range resulting in an uneven change in gain in the Volcano SPECIFICATIONS Gain range 90dB Gain line setting 84dB to 6dB Gain instrument setting 72dB to 18dB Pedal resolution 375dB Maximum input level line setting 15dBu 12V p p Maximum input level instrument setting 3dBu 3Vp p Maximum output level both se...

Page 16: ...15 ...

Reviews: